Tabla de contenido
Publicidad
Idiomas disponibles
Idiomas disponibles
Enlaces rápidos
Publicidad
Tabla de contenido

Manuales relacionados para Urmet miro 1750 Serie


Resumen de contenidos para Urmet miro 1750 Serie
- Página 1 Mod. 1750 DS 1750-008 LBT 20057 VIDEOCITOFONO VIVAVOCE 2VOICE 2VOICE HAND-FREE VIDEO DOOR PHONE VIDEOPHONE MAINS-LIBRES 2VOICE VIDEOINTERFONO MANOS LIBRES 2VOICE VIDEO-FREISPRECHANLAGE 2VOICE Sch./Ref.1750/5 (Nero, Black, Noire, Negro, Schwarz) Sch./Ref.1750/6 (Bianco, White, Blanc, Blanco, Weiß)
- Página 2 ITALIANO I videocitofoni Sch. 1750/5 e 1750/6 sono dedicati all’utilizzo in impianti videocitofonici del sistema 2Voice. DESCRIZIONE DEI COMPONENTI E CARATTERISTICHE MUTE Regolazione volume di chiamata (MAX, MEDIO, MUTE) Altoparlante di chiamata e conversazione Regolazione luminosità display Regolazione intensità colore display Display 4,3”...
- Página 3 INSTALLAZIONE Murare la scatola incasso all’altezza indicata nel disegno seguente. Fissare la staffa alla scatola incasso o a muro come indicato. Programmare i dip-switch di programmazione. Scatola Mod. 503 Scatola Ø 60 mm n° 2 M3,5 x 19 mm n° 2 2,9 x 13 mm a corredo a testa svasata n°...
-
Página 4: Descrizione Dei Morsetti
Per il collegamento del videocitofono in entra-esci bisogna rimuovere lo sportellino, come indicato in fi gura, ed inserire nella sede il circuito adattatore sch. 1750/50 seguendo le istruzioni riportate nel suo libretto a corredo prodotto. DESCRIZIONE DEI MORSETTI Suoneria supplementare PANIC Ingresso panico Pulsante... -
Página 5: Segnalazioni Led
(*) Per entrare o uscire dallo stato di programmazione premere e tenere premuto il tasto per più di 5 secondi; la conferma dell’entrata in programmazione avviene con il lampeggio lento del led giallo; comunque allo scadere della temporizzazione di 10 min si esce dallo stato di programmazione. SEGNALAZIONI LED 8. - Página 6 Se il cursore è nella posizione MUTE, in caso di chiamata il modulo video del videocitofono si accenderà se la chiamata è video; inoltre anche tutte le segnalazioni acustiche (beep) saranno disabilitate. Non saranno invece escluse le eventuali suonerie supplementari. ATTIVAZIONE FONIA CON PRESSIONE DEL TASTO (MODALITÀ...
- Página 7 ENGLISH video door phone Sch. 1750/5 and 1750/6 are dedicated to be used in 2Voice video door phone systems. DESCRIPTION OF COMPONENTS AND FEATURES MUTE Call volume adjustment (MAX, MEDIUM; MUTE) Call and conversation speaker Display brightness adjustment Display colour intensity adjustment Display 4.3”...
- Página 8 INSTALLATION Install fl ush-mounting box at the height indicated in the drawing below. Fix the bracket to the mounting box or to the wall as indicated. Program the dip switches. Box Mod. 503 Box Ø 60 mm n° 2 M3,5 x 19 mm n°...
-
Página 9: Button Functions
To connect the video door phone in in-out, it is necessary to remove the door, as indicated in the fi gure, and insert the adaptor circuit Ref. 1750/50, following the instructions found in the booklet provided with the product. TERMINAL PINS DESCRIPTION Supplementary ringer Panic input PANIC... -
Página 10: Indicator Leds
(*) To enter and exit programming state, hold button pressed for longer than 5 seconds. The yellow LED will blink slowly to indicate that programming mode is selected. Programming mode will shut down in all cases after the 10 minute timeout. INDICATOR LEDS 8. - Página 11 If the cursor is in the MUTE position, in case of a call the video door phone video module will turn on if it is a video call; moreover, all the acoustic signals (beeps) will be disabled. Supplementary ring-tone events will not be excluded. ACTIVATING AUDIO BY PRESSING THE (PUSH TO TALK MODE) BUTTON If the communication between the calling station and the video door phone is disturbed, it is possible to activate the two audio channels (inwards and outwards) individually.
- Página 12 FRANÇAIS Les vidéophones Réf. 1750/5 et 1750/6 sont conçus pour être utilisés dans les installations de vidéophonie du système 2Voice. DESCRIPTION DES COMPOSANTS ET CARACTERISTIQUES MUTE Réglage du volume d’appel (MAXI, MOYEN, MUTE) Haut-parleur d’appel et de conversation Réglage de la luminosité de l’affi cheur Réglage d’intensité...
- Página 13 INSTALLATION Emmurer le boîtier encastrable à la hauteur indiquée dans la fi gure suivante. Fixer l’étrier au boîtier encastrable ou à la paroi, comme indiqué. Régler les commutateurs de programmation. Boîtier Mod. 503 Boîtier Ø 60 mm n° 2 M3,5 x 19 mm n°...
-
Página 14: Description Des Bornes
Pour le raccordement du vidéophone en mode entrée/sortie, il est nécessaire de déposer le volet (voir fi gure) et de mettre en place le circuit adaptateur Réf. 1750/50, en suivant les instructions contenues dans la notice du produit. DESCRIPTION DES BORNES Sonnerie supplémentaire Entrée panique PANIC... -
Página 15: Signalisations Par Led
(*) Pour accéder ou quitter l’état de programmation, maintenir la touche enfoncée pendant plus de 5 secondes; le clignotement lent de la LED jaune confi rme l’accès à la programmation. Au bout de 10 minutes, le système quittera automatiquement l’état de programmation. SIGNALISATIONS PAR LED 8. -
Página 16: Activation De La Phonie En Appuyant Sur La Touche
Si le curseur est en position MUTE, le module vidéo du vidéophone s’allumera en cas d’appel vidéo et tous les signaux sonores (bips) seront désactivés. En revanche, les éventuelles sonneries supplémentaires ne seront pas exclues. ACTIVATION DE LA PHONIE EN APPUYANT SUR LA TOUCHE (MODE PUSH TO TALK) Si la communication entre le poste d’appel et le vidéophone est perturbée, il est possible d’activer individuellement les deux canaux de phonie (vers l’intérieur et vers l’extérieur). -
Página 17: Descripción De Los Componentes Y Características
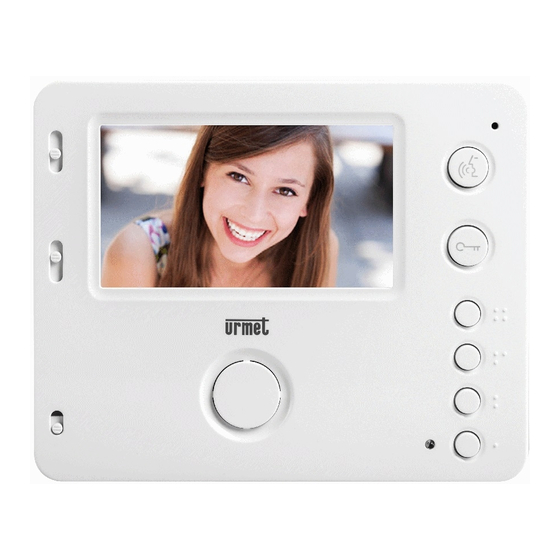
ESPAÑOL Los videointerfonos Ref. 1750/5 y 1750/6 están destinados al uso en instalaciones videointerfónicas del sistema 2Voice. DESCRIPCIÓN DE LOS COMPONENTES Y CARACTERÍSTICAS MUTE Regulación del volumen de llamada (MAX, MEDIO, MUTE) Altavoz de llamada y conversación Regulación del brillo de la pantalla Regulación de la intensidad del color de la pantalla Pantalla 4,3”... -
Página 18: Instalación
INSTALACIÓN Empotrar la caja a la altura indicada en la fi gura siguiente. Fijar el soporte en la caja para empotrar o en la pared, según se indica. Confi gurar los interruptores dip de programación. Caja Mod. 503 Caja Ø 60 mm n°... -
Página 19: Descripción De Los Bornes
Para la conexión del videointerfono en entrar-salir se debe retirar la tapa, como se indica en la fi gura, e introducir en el alojamiento el circuito adaptador ref. 1750/50 siguiendo las instrucciones detalladas en el manual entregado con el producto. DESCRIPCIÓN DE LOS BORNES Timbre adicional PANIC... -
Página 20: Funcionamiento Con Prótesis Auditivas
(*) Para entrar o salir del estado de programación, pulsar y mantener pulsada el pulsador durante más de 5 segundos; la confi rmación de la entrada en programación se produce con el parpadeo lento del led amarillo; en todos los casos, cuando se cumple la temporización de 10 min. se sale del estado de programación. -
Página 21: Activación De La Fonía Pulsando El Pulsador (Modo "Push To Talk")
Si el cursor está en la posición MUTE, en caso de llamada se enciende el módulo vídeo del videointerfono si la llamada es vídeo; además, se desactivan todas las indicaciones acústicas (bips). En cambio, no se desactivan los posibles timbres adicionales. ACTIVACIÓN DE LA FONÍA PULSANDO EL PULSADOR (MODO “PUSH TO TALK”) Si la comunicación entre el puesto de llamada y el videointerfono tiene disturbios, es posible activar los dos... - Página 22 DEUTSCH Die Videoanlagen 1750/5 e 1750/6 der Serie sind speziell für den Einsatz in 2Voice-Videoanlagen konzipiert. GERÄTEBESCHREIBUNG UND GERÄTEMERKMALE MUTE Einstellen der Ruftonlautstärke (STUMM - MITTEL - LAUT) Gegensprech- und Ruftonlautsprecher Einstellen der Display-Helligkeit Einstellen der Display-Farbsättigung 4,3’’-Display Format 16:9 Mikrofon Taste zur Aktivierung/Deaktivierung eines Gesprächs...
- Página 23 INSTALLATION Einbaudose wie unten abgebildet in der angegebenen Höhe installieren. Anbauplatte wie abgebildet an der Unterputzdose oder an der Wand befestigen. Die Programmierschalter programmieren. Einbaudosetyp 503 Einbaudose Ø 60 mm n° 2 M3,5 x 19 mm 2x Senkkopfschrauben (mitgeliefert) 2,9 x 13 mm 2x Wanddübel und Schrauben (mitgeliefert) Anschlüsse herstellen.
-
Página 24: Beschreibung Der Anschlussklemmen
Für das Durchschleifen der Videoanlage muss der Deckel des Anschlussfachs wie abgebildet entfernt und die Adapterschaltung 1750/50 gemäß den mitgelieferten Anweisungen eingesetzt werden. BESCHREIBUNG DER ANSCHLUSSKLEMMEN Zusätzliches Läutwerk PANIC Notrufeingang Taste Taste Etagenruf Anschluss an den System-BUS LINE IN TASTENFUNKTION Status PROGRAMMIER- RUHESTELLUNG... - Página 25 (*) Um sich in den Programmierstatus zu begeben oder diesen zu verlassen, die Taste länger als 5 Sekunden gedrückt halten. Die Bestätigung des Beginns des Programmierstatus erfolgt durch langsames Blinken der gelben Led. In jedem Fall verlässt man nach Ablauf des Takts von 10 Minuten den Programmierstatus.
-
Página 26: Mute Lautstärkeneinstellung Des Klingeltons
MUTE LAUTSTÄRKENEINSTELLUNG DES KLINGELTONS Mit Schieberegler 1 kann die Ruftonlautstärke eingestellt und der Rufton stumm geschaltet werden (siehe “Gerätebeschreibung und Gerätemerkmale”). Die Mute Lautstärkeneinstellung des Klingeltons ist an einer roten Markierung im oberen Teil des Schiebereglerfensters erkennbar. Bei Stummschaltung (MUTE) schaltet sich das Videomodul der Videoanlage ein, und der Ruf wird als Videoruf durchgestellt. - Página 27 Nach entsprechender Programmierung der Yokis-Geräte stehen folgende Möglichkeiten zur Verfägung: – zentral gesteuertes Herunterfahren der Rollläden mit einem Taster (z. B. – Ausschalten der Beleuchtung mit einem zweiten Taster (z. B. Weitere Informationen zur YOKIS-Produktlinie fi nden Sie auf www.yokis.com DS1750-008...
- Página 28 VIA BOLOGNA 188/C http://www.urmet.com Telef. +39 011.24.00.000 (RIC. AUT.) e-mail: info@urmet.com +39 011.24.00.300 - 323 Fabbricato da Urmet Electronics Limited (azienda del gruppo Urmet) - Made in P.R.C. Manufactured by Urmet Electronics Limited (an Urmet group company) - Made in P.R.C.