
Manuales relacionados para Urmet Miro


Resumen de contenidos para Urmet Miro
- Página 1 Mod. 1183 DS 1183-013A LBT 20108 CITOFONO VIVAVOCE 2VOICE 2VOICE HAND-FREE DOOR PHONE INTERPHONE MAINS-LIBRES 2 VOICE INTERFONO MANOS LIBRES 2VOICE SPRECHANLAGE 2VOICE Sch./Ref.1183/7...
-
Página 2: Descrizione Dei Componenti
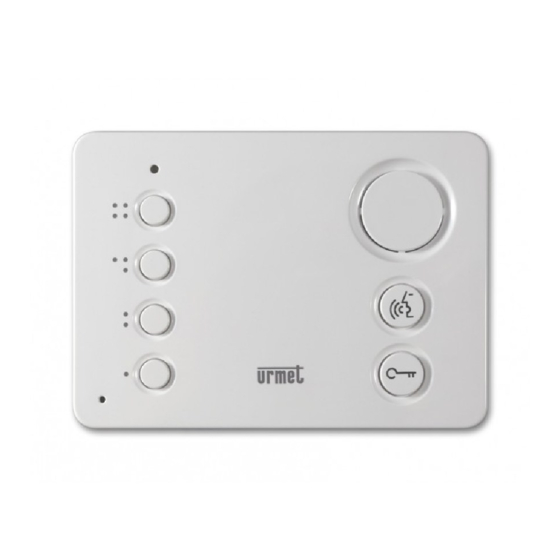
ITALIANO Il citofono Sch. 1183/7 è dedicato all’utilizzo in impianti citofonici e videocitofonici del sistema 2Voice. DESCRIZIONE DEI COMPONENTI SW1 SW2 Microfono Pulsante vedi tabella funzione pulsanti Pulsante vedi tabella funzione pulsanti Pulsante per connessione a dispositivi Yokis (contatti X1, GT): max 50 mA - 12 Vcc Pulsante per connessione a dispositivi Yokis (contatti Y1, GT): max 50 mA - 12 Vcc Led di segnalazione multicolore... -
Página 3: Con Scatola Incasso Ø 60 Mm
INSTALLAZIONE CON SCATOLA INCASSO MOD. 503 Murare la scatola incasso all’altezza indicata nel disegno seguente. Fissare la staffa in metallo alla scatola incasso. Scatola Mod. 503 Staffa metallica n° 2 M3,5 x 19 mm a corredo Eseguire i collegamenti sul citofono. Fissare il citofono alla staffa. -
Página 4: Descrizione Dei Morsetti
AD APPOGGIO PARETE Rimuovere dal citofono la base in plastica e fi ssarla al muro come indicato nel disegno seguente (eventualmente usare la dima di foratura presente nell’ultima pagina del libretto). n° 2 viti e tasselli a corredo Eseguire i collegamenti sul citofono. Fissare il citofono alla base in plastica. -
Página 5: Funzione Pulsanti
FUNZIONE PULSANTI Stato ATTESA STATO DI RIPOSO E SGANCIO PROGRAMMAZIONE* RIPOSO IN FONIA TASTO (ricezione (SOLO CON PREMUTO chiamata) CITOFONO A RIPOSO) Pulsante Apriporta Apriporta Apriporta Apriporta Abilita/disabilita pedonale pedonale pedonale pedonale apriporta automatico Se premuto nella modalità di funzionamento: A) “Mani libere”... - Página 6 ATTIVAZIONE FONIA CON PRESSIONE DEL TASTO (MODALITÀ PUSH TO TALK) Se la comunicazione tra la postazione di chiamata e il citofono risulta disturbata è possibile attivare i due canali di fonia (verso l’interno e verso l’esterno) singolarmente. Dopo aver ricevuto una chiamata, premere brevemente per attivare la fonia dal posto esterno, in seguito se viene mantenuto premuto il tasto si attiva il canale audio verso l’esterno e si può...
-
Página 7: Description Of Components
ENGLISH The door phone Ref. 1183/7 is designed for use in 2Voice system audio door phone and video door phone installations. DESCRIPTION OF COMPONENTS SW1 SW2 Microphone Button see button function table Button see button function table Button to connect to Yokis devices; contacts X1, GT: max 50 mA @ 12 Vcc Button to connect to Yokis devices;... - Página 8 INSTALLATION WITH FLUSH-MOUNTED CASING MOD. 503 Install fl ush-mounting box at the height indicated in the drawing below. Fix the bracket to the mounting box. Box Mod. 503 Metal bracket n° 2 M3,5 x 19 mm included Connect. Fix the video door phone to the bracket. WITH FLUSH-MOUNTED CASING Ø...
- Página 9 WALL SURFACE MOUNTING Remove the plastic base from the door phone unit and fi x the base to the wall as shown in the drawing here below (you may want to use the drilling template supplied at the end of this manual). n°...
-
Página 10: Button Functions
BUTTON FUNCTIONS State STATE OF WAITING STAND-BY PROGRAMMING* FOR PICK-UP AND BUTTON STAND-BY DURING AUDIO OPERATION (ONLY WITH (RECEIVING DOOR PHONE IN PRESSED CALL) Button STAND-BY) Open Open Open Connect / disconnect the pedestrian pedestrian Open pedestrian door pedestrian automatic door opening door door door... - Página 11 ACTIVATING AUDIO BY PRESSING THE (PUSH TO TALK MODE) BUTTON If the communication between the calling station and the door phone is disturbed, it is possible to activate the two audio channels (inwards and outwards) individually. After having received a call, short press to activate the audio from the door unit, then if the button is held pressed down, the audio channel is activated externally and the user can speak to the caller.
-
Página 12: Description Des Composants
FRANÇAIS L’interphone Réf. 1183/7 est destiné à une utilisation sur des installations d’interphone et vidéophone du système 2Voice. DESCRIPTION DES COMPOSANTS SW1 SW2 Microphone Touche : voir le tableau des fonctions des touches Touche : voir le tableau des fonctions des touches Touche pour la connexion à... - Página 13 INSTALLATION AVEC BOÎTIER ENCASTRÉ MOD. 503 Emmurer le boîtier encastrable à la hauteur indiquée dans la fi gure suivante. Fixer l’étrier au boîtier encastrable. Boîtier Mod. 503 Bride métallique n° 2 M3,5 x 19 mm de sèrie Réaliser les branchements. Fixer le vidéophone à...
-
Página 14: En Appui Mural
EN APPUI MURAL Retirer la base en plastique de l’interphone et la fi xer au mur comme indiqué sur le dessin suivant (utiliser au besoin le gabarit de perçage présent à la dernière page de la notice). n° 2 vis et chevilles de série Réaliser les branchements. -
Página 15: Fonctions Des Touches
FONCTIONS DES TOUCHES Etat ETAT DE ATTENTE REPOS ET PROGRAMMATION* DECROCHAGE REPOS PHONIE TOUCHE (UNIQUEMENT (RECEPTION ENFONCEE SI VIDEOPHONE APPEL) AU REPOS) Touche Habilitation/exclusion Ouvre-porte Ouvre-porte Ouvre-porte Ouvre-porte piétons ouvre-porte piétons piétons piétons automatique Si enfoncé en mode de fonctionnement: A) “Mains-libres”... -
Página 16: Activation De La Phonie En Appuyant Sur La Touche
ACTIVATION DE LA PHONIE EN APPUYANT SUR LA TOUCHE (MODE PUSH TO TALK) Si la communication entre le poste d’appel et le vidéophone est perturbée, il est possible d’activer individuellement les deux canaux de phonie (vers l’intérieur et vers l’extérieur). Après avoir reçu un appel, appuyer brièvement pour activer la phonie depuis le poste externe;... -
Página 17: Descripción De Los Componentes
ESPAÑOL El interfono Ref. 1183/7 está destinado para usar con sistemas de interfono y videointerfono del sistema 2Voice. DESCRIPCIÓN DE LOS COMPONENTES SW1 SW2 Micrófono Pulsador : ver la tabla de función de pulsadores Pulsador : ver la tabla de función de pulsadores Pulsador para la conexión a dispositivos Yokis;... -
Página 18: Instalación
INSTALACIÓN CON CAJA PARA EMPOTRAR MOD. 503 Empotrar la caja a la altura indicada en la fi gura siguiente. Fijar el soporte en la caja para empotrar. Caja Mod. 503 Abrazadera metálica n° 2 M3,5 x 19 mm incluidos Efectuar las conexiones. Fijar el videointerfono en el soporte. -
Página 19: Para Instalar Sobre La Pared
PARA INSTALAR SOBRE LA PARED Retire el interfono de la base de plástico y fíjelo a la pared como se muestra en la siguiente fi gura (utilice eventualmente la plantilla de perforación presente en la última página de este folleto). n°... -
Página 20: Función De Los Pulsadores
FUNCIÓN DE LOS PULSADORES Estado ESTADO DE ESPERA DE PROGRAMACIÓN* REPOSO Y RESPUESTA (SÓLO CON REPOSO EN FONÍA PULSADOR (RECEPCIÓN EL VIDEOINTERFONO PULSADO LLAMADA) Pulsador REPOSO) Apertura de Apertura de Apertura de Activa/desactiva la la puerta para la puerta para Apertura de la puerta para peatones la puerta para función abre puerta... -
Página 21: Activación De La Fonía Pulsando El Pulsador (Modo "Push To Talk")
ACTIVACIÓN DE LA FONÍA PULSANDO EL PULSADOR (MODO “PUSH TO TALK”) Si la comunicación entre el puesto de llamada y el videointerfono tiene disturbios, es posible activar los dos canales de fonía (hacia el interior y hacia el exterior) de forma individual. Después de recibir una llamada, pulsar brevemente para activar la fonía desde el microaltavoz;... - Página 22 DEUTSCH Die Sprechanlage Typ 183/7 ist der Verwendung in Sprechanlagen und Videosprechanlagen des 2Voice-Systems vorbehalten. GERÄTEBESCHREIBUNG SW1 SW2 Mikrofon Taste : siehe Übersicht Tastenfunktion Taste : siehe Übersicht Tastenfunktion Taste : zur Anschaltung an Yokis-Geräte, Kontakt X1, GT: max 50 mA bei 12 Vdc Taste : zur Anschaltung an Yokis-Geräte, Kontakt Y1, GT: max 50 mA bei 12 Vdc Mehrfarbige LED-Anzeige...
- Página 23 INSTALLATION MIT UNTERPUTZDOSE MOD. 503 Einbaudose wie unten abgebildet in der angegebenen Höhe installieren. Anbauplatte wie abgebildet an der Unterputzdose. Einbaudosetyp 503 Anbauplatte n° 2 M3,5 x 19 mm (mitgeliefert) Anschlüsse herstellen. Videoanlage an der Halterung befestigen. MIT UNTERPUTZDOSE Ø 60 MM Einbaudose wie in der angegebenen Höhe installieren.
-
Página 24: Beschreibung Der Anschlussklemmen
FÜR AUFPUTZMONTAGE Das Kunststoffunterteil von der Sprechanlage entfernen und wie in der folgenden Zeichnung gezeigt an der Wand befestigen (ggf. die auf der letzten Seite der Anleitung befi ndliche Bohrschablone verwenden). n° 2 Wanddübel und Schrauben (mitgeliefert) Anschlüsse herstellen. Die Sprechanlage am Kunststoffunterteil befestigen. BESCHREIBUNG DER ANSCHLUSSKLEMMEN Gemeinsamer Leiter der Tasten Taste... -
Página 25: Led-Anzeigen
TASTENFUNKTION Status PROGRAMMIER- WARTEZEIT RUHESTELLUNG STATUS* RUHESTELLUNG ABHEBEN IM GESPRÄCH UND TASTE (NUR BEI (RUFEINGANG) GEDRÜCKT VIDEOANLAGE IN Taste RUHESTELLUNG) Automatischen Türöffnerbefehl Türöffnerbefehl Türöffnerbefehl Türöffnerbefehl Türöffner ein-/ ausschalten In Betriebsart Einstellung der A) “Freisprechen”: das Gespräch wird beendet; Rufl autstärke der B) „Push-to-Talk“: Sprechanlage und Sprechkanal... - Página 26 SPRECHEN MIT SPRECHTASTE (PUSH-TO-TALK) Ist die Kommunikation zwischen Ruf- und Sprechanlage gestört, können beide Sprechkanäle (nach innen und nach außen) einzeln freigeschaltet werden. Um den Audiokanal nach außen zum Sprechen freizuschalten, drücken Sie nach der Rufannahme die Taste und halten diese gedrückt. Zum Hören lassen Sie die Taste wieder los.
- Página 27 DS1183-013A...
- Página 28 URMET S.p.A. Area tecnica 10154 TORINO (ITALY) servizio clienti +39 011.23.39.810 VIA BOLOGNA 188/C http://www.urmet.com Telef. +39 011.24.00.000 (RIC. AUT.) e-mail: info@urmet.com +39 011.24.00.300 - 323 Prodotto in TUNISIA su specifi ca Urmet Manufactured in TUNISIA to Urmet specifi cation...