Tabla de contenido
Publicidad
Idiomas disponibles
Idiomas disponibles
Enlaces rápidos
Publicidad
Capítulos
Tabla de contenido

Manuales relacionados para auna Fullmatic


Resumen de contenidos para auna Fullmatic
-
Página 3: Tabla De Contenido
Sehr geehrter Kunde, wir gratulieren Ihnen zum Erwerb Ihres Gerätes. Lesen Sie die folgenden Hinweise sorgfältig durch und befolgen Sie diese, um möglichen Schäden vorzubeugen. Für Schäden, die durch Missachtung der Hinweise und unsachgemäßen Gebrauch entstehen, übernehmen wir keine Haftung. Scannen Sie den folgenden QR-Code, um Zugriff auf die aktuellste Bedienungsanleitung und weitere Informationen rund um das Produkt zu erhalten:... -
Página 4: Sicherheitshinweise
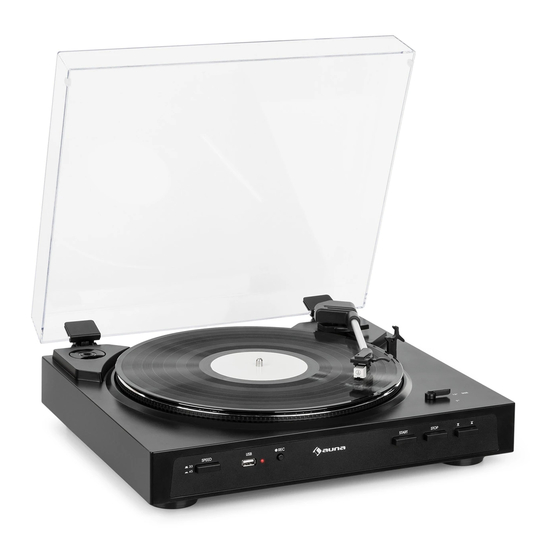
SICHERHEITSHINWEISE Wählen Sie einen sicheren Standort aus und stellen Sie das Gerät nicht in direktes Sonnenlicht oder neben eine Wärmequelle. 2. Vermeiden Sie Umgebungen, an denen das Gerät Vibrationen, übermäßigem Staub, Kälte oder Feuchtigkeit ausgesetzt ist. 3. Um Stromschläge zu vermeiden, darf das Gehäuse nicht geöffnet werden. - Página 5 Tonarmsperre – Verwenden Sie diese Sperre, um den Tonarm im Ruhezustand zu sichern. Tonabnehmer & Schutzkappe – Bitte entfernen Sie vor dem Abspielen der Platte die Kunststoffschutzkappe vom Tonabnehmer. Auswahl der Plattengröße 7” & 12” – Wählen Sie die abzuspielende Plattengröße.
-
Página 6: Zusammemnbau
Auswahl der Betriebsarten PHONO oder LINE OUT. RCA-Ausgang – Verbinden Sie den RCA-Ausgang mit einem Mischpult oder Verstärker Ihres Soundsystems. Netzanschlussbuchse – Verbinden Sie das Netzteil mit einem Wechselstromausgang mit der geeigneten Spannung. An-/Aus-Schalter – Drücken Sie diese Taste, um den Plattenspieler an- oder auszuschalten. -
Página 7: Verstärker-Anschluss
Riemen Antrieb Hinweis: Stellen Sie sicher, dass der Antriebsriemen nicht verdreht ist. Vermeiden Sie den Kontakt mit Öl. Ölspritzer lassen den Riemen rutschig werden. VERSTÄRKER-ANSCHLUSS Verbinden Sie den RCA-Ausgang mit dem AUX-Eingang oder Phono- Eingang Ihres Verstärkers oder Stereoanlage: • Der rote Stecker wird in den rechten Kanaleingang gesteckt. -
Página 8: Abspielen Von Platten
ABSPIELEN VON PLATTEN Öffnen Sie die Abdeckhaube. 2. Verbinden Sie das Netzkabel mit der Stromquelle. 3. Drücken Sie den An-/Aus-Schalter an der Rückseite des Geräts, um die Stromversorgung anzuschalten. 4. Legen Sie eine Schallplatte auf den Plattenteller und wählen Sie die passende Geschwindigkeit (33/45). -
Página 9: Ersetzen Der Nadel
ERSETZEN DER NADEL Entnehmen der Nadel aus dem Tonabnehmer Setzen Sie einen Schraubendreher an der Spitze des Headshells an und drücken Sie ihn herunter wie in in Skizze „A“ gezeigt. 2. Entfernen Sie das Headshell, indem Sie es nach vorne ziehen und dabei herunterdrücken. -
Página 10: Hinweise Zur Entsorgung
HINWEISE ZUR ENTSORGUNG Befindet sich die linke Abbildung (durchgestrichene Mülltonne auf Rädern) auf dem Produkt, gilt die Europäische Richtlinie 2012/19/EU. Diese Produkte dürfen nicht mit dem normalen Hausmüll entsorgt werden. Informieren Sie sich über die örtlichen Regelungen zur getrennten Sammlung elektrischer und elektronischer Gerätschaften. -
Página 11: Declaration Of Conformity
Dear Customer, Congratulations purchasing this equipment. Please read this manual carefully and take care of the following hints to avoid damages. Any failure caused by ignoring the items and cautions mentioned in the instruction manual is not covered by our warranty and any liability. -
Página 12: Safety Instructions
SAFETY INSTRUCTIONS Choose a safe location and avoid placing the unit in direct sunlight or near any heat source. 2. Avoid environments subject to vibration, excessive dust, cold or moisture. 3. Due to the risk of electrical shock, do not open the cabinet. Should a foreign object accidentally find its way into the interior of the unit, contact your local dealer. - Página 13 Pick-up Arm Lock – Use this to lock the Pick-up Arm in place when not in use. Cartridge & Protector – Please remove the Plastic cartridge protector before playing vinyl record. 7” & 12” vinyl record selector – select the vinyl record size you want to play Adaptor –...
-
Página 14: Assembly
PHONO or LINE OUT mode button RCA output Jack – Connect the RCA line to a mixer or an amplifier in your sound system. Power adaptor jack – Connect the adaptor to an AC outlet of the proper voltage. Power – Press it to power on/off the turntable. ASSEMBLY Drive belt The belt and turntable platter have been installed properly at factory, but... -
Página 15: Amplifier Connection
Belt Motor Pulley Note: Make sure that the drive belt is not twisted or distorted. Avoid oil. Oil splashes will make the belt slippery. AMPLIFIER CONNECTION Connect the RCA output to the AUX input or phono input of your amplifier or stereo system: •... -
Página 16: Playing Records
PLAYING RECORDS Open the lid. 2. Connect the DC power cord to an electrical outlet. 3. Press the on/off button in the rear to power on the unit. 4. Place a record on the turntable platter and select the desired speed (33/45) according to the record, at the same time, please make sure the 7”... -
Página 17: How To Replace The Needle
HOW TO REPLACE THE NEEDLE Removing the needle from the cartridge Place a screwdriver at the tip of the needle headshell and push downwards in the direction shown in sketch “A” 2. Remove the needle headshell by pulling it forwards and pushing downwards. -
Página 18: Hints On Disposal
HINTS ON DISPOSAL According to the European waste regulation 2012/19/ EU this symbol on the product or on its packaging indicates that this product may not be treated as household waste. Instead it should be taken to the appropriate collection point for the recycling of electrical and electronic equipment. -
Página 19: Déclaration De Conformité
Chère cliente, cher client, Toutes nos félicitations pour l’acquisition de ce nouvel appareil. Veuillez lire attentivement et respecter les instructions de ce mode d’emploi afin d’éviter d’éventuels dommages. Nous ne saurions être tenus pour responsables des dommages dus au non-respect des consignes et à... -
Página 20: Consignes De Sécurité
CONSIGNES DE SÉCURITÉ Choisissez un emplacement sûr et ne placez pas l‘appareil directement au soleil ou près d‘une source de chaleur. 2. Évitez les environnements où l‘appareil est exposé à des vibrations, à une poussière excessive, au froid ou à l‘humidité. 3. - Página 21 Verrouillage du bras - Utilisez ce verrouillage pour fixer le bras lorsqu'il est au repos. Tête de lecture et capuchon de protection - Veuillez retirer le capuchon de protection en plastique de la tête d lecture avant de lire le disque. Sélection de la taille du disque entre 7 "et 12"...
-
Página 22: Assemblage
Sélection des modes PHONO ou LINE OUT. Sortie RCA - Connectez la sortie RCA à une console de mixage ou à un amplificateur de votre système audio. Connecteur d'alimentation - Branchez l'adaptateur secteur à une prise secteur avec la tension appropriée. Bouton d'alimentation - Appuyez sur ce bouton pour allumer ou éteindre la platine. -
Página 23: Branchement Sur L'amplificateur
Courroie Entraînement Remarque : Assurez-vous que la courroie n‘est pas tordue. Eviter le contact avec l‘huile. Les éclaboussures d‘huile rendent la courroie glissante. BRANCHEMENT SUR L‘AMPLIFICATEUR Connectez la sortie RCA à l’entrée AUX ou à l’entrée phono de votre amplificateur ou stéréo : •... -
Página 24: Lecture D'un Disque Vinyle
LECTURE D‘UN DISQUE VINYLE Ouvrez le couvercle. 2. Branchez le cordon d‘alimentation à la source d‘alimentation. 3. Appuyez sur l‘interrupteur marche / arrêt à l‘arrière de l‘appareil pour allumer l‘appareil. 4. Placez un disque sur la platine et sélectionnez la vitesse appropriée (33/45). -
Página 25: Remplacement De L'aiguille
REMPLACEMENT DE L‘AIGUILLE Démontage de l‘aiguille du bras de lecture Fixez un tournevis sur le dessus de la tête de lecture et abaissez-la comme indiqué sur le schéma „A“. 2. Enlevez la cellule en la tirant vers l‘avant tout en appuyant dessus. Cheville de guidage Installation de l‘aiguille Saisissez la pointe de la tête et insérez-la en la poussant dans la... -
Página 26: Informations Sur Le Recyclage
INFORMATIONS SUR LE RECYCLAGE Vous trouverez sur le produit l’image ci-contre (une poubelle sur roues, barrée d‘une croix), ce qui indique que le produit se trouve soumis à la directive européenne 2012/19/UE. Renseignez-vous sur les dispositions en vigueur dans votre région concernant la collecte séparée des appareils électriques et électroniques. -
Página 27: Declaración De Conformidad
Estimado cliente: Le felicitamos por la adquisición de este producto. atentamente siguiente manual siga cuidadosamente las instrucciones de uso con el fin de evitar posibles daños. La empresa no se responsabiliza de los daños ocasionados por un uso indebido del producto o por haber desatendido las indicaciones de seguridad. -
Página 28: Indicaciones De Seguridad
INDICACIONES DE SEGURIDAD Seleccione una ubicación segura y no coloque el aparato bajo la luz directa del sol ni junto a una fuente de calor. Evite entornos en donde el aparato se pueda ver expuesto a vibraciones, demasiado polvo, frío o humedad. Para evitar descargas eléctricas, no abra la carcasa. - Página 29 Bloqueo del brazo - Utilice este bloqueo para asegurar el brazo con el tocadiscos en reposo. Cartucho fonocaptor y tapa de protección - Antes de reproducir un disco, retire la tapa de plástico protectora del cartucho fonocaptor. Selección del tamaño del disco 7" o 12" - Seleccione el tamaño del disco que desea reproducir.
-
Página 30: Montaje
Selección de los modos de funcionamiento PHONO o LINE OUT. Salida RCA - Conecte la salida RCA a una mesa de mezclas o a un amplificador de su sistema de sonido. Toma de fuente de alimentación - Conecte la fuente de alimentación a una salida de corriente alterna con la tensión adecuada. -
Página 31: Conexión Al Amplificador
Correa Motor Nota: Asegúrese de que la correa de transmisión no esté girada. Evite el contacto con el aceite. Las salpicaduras de aceite pueden hacer que la correa patine. CONEXIÓN AL AMPLIFICADOR Conecte la salida RCA a la salida AUX o Phono de su amplificador o equipo estéreo: •... -
Página 32: Reproducción De Discos
REPRODUCCIÓN DE DISCOS Abra la cubierta. Conecte el cable de alimentación a la fuente de electricidad. Pulse el interruptor on/off situado en la parte trasera del aparato para apagar el suministro eléctrico. Coloque un disco sobre el plato del tocadiscos y seleccione la velocidad deseada (33/45). -
Página 33: Sustituir La Aguja
SUSTITUIR LA AGUJA Retire al aguja del cartucho fonocaptor Coloque un destornillador en la cubierta de la aguja y presiónelo hacia abajo como se muestra en el esquema „A“. Retire la cubierta tirando hacia adelante y luego presionando hacia abajo. Barra guía Colocación de la aguja Agarre la punta de la cubierta y colóquela presionándola en la dirección... -
Página 34: Indicaciones Para La Retirada Del Aparato
INDICACIONES PARA LA RETIRADA DEL APARATO Si el aparato lleva adherida la ilustración de la izquierda (el contenedor de basura tachado) entonces rige la normativa europea, directiva 2012/19/UE. Estos productos no pueden depositarse en los contenedores destinados a la basura común. Infórmese sobre las leyes territoriales que regulan la recogida separada de aparatos eléctricos y electrónicos. - Página 35 Gentile Cliente, La ringraziamo per aver acquistato il dispositivo. La preghiamo di leggere attentamente le seguenti istruzioni per l’uso e di seguirle per evitare possibili danni tecnici. Non ci assumiamo alcuna responsabilità per danni scaturiti da una mancata osservazione delle avvertenze di sicurezza e da un uso improprio del dispositivo.
-
Página 36: Avvertenze Di Sicurezza
AVVERTENZE DI SICUREZZA Scegliere un luogo appropriato e non posizionare il dispositivo nella luce solare diretta o vicino a fonti di calore. Evitare ambienti in cui il dispositivo è sottoposto a vibrazioni, polvere eccessiva, freddo o umidità. Per evitare folgorazioni, l’alloggiamento non deve essere aperto. Se inavvertitamente dei corpi estranei finiscono all’interno del dispositivo, rivolgersi a un tecnico specializzato. - Página 37 Blocco del braccio del pick-up: utilizzare questo blocco per fissare il braccio del pick-up quando non è in uso. Pick-up & protezione: si prega di togliere la copertura protettiva in plastica dal pick-up prima di riprodurre un disco. Selezionare la grandezza del disco 7” o 12”: selezionare la dimensione del disco da riprodurre.
-
Página 38: Montaggio
Selezione della modalità di funzionamento PHONO o LINE OUT. Uscita RCA: collegare l’uscita RCA con un mixer o un amplificatore del vostro impianto stereo. Connessione di rete: collegare l’alimentatore con un’uscita a corrente alternata con tensione appropriata. Interruttore On/Off: premere questo tasto per accendere o spegnere il giradischi. -
Página 39: Connettere Un Amplificatore
Cinghia Trazione Nota: assicurarsi che la cinghia non sia arrotolata. Evitare il contatto con olio. Gli spruzzi d’olio rendono la cinghia scivolosa. CONNETTERE UN AMPLIFICATORE Collegare l’uscita RCA con l’ingresso AUX o PHONO dell’amplificatore o dell’impianto stereo: • Lo spinotto rosso viene inserito nel canale destro. •... -
Página 40: Riprodurre Dischi
RIPRODURRE DISCHI Aprire la copertura. 2. Collegare il cavo alla fonte di elettricità. 3. Premere l’interruttore On/Off sul retro del dispositivo per accendere l’alimentazione. 4. Posizionare un disco sul piatto e selezionare la velocità (33/45). Assicurarsi che sia selezionata la grandezza del disco corretta di 7” o 12”. 5. -
Página 41: Cambiare La Puntina
CAMBIARE LA PUNTINA Togliere la puntina dal pick-up Mettere un cacciavite sulla punta dell’headshell e premere come mostrato nell’immagine A. 2. Rimuovere l’headshell premendo e tirando in avanti contemporaneamente. Perno guida Mettere la puntina Impugnare la punta dell’headshell e inserirla, premendo nella direzione mostrata in immagine B. -
Página 42: Smaltimento
SMALTIMENTO Se sul prodotto è presente la figura a sinistra (il bidone dei rifiuti con le ruote), si applica la direttiva europea 2012/19/UE. Questi prodotti non possono essere smaltiti con i rifiuti normali. Informarsi sulle disposizioni vigenti per la raccolta di dispositivi elettrici ed elettronici.