Tabla de contenido
Publicidad
Idiomas disponibles
Idiomas disponibles
Enlaces rápidos
Publicidad
Capítulos
Tabla de contenido

Manuales relacionados para auna NR-620


Resumen de contenidos para auna NR-620
-
Página 3: Tabla De Contenido
Sehr geehrter Kunde, wir gratulieren Ihnen zum Erwerb Ihres Gerätes. Lesen Sie die folgenden Hinweise sorgfältig durch und befolgen Sie diese, um möglichen Schäden vorzubeugen. Für Schäden, die durch Missachtung der Hinweise und unsachgemäßen Gebrauch entstehen, übernehmen wir keine Haftung. Scannen Sie den folgenden QR-Code, um Zugriff auf die aktuellste Bedienungsanleitung und weitere Informationen rund um das Produkt zu erhalten:... -
Página 4: Technische Daten
TECHNISCHE DATEN Artikelnummer 10007043, 10007044, 10018519 1 x USB-Eingang 1 x SD-Eingang Anschlüsse 1 x 3,5 mm Kopfhörer-Eingang 1 x Stereo-Cinch-Audioausgang Abspielbare Formate CD, CD-R, CD-RW, MP3 Disc-Formate CD, MP3-CD, Schallplatte Stromversorgung 230 V, 50 Hz Maße Gerät 40 x 23,5 x 30 cm Gewicht ca 4,5 kg Gerät... -
Página 5: Sicherheitshinweise
SICHERHEITSHINWEISE Allgemeine Sicherheitshinweise VORSICHT Verletzungsgefahr! Hören Sie nicht mit übermäßig hoher Lautstärke Musik, da dies zu Hörschäden führen kann. • Kinder ab 8 Jahren, psychisch, sensorisch und körperlich eingeschränkte Menschen dürfen das Gerät nur benutzen, wenn sie vorher von einer für sie verantwortlichen Aufsichtsperson ausführlich mit den Funktionen und den Sicherheitsvorkehrungen vertraut gemacht wurden und die damit verbundenen Risiken verstehen. - Página 6 Belüftung • Blockieren oder bedecken Sie keinesfalls die Belüftungsöff nungen, Löcher oder Öff nungen des Geräts, mit Gegenständen wie Teppichen, Tüchern und ähnlichem, da andernfalls die Funktionalität und/oder die Belüftung für eine sicherer Verwendung nicht gewährleistet werden können. • Die Unterseite des Geräts kann warm werden, wenn das Gerät über einen längeren Zeitraum verwendet wird.
-
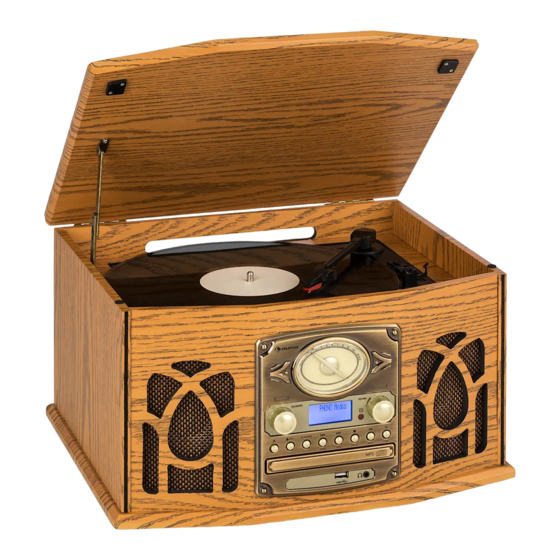
Página 7: Geräteübersicht
GERÄTEÜBERSICHT Ziffernblock Radiobandwahlschalter LCD Anzeige FM Stereo-LED Funktionsschalter Frequenzregler Betriebsstatus-LED Fernbedienungsempfänger Ein/Aus, Lautstärkeregler Abbrechen/Suche zurück Ordner hoch Skip/Such-Taste Wiedergabequelle CD Fach öffnen Extra-Bass ein/aus Wiedergabe/Pause/Stopp Aufnahme USB-Anschluss CD Fach 3.5 mm Kopfhöreranschluss SD/MMC Kartenleser... - Página 8 Tapedeck (Seite) Kassette Vorlauf/ Auswerfen Kassettenfach Plattenspieler (Aufsicht) Spindeladapter Tonarmhalter Geschwindigkeitsregler Auto-Stopp Plattenteller...
- Página 9 Anschlüsse (Rückseite) FM Wurfantenne Netzkabel Line-Ausgang (Cinch)
-
Página 10: Fernbedienung
FERNBEDIENUNG Hinweis: Die Fernbedienung benötigt zum Betrieb 2 AAA-Batterien. Die Batterien sind nicht im Lieferumfang enthalten! Öffnen / Schließen Taste drücken, um das CD-Fach zu öffnen oder zu schließen. INFO Encodierungs-Bitrate wählen Aufnahme / Kopieren PLAY MODE Wiederholung / Intro / Zufallswiedergabe PROG. -
Página 11: Anschluss Und Inbetriebnahme
ANSCHLUSS UND INBETRIEBNAHME • Verbinden Sie das Netzkabel (31) mit einer Steckdose. • Schalten Sie das Gerät ein (5) und die blaue Beleuchtung des Displays (2) schaltet sich ein. • Wählen Sie die gewünschte Funktion (3). Es wird Ton wiedergegeben und das Gerät ist betriebsbereit. RADIO Manuelle Frequenzänderung •... -
Página 12: Cd-Wiedergabe
CD-WIEDERGABE • Stellen Sie den Funktionsschalter (3) auf “CD/USB/SD”. • Drücken Sie “Open/Close” (18) um das CD-Fach (10) zu öffnen. • Legen Sie eine CD mit der bedruckten Seite nach oben ein und schließen Sie das CD-Fach. • Die CD wird erkannt und die LCD Anzeige (2) zeigt die Anzahl und Wiedergabedauer aller Titel an. - Página 13 MP3-Titel Formatanforderungen MP3 Bitrate: 32 kbps~256 kbps; die Leistung der MP3-Wiedergabe variiert je nach Aufnahmequalität und Methode. Die Ladezeit eine MP3-CD ist auch länger als bei normalen Musik-CDs. Wiederholung/Intro/Zufallswiedergabe (über Fernbedienung) Drücken Sie „Repeat/Intro/Random“ während der Wiedergabe mehrfach um folgende Aktion auszuführen: (1) Track wiederholen (1 a) nur bei MP3-CDs: Ordner wiederholen (2) Alle wiederholen...
-
Página 14: Wiedergabe Von Mp3 Über Usb-Speicher Oder Speicherkarte
WIEDERGABE VON MP3 ÜBER USB-SPEICHER ODER SPEICHERKARTE • Wählen Sie mit dem Funktionsschalter (3) den CD/USB/SD-Modus und wählen Sie als Quelle (7) „USB or Card”-Modus. • Schließen Sie nun das USB-Speichermedium oder legen Sie die Speicherkarte wie auf dem Bild zu sehen ein. Die bedruckte Seite der Speicherkarte muss nach unten zeigen. -
Página 15: Tape Deck: Kassette
TAPE DECK: KASSETTE • Kassettenwiedergabe: Das Gerät beginnt automatisch mit der Wiedergabe wenn eine Kassette eingelegt wird. • Stoppen und auswerfen: Drücken Sie “Tape forward / Eject“ komplett herein um die Kassette auszuwerfen. Der Taster verbleibt in dieser Position. • Schneller Vorlauf: Drücken Sie „Tape forward / Eject“... -
Página 16: Schallplatte
SCHALLPLATTE Vor der Benutzung: Entfernen Sie den Schutz am Tonabnehmer. Lösen Sie den Tonarm vom Halter und sichern Sie diesen wieder nach dem Gebrauch. • Wählen Sie “Phono” mittels Funktionswahlschalter (3). • Wählen Sie die Geschwindigkeit entsprechend der Aufnahme. • Legen Sie die Schallplatte auf den Plattenteller (Verwenden Sie falls nötig den Spindeladapter). - Página 17 (2) Aufnahme einer kompletten CD • Legen Sie eine CD mit der bedruckten Seite nach oben ein & schließen Sie das CD-Fach. • Nachdem Sie die CD eingelegt haben, drücken Sie “Record“ (9) – Notiz: Drücken Sie nicht “Play/Pause/Stop” (19) und dann „record“, da sonst nur der gerade wiedergegebene Titel aufgenommen wird.
- Página 18 (4) MP3-Dateien kopieren Falls Sie eine MP3-CD einlegen, können Sie diese Dateien auf USB oder SD/ MMC-Karte kopieren. Drücken Sie „Record“ (9). Die Bedienung erfolgt wie bei der Aufnahme und es werden erkannte MP3-Dateien kopiert. Schallplatte umwandeln • Schließen Sie ein USB-Speicher an auf den Sie aufnehmen wollen (es muss genügend freier Speicher vorhanden sein).
- Página 19 Dateien von USB zu SD oder umgekehrt Sie können durch Drücken von “record“ (9) Dateien kopieren: (1) einen Titel kopieren (bei Kopie von SD-Karte zu USB) • Starten Sie die Wiedergabe des zu kopierenden Titels von SD-Karte. • Drücken Sie während der Wiedergabe “Record“ (9) “ und &...
-
Página 20: Löschen Von Dateien Von Usb / Sd-Karte (Über Fernbedienung)
LÖSCHEN VON DATEIEN VON USB / SD-KARTE (ÜBER FERNBEDIENUNG) Sie können mit dem Gerät auch Dateien von USB oder SD/MMC-Karte löschen: Einzelne Datei löschen • Wählen Sie den “USB“- oder “SD“-Modus. • Drücken und halten Sie “Info“ für 3 Sekunden und auf der LCD- Anzeige (2) zeigt (del ---001) an •... -
Página 21: Usb/Speicherkarte Entnehmen
USB/SPEICHERKARTE ENTNEHMEN Um USB-Speichermedium oder SD/MMC-Speicherkarte zu entfernen, schalten Sie zuerst das Gerät aus oder wechseln zum CD-, Kassetten- oder Radiomodus. Nun können Sie den USB-Speicher trennen bzw. die Speicherkarte sorgsam herausziehen. LINE-AUSGANG Hier können Sie eine HiFi-Anlage anschließen. Verbinden Sie diese mit einem Cinchkabel (nicht im Lieferumfang enthalten) mit dem Line-Ausgang (29). -
Página 22: Hinweise Zur Entsorgung
HINWEISE ZUR ENTSORGUNG Befi ndet sich die linke Abbildung (durchgestrichene Mülltonne auf Rädern) auf dem Produkt, gilt die Europäische Richtlinie 2012/19/EU. Diese Produkte dürfen nicht mit dem normalen Hausmüll entsorgt werden. Informieren Sie sich über die örtlichen Regelungen zur getrennten Sammlung elektrischer und elektronischer Gerätschaften. - Página 23 Dear Customer, Congratulations on purchasing this device. Please read the following instructions carefully and follow them to prevent possible damages. We assume no liability for damage caused by disregard of the instructions and improper use. Scan the QR code to get access to the latest user manual and more product information.
-
Página 24: Technical Data
TECHNICAL DATA Part number 10007043, 10007044, 10018519 1 x USB In 1 x SD In Connectors 1 x 3.5 mm-Headphones 1 x Stereo-RCA out Playable formats CD, CD-R, CD-RW, MP3 Disc formats CD, MP3-CD, vinyl record Power supply 230 V, 50 Hz Dimensions device 40 x 23,5 x 30 cm Weight... -
Página 25: Safety Instructions
SAFETY INSTRUCTIONS General safety instructions CAUTION Risk of injury. Do not listen to music at excessive volume as this may result in a loss of hearing. • This device may be only used by children 8 years old or older and persons with limited physical, sensory and mental capabilities and / or lack of experience and knowledge, provided that they have been instructed in use of the device by a responsible person who... - Página 26 Ventilation • Do not block or cover the ventilation holes, vents, or openings of the unit with anything, such as carpet, cloth, or similar, as otherwise the openings may not be able to ensure functionality and / or ventilation for safe use. •...
-
Página 27: Product Overview
PRODUCT OVERVIEW Dial pointer radio band selector switch LCD display FM stereo LED indicator Functions switch Tuning knob Power LED indicator Remote sensor Power on/off, Volume knob Skip/search down button Folder up button Skip/search up button Source button CD door open button Extra bass on/off button Play/pause/stop button Record button... - Página 28 Tapedeck Tape forward / eject button Cassette door cover Turntable (top view) Spindle adaptor Pick-up holder Turntable speed selector Auto stop switch...
- Página 29 Connectors (rear panel) FM wire antenna AC cord Line out socket (L/R)
-
Página 30: Remote Control
REMOTE CONTROL Note: The remote control requires 2 AAA batteries to operate. The batteries are not included in the delivery! Open / Close Press key to open or close the CD tray. INFO Select encoding bitrate Record / Copy PLAY MODE Repeat / Intro / Shuffle PROG. -
Página 31: Connection & Initial Use
CONNECTION & INITIAL USE • Connect the power cord (31) to ac outlet. • Turn on the power (5) until the LCD display (2) with blue backlight on. • Then switch the function selector (3) to “Tuner“ function. If sound is coming out from the speaker, it’s mean the power supply is normal. -
Página 32: Cd Playback
CD PLAYBACK • Set the function switch (3) to „CD/USB/SD“. • Press „Open/Close“ (18) to open the CD compartment (10). • Insert a CD with the printed side facing up and close the CD compartment. • The CD is recognized and the LCD display (2) shows the number and playback time of all tracks. - Página 33 MP3 track format requirements MP3 Bitrate: 32 kbps~256 kbps; MP3 playback performance varies depending on recording quality and method. The loading time of an MP3 CD is also longer than normal music CDs. Repeat/Intro/Random playback (via remote control) Press „Repeat/Intro/Random“ repeatedly during playback to perform the following action: (1) Repeat track (1 a) MP3 CDs only: Repeat folder...
-
Página 34: Playback Of Mp3 Files From Usb Storage Media Or Memory Card
PLAYBACK OF MP3 FILES FROM USB STORAGE MEDIA OR MEMORY CARD • Set the function selector (3) at CD/USB/SD mode and then press Source button (7) to select “USB or Card” mode. • Plug-in the USB plug with the face up & make sure it going into completely or insert the memory card in the direction of the arrow as shown in the label on the underside of the memory card slot cover. -
Página 35: Tape Deck: Cassette
TAPE DECK: CASSETTE • Cassette Playback: the unit automatically starts playing when a cassette is inserted. • Stop and Eject: Press „Tape forward / Eject“ completely in to eject the cassette. The button remains in this position. • Fast forward: Press „Tape forward / Eject“ halfway in to activate fast forward. -
Página 36: Playing A Record
PLAYING A RECORD Before use: Remove the guard on the pickup. Detach the tone arm from the holder and secure it again after use. • Select „Phono“ by means of the function selector switch (3). • Select the speed according to the recording. •... - Página 37 (2) Recording a complete CD • Insert a CD with the printed side up & close the CD compartment. • After inserting the CD, press „Record“ (9) - Note: Do not press „Play/ Pause/Stop“ (19) and then „record“, otherwise only the track currently playing will be recorded.
- Página 38 (4) Copy MP3 files If you insert an MP3 CD, you can copy these files to USB or SD/MMC card. Press „Record“ (9). The operation is the same as recording and recognized MP3 files are copied. Convert record • Connect a USB memory to which you want to record (there must be enough free space).
- Página 39 Files from USB to SD or vice versa You can copy files by pressing „record“ (9): (1) copy a title (when copying from SD card to USB). • Start playback of the title to be copied from SD card. • During playback, press „record“...
-
Página 40: Deleting Files From Usb / Sd Card (Via Remote Control)
DELETING FILES FROM USB / SD CARD (VIA REMOTE CONTROL). You can also delete files from USB or SD/MMC card with the device: Delete single file • Select „USB“ or „SD“ mode. • Press and hold „Info“ for 3 seconds and the LCD display (2) will show (del ---001) •... -
Página 41: Removing Usb/Memory Card
REMOVING USB/MEMORY CARD To remove USB memory device or SD/MMC memory card, first turn off the device or switch to CD, cassette or radio mode. Now you can disconnect the USB memory or pull out the memory card carefully. LINE OUTPUT Here you can connect a HiFi system. -
Página 42: Hints On Disposal
HINTS ON DISPOSAL According to the European waste regulation 2012/19/ EU this symbol on the product or on its packaging indicates that this product may not be treated as household waste. Instead it should be taken to the appropriate collection point for the recycling of electrical and electronic equipment. - Página 43 Estimado cliente: Le felicitamos por la adquisición de este producto. atentamente siguiente manual siga cuidadosamente las instrucciones de uso con el fin de evitar posibles daños. La empresa no se responsabiliza de los daños ocasionados por un uso indebido del producto o por haber desatendido las indicaciones de seguridad.
-
Página 44: Datos Técnicos
DATOS TÉCNICOS Número de artículo 10007043, 10007044, 10018519 1 x Entrada USB 1 x Entrada SD Conexiones 1 x Clavija de entrada para auriculares de 3,5 mm 1 x Salida de audio RCA estéreo Formatos reproducibles CD, CD-R, CD-RW, MP3 Formato de disco CD, MP3-CD, discos Fuente de alimentación... -
Página 45: Indicaciones De Seguridad
INDICACIONES DE SEGURIDAD Advertencias generales de seguridad ATENCIÓN Riesgo de lesiones. No escuche la música a un volumen demasiado alto, pues podría provocar daños auditivos. • Este aparato puede ser utilizado por niños mayores de 8 años y personas con discapacidades físicas, sensoriales y mentales y/o con falta de experiencia y conocimientos, siempre y cuando hayan sido instruidos sobre el uso del aparato y comprendan los peligros y riesgos asociados. - Página 46 Ventilación • Nunca bloquee ni tape los orifi cios de ventilación, agujeros o aperturas del aparato con objetos como alfombras, paños o similares, pues podrían poner en riesgo su funcionalidad y/o ventilación en cuanto a un uso seguro. • La parte inferior del aparato puede calentarse si se utiliza durante un periodo de tiempo prolongado.
-
Página 47: Elementos De Control
ELEMENTOS DE CONTROL Indicador numérico Selector de banda de radio Indicador LCD LED FM estéreo Selector de funciones Regulador de frecuencias Estado del equipo LED Receptor del mando a distancia On/Off, regulador de volumen Cancelar/Buscar de nuevo Carpeta arriba Tecla omitir/buscar Fuente de reproducción Abrir compartimento de CD On/Off bajo extra... - Página 48 Casetera (Parte lateral) Casete Avance/Expulsar Compartimento de casetes Tocadiscos (vista desde arriba) Adaptador de la aguja Sujeción del brazo giratorio Regulador de la velocidad Autostop del tocadiscos...
- Página 49 Conexiones (Lado posterior) Antena retráctil FM Cable de alimentación Salida en línea (RCA)
-
Página 50: Mando A Distancia
MANDO A DISTANCIA Nota: El mando a distancia necesita 2 pilas AAA para funcionar. Las pilas no están incluidas en la entrega. Abrir / Cerrar Pulse el botón para abrir o cerrar la bandeja de CD. INFO Seleccione la tasa de bits de codificación Registro / Copia PLAY MODE... -
Página 51: Conexión Y Puesta En Marcha
CONEXIÓN Y PUESTA EN MARCHA • Conecte el cable de alimentación (31) a una toma de corriente. • Encienda el dispositivo (5) y se iluminará la iluminación azul de la pantalla (2). • Elija la función deseada (3). Sonará un sonido. El dispositivo está listo para funcionar. -
Página 52: Reproducción De Cd
REPRODUCCIÓN DE CD • Coloque el selector de funciones (3) en “CD/USB/SD”. • Pulse “Open/Close” (18) para abrir el compartimento de CD (10). • Coloque un CD con la cara impresa hacia arriba y cierre el compartimento. • Se reconocerá al CD y la pantalla LCD (2) enseñará el número y la duración de la reproducción de todos los títulos. - Página 53 Requisitos de formato para títulos MP3 MP3 velocidad de bits: 32 kbps~256 kbps; la potencia de la reproducción de MP3 varía según la calidad de grabación y método. El tiempo de carga de un CD MP3 dura más que el de un CD de música convencional. Repetición/Intro/Modo aleatorio (mediante mando a distancia) Pulse varias veces „Repeat/Intro/Random“...
-
Página 54: Reproducción Mp3 Mediante Usb Otarjetas De Memoria
REPRODUCCIÓN MP3 MEDIANTE USB O TARJETAS DE MEMORIA • Elija con el selector de funciones (3) el modo CD/USB/SD y como fuente (7,) modo “USB or Card”. • Conecte el dispositivo USB o introduzca una tarjeta de memoria como se indica en la imagen. El lado impreso de la tarjeta de memoria debe señalar hacia abajo. -
Página 55: Casetera
CASETERA • Reproducción de casetes: El dispositivo empieza la reproducción automática una vez introducido un casete. • Detener y expulsar: Pulse el fondo “Tape forward / Eject“ para expulsar un casete. El botón se queda en esta posición. • Rebobinar rápidamente hacia delante: Pulse “tape forward / Eject“ hasta la mitad para activar la rebobinación rápida. -
Página 56: Tocadiscos
TOCADISCOS Antes de uso: Retire la protección de la grabadora de sonido. Suelte el brazo del tocadiscos de su soporte y colóquelo de nuevo tras su uso. • Elija “Phono” mediante el selector de funciones (3). • Ajuste la velocidad de acuerdo a la grabación. •... - Página 57 (2) Grabar un CD completo • Inserte un CD con la cara impresa hacia arriba y cierre el compartimento de CD. • Una vez cargado el CD, pulse “Record“ (9) – Nota: no pulse “Play/ Pause/Stop” (19) y luego „record“, puesto que se grabará la pista reproducida.
- Página 58 (4) Copiar archivos de MP3 Si ha introducido un CD MP3, puede copiar los archivos a un USB o una tarjeta SD/MMC. Pulse “Record“ (9). El funcionamiento se realiza de la misma manera que durante la grabación y se copiarán los archivos reconocidos.
- Página 59 Copiar archivos de USB a SD y viceversa Puede copiar archivos pulsando “record“ (9): (1) Copiar una pista (de tarjeta SD a USD) • Empieza a reproducir la pista que quiere copiar de la tarjeta SD. • Pulse durante la reproducción “Record“ (9), durante el proceso de copia aparecerán y se iluminarán &...
-
Página 60: Eliminar Archivos De Usb /Tarjeta Sd (Mediante Mando A Distancia)
ELIMINAR ARCHIVOS DE USB /TARJETA SD (MEDIANTE MANDO A DISTANCIA) Con el dispositivo puede también eliminar archivos de USB o tarjetas SD/ MMC: Eliminar un archivo • Seleccione modo “USB“ o“SD“. • Mantenga pulsado “Info” durante 3 segundos y en la pantalla LCD (2) aparecerá... -
Página 61: Retirar Tarjeta De Memoria/Usb
RETIRAR TARJETA DE MEMORIA/USB Para retirar un USB o una tarjeta de memoria SD/MMC, apague primero el dispositivo o cambie al modo CD, casete o radio. Ahora puede retirar el USB o la tarjeta de memoria. SALIDA LINE Puede conectar un sistema HiFi al aparato. Para ello utilice un cable RCA (no incluido en el envío) y la salida en línea (29). -
Página 62: Retirada Del Aparato
RETIRADA DEL APARATO Si el aparato lleva adherida la ilustración de la izquierda (el contenedor de basura tachado) entonces rige la normativa europea, directiva 2012/19/UE. Este producto no debe arrojarse a un contenedor de basura común. Infórmese sobre las leyes territoriales que regulan la recogida separada de aparatos eléctricos y electrónicos. - Página 63 Cher client, Toutes nos félicitations pour l’acquisition de ce nouvel appareil. Veuillez lire attentivement les instructions suivantes de branchement et d’utilisation afin d’éviter d’éventuels dommages. Le fabricant ne saurait être tenu pour responsable des dommages dus au non-respect des consignes de sécurité et à la mauvaise utilisation de l’appareil.
-
Página 64: Fiche Technique
FICHE TECHNIQUE Numéro d’article 10007043, 10007044, 10018519 1 x USB In 1 x SD In Connections 1 x 3.5 mm-Headphones 1 x Stereo-RCA out Types formats CD, CD-R, CD-RW, MP3 Types disc CD, MP3-CD, vinyl record Alimentation électrique 230 V, 50 Hz Dimensions 40 x 23,5 x 30 cm Poids... -
Página 65: Consignes De Sécurité
CONSIGNES DE SÉCURITÉ Consignes générales de sécurité ATTENTION Risque de blessures ! n‘écoutez pas de musique à trop fort volume, car cela peut endommager votre audition. • Cet appareil peut être utilisé par des enfants de 8 ans ou plus et des personnes ayant des capacités physiques, sensorielles et mentales limitées et / ou dénuées d‘expérience et de connaissances, à... - Página 66 Ventilation • Ne pas obstruer ni couvrir les ouvertures de ventilation, les trous ou les ouvertures de l‘appareil avec des objets tels que des tapis, tissus et similaires, car la fonctionnalité et/ou la ventilation en toute sécurité ne pourraient pas être garanties. •...
-
Página 67: Boutons De Commande
BOUTONS DE COMMANDE Bloc des chiffres bouton de sélection de bande Affichage LCD LED stéréo FM Commutateur de fonctions régleur de fréquence Statut LED récepteur de télécommande marche/arrêt, bouton de réglage annuler, recherche arrière du volume dossier parent saut, recherche avant touche de lecture ouvrir le lecteur CD basses supplémentaires marche/... - Página 68 Compartiment à cassette cassette avancer/éjecter emplacement cassette Platine centreur de disque support pour bras de lecture régleur de vitesse pour la arrêt automatique platine...
- Página 69 Branchement (arriere) antenne filaire FM câble d’alimentation sortie LINE (L/R)
-
Página 70: Télécommande
TÉLÉCOMMANDE Note : La télécommande nécessite 2 piles AAA pour fonctionner. Les piles ne sont pas incluses dans la livraison ! Ouvrir / Fermer Appuyez sur le bouton pour ouvrir ou fermer le plateau de CD. INFO Sélectionner le débit binaire d'encodage Enregistrement / Copie PLAY MODE Répéter / Intro / Mélanger... -
Página 71: Branchement & Première Utilisation
BRANCHEMENT & PREMIÈRE UTILISATION • Branchez le câble d’alimentation sur une prise. • Allumez l’appareil (5) et la lumière bleue de l’écran s’allumera. • Sélectionnez la fonction désirée (3). Un clic indiquera que l’appareil est prêt à être utilisé. RADIO Changement manuel de la fréquence •... -
Página 72: Lecture De Cd
LECTURE DE CD • Réglez le commutateur de fonction (3) sur „CD/USB/SD“. • Appuyez sur „Open/Close“ (18) pour ouvrir le compartiment CD (10). • Insérez un CD avec la face imprimée vers le haut et fermez le compartiment du CD. •... - Página 73 Conditions pour la lecture des titres MP3 Bitrate du MP3 : 32 kbps ~ 256 kbps; la qualité de la lecture dépend de la qualité et de la méthode de l’enregistrement. La durée nécessaire pour le lancement d’un CD MP3 est supérieure à celle d’une CD normal. Lecture/Intro/Lecture aléatoire Pendant la lecture, appuyez sur «...
-
Página 74: Lecture De Mp3 À Partir D'une Clef Usb Ou D'une Carte Mémoire
LECTURE DE MP3 À PARTIR D’UNE CLEF USB OU D’UNE CARTE MÉMOIRE • Positionnez le commutateur de fonctions (3) sur « CD/USB/SD » et sélectionnez le mode « USB or Card » comme source (4). • Insérez maintenant la clef USB ou la carte mémoire comme illustré sur l’image. -
Página 75: Écouter Des Cassettes
ÉCOUTER DES CASSETTES • Lire une cassette : Lorsqu’une cassette est insérée, l’appareil la lit automatiquement. • Arrêter et éjecter : Enfoncez complètement la touche « Tape forward / Eject » pour éjecter une cas- sette. La touche reste enfoncée. •... -
Página 76: Platine
PLATINE Instructions : Retirez la protection de la pointe. Avant utilisation, enlevez le bras de lecture de son support et remettez-le sur le support après utilisation. • Positionnez le commutateur de fonctions (3) sur « Phono/Aux ». • Réglez la vitesse selon l’enregistrement. •... - Página 77 (2) Enregistrer un CD entier • Insérez un CD avec le côté imprimé vers le haut et refermez le lecteur • Appuyez ensuite sur « Record » (9) - Remarque : N’appuyez pas sur « Play/Pause/Stop » (19) et « Record », sinon seul le titre actuel sera enregistré.
- Página 78 (4) Copier des fichiers MP3 Si vous insérez CD MP3, ces fichiers peuvent être copiés sur USB ou SD/ MMC. Appuyez sur « Record » (9). Le processus est le même que ci-dessus. Dès que des fichiers MP3 sont reconnus, ils sont copiés. Encoder un vinyle •...
- Página 79 Copier des fichiers depuis une clef USB sur une carte SD ou l’inverse I (1) Copier un titre (depuis la carte SD vers l’USB) • Lancez la lecture du titre à copier comme d’habitude depuis la carte SD. • Pendant la lecture, appuyez sur « Record » (9), “ “ & “ “ s’affichent et clignotent pendant la copie.
-
Página 80: Effacer Des Fichiers Sur Une Clef Usb/Carte Sd (Avec La Télécommande)
EFFACER DES FICHIERS SUR UNE CLEF USB/ CARTE SD (AVEC LA TÉLÉCOMMANDE) Effacer un fichier • Sélectionnez le mode USB ou SD. • Appuyez sur « info » et maintenez la touche enfoncée pendant 3 secondes, l’écran LCD (2) affichera (del ---001). •... -
Página 81: Retirer Une Clef Usb/Carte Sd
RETIRER UNE CLEF USB/CARTE SD Pour retirer une carte mémoire, la chaîne hifi doit d’abord être éteinte ou placée sur un autre mode comme CD, cassette ou radio. Retirez ensuite la clef USB ou la carte mémoire de son emplacement avec précaution. SORTIE LINE Vous pouvez ici connecter une chaîne hifi. -
Página 82: Conseils Pour Le Recyclage
CONSEILS POUR LE RECYCLAGE Le pictogramme ci-contre apposé sur le produit signifi e que la directive européenne 2012/19/UE s‘applique (poubelle à roues barrée d’une croix). Ces produits ne peuvent être jetés dans les poubelles domestiques courantes. Renseignez-vous concernant les règles appliquées pour la collecte d’appareils électriques et électroniques. - Página 83 Gentile cliente, La ringraziamo per aver acquistato il dispositivo. La preghiamo di leggere attentamente le seguenti istruzioni per l’uso e di seguirle per evitare possibili danni tecnici. Non ci assumiamo alcuna responsabilità per danni scaturiti da una mancata osservazione delle avvertenze di sicurezza e da un uso improprio del dispositivo.
-
Página 84: Dati Tecnici
DATI TECNICI Articolo numero 10007043, 10007044, 10018519 1 x porta USB 1 x ingresso SD Attacchi 1 x entrata cuffie 3,5 mm 1 x uscita stereo RCA Formati supportati CD, CD-R, CD-RW, MP3 Dischi supportati CD, MP3-CD, disco in vinile Alimentazione 230 V, 50 Hz Dimensioni dispositivo... -
Página 85: Avvertenze Di Sicurezza
AVVERTENZE DI SICUREZZA Avvertenze di sicurezza generiche ATTENZIONE Pericolo di lesione! Non ascoltare la musica a volume eccessivamente altro, in quanto può provocare danni all’udito. • Questo dispositivo può essere utilizzato da bambini a partire da 8 anni e da persone con limitate capacità fi siche e psichiche o con conoscenza ed esperienza limitate, solo se sono stati istruiti sulle modalità... - Página 86 Ventilazione • Non bloccare in nessun caso le fessure di ventilazione, i fori o le aperture del dispositivo con oggetti, come tappeti, teli e similari, altrimenti non possono essere garantite funzionalità e/o ventilazione per un utilizzo sicuro. • Il lato inferiore del dispositivo può diventare caldo dopo utilizzi prolungati.
-
Página 87: Comandi
COMANDI Tastiera numerica Selettore di banda radio Display LCD FM Stereo LED Interruttore di funzione Controllo della frequenza LED di stato operativo Ricevitore di controllo remoto On/Off, controllo del volume Cancella/Ricerca indietro Cartella su Pulsante di salto/ricerca Fonte di riproduzione Aprire il vassoio dei CD Bassi extra on/off Gioca/Pausa/Stop... - Página 88 Riproduzione cassette (laterale) Avanzamento cassetta /Eject Vano cassetta Giradischi (descrizione) Adattatore del mandrino Supporto braccio giradischi Manopola velocità piatto del Auto Stop giradischi...
- Página 89 Attacchi (retro) Antenna a filo FM Cavo di alimentazione Uscita Line (RCA)
-
Página 90: Telecomando
TELECOMANDO Nota: Il telecomando richiede 2 batterie AAA per funzionare. Le batterie non sono incluse nella consegna! Aprire / Chiudere Premere il pulsante per aprire o chiudere il vassoio dei CD. INFO Selezionare il bit rate di codifica Registrazione / Copia PLAY MODE Ripetizione / Intro / Shuffle PROG. -
Página 91: Attacchi E Messa In Funzione
ATTACCHI E MESSA IN FUNZIONE • Collegare il cavo di alimentazione (31) alla presa. • Accendere il dispositivo (5): il display LCD (2) si accende con retroilluminazione blu. • Selezionare la funzione (3): il dispositivo emette un segnale acustico ed è... -
Página 92: Riprodurre Un Cd
RIPRODURRE UN CD • Impostare il selettore di funzione (3) su „CD/USB/SD“. • Premere il tasto „Open / Close“ (18) per aprire il vano CD (10). • Inserire un CD con il lato stampato rivolto verso l‘alto e chiudere il vano •... - Página 93 Requisiti formato MP3 Bitrate MP3: 32 kbps ~ 256 kbps; la riproduzione MP3 varia in base alla qualità della registrazione. Ripeti / Intro / riproduzione casuale (tramite telecomando) Premere ripetutamente „Repeat / Intro / Random“ durante la riproduzione per: (1) ripetere il brano (1a) Solo per CD MP3: ripetere la cartella (2) Ripetere tutti i brani (3) Intro...
-
Página 94: Riproduzione Di Mp3 Tramite Dispositivo Usb O Scheda Di Memoria
RIPRODUZIONE DI MP3 TRAMITE DISPOSITIVO USB O SCHEDA DI MEMORIA • Utilizzare tramite il selettore di funzione (3) la modalità CD/USB/SD e selezionare „USB o modalità Card“ come fonte (7). • Collegare il dispositivo USB oppure inserire la scheda di memoria come mostrato nella figura. -
Página 95: Cassette
CASSETTE • Riproduzione cassette: il dispositivo inizia automaticamente la riproduzione appena viene inserita una cassetta. • Stop e Eject: premere in dentro il tasto „Tape forward / Eject“ per espellere la cassetta. Il tasto resta in questa posizione. • Fast forward: premere a metà il tasto „Tape forward/Eject“ per l’avanzamento veloce. -
Página 96: Dischi In Vinile
DISCHI IN VINILE Prima dell‘uso: rimuovere la protezione della testina fonografica. Rimuovere il braccio del giradischi dal supporto e dopo l‘uso inserirlo di nuovo. • Selezionare „Phono“ tramite il selettore di funzione (3). • Impostare la velocità in base alla registrazione. •... - Página 97 (2) Registrare un CD completo • Inserire un CD con il lato stampato rivolto verso l‘alto e chiudere il vano • Una volta inserito il CD, premere il tasto „Record“ (9) - Nota: non premere „Play/Pause/Stop“ (19) e poi „Record“, altrimenti viene registrato solo il brano in riproduzione.
- Página 98 (4) Copiare file MP3 Se si inserisce un CD MP3, è possibile copiare questi file su USB o scheda SD/MMC. Premere „Record“ (9). L‘utilizzo è uguale alla registrazione e riconoscerà i file MP3 copiati. Convertire un disco in vinile • Collegare un dispositivo USB su cui registrare (deve esserci memoria libera sufficiente).
- Página 99 Copiare file da USB a SD e viceversa Copiare i file premendo „record“ (9): (1) Copiare un brano (dalla scheda SD a USB) • Avviare la riproduzione del brano da copiare dalla scheda SD. • Durante la riproduzione, premere „Record“ (9): durante la copia compaiono e lampeggiano &...
-
Página 100: Cancellare File Dal Dispositivo Usb / Dalla Scheda Sd (Tramite Telecomando)
CANCELLARE FILE DAL DISPOSITIVO USB / DALLA SCHEDA SD (TRAMITE TELECOMANDO) È possibile utilizzare il dispositivo anche per cancellare i file da USB o da scheda SD/MMC: Cancellare file singoli • Selezionare la modalità „USB“ oppure „SD“. • Tenere premuto „Info“ per 3 secondi e sul display LCD (2) compare (del --- 001) •... -
Página 101: Rimuovere Il Dispositivo Usb / La Scheda Di Memoria
RIMUOVERE IL DISPOSITIVO USB / LA SCHEDA DI MEMORIA Per rimuovere un dispositivo USB o una scheda di memoria SD/MMC, spegnere il dispositivo oppure passa- re alla modalità radio, CD o cassetta. Ora è possibile disinserire il dispositivo USB o la scheda di memoria. USCITA LINE È... -
Página 102: Smaltimento
SMALTIMENTO Se sul prodotto è presente la fi gura a sinistra (il cassonetto dei rifi uti mobile sbarrato), si applica la direttiva europea 2012/19/UE. Questi prodotti non possono essere smaltiti con i rifi uti normali. Informarsi sulle disposizioni vigenti in merito alla raccolta separata di dispositivi elettrici ed elettronici.