SPORTSTECH BT300 Manual Del Usuario
Ocultar thumbs
Ver también para BT300:
- Manual del usuario (51 páginas) ,
- Manual del usuario (72 páginas)
Tabla de contenido
Publicidad
Idiomas disponibles
Idiomas disponibles
Enlaces rápidos
Publicidad
Capítulos
Tabla de contenido

Manuales relacionados para SPORTSTECH BT300


Resumen de contenidos para SPORTSTECH BT300
- Página 1 BT300...
- Página 3 Sehr geehrter Kunde wir freuen uns, dass Sie sich für ein Gerät aus der SPORTSTECH Produktpalette entschieden haben. SPORTSTECH Sportgeräte bieten Ihnen hohe Qualität und neue Technologie. Um die Leistungsfähigkeit des Gerätes voll nutzen zu können und viele Jahre Freude an Ihrem Gerät zu haben, lesen Sie bitte vor der Inbetriebnahme und dem Beginn des Trainings dieses Benut- zerhandbuch sorgfältig durch und verwenden Sie das Gerät den Anweisungen entsprechend.
- Página 4 Aufbau, Benutzung, Abbau. 1. QR-Code scannen 2. Videos anschauen 3. Schnell und sicher starten Link zu den Videos: https://service.innovamaxx.de/bt300_video Uns gibt es auch auf Social Media! Hol dir die neuesten Produktinfos, Trainingsinhalte uvm. auf unserer: Instagram-Seite Facebook-Seite https://www.instagram.com/sportstech.de https://www.facebook.com/sportstech.de...
-
Página 5: Tabla De Contenido
INHALTSVERZEICHNIS 1. SICHERHEITSHINWEISE ..................6 2. EXPLOSIONSZEICHNUNG/ERSATZTEILLISTE .............. 7 3. REINIGUNG UND PFLEGE ..................8 4. MONTAGEANLEITUNG ..................... 8 5. BENUTZUNG ......................14 6. ENTSORGUNG ......................15... -
Página 6: Sicherheitshinweise
1. SICHERHEITSHINWEISE Diese allgemeinen Sicherheitshinweise sind bei der Verwendung dieses Produkts zu beachten. Lesen Sie alle Anweisungen, bevor Sie das Produkt benutzen. Bewahren Sie das Benutzerhandbuch an einem sicheren Ort auf, um im Bedarfsfall jederzeit darauf zurückgreifen zu können. Montieren Sie das Gerät entsprechend der Montageanleitung. Verwenden Sie nur die Einzelteile, welche zur Montage mitgeliefert wurden und in der Stückliste als speziell für dieses Gerät aufgeführt sind. -
Página 7: Explosionszeichnung/Ersatzteilliste
2. EXPLOSIONSZEICHNUNG/ERSATZTEILLISTE Unter folgendem Link Unter folgendem Link finden Sie die Explosionszeichnung finden Sie die Explosionszeichnung und die Ersatzteile-Liste: und die Ersatzteile-Liste: https://service.innovamaxx.de/bt300_spareparts https://service.innovamaxx.de/bt300_spareparts... -
Página 8: Reinigung Und Pflege
3. REINIGUNG UND PFLEGE A. Das Sicherheitsniveau des Gerätes kann nur beibehalten werden, wenn es regelmässig auf Schäden und Verschleiss untersucht wird, wie z. B. Seile, Rollen, Anschlussstellen. B. Tauschen Sie defekte Teile sofort und/oder benutzen das Gerät nicht bis zur Reparatur C. - Página 9 Schritt 1: Hauptrahmen (1) und hintere Stütze (4) mit Schraube zusammensetzen und diese mit den Werkzeugen (10) (15) festziehen. Schritt 2: Klappen Sie den Hauptrahmen (1) auf und legen Sie die langen Sperrstift (12) in den Hauptrahmen (1). Es gibt 5 verstellbare Löcher.
- Página 10 Schritt 3: Legen Sie den kurzen Sperrstift (11) wie unten abgebildet in eines der fünf Positionslöcher ein und befestigen Sie die Griffseile (9) am vorderen Stützrohr. Schritt 4: Befestigen Sie die Griffstange (3) am Hauptrahmen und ziehen Sie die lange Schraube (13) mit Werkzeug B (15) fest.
- Página 11 Schritt 5: Befestigen Sie die Schaumstützen (5) am Hauptrahmen (1). Schritt 6: Befestigen Sie die Plastikabdeckung B (8) am Hauptrahmen durch Verschrauben und Festziehen mit Werkzeug B (15).
- Página 12 Schritt 7: Befestigen Sie den Zähler (6) an der Griffstange (3) und schliessen das Display an.
- Página 13 Schritt 8: Befestigen Sie den U Knie Teil (3) am Hauptrahmen und ziehen Sie die kurze Schraube (13) mit Werkzeug B (15) fest. Befestigen Sie die Kunststoffabdeckung A (7) am Knie-Teil und setzen Sie den langen Sperrstift (12) in das Loch. Beenden Sie die Montage des Bauchtrainers.
-
Página 14: Benutzung
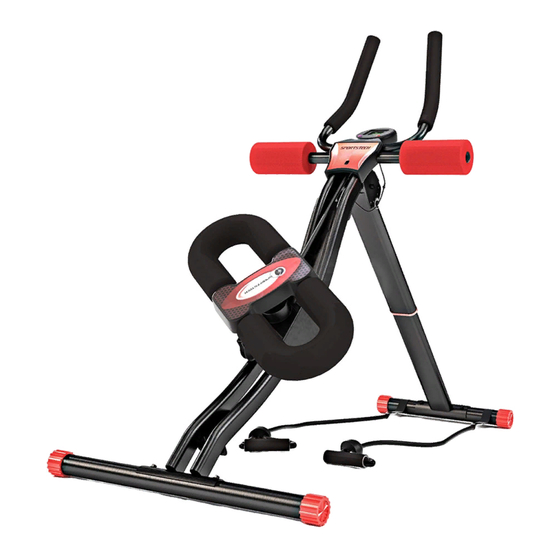
5. BENUTZUNG Hauptbauchmuskeltraining: Befestigen Sie das Kniehalterteil mit dem langen Sperrstift (12) in der mittleren Position. Setzen Sie Ihre Knie in das Kniehalterteil (2) und greifen Sie die Griffstange (3) mit Ihren Händen. Beachten Sie, dass das Kniehalterteil automatisch nach unten rutscht, wenn Sie Ihre Knie einsetzen. Jetzt können Sie beginnen, Ihren Körper zu heben, indem Sie die Beine bis zum Oberkörper schieben. -
Página 15: Entsorgung
6. ENTSORGUNG Recyclingkreislauf Verpackungsmaterialien können wieder dem Rohstoffkreislauf zugeführt werden. Entsorgen Sie die Verpackung gemäß den aktuellen Bestimmungen. Informationen erhalten Sie bei den Rückgabe- und Sammelsystemen Ihrer Gemeinde. C. Hinweise zur Entsorgung und Symbolik für ein Elektrogerät ohne Batterie: Hinweise zum Elektro- und Elektronikgerätegesetz (ElektroG) Wir weisen Besitzer von Elektro- und Elektronikaltgeräten darauf hin, dass Elektroaltgeräte gemäß... - Página 17 Dear customer, We are pleased you chose a device from the SPORTSTECH product range. SPORTSTECH sports equip- ment offers you high quality and new technology. In order to fully use the potential of your device and be able to enjoy it for many years, please read this manual carefully before starting up and beginning of training, and use the device according to the instruc- tions.
- Página 18 1. Scan the QR code 2. Watch videos 3. Start fast and safely Link to the videos: https://service.innovamaxx.de/bt300_video We are also on social media! Get the latest product information, training content and much more on our: Instagram-page Facebook-page https://www.instagram.com/sportstech.de https://www.facebook.com/sportstech.de...
- Página 19 TABLE OF CONTENTS 1. SAFETY INSTRUCTIONS ..................20 2. EXPLODED DRAWING/SPARE PARTS LIST ..............21 3. CARE AND MAINTENANCE ..................22 4. ASSEMBLY INSTRUCTION ..................22 5. HOW TO USE ......................28 6. DISPOSAL ......................29...
-
Página 20: Safety Instructions
1. SAFETY INSTRUCTIONS Before you start training, please make sure that you have read the whole user ma- nual, especially the safety notes, maintenance information and cleaning information. Make sure that everyone who is using the device has read this information. Please make sure that you strictly follow the safety information and maitenance information. -
Página 21: Exploded Drawing/Spare Parts List
2. EXPLODED DRAWING/SPARE PARTS LIST At the following link At the following link you will find the exploded drawing you will find the exploded drawing and the spare parts list: and the spare parts list: https://service.innovamaxx.de/bt300_spareparts https://service.innovamaxx.de/bt300_spareparts... -
Página 22: Care And Maintenance
3. CARE AND MAINTENANCE A. The safety level of the equipment can be maintained only if it is examined regularly for damage and wear ,e.g. ropes, pulleys, connection points. B. Replace defective components immediately and/or keep the equipment out of use until repair. C. - Página 23 Step 1: Fit together main frame (1) and back tube (4) by screw and tighten it by the tools (10) (15). Step 2: Unfold the main frame (1),and insert the long lock pin (12) into the main frame(1). There are 5 adjustable holes.
- Página 24 Step3: Insert the short lock pin (11) as below picture with five position hole, and set the handle ropes (9) to the front tube. Step 4: Lock the handle bar (3) into the main frame, and tighten the long screw (13) by the tool B (15)
- Página 25 Step 5: Insert the foam (5) to the main frame(1). Step 6: Lock the plastic cover B (8) to the main frame by screw and tighten it by the tool B (15)
- Página 26 Step 7: Insert the counter (6) into the handle bar(3),and connect the display line.
- Página 27 Step 8: Insert the U knee part (3) into the main frame,and tighten the short screw (13) by the tool B (15).put the plastic cover A (7) into the knee part, and insert the long lock pin (12) into the hole. Finish the installation of Twist Power Plank.
-
Página 28: How To Use
5. HOW TO USE Main Abdominal Training: Fix the knee holder part with the long lock pin (12) in the middle position. Put your knees inside the knee holder part (2) and grab the handle bar (3) with your hands. Note that you will slide down the rails automatically when putting your knees inside. -
Página 29: Disposal
6. DISPOSAL Recycling loop Packaging material can be conveyed back to the raw material cycle. Dispose of packaging material in accordance with legal provisions. Information can be retrieved from the return or collections systems of your community. C. Notes on Disposal of, and Symbols for, an Electrical Device without a Battery: Notes on the Electrical and Electronic Equipment Act (ElektroG) We would like to point out to owners of electrical and electronic equipment that, according to the applicable legal regulations, electrical devices must be disposed of separately from municipal waste. - Página 31 Estimado cliente, Nos complace que haya elegido un dispositivo de la línea de productos SPORTSTECH. Las máquinas de deporte de SPORTSTECH ofrecen una gran calidad y una tecnología innovadora. Con el fin de usar todo el potencial de su dispositivo y para que pueda disfrutarlo durante muchos años, por favor lea este manual cuidadosamente antes de comenzar a ejercitarse, y use el dispositivo de acuer- do a las instrucciones.
- Página 32 Montaje, Utilizar, Desmontaje. 1. Escanear el código QR 2. Ver vídeos 3. Comienza rápido y seguro Enlace a los videos: https://service.innovamaxx.de/bt300_video ¡También estamos en redes sociales! Obtenga la última información sobre nuestros productos, entrenamientos y mucho más aquí: Instagram Facebook https://www.instagram.com/sportstech.de https://www.facebook.com/sportstech.de...
- Página 33 CONTENIDO 1. PRECAUCIONES DE SEGURIDAD ................34 2. DIBUJO DE EXPLOSIÓN/LISTA DE REPUESTOS ............35 3. CUIDADO Y MANTENIMIENTO .................. 36 4. INSTRUCCIONES DE ENSAMBLAJE ................36 5. INSTRUCCIONES DE USO ..................42 6. DESECHO ......................43...
-
Página 34: Precauciones De Seguridad
1. PRECAUCIONES DE SEGURIDAD Antes de comenzar su entrenamiento, por favor asegúrese de haber leído la totalidad de este manual de usuario, en especial las indicaciones de seguridad, la información de mantenimiento y la información de limpieza. Asegúrese de que todos los que usen el dispositivo hayan leído la información. -
Página 35: Dibujo De Explosión/Lista De Repuestos
2. DIBUJO DE EXPLOSIÓN/LISTA DE REPUESTOS En el siguiente enlace En el siguiente enlace encontrarás el dibujo de explosión encontrarás el dibujo de explosión y la lista de repuestos: y la lista de repuestos: https://service.innovamaxx.de/bt300_spareparts https://service.innovamaxx.de/bt300_spareparts... -
Página 36: Cuidado Y Mantenimiento
3. CUIDADO Y MANTENIMIENTO A. El nivel de seguridad del equipo puede mantenerse únicamente si éste se revisa de manera regular en busca de daño y desgaste, por ejemplo, cables, poleas, puntos de conexión. B. Reemplace los componentes defectuosos inmediatamente y/o no utilice el equipo hasta repararlo. C. - Página 37 Paso 1: Una la estructura principal (1) y el tubo posterior (4) con los tornillos y apriete con las llaves (10) (15). Paso 2: Despliegue la estructura principal (1) e inserte el pin de bloqueo largo (12) en la estructura principal (1).
- Página 38 Paso 3: Inserte el pin de bloqueo corto (11) como se muestra en la imagen de abajo con 5 agujeros de posición, y ajuste las cuerdas (9) al tubo frontal. Paso 4: Asegure el manillar (3) en la estructura principal, y apriete los tornillos largos (13) con la llave B (15).
- Página 39 Paso 5: Inserte las espumas (5) en la estructura principal (1). Paso 6: Asegure la cubierta de plástico B (8) a la estructura principal con tornillos y apriétela con la llave B (15).
- Página 40 Paso 7: Inserte el contador (6) en el manillar (3), y conecte el cable.
- Página 41 Paso 8: Inserte la pieza en U (3) en la estructura principal y apriete los tornillos cortos (13) con la llave B (15). Ubique la cubierta plástica A (7) en la pieza en U e inserte el pin de bloqueo largo (12) en el agujero.
-
Página 42: Instrucciones De Uso
5. INSTRUCCIONES DE USO Entrenamiento abdominal estándar: Fije la pieza en U con el pin de bloqueo largo (12) en la posición central. Ponga sus rodillas dentro de la pieza en U (2) y agarre el manillar (3) con sus manos. Tenga en cuenta que deslizará los rieles automáticamente al poner sus rodillas adentro. -
Página 43: Desecho
6. DESECHO Reciclaje loop El material de empaque puede trasladarse de nuevo al ciclo de materias primas. Deshágase del material de empaque de acuerdo a las normativas legales. Puede encontrar información en los sistemas de recolección de su comunidad. Notas sobre la Ley sobre aparatos eléctricos y electrónicos (ElektroG) Quisiéramos señalar a los propietarios de aparatos eléctricos y electrónicos viejos que éstos deben desecarse por separado de los residuos municipales de con- formidad con las normas legales aplicables. - Página 45 FRANÇAIS Cher client, Nous sommes ravis que vous ayez choisi un appareil de la gamme de produits SPORTSTECH. Les équi- pements sportifs SPORTSTECH vous offrent une qualité élevée et une technologie innovante. Afin d'utiliser pleinement le potentiel de votre appareil et de pouvoir l'apprécier pendant de nombreuses années, lisez attentivement ce manuel avant l'utilisation et le début de votre entraînement et utilisez l'ap-...
- Página 46 3. Démarrez rapidement et en toute sécurité Lien vers les vidéos: https://service.innovamaxx.de/bt300_video Vous pouvez aussi nous trouver sur les réseaux sociaux! Retrouve les dernières informations sur les produits, le contenu des entraînements et bien plus encore sur notre: la page Instagram la page Facebook https://www.instagram.com/sportstech.de https://www.facebook.com/sportstech.de...
- Página 47 TABLE DES MATIÈRES 1. PRÉCAUTIONS DE SÉCURITÉ ................... 48 2. DESSIN ÉCLATÉ/LISTE DES PIÈCES DE RECHANGE ............ 49 3. ENTRETIEN ET MAINTENANCE ................. 50 4. INSTRUCTIONS DE MONTAGE .................. 50 5. MODE D‘EMPLOI ..................... 56 6. MISE AU REBUT ...................... 57...
-
Página 48: Précautions De Sécurité
1. PRÉCAUTIONS DE SÉCURITÉ Avant de commencer votre entraînement, veuillez vous assurer que vous avez lu le mode d‘emploi en entier, en particulier les consignes de sécurité, les informations de maintenance et les informations de nettoyage. Assurez-vous que cette information soit lue avant l’utilisation de l’appareil par quiconque. -
Página 49: Dessin Éclaté/Liste Des Pièces De Rechange
2. DESSIN ÉCLATÉ/LISTE DES PIÈCES DE RECHANGE A l‘adresse suivante A l‘adresse suivante vous trouverez le dessin éclaté vous trouverez le dessin éclaté et la liste des pièces de rechange : et la liste des pièces de rechange : https://service.innovamaxx.de/bt300_spareparts https://service.innovamaxx.de/bt300_spareparts... -
Página 50: Entretien Et Maintenance
3. ENTRETIEN ET MAINTENANCE A. Le niveau de l‘équipement de sécurité peut être maintenue que si elle est examinée régulièrement pour les dommages et l‘usure, e.g. des cordes, des poulies, des points de connexion. B. Remplacez les pièces défectueuses immédiatement et / ou n’utilisez pas l’appareil jusqu‘à ce qu’il soit réparé. - Página 51 Étape 1: Assemblez le cadre principal (1) et le tube arrière (4) par le vis et serrez les par les outils (10) (15). Étape 2: Dépliez le cadre principal (1), et insérez la tige longue de verrouillage (12) dans le cadre principal (1). Il y a 5 trous réglables.
- Página 52 Étape 3: Insérez la tige courte de verrouillage (11) comme présenté sur l’image cidessous avec cinq trous de position, et fixez les cordes de poignée (9) sur le tube avant. Étape 4: Verrouiller le guidon (3) dans le cadre principal , et serrer la vis longue (13) par l‘outil B (15).
- Página 53 Étape 5: Insérez l’écume (5) dans le cadre principal(1). Étape 6: Verrouiller le couvercle en plastique B (8) au cadre principal par un vis et serrez le par l‘outil B (15).
- Página 54 Étape 7: Insérez le compteur (6) dans le guidon (3), et connectez la ligne d‘affichage.
- Página 55 Étape 8: Insérez la partie U du genou (3) dans le cadre principal, et serrez le vis (13) par l‘outil B (15). Mettez le couvercle en plastique A (7) dans la partie du genou, et insérer la longue tige de verrouillage (12) dans le trou.
-
Página 56: Mode D'emploi
5. MODE D‘EMPLOI Principal entraînement abdominale: Fixez la partie de support du genou avec la longue goupille de verrouillage (12) en position médiane. Mettez vos genoux à l‘intérieur de la partie de support du genou (2) et saisissez le guidon (3) avec vos mains. -
Página 57: Mise Au Rebut
6. MISE AU REBUT Chaîne du recyclage Les matériaux d‘emballage peuvent être transportés vers le cycle des matières premières. La disposition des matériaux d‘emballage, conformément aux dispositions légales. Les informations peuvent être récupérées à partir des systèmes de retour ou de collections. Information relative à... - Página 59 ITALIANO Gentile cliente Siamo lieti che abbiate scelto un dispositivo della gamma SPORTSTECH. L'attrezzatura sportiva SPORT- STECH ti offre alta qualità e tecnologia innovativa. Per sfruttare a pieno il potenziale del dispositivo e poterlo utilizzare per molti anni, raccomandiamo di leggere attentamente questo manuale prima di iniziare l’allenamento e di utilizzare il dispositivo seguen-...
- Página 60 2. Guarda il video 3. Inizia ad allenarti veloce e sicuro Link per il Video: https://service.innovamaxx.de/bt300_video Ci siamo anche sui social! Scopri le ultime novità sui prodotti, contenuti per l'allenamento e molto altro ancora sul nostro: pagina Instagram pagina Facebook https://www.instagram.com/sportstech.de https://www.facebook.com/sportstech.de...
- Página 61 INDICE 1. PRECAUZIONI DI SICUREZZA ................... 62 2. DISEGNO ESPLOSO/LISTA DEI PEZZI DI RICAMBIO ............. 63 3. CURA E MANUTENZIONE ..................64 4. ISTRUZIONI DI MONTAGGIO ..................64 5. ISTRUZIONI PER LE OPERAZIONI ................70 6. SMALTIMENTO ....................... 71...
-
Página 62: Precauzioni Di Sicurezza
1. PRECAUZIONI DI SICUREZZA Prima di iniziare l’allenamento, assicurarsi di aver letto l’intero manuale d’uso, in particolare le indicazioni di sicurezza, di manutenzione e pulizia. Assicurarsi che tutti coloro che usano il dispositivo abbiano letto queste informazioni. Un uso improprio può causare rischi di possibili incidenti, danni alla salute o al dispositivo di allenamento. -
Página 63: Disegno Esploso/Lista Dei Pezzi Di Ricambio
2. DISEGNO ESPLOSO/LISTA DEI PEZZI DI RICAMBIO Al seguente link Al seguente link troverete il disegno esploso troverete il disegno esploso e la lista dei pezzi di ricambio: e la lista dei pezzi di ricambio: https://service.innovamaxx.de/bt300_spareparts https://service.innovamaxx.de/bt300_spareparts... -
Página 64: Cura E Manutenzione
3. CURA E MANUTENZIONE A.. Il livello di sicurezza dell‘apparecchio può essere mantenuto solo se si esamina regolarmente l’attrezzatura per danni e usura, ad es. corde, carrucole, punti di connessione. B. Sostituire immediatamente le parti difettose e/o non utilizzare l‘attrezzatura fino se non dopo la sua riparazione. - Página 65 Passo 1: Montare insieme il telaio principale (1) ed il tubo posteriore (4) avvitando e stringendo le viti con gli attrezzi (10) (15). Passo 2: Aprire il telaio principale (1), e inserire il perno di bloccaggio lungo (12) nel telaio principale (1). Ci sono 5 fori regolabili.
- Página 66 Passo 3: Inserire il perno di bloccaggio breve (11) come l’immagine sotto con i cinque fori di posizione, e fissare le corde del manico (9) al tubo anteriore. Passo 4: Bloccare il manubrio (3) nel telaio principale, e stringere la vite lunga (13) con l’attrezzo B (15).
- Página 67 Passo 5: Inserire i materiali isolanti (5) nel telaio principale(1). Passo 6: Bloccare la copertura in plastica B (8) al telaio principale avvitando e stringendo le viti con gli attrezzi (15).
- Página 68 Passo 7: Inserire il contatore (6) nel manubrio (3), e collegare il display.
- Página 69 Passo 8: Inserire la parte del ginocchio a U (3) nel telaio principale, e stringere la vite corta (13) con l’attrezzo B (15). Posizionare la copertura in plastica A (7) nella parte del ginocchio, e inserire il perno di loccaggio lungo (12) nel foro. Completare l‘installazione del Twist Power Plank.
-
Página 70: Istruzioni Per Le Operazioni
5. ISTRUZIONI PER LE OPERAZIONI Allenamento principale per gli addominali: Fissare la parte dell’alleggiamento del ginocchio con il perno di blocco lungo (12) in posizione centrale. Mettere le ginocchia all‘interno della parte dell’alloggiamento del ginocchio (2) e afferrare il manubrio (3) con le mani. Si prega di notare che si scivolerete lungo i binari automaticamente quando mettete le ginocchia all‘interno. -
Página 71: Smaltimento
6. SMALTIMENTO Riciclaggio dei rifiuti Il materiale di imballaggio può essere trasportato di nuovo al ciclo delle materie prime. Smaltire il materiale di imballaggio in conformità alle disposizioni di legge. Le informazioni possono essere recuperate dai sistemi di ritorno o di raccolta della vostra comunità. Avviso sulla legge degli apparecchi elettrici ed elettronici (ElektroG) Desideriamo far notare ai proprietari di vecchie apparecchiature elettriche ed elettroniche che le apparecchiature elettriche devono essere raccolte separatamente dai rifiuti urbani, in conformità... - Página 73 GEBRUIKSAANWIJZING NEDERLANDS Geachte klant, We zijn blij dat je een apparaat uit het SPORTSTECH-assortiment hebt gekozen. De sportuitrusting van SPORTSTECH brengt hoogwaardige apparaten met nieuwe technologieën. Lees vóór gebruik deze gebruikershandleiding aandachtig door en gebruik het apparaat zoals aangege- ven. Zo zul je ten volle van de prestaties van het apparaat kunnen profiteren en er vele jaren geniet van hebben.
- Página 74 1. Scan de QR-code 2. Bekijk video‘s 3. Begin snel en veilig Link naar de video's: https://service.innovamaxx.de/bt300_video We zijn ook actief op social media! Raadpleeg voor de meest recente productinformatie, trainingen en nog veel meer, onze: Instagram-pagina Facebook-pagina https://www.instagram.com/sportstech.de https://www.facebook.com/sportstech.de...
- Página 75 INHOUD 1. BELANGRIJKE VEILIGHEIDSINSTRUCTIES ..............76 2. EXPLOSIETEKENING/ONDERDELENLIJST ..............77 3. REINIGING EN ONDERHOUD ..................78 4. MONTAGE ......................78 5. GEBRUIK ........................ 84 6. VERWIJDERING ....................... 85...
-
Página 76: Belangrijke Veiligheidsinstructies
1. BELANGRIJKE VEILIGHEIDSINSTRUCTIES Deze algemene veiligheidsinformatie moet strikt worden nageleefd bij het gebruik van dit product. Lees alle instructies voordat je het product gebruikt. Bewaar de ge- bruikershandleiding op een veilige plaats zodat deze kan worden gebruikt wanneer dat nodig is. 1. -
Página 77: Explosietekening/Onderdelenlijst
2. EXPLOSIETEKENING/ONDERDELENLIJST Onder de volgende link Onder de volgende link vind je de explosietekening vind je de explosietekening en de reserveonderdelenlijst: en de reserveonderdelenlijst: https://service.innovamaxx.de/bt300_spareparts https://service.innovamaxx.de/bt300_spareparts... -
Página 78: Reiniging En Onderhoud
3. REINIGING EN ONDERHOUD A. Warschuwing! De veiligheid van het toestel kan alleen worden gehandhaafd als het regelmatig wordt gecontroleerd op schade en/of slijtage, zoals touwen, katrollen en aansluitpunten. B. Controleer en bevestig alle onderdelen voordat je het toestel in gebruik neemt. Vervang defecte onderdelen onmiddellijk en stop het gebruik tot het weer in perfecte staat is. - Página 79 Stap 1: Zet het hoofdframe (1) en de achterste steun (4) met een schroef samen en draai ze vast met het gereedschap (10) (15). Stap 2: Klap het hoofdframe (1) op en plaats de lange borgpen (12) in het hoofdframe (1). Er zijn 5 verstelbare gaten.
- Página 80 Stap 3: Steek de korte borgpen (11) in één van de vijf positiegaten zoals hieronder afgebeeld en bevestig de touwen (9) aan de voorste steunbuis. Stap 4: Bevestig de gripstang (3) aan het hoofdframe en draai de lange schroef (13) vast met gereedschap B (15).
- Página 81 Stap 5: Bevestig de schuimsteunen (5) aan het hoofdframe (1). Stap 6: Bevestig de plastic kap B (8) aan het hoofdframe door deze vast te schroeven en vast te zetten met gereedschap B (15).
- Página 82 Stap 7: Bevestig de teller (6) aan de gripstang (3) en sluit het display aan.
- Página 83 Stap 8: Bevestig het U-kniestuk (3) aan het hoofdframe en draai de korte schroef (13) vast met gereedschap B (15). Bevestig de plastic kap A (7) aan het kniestuk en steek de lange borgpen (12) in het gat. De buiktrainer is nu gemonteerd. LET OP: Sta na de training langzaam op om te voorkomen dat de elastische kracht terugveert.
-
Página 84: Gebruik
5. GEBRUIK Training van de hoofdbuikspieren: Bevestig het kniesteungedeelte met de lange borgpen (12) in de middelste stand. Plaats je knieën in de kniesteun (2) en pak de gripstang (3) vast met je handen. Je zult merken dat het kniesteungedeelte automatisch naar beneden glijdt als je je knieën erin zet. Nu kun je beginnen met het optillen van je lichaam door je benen tot aan je bovenlichaam te duwen. -
Página 85: Verwijdering
6. VERWIJDERING Recyclingcyclus Verpakkingsmaterialen kunnen worden teruggebracht in de grondstoffenkringloop. Voer de verpakking af volgens de geldende voorschriften. Informatie kan worden verkregen uit de retournerings- en ophaalsystemen van je gemeente. Informatie volgens de wet op elektrische en elektronische apparatuur (ElektroG - Duitse norm) We wijzen de eigenaren van elektrische en elektronische apparatuur erop dat oude elektrische apparatuur gescheiden van het gemeentelijk afval moet worden ingezameld volgens de geldende wettelijke voorschriften. - Página 86 Verkauf durch / Distributed by / Distribuido por / Distribué / Distribuito da / Verkoop via Sportstech Brands Holding GmbH Potsdamer Platz 11 10785 Berlin +49 30 220 663 569 http://www.sportstech.de...