Tabla de contenido
Publicidad
Idiomas disponibles
Idiomas disponibles
Enlaces rápidos
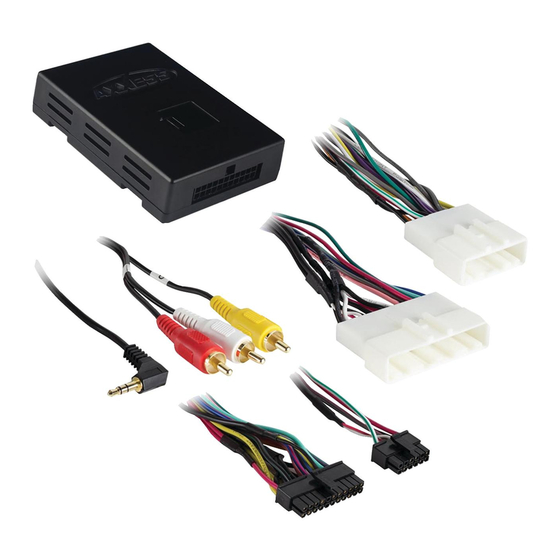
INTERFACE COMPONENTS
• NITO-01 interface
• NITO-01 harness
• 16-pin harness with stripped leads
• AX-CAM6V 12-volt to 6-volt converter
AxxessInterfaces.com
Maxima Amplifier Interface 2016-up
Nissan
Visit
AxxessInterfaces.com
for more detailed information about the product and up-to-date
vehicle specific applications
INTERFACE FEATURES
• Provides accessory power
(12-volt 10-amp)
• Retains the factory AUX-IN jack
• Provides NAV outputs (parking
• Used in amplified applications
brake, reverse, speed sense)
• Adjustable gain control for
• Pre-wired ASWC-1 harness
(ASWC-1 sold separately)
• High level speaker input
• Retains the factory backup
• Retains balance
camera
• Micro-B USB updatable
• Retains the audible parking
© COPYRIGHT 2018 METRA ELECTRONICS CORPORATION
I N S TA L L AT I O N I N S T R U C T I O N S
TABLE OF CONTENTS
Connections ............................................................2
Installation .............................................................3
Programming .........................................................3
Adjustments ...........................................................3
sensor warning
Extra Settings .........................................................4
overall volume
OPTIONAL ACCESSORIES
Steering Wheel Control Interface: ASWC-1
TOOLS REQUIRED
• Crimping tool and connectors, or solder gun,
solder, and heat shrink
• Tape • Wire cutter • Zip ties
Attention!
out of the ignition for a few minutes before
removing the factory radio. When testing the
aftermarket equipment, ensure that all factory
equipment is connected before cycling the
key to ignition.
NITO-01
(sold separately)
Let the vehicle sit with the key
REV. 11/19/18 INSTNITO-01
Publicidad
Capítulos
Tabla de contenido

Manuales relacionados para Metra AXXESS NITO-01


Resumen de contenidos para Metra AXXESS NITO-01
-
Página 1: Tabla De Contenido
• NITO-01 harness aftermarket equipment, ensure that all factory • 16-pin harness with stripped leads equipment is connected before cycling the key to ignition. • AX-CAM6V 12-volt to 6-volt converter AxxessInterfaces.com © COPYRIGHT 2018 METRA ELECTRONICS CORPORATION REV. 11/19/18 INSTNITO-01... -
Página 2: Connections
CONNECTIONS The following (3) wires are only for multimedia/navigation radios that require these wires. From the 16-pin harness with stripped leads to the aftermarket radio: • Connect the Blue/Pink wire to the VSS/speed sense wire. • Connect the Red wire to the accessory wire. • Connect the Green/Purple wire to the reverse wire. Note: If installing an ASWC-1 (sold separately), there will be an accessory wire on the NITO- 01 harness to connect as well. -
Página 3: Installation
INSTALLATION ADJUSTMENTS With the key in the off position: Audio level adjustment: • With the vehicle and radio turned on, turn the volume up 3/4 of the way. • Connect the 16-pin harness with stripped leads, and the NITO-01 harness, into the NITO-01 interface. • With a small flat-blade screwdriver, adjust the potentiometer clockwise to raise the audio level;... -
Página 4: Extra Settings
• The SEEK-UP and SEEK-DOWN buttons on the steering wheel will change the minutes. certified technicians • Pressing the PTT button will exit this process. Note: If 10 seconds elapses with no activity, this process will time out. AxxessInterfaces.com © COPYRIGHT 2018 METRA ELECTRONICS CORPORATION REV. 11/19/18 INSTNITO-01... - Página 5 • Arnés de 16 pins con conectores pelados todo el equipo de fábrica esté conectado antes de encender la llave de encendido. • AX-CAM6V 12 voltios al convertidor de 6 voltios AxxessInterfaces.com © COPYRIGHT 2018 METRA ELECTRONICS CORPORATION REV. 11/19/18 INSTNITO-01...
-
Página 6: Conexiones
CONEXIONES Los siguientes (3) cables son para radios de mercado secundario con multimedios/navegación Del arnés de 16 pins con conectores pelados al radio de mercado secundario: que tienen estos cables. • Conecte el cable rojo con el cable de accesorios. • Conecte el cable azul/rosa al cable VSS o de detección de velocidad. Nota: Si va a instalar el AX-LCD (se vende por separado), habrá... -
Página 7: Instalación
INSTALACIÓN AJUSTES Con la llave en la posición de apagado: Ajuste del nivel de audio: • Con el vehículo y el radio encendidos, aumente el volumen hasta 3/4 de su totalidad. • Conecte el arnés de 16-pins con conectores pelados, y el árnes NITO-01, a la interfase NITO-01. • Con un pequeño destornillador, ajuste el potenciómetro hacia la derecha para aumentar el nivel de audio y hacia la izquierda para disminuir el nivel de audio. -
Página 8: Configuraciones Adicionales
• Mientras el vehículo está en reversa, la cámara de reversa y la vista en 360 se mostrarán en la pantalla de la radio. Esto es generado por el con el soporte técnico de Metra / Axxess. propio vehículo; Un módulo de fábrica independiente controla la vista.