Tabla de contenido
Publicidad
Idiomas disponibles
Idiomas disponibles
Enlaces rápidos
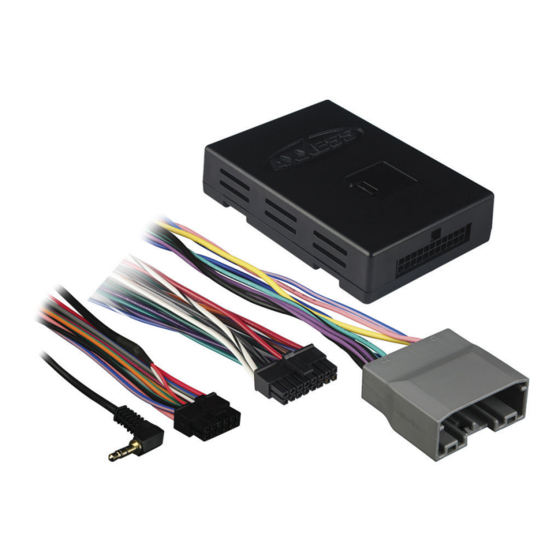
INTERFACE COMPONENTS
• AXTO-CH3 harness
• AXTO-CH3 interface
• 16-pin harness • 4-pin harness
APPLICATIONS
See inside front cover
AxxessInterfaces.com
Chrysler Data Interface 2007-Up
INTERFACE FEATURES
• Provides accessory power (12-volt 10 amp)
• Retains R.A.P. (retained accessory power)
• Used in amplified or non-amplified systems
• Provides NAV outputs (parking brake, reverse, speed sense)
• Pre-wired AXSWC harness (AXSWC sold separately)
• Adjustable gain control for overall volume (on amplified systems)
• Retains blind spot detection system (if equipped)
• High level speaker input
• Retains balance and fade
• Micro-B USB updatable
© COPYRIGHT 2020 METRA ELECTRONICS CORPORATION
AXTO-CH3
I N S T A L L A T I O N I N S T R U C T I O N S
TABLE OF CONTENTS
Application List ......................................................2
- For models without an amplifier .......................3
- For models with an amplifier .............................4
Installation .............................................................5
Programming .........................................................5
Audio Level Adjustment ........................................6
TOOLS & INSTALLATION ACCESSORIES REQUIRED
• Crimping tool and connectors, or solder gun,
solder, and heat shrink • Tape • Wire cutter
• Zip ties • Small flat-blade screwdriver
Product Info
REV. 1/23/20 INSTAXTO-CH3
Publicidad
Capítulos
Tabla de contenido

Manuales relacionados para Metra AXXESS AXTO-CH3


Resumen de contenidos para Metra AXXESS AXTO-CH3
-
Página 1: Tabla De Contenido
• Zip ties • Small flat-blade screwdriver • Micro-B USB updatable INTERFACE COMPONENTS • AXTO-CH3 harness Product Info • AXTO-CH3 interface • 16-pin harness • 4-pin harness APPLICATIONS See inside front cover AxxessInterfaces.com © COPYRIGHT 2020 METRA ELECTRONICS CORPORATION REV. 1/23/20 INSTAXTO-CH3... -
Página 2: Application List
APPLICATION LIST CHRYSLER DODGE JEEP MITSUBISHI 2011-2014 Avenger 2008-2014 Commander 2008-2010 Raider 2008-2009 2008-2010 Caliber 2009-2012 Compass 2009-2017.5 Aspen 2008-2009 Challenger 2008-2014 Grand Cherokee 2008-2013 1500/2500/3500 2012 Sebring 2007-2010 Charger 2008-2010 Liberty 2008-2012 Chassis Cab 3500/4500/5500 2012 Town and Country 2008-2017 Dakota 2008-2011... -
Página 3: Connections
CONNECTIONS For models without a factory amplifier: From the AXTO-CH3 harness to the aftermarket radio, connect the: • Black wire to the ground wire. From the 16-pin harness to the aftermarket radio, connect the: • Yellow wire to the battery wire. • Red wire to the accessory wire. • Blue wire to the power antenna wire. • Orange/White wire to the illumination wire (if applicable). •... -
Página 4: For Models With An Amplifier
CONNECTIONS For models with a factory amplifier: From the AXTO-CH3 harness to the aftermarket radio, connect the: • Black wire to the ground wire. From the 16-pin harness to the aftermarket radio, connect the: • Yellow wire to the battery wire. • Red wire to the accessory wire. • Blue wire to the power antenna wire. • Blue/White wire to the amp turn on wire. •... -
Página 5: Installation
INSTALLATION PROGRAMMING With the key in the off position: 1. Cycle the ignition on and wait until the radio comes on. 1. Connect the 16-pin harness, and the AXTO-CH3 harness, to the AXTO-CH3 interface. Note: If the radio doesn’t come on within 60 seconds, cycle the key off, then unplug the interface. -
Página 6: Audio Level Adjustment
AUDIO LEVEL ADJUSTMENT (amplified models only) 1. With the vehicle and radio turned on, turn the volume up 3/4 of the way. 2. With a small flat-blade screwdriver, adjust the potentiometer clockwise to raise the audio level; counterclockwise to lower the audio level. 3. - Página 7 REV. 1/23/2020 INSTAXTO-CH3...
- Página 8 Log onto www.installerinstitute.com or call 800-354-6782 for more information and take steps toward a better tomorrow. Metra recommends MECP certified technicians AxxessInterfaces.com © COPYRIGHT 2020 METRA ELECTRONICS CORPORATION REV. 1/23/20 INSTAXTO-CH3...
-
Página 9: Información Del Producto
• Actualizable por micro-B USB • Pequeño destornillador de cabeza plana COMPONENTES DE LA INTERFASE • Arnés AXTO-CH3 Información del producto • Interfase AXTO-CH3 • Arnés de 16 pins • Arnés de 4 pins APLICACIONES Lista de aplicaciones dentro AxxessInterfaces.com © COPYRIGHT 2020 METRA ELECTRONICS CORPORATION REV. 1/23/20 INSTAXTO-CH3... -
Página 10: Lista De Aplicaciones
LISTA DE APLICACIONES CHRYSLER DODGE JEEP MITSUBISHI 2011-2014 Avenger 2008-2014 Commander 2008-2010 Raider 2008-2009 2008-2010 Caliber 2009-2012 Compass 2009-2017.5 Aspen 2008-2009 Challenger 2008-2014 Grand Cherokee 2008-2013 1500/2500/3500 2012 Sebring 2007-2010 Charger 2008-2010 Liberty 2008-2012 Chassis Cab 3500/4500/5500 2012 Town and Country 2008-2017 Dakota 2008-2011... -
Página 11: Conexiones
CONEXIONES Para modelos sin amplificador: Desde el arnés AXTO-CH3 al radio de mercado secundario: • Cable negro al cable de tierra. Del arnés de 16 pins con conectores pelados al radio de mercado secundario, conecte el: • Cable rojo con el cable de accesorios. • Cable amarillo con el cable de la batería. • Cable anaranjado/blanco al cable de iluminación (si aplicable). • Cable azul de la antena de encendido. ¡Atención! Los siguientes (4) cables se invirtieron a propósito. -
Página 12: Para Modelos Con Amplificador
CONEXIONES Para modelos con amplificador: Desde el arnés AXTO-CH3 al radio de mercado secundario: • Cable negro al cable de tierra. Del arnés de 16 pins con conectores pelados al radio de mercado secundario, conecte el: • Cable rojo con el cable de accesorios. • Cable amarillo con el cable de la batería. • Conecte el cable azul/blanco al cable de encendido del amplificador. • Cable azul de la antena de encendido. •... -
Página 13: Instalación
INSTALACIÓN PROGRAMACIÓN Con la llave en la posición de apagado: 1. Encienda el encendido y espere hasta que se encienda la radio. 1. Conecte el arnés de 16 pins y el arnés AXTO-CH3 a la interfaz AXTO-CH3. Nota: Si la radio no se enciende en 60 segundos, apague la llave y luego desconecte la interfaz. -
Página 14: Ajuste De Nivel De Audio
AJUSTE DE NIVEL DE AUDIO (solo modelos amplificados 1. With the vehicle and radio turned on, turn the volume up 3/4 of the way. 2. With a small flat-blade screwdriver, adjust the potentiometer clockwise to raise the audio level; counterclockwise to lower the audio level. 3. - Página 15 REV. 1/23/2020 INSTAXTO-CH3...
- Página 16 800-354-6782 para obtener más información y avance hacia un futuro mejor. Metra recomienda técnicos con certificación del Programa de Certificación en Electrónica Móvil (Mobile Electronics Certification Program, MECP). AxxessInterfaces.com © COPYRIGHT 2020 METRA ELECTRONICS CORPORATION REV. 1/23/20 INSTAXTO-CH3...