Tabla de contenido
Publicidad
Idiomas disponibles
Idiomas disponibles
Enlaces rápidos
OWNER'S INSTRUCTION & SAFETY MANUAL
BICYCLE SEAT MANUAL
DASH® RM
IMPORTANT: READ CAREFULLY AND
KEEP FOR FUTURE REFERENCE
IMPORTANT : LISEZ ATTENTIVEMENT
CE DOCUMENT ET GARDEZ-LE POUR
RÉFÉRENCE FUTURE
IMPORTANTE: LEA ATENTAMENTE
ESTE MANUAL Y CONSÉRVELO PARA
FUTURAS CONSULTAS
重要 : 本書はよく お読みのうえ保管して
おいてく ださい。
Publicidad
Tabla de contenido

Manuales relacionados para Burley DASH RM


Resumen de contenidos para Burley DASH RM
- Página 1 OWNER’S INSTRUCTION & SAFETY MANUAL BICYCLE SEAT MANUAL DASH® RM IMPORTANT: READ CAREFULLY AND KEEP FOR FUTURE REFERENCE IMPORTANT : LISEZ ATTENTIVEMENT CE DOCUMENT ET GARDEZ-LE POUR RÉFÉRENCE FUTURE IMPORTANTE: LEA ATENTAMENTE ESTE MANUAL Y CONSÉRVELO PARA FUTURAS CONSULTAS 重要 : 本書はよく お読みのうえ保管して おいてく...
-
Página 2: Tabla De Contenido
Burley. Pour plus d’informations et si vous avez For questions and additional information, please contact your authorized Burley des questions, veuillez contacter votre dealer or visit www.burley.com. revendeur agréé Burley ou visiter le site internet www.burley.com. -
Página 3: Importante
Garantía limitada de Burley 重要 Importante 自転車用シートを使用する前に、 このバーリ Antes de usar su asiento de bicicleta, ーのマニュアルをよく理解してください。 質問 lea atentamente este manual de Burley. や追加情報については、 バーリーの正規販売 Si tiene cualquier pregunta o necesita 店にお問い合わせいただくか、 www.burley. información adicional, póngase en comをご覧ください。 contacto con su distribuidor autorizado... -
Página 4: Caution
CAUTION • WARNING! Failure to comply with the manufacturer’s instructions can lead to serious injury or death of the passenger/rider. • WARNING: Do not attach additional luggage to the child carrier. - Attaching additional luggage or accessories may exceed the load limit of the Bicycle Seat, and may lessen the stability (see page 15 for load limits). - Página 5 Seat Tube multiple times before securing the buckle. • Recommended maximum speed limits: - 15 mph (24 km/h) on smooth, straight roads - 5 mph (8 km/h) when turning or on uneven roads OWNER’S INSTRUCTION & SAFETY MANUAL BURLEY.COM...
-
Página 6: Compatibility
Compatibility • This Bicycle Seat must only be mounted to bicycles with racks that: - Comply with the ISO 11243 standard. - Load Capacity of Rack ≥ 55 lbs (25 kg) - Width of Rack: 4.72 - 6.89 in (120 - 175 mm) - Tubing Diameter of Rack: 0.39 - 0.63 in (10 - 16 mm) •... -
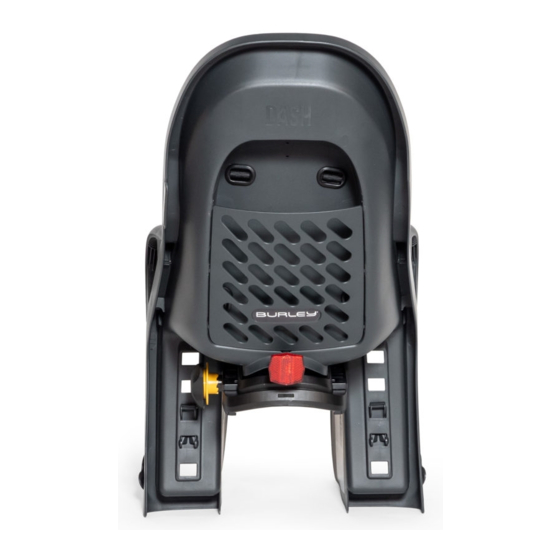
Página 7: Burley Bicycle Seat Guide
Burley Bicycle Seat Guide: 7. Rear Bracket 1. Harness 8. Center of Gravity Indicator 2. 5-Point Buckle 9. Serial Number Label 3. Safety Strap 10. Rack Mounting System 4. Footrest 11. Adjustment Knob 5. Rear Storage Compartment 12. Locking Ring 6. -
Página 8: Attaching The Bicycle Seat To Your Bicycle
Attaching the Bicycle Seat to Your Bicycle 1. Rotate the Adjustment Knob counter-clockwise [Figure 1] to open the Rack Clamp [Figure 2] until it is wider than the bicycle rack the Bicycle Seat will be attached to. 2. Place the Bicycle Seat on the bicycle rack and position it so that it is properly aligned according to the instructions for “Checking the Alignment of the Bicycle Seat”... -
Página 9: Checking The Alignment Of The Bicycle Seat
NOTE: Ensure the Bicycle Seat is mounted securely to the rack by following the instructions in the “Attaching the Bicycle Seat to your Bicycle” section (see Page 8) before proceeding to the next step. Figure 5 OWNER’S INSTRUCTION & SAFETY MANUAL BURLEY.COM... -
Página 10: Securing The Safety Strap
Securing the Safety Strap 1. Loop the Safety Strap around the Seat Tube and secure the buckle [Figure 6]. 2. Pull on the free end of the Safety Strap until it is tightly secured to the bicycle frame [Figure 7]. NOTE: Be careful to ensure that the free end of the Safety Strap is not able to come in contact with the wheel of the bicycle. -
Página 11: Securing The Child
Footrest height. 3. To remove the child, press the yellow release button on the 5-point harness [Figure 8a]. WARNING Avoid serious injury from falling or sliding out. Always use 5-point harness. Figure 8 Figure 9 OWNER’S INSTRUCTION & SAFETY MANUAL BURLEY.COM... -
Página 12: Adjusting The Footrests
Adjusting the Footrests The height of each footrest can be adjusted to 4 different positions to ensure the child is comfortable and safe: 1. Release each footrest from the Bicycle Seat by squeezing the rear tabs together [Figure 10a], and rotating the footrest up and away from the leg of the seat [Figure 10b]. 2. -
Página 13: Adjusting The Harness Position
NOTE: If you are adjusting from the upper harness position to the lower harness position, the Rear Bracket will need to be passed back through the slot in the seat pad before passing it through the lower harness adjustment hole. Figure 14 Figure 13 Figure 15 Figure 16 OWNER’S INSTRUCTION & SAFETY MANUAL BURLEY.COM... -
Página 14: Removing The Bicycle Seat From Your Bicycle
Removing the Bicycle Seat From Your Bicycle 1. Detach the Safety Strap by releasing the buckle. 2. Pull the Locking Ring towards the Adjustment Knob [Figure 17a] and rotate the Adjustment Knob counter-clockwise [Figure 17b] until the Rack Clamp is wider than the width of the bicycle rack [Figure 18]. -
Página 15: Before You Ride
Connect with Burley: Whether you ride your bike all year long or are a fair weather rider, Burley shares your enthusiasm for making the most of your bike. Thank you for your business. We appreciate it. -
Página 16: Burley Limited Warranty
Burley Limited Warranty: This Burley Bike Seat is warranted from the date of purchase against defects in materials and workmanship for 3 years. Your original dated sales or delivery receipt showing the date of purchase is your proof of purchase. - Página 17 OWNER’S INSTRUCTION & SAFETY MANUAL BURLEY.COM...
-
Página 18: Attention
ATTENTION • AVERTISSEMENT ! Le non-respect des instructions du fabricant peut entraîner des blessures graves, voire la mort du passager ou du conducteur. • AVERTISSEMENT : Ne fixez pas de bagages supplémentaires au siège-enfant. – La fixation de bagages ou d’accessoires supplémentaires peut dépasser la limite de chargement du siège-enfant et en réduire la stabilité... - Página 19 à travers la boucle. • Vitesses maximales recommandées : – 24 km/h (15 mph) sur les routes droites et plates – 8 km/h (5 mph) dans les virages et sur les routes accidentées INSTRUCTION DU PROPRIÉTAIRE ET MANUEL DE SÉCURITÉ BURLEY.COM...
-
Página 20: Compatibilité
Compatibilité • Ce siège-enfant ne doit être monté que sur des vélos, dont les porte-bagages : – Conforme à la norme ISO 11243. – Capacité de chargement du porte-bagage ≥ 25 kg (55 lb) – Largeur de porte-bagage 120 - 175 mm (4,72 - 6,89 po) –... -
Página 21: Guide Du Siège-Enfant Burley
Guide du siège-enfant Burley : 7. Support arrière 1. Harnais 8. Indicateur de centre de gravité 2. Boucle à 5 points 9. Étiquette du numéro de série 3. Sangle de sécurité 10. Baie de montage du porte-bagage 4. Repose-pied 11. Bouton d’ajustement 5. -
Página 22: Fixation De La Selle À Votre Vélo
Fixation de la selle à votre vélo 1. Tournez le bouton d’ajustement dans le sens inverse des aiguilles d’une montre [Figure 1] pour ouvrir la pince du porte-bagage [Figure 2] jusqu’à ce que son écartement soit plus large que le porte-bagage. -
Página 23: Vérification De L'alignement Du Siège-Enfant
REMARQUE : Assurez-vous que le siège-enfant est bien fixé au porte-bagage en suivant les instructions de la section « Fixation de la selle à votre vélo » (voir page 22) avant de passer aux étapes suivantes. Figure 5 INSTRUCTION DU PROPRIÉTAIRE ET MANUEL DE SÉCURITÉ BURLEY.COM... -
Página 24: Mise En Place De La Sangle De Sécurité
Mise en place de la sangle de sécurité 1. Enroulez la sangle de sécurité autour du tube de selle et attachez la boucle [Figure 6]. 2. Tirez sur l’extrémité libre de la sangle de sécurité jusqu’à ce qu’elle soit fermement arrimée au cadre de la bicyclette [Figure 7]. -
Página 25: Sécurisation De L'enfant
3. Pour sortir l’enfant du siège, appuyez simplement sur le bouton jaune d’ouverture du harnais à 5 points [Figure 8a]. AVERTISSEMENT Les chutes et glissades peuvent entraîner des blessures graves. Utilisez toujours un harnais à 5 points. Figure 8 Figure 9 INSTRUCTION DU PROPRIÉTAIRE ET MANUEL DE SÉCURITÉ BURLEY.COM... -
Página 26: Réglage Des Repose-Pieds
Réglage des repose-pieds La hauteur de chaque repose-pieds peut être réglée sur 4 positions différentes pour que votre enfant soit bien assis et en sécurité : 1. Libérez chaque repose-pied du siège-enfant en pressant les languettes arrière l’une contre l’autre [Figure 10a] tout en faisant tourner le repose-pied dans la direction opposée au support du siège [Figure 10 b]. -
Página 27: Ajustement De La Position Du Harnais
être passé dans la fente du rembourrage du siège avant de le passer par l’orifice de réglage inférieur du harnais. Figure 14 Figure 13 Figure 15 Figure 16 INSTRUCTION DU PROPRIÉTAIRE ET MANUEL DE SÉCURITÉ BURLEY.COM... -
Página 28: Retrait Du Siège-Enfant Du Vélo
Retrait du siège-enfant du vélo 1. Détachez la sangle de sécurité en relâchant la boucle. 2. Tirez l’anneau de verrouillage vers le bouton d’ajustement [Figure 17 a] et tournez le bouton d’ajustement dans le sens inverse des aiguilles d’une montre [Figure 17 b] jusqu’à ce que l’écartement de la pince du porte-bagage soit plus large que le porte-bagage [Figure 18]. -
Página 29: Avant D'utiliser Votre Produit
à tirer le meilleur parti de votre vélo. Nous apprécions l’intérêt que vous nous portez. burley.com Identification du produit : En cas de questions sur le nom ou l’année du modèle de votre produit Burley, veuillez consulter notre page Web d’identification de produit : burley.com/support/what-year-is-my-burley INSTRUCTION DU PROPRIÉTAIRE ET MANUEL DE SÉCURITÉ... -
Página 30: Garantie Limitée Burley
Garantie limitée Burley : Ce siège-enfant de Burley est garanti à partir de la date d’achat contre les défauts de matériaux et de fabrication pendant 3 ans. La date de l’achat d’origine indiquée sur le reçu daté constitue la preuve d’achat. - Página 31 INSTRUCTION DU PROPRIÉTAIRE ET MANUEL DE SÉCURITÉ BURLEY.COM...
-
Página 32: Precaución
PRECAUCIÓN • ADVERTENCIA El incumplimiento de las instrucciones del fabricante puede dar lugar a lesiones graves o a la muerte del pasajero o conductor. • ADVERTENCIA: No añada equipaje a la silla infantil. - Al añadir equipaje o accesorios, se puede exceder el límite de carga del asiento infantil y reducir su estabilidad (consulte los límites de carga en la página 43). - Página 33 • Límites máximos de velocidad recomendados: - 24 km/h (15 mph) en carreteras uniformes y rectas; - 8 km/h (5 mph) al girar o en carreteras con firme irregular. INSTRUCCIONES DEL PROPIETARIO Y MANUAL DE SEGURIDAD BURLEY.COM...
-
Página 34: Compatibilidad
Compatibilidad • Este asiento infantil debe instalarse únicamente en bicicletas con portabultos que: - cumplan la norma ISO 11243. - Capacidad de carga del portabultos ≥ 25 kg (55 lb) - Anchura del portabultos: 120-175 mm (4,72-6,89 in) - Diámetro de tubo del portabultos: 10-16 mm (0,39-0,63 in) •... -
Página 35: Guía De Asiento Infantil Burley
Guía de asiento infantil Burley: 7. Soporte trasero 1. Arnés 8. Indicador del centro de gravedad 2. Hebilla de 5 puntos 9. Etiqueta del número de serie 3. Cinta de seguridad 10. Sistema de montaje en el portabultos 4. Reposapiés 11. -
Página 36: Instalación Del Asiento Infantil En La Bicicleta
Instalación del asiento infantil en la bicicleta 1. Gire la perilla de ajuste en el sentido contrario a las agujas del reloj (Figura 1) para abrir la abrazadera del portabultos (Figura 2) hasta una anchura mayor que la del portabultos en el que se va a instalar el asiento infantil. -
Página 37: Comprobar La Alineación Del Asiento Infantil
NOTA: Asegúrese de que el asiento infantil está bien instalado en el portabultos según las instrucciones dadas en el apartado «Instalación del asiento infantil en la bicicleta» (consulte la página 36) antes de continuar con los pasos siguientes. Figura 5 INSTRUCCIONES DEL PROPIETARIO Y MANUAL DE SEGURIDAD BURLEY.COM... -
Página 38: Fijación De La Correa De Seguridad
Fijación de la correa de seguridad 1. Pase la correa de seguridad alrededor del tubo del sillín y asegure la hebilla (Figura 6). 2. Tire del extremo libre de la correa de seguridad hasta fijarla bien al cuadro de la bicicleta (Figura 7). -
Página 39: Colocación Segura Del Niño
3. Para sacar al niño, pulse el botón de liberación amarillo del arnés de 5 puntos (Figura 8a). ADVERTENCIA Evite lesiones graves por caídas o deslizamientos. Utilice siempre el arnés de cinco puntos. Figura 8 Figura 9 INSTRUCCIONES DEL PROPIETARIO Y MANUAL DE SEGURIDAD BURLEY.COM... -
Página 40: Ajuste De Los Reposapiés
Ajuste de los reposapiés Cada reposapiés tiene 4 alturas diferentes que pueden regularse para mejorar la comodidad y seguridad del niño: 1. Apriete las pestañas posteriores de cada reposapiés del asiento infantil para soltarlo (Figura 10a), gire y separe el reposapiés de la pata del asiento (Figura 10b). 2. -
Página 41: Ajuste De La Posición De Los Arneses
NOTA: Si lo que desea es regular el arnés de la posición superior a la inferior, deberá pasar el soporte trasero por la ranura del cojín del asiento antes de pasarlo por el orificio inferior de ajuste del arnés. Figura 14 Figura 13 Figura 15 Figura 16 INSTRUCCIONES DEL PROPIETARIO Y MANUAL DE SEGURIDAD BURLEY.COM... -
Página 42: Desinstalación Del Asiento Infantil De La Bicicleta
Desinstalación del asiento infantil de la bicicleta 1. Suelte la correa de seguridad soltando la hebilla. 2. Tire del anillo de bloqueo hacia la perilla de ajuste (Figura 17a) y gírela en sentido contrario a las agujas del reloj (Figura 17b) hasta que la abrazadera del portabultos tenga una anchura mayor que la del portabultos (Figura 18). -
Página 43: Antes De Circular Con La Bicicleta
Conecte con Burley: Tanto si monta en bicicleta todo el año como si lo hace solo con buen tiempo, Burley desea compartir su entusiasmo por sacar el máximo partido a su bicicleta. Gracias por su confianza. Nuestro más sincero agradecimiento. -
Página 44: Garantía Limitada De Burley
Garantía limitada de Burley: Este asiento de bicicleta Burley está garantizado desde la fecha de compra contra defectos en materiales y mano de obra durante 3 años.Como prueba de compra es necesario disponer de un recibo de compra o venta que muestre la fecha de adquisición. - Página 45 INSTRUCCIONES DEL PROPIETARIO Y MANUAL DE SEGURIDAD BURLEY.COM...
- Página 46 注意 • 警告 : メーカーの指示に従わなかった場合、 使用者/同乗者の重傷または死亡につながる恐れがあ ります。 • 警告 : チャイルドシートには荷物を載せないでください。 - 他の荷物やアクセサリを載せると、 自転車用シートの耐荷重を超え、 安定性が損なわれる可能性 があります (耐荷重については 57 ページ をご参照ください) - 他の荷物やアクセサリは自転車用シートとは反対の端に載せることをお勧めします (後ろ側の自 転車用シートを使用する場合は前側のキャリアを使用してください) 。 • 警告 : シートにお子様を乗せていると、 自転車が通常とは異なる動作をすることがあります。 - 自転車用チャイルドシートに重みが加わると、 安定性が損なわれ、 特にハンドル操作やブレーキ 操作など、 走行時の特質に変化が生じることがあります。 - 自転車用チャイルドシートを自転車に載せる場合、 自転車の乗り降りの仕方を調整しなければな らないことがあります。 自転車の乗り降りの際はご注意ください。 - 自転車に乗る際は、...
- Página 47 • お子様を自転車用シートに乗せるときは、 運転者よりも温かい服装をさせて、 雨から保護するように してください。 • お子様を乗せる前に自転車用シートが (直射日光などが原因で) 高温になっていないか確認してく ださい。 • 悪天候下や危険な状況下では絶対に使用しないでください。 • 十分な照明をつけずに絶対に夜間に自転車に乗らないでください。 • 自転車用シートからラックマウンティングシステムを取り外さないでください。 • 舗装されていない道を走行する場合、 自転車用シートの使用は控えることをお勧めします。 • 安全ストラップの端が車輪に触れないようにしてください。 必要に応じて、 バックルに通す前に余っ ているウェビング部分をシートチューブに数回巻き付けてください。 • 推奨制限速度 : - 平坦で真っすぐな道では 15 mph (24 km/時) - 曲がり角や平坦ではない道では 5 mph (8 km/時) 使用説明書・安全マニュアル 日本語 BURLEY.COM...
- Página 48 互換性 • この自転車用シートは、 必ず以下に当てはまるラックが付いた自転車に取り付けて ください。 - ISO 11243 規格適合 - ラックの耐荷重 ≥ 25 kg - ラックの幅 : 120~175 mm - ラックのチューブ直径10~16 mm • この自転車用シートは、 必ず以下に当てはまる車輪が付いた自転車に取り付けてく ださい。 26 インチ、 650B/27.5 インチ、 700C、 または29 インチ。 - ホイールのサイズが小さいカーゴバイクについては、 互換性を確認するために 製造元にご相談ください。 • この自転車用シートは以下には取り付けないでください。 - フルサスペンション自転車 - 原動機付き自転車...
-
Página 49: バーレー自転車用シートガイド
バーレー自転車用シートガイ ド : リアブラケッ ト 1. シートベルト 重心インジケーター 2. 5 点シートベルト シリアル番号ラベル 3. 安全ストラップ 10. ラックマウンティングシステム 4. フッ トレスト 11. 調節ノブ 5. リア収納用コンパートメント 12. ロッキングリング 6. 製品識別 13. ラッククランプ 使用説明書・安全マニュアル 日本語 BURLEY.COM... -
Página 50: 自転車に自転車用シートを取り付ける
自転車に自転車用シートを取り付ける 1. 調節ノブを反時計回りに回して [図 1]、 自転車用シートを取り付ける自転車ラックよりも 広くなるようにラッククランプを開きます [図 2]。 2. 自転車用シートを自転車ラックに載せて、 51 ページの 「自転車用シートの位置を確認す る」 の手順に従って適切な位置に取り付けます。 3. ラッククランプがラック周りにしっかりと固定されるまで [図 4a] 調節ノブを時計回りに回 します [図 3]。 ラッククランプがしっかりと自転車ラックチューブに固定されていることを 確認してください。 4. 自転車用シートがラックにしっかりと固定されるまで調節ノブを時計回りに回し続けま す。 注 : 調節ノブを最後まで回すと、 カチッとというロッキングリングの音が聞こえるはずです。 最後まできっちり締めることで、 ロッキングリングによって調節ノブが反時計回りに回るの を防ぐことができます [図 4b]。 図 図 図... -
Página 51: 自転車用シートの位置を確認する
自転車用シートの位置を確認する • 自転車用シートには重心インジケーターとして、 プラスチックシェルの外側にマークが付 いています [図 5a]。 • 重心インジケーターが必ず以下のいずれかにあるようにしてください。 - 自転車の後輪の車軸の前、 または - 自転車の後輪の車軸の後ろ 10 cm以内[図 5b] • 重心インジケーターが自転車の後輪の車軸の10cm以上後ろにある場合は、 自転車用シ ートが正確な位置にく るようにラックの前方向に動かしてください。 注 : 次の手順に進む前に、 「 自転車に自転車用シートを取り付ける」 のセクション (50 ペ ージ参照) の手順に従って、 自転車用シートをラックにしっかりと取り付けてください。 図 使用説明書・安全マニュアル 日本語 BURLEY.COM... -
Página 52: 安全ストラップを締める
安全ストラップを締める 1. 安全ストラップをシートチューブに巻き付けて、 バックルを固定します [図 6]。 2. 自転車のフレームにしっかりと固定されるまで安全ストラップの端を引っ張ります [図 7]。 注 : 注 : 安全ストラップの端が車輪に触れないようにしてください。 必要に応じて、 バック ルに通す前に余っているウェビング部分をシートチューブに数回巻き付けてください [図 7a]。 警告 自転車用シートを取り付けたら、 自転車のすべての部品が正常に機能するかどう かを確認してください。 図 図 図 自転車用チャイルドシート 日本語... -
Página 53: お子様を乗せる
トの各調節ポイントを緩めたり締めたり してぴったりとフィッ トさせます [図 8]。 2. 安全のため、 フッ トレストのストラップを使ってお子様の足を固定してください [図 9]。 ストラップがきつすぎず、 お子様が快適な状態であることを確認してください。 注 : フッ トレストの高さの調節方法については、 「 フッ トレストを調節する」 のセクション (54 ページ) をご覧ください。 3.お子様を降ろす際は、 5 点シートベルトの黄色のリリースボタンを押します [図 8a]。 警告 落ちたり滑り落ちたり しして怪我をしないように気を付けてください。 必ず 5 点シートベルトをご使 用ください。 図 図 使用説明書・安全マニュアル 日本語 BURLEY.COM... -
Página 54: フッ トレストを調節する
フッ トレストを調節する お子様にとって快適で安全な状態にするために、 フッ トレストの高さは 4 段階調節するこ とができます。 1. 後ろのタブを同時に押してフッ トレストが自転車用シートから離し [図 10a]、 フッ トレス トを上方向にシートの脚から離れるように上方向に回します [図 10b]。 2. フッ トレストを自転車用シートに再度取り付けるには、 シートの脚の適切な穴に上後ろ のフックをはめ込み [図 11a]、 後ろのタブがシートの脚の下の穴に入るまで [図 12]フッ トレストを下方向前側に回してシートに戻します [図 11b]。 注 : 快適性と安全のために、 フッ トレストの高さはお子様のひざが90度に曲がる高さに 設定してください。 図 図 図 自転車用チャイルドシート... -
Página 55: シートベルトの位置を調節する
1. 自転車用シートの後ろにあるリアブラケッ トに触れます [図 13]。 2. リアブラケッ トを横向きに回して、 シートベルトの下の調節穴に通して、 シートパッ ドに 差し込みます [図 14]。 3. リアブラケッ トをシートベルトの上の調節穴に通し、 回してリアシートの背にしっかりと 固定します [図 15]。 4. 残りのショルダーストラップにも手順 1~3 を繰り返します。 調節している間にシートベ ルトのストラップがよじれないように気を付けてください [図 16]。 注 : シートベルトの位置を上から下に調節する場合は、 リアブラケッ トをシートパッ ドに 差し込んでから、 下の調節穴に通してください。 図 図 図 図 使用説明書・安全マニュアル 日本語 BURLEY.COM... -
Página 56: 自転車から自転車用シートを取り外す
自転車から自転車用シートを取り外す 1. バックルを放して安全ストラップを取り外します。 2. 調節ノブに向かってロッキングリングを引っ張り [図 17a]、 ラッククランプがラックの幅 より広くなるまで [図 18] 調節ノブを反時計回りに回します [図 17b]。 3. 自転車用シートを自転車ラックから持ち上げて自転車から取り外します[図 19]。 図 図 図 自転車用チャイルドシート 日本語... -
Página 57: 自転車に乗る前に
さい。 - いずれかの部品が破損している場合は、 自転車用シート • 最高年齢 : 5歳* を使用しないでください。 *お子様の年齢に関係なく体重制限を超え - 破損している部品を交換してから自転車用シートをご使 ないようにしてください。 用ください。 破損 ・ 摩耗した部品の交換については、 バーレー正規販売店 までお問い合わせください。 バーレーをフォロー : 一 年中自転車に乗る方でも、 晴れた日に自転車を楽しむ方でも、 バーレーは自転車を存分に楽し めるようにお手伝いします。 この度は当社製品をお買い上げいただきありがとうございます。 心よ り感謝申し上げます。 burley.com 製品識別 : ご使用のバーレー製品のモデル名や製造年についてご質問がある場合は、 以下の製品識別のウェ ブページをご覧ください : burley.com/support/what-year-is-my-burley 使用説明書・安全マニュアル 日本語 BURLEY.COM... -
Página 58: バーレー限定保証
には、 重大な故障に対する交換または返金、 およびその他の合理的に予測可能な損失ま たは損害に対する補償を受ける権利があります。 また、 商品の品質が許容範囲外で、 その 故障が重大な故障にならない場合、 商品の修理または交換を受ける権利があります。 本限定保証は、 お客様に特定の法的権利を付与するものであり、 州または国によって異な る他の権利が与えられる場合があります。 米国またはカナダの保証サービスまたは交換部品については、 お電話 (800-311-5294) ま たはメール (burley@burley.com) でバーレーまで直接お問い合わせください。 米国または カナダ以外の国の保証サービスまたは交換部品については、 商品を購入された販売店に 保証サービスについてお問い合わせください。 お問い合わせの際は、 製品モデル、 シリア ル番号、 故障内容の説明をお手元にご用意ください。 交換部品の中には、 本限定保証期間後はお買い上げいただけないものもあります。 詳しく は、 www.burley.com をご覧いただくか、 お電話 (541-687-1644) でお問い合わせくださ い。 自転車用チャイルドシート 日本語... - Página 59 使用説明書・安全マニュアル 日本語 BURLEY.COM...
- Página 60 BURLEY.COM BURLEY DESIGN 1500 Westec Drive Eugene, OR 97402 P. 541.687.1644 or 800.423.8445 F. 541.687.0436 burley@burley.com ©2019 Burley Design LLC “Burley” is a registered trademark of Burley Design LLC 170620_02 (MAN0517)