Tabla de contenido
Publicidad
Idiomas disponibles
Idiomas disponibles
Enlaces rápidos
USER MANUAL
WIRELESS COLOR WEATHER STATION
WITH MOON PHASE
We thank you for your purchase of Baldr wireless color weather
station with moon phase.It has been designed and constructed
using innovative components and techniques to enable the
perfect display. Please read the instructions carefully to become
familiar with the properties and functions before you use the unit.
English
MODEL:B0359WST2H2PR-V1
(EU VERSION)
Deutsche
Français
Italiano
Español
Publicidad
Tabla de contenido
Solución de problemas

Manuales relacionados para BALDR B0359WST2H2PR-V1


Resumen de contenidos para BALDR B0359WST2H2PR-V1
- Página 1 (EU VERSION) WIRELESS COLOR WEATHER STATION WITH MOON PHASE We thank you for your purchase of Baldr wireless color weather station with moon phase.It has been designed and constructed using innovative components and techniques to enable the perfect display. Please read the instructions carefully to become familiar with the properties and functions before you use the unit.
- Página 2 CONTENTS English - - - - - - - - - - - - - - - - - - - - - - - - - - - - - - - - - - - - - - - - - - - 03 ~ 18 Deutsche - - - - - - - - - - - - - - - - - - - - - - - - - - - - - - - - - - - - - - - - - - - 19 ~ 36 Français - - - - - - - - - - - - - - - - - - - - - - - - - - - - - - - - - - - - - - - - - - - 37 ~ 54 Italiano...
-
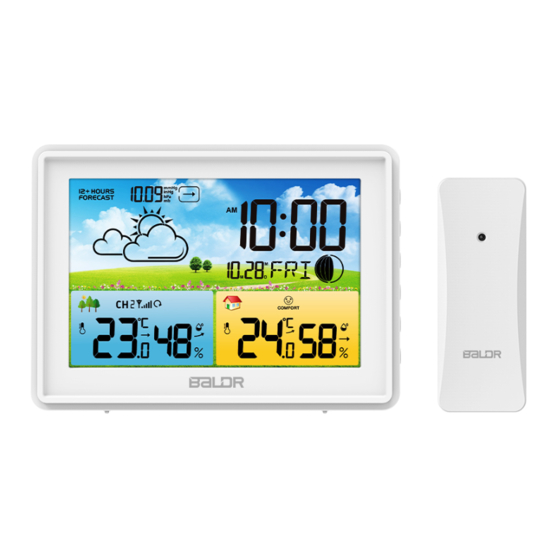
Página 3: Main Unit
OVERVIEW MAIN UNIT 1. Temperature and humidity 13. “ SET ” button of Channel 1/2/3 Switch C/F or enter into time 2. Max/min record of Channel setting 1/2/3 14. “ MEM ” button 3. Indoor temperature and Check or clear Max/min humidity record 4. - Página 4 5. Three comfort level Switch channel or clear sensors indication data and re-registration 6. Weather forecast 16. “ ▲” button Weather forecast for next Indoor temperature/humidity 12-24 hours and barometric calibration or 7. Barometric Pressure Increase the data Barometer display in mmHg, 17.
-
Página 5: Outdoor Sensor
WARNING: THIS PRODUCT CONTAINS A BUTTON-CELL BATTERY. IF SWALLOWED, IT COULD CAUSE SEVERE INJURY OR DEATH IN JUST 2 HOURS.SEEK MEDICAL ATTENTION IMMEDIATELY IF INGESTED. OUTDOOR SENSOR 1. Signal light 2. Hanging hole 3. Battery compartment 4. Channel 1-2-3 switch FEATURES •Clear color LCD display •DCF Radio controlled time... -
Página 6: Package Content
1 x AC Adaptor 1 x CR2032 Cell Battery 1 x User Manual GETTING START BALDR recommends high quality alkaline or lithium batteries for the best product performance. Heavy duty or rechargeable batteries are not recommended. MAIN UNIT INSTALLATION Remove the cell battery’s Insulating strip ,then plug the adaptor to a powered outlet. -
Página 7: Sensor Setup
SENSOR SETUP ● Switch the Channel 1-2-3 of the senor to any channel you want. For example, you can set to Channel 1 for the sensor. But please ensure the main unit are set to the same channel before synchronization. (Special note: Press “CH” button on the main unit to set the channel.The setting order is CH1--CH2--CH3--Channel scan (from CH1 to CH2 to CH3,10 seconds intervals),you must select the same number choices for both the sensor and the main... - Página 8 2. Once signal received, the main unit will display the received time/ month/date/weekday with symbol “ ” displaying on screen. 3. Daily RCC signal receiving: there are regular radio signal receiving at 1:00AM,2:00AM, 3:00AM, 4:00AM, 5:00AM each day. It starts receiving signal at 1:00AM everyday.
-
Página 9: Alarm Function
7. Press “ SET ” to select Minutes. Press “▲” or “ ▼/RCC ” button to adjust the value. 8. Press “ SET ” to select Year. Press “▲” or “ ▼/RCC ” button to adjust the value. 9. Press “ SET ” to select Month&Date display format. Default setting : D/M. -
Página 10: Snooze Function
5. During setting, touch top button to save and exit setting. 6. During setting, if no operation for 20 seconds, it will automatically save and exit setting. 7. The alarm is default ON after setting the alarm time. Alarm symbol will display on screen. - Página 11 4. Press and hold “MEM” button will clear the max and min record and reactivate the memory. 5. During setting, if no operation for 5 seconds, it will automatically save and exit setting. 6. Normally, the Max and Min record will update every 24 hours at 0:00.
-
Página 12: Barometric Pressure
reading will be “1%”;for humidity higher than 99%,the reading will be “99%”. 3. Accuracy: when the temperature is between 20℃~26℃(68℉~ 78.8℉) and the humidity is between 40-80%,the accuracy is ±5%, if out of this range the accuracy will be ±8%. 4. -
Página 13: Weather Forecast
0 ℃. MOON PHASE New Moon Waxing Crescent First Quarter Waxing Gibbous Full Moon Waning Gibbous Last Quarter Waning Crescent CALIBRATION Baldr weather stations were calibrated precisely at our manufacturing facility, but if you want the data of this product... - Página 14 to be consistent with the reading of the equipment you are more trusted or more used to, you can manually calibrate the indoor temperature, humidity and barometer values. 1. When in time display mode, press and hold “▲” button to enter Calibration mode.
-
Página 15: Troubleshooting
TROUBLE SHOOTING Problem Possible Solution Outdoor reading is Flashing of the outdoor reading is generally an flashing or showing indication of wireless interference. dashes 1. Bring both the sensor and display indoors, side by side and remove batteries from each. 2. - Página 16 If your BALDR product does not operate properly after trying the troubleshooting steps, please contact the seller on your order page or shoot an email to: service@baldr.com. PLACEMENT INSTRUCTION BALDR sensors are sensitive to surrounding environmental conditions. Proper placement of both the main unit and outdoor sensor are critical to the accuracy and performance of this product.
- Página 17 ● Please do not use other electrical products such as headphones or speakers operating on the same signal frequency. ● Neighbors using electrical devices operating on the same signal frequency can also cause interference. PRECAUTIONS ● Do not clean any part of the product with benzene, thinner or other solvent chemicals.
- Página 18 Warranty BALDR provides a 1-year limited warranty on this product against manufacturing defects in materials and workmanship. Warranty service can only be performed by our authorized service center. The original dated bill of sale must be presented upon request as proof of purchase to us, or our authorized service center.
- Página 19 ÜBERSICHT HAUPTEINHEIT 1. Temperatur und 14. “ MEM ” Taste Feuchtigkeit von Kanal 1/2/3 Max/min-Eintrag prüfen oder 2. Max/min Aufzeichnung von löschen Kanal 1/2/3 15. “ CH ” Taste 3. Raumtemperatur und Umschalten der C/F-, RCC- Raumluftfeuchtigkeit Funktion oder Erhöhen der 4.
- Página 20 5. Anzeige von drei 16. “ ▲” Taste Komfortstufen Innentemperatur / 6. Die Wettervorhersage Luftfeuchtigkeit und Wettervorhersage für die barometrische Kalibrierung nächsten 12-24 Stunden oder Erhöhen der Daten 7. Barometrischer Druck 17. “ ▼/RCC ” button Barometer-Anzeige in mmHg, RCC-Funktion oder die Daten inHg oder hPa/mb verringern 8.
- Página 21 Pluspol Aussuchen WARNUNG: DIESES PRODUKT ENTHÄLT EINE KNOPFZELLENBATTERIE. BEI VERSCHLUCKEN KANN ES IN NUR 2 STUNDEN ZU SCHWEREN VERLETZUNGEN ODER ZUM TOD FÜHREN. BEI VERSCHLUCKEN SOFORT EINEN ARZT AUFSUCHEN. SENSOR FÜR AUßEN...
- Página 22 1. Signalleuchte 2. Aufhängeloch 3. Batteriefach 4. Schalter Kanal 1-2-3 MERKMALE •Klarer Farb-LCD-Bildschirm •DCF Funkgesteuerte Zeit •Wettervorhersage für die nächsten 12-24 Stunden mit Barometer •Messungen von Feuchtigkeit und Temperatur (℃/℉) •bis zu 3 HF-Kanäle für Außensensoren (nur ein Sensor im Lieferumfang enthalten) •Max/Min-Aufzeichnung von Temperatur und Feuchtigkeit •Komfort-Level-Anzeige...
-
Página 23: Sensor-Installation
START ERHALTEN BALDR empfiehlt qualitativ hochwertige Alkali- oder Lithiumbatterien für die beste Produktleistung. Hochleistungsbatterien oder wiederaufladbare Batterien werden nicht empfohlen. INSTALLATION DER HAUPTEINHEIT Entfernen Sie den Isolierstreifen der Zellenbatterie und stecken Sie dann den Adapter in eine Steckdose. SENSOR-INSTALLATION 1. Entfernen Sie den Batteriefachdeckel;... - Página 24 wird blinken. Wenn innerhalb von 3 Minuten kein Signal empfangen wird, hört sie auf, das Außensignal zu empfangen. 2. Wenn sich die Haupteinheit außerhalb des 3-Minuten- Signalempfangsfensters befindet, müssen Sie die Taste " CH " drücken und gedrückt halten, um wieder in den Signalempfang zu gelangen.
- Página 25 empfangen wird, hört es an diesem Tag auf, das Signal zu empfangen. 4. Manueller Empfang: Halten Sie die Taste " ▼/RCC " gedrückt, um den RCC-Signalempfang aufzurufen. 5. Beim Empfang, keine Antwort, wenn Sie andere Tasten drücken, können Sie die Taste " ▼/RCC " drücken und gedrückt halten, um den RCC-Empfang zu beenden.
- Página 26 Standardeinstellung : 0. Drücken Sie die Taste “▲” oder “ ▼/RCC ”, um die Zeitzone von -12 H bis + 12 H zu wählen. 5. Drücken Sie " SET ", um 12/24H Zeitformat zu wählen. Standardeinstellung :24 H. Drücken Sie die Taste “▲” oder “ ▼/ RCC ”...
- Página 27 Einstellung zu speichern und zu beenden. 17. Wenn während der Einstellung 20 Sekunden lang keine Bedienung erfolgt, wird die Einstellung automatisch gespeichert und beendet. ALARMFUNKTION Einstellung der Alarmzeit 1. Drücken und halten Sie die Taste " ", um zur Einstellung der Weckzeit zu gelangen.
- Página 28 SCHLUMMERFUNKTION 1. Wenn der Alarm ertönt, drücken Sie eine beliebige andere Taste außer der oberen Taste, um den Alarm zu stoppen. Und der Alarm wird am nächsten Tag wieder losgehen. 2. Oder wenn der Wecker läutet, drücken Sie den oberen Knopf, um die Schlummerfunktion zu aktivieren.
- Página 29 TEMPERATUR 1. Nach dem Einschalten wird die Innentemperatur automatisch angezeigt, der Messwert wird alle 30 Sekunden aktualisiert und der Empfang des Außensignals beginnt, was maximal 3 Minuten dauert. 2. Anzeigebereich der Innentemperatur: -10℃~ 50.0℃(14℉~ 122℉); bei einer Temperatur unter -10℃ lautet die Anzeige: "LL.L"; bei einer Temperatur über +50℃...
- Página 30 wird angezeigt, wenn sich die Luftfeuchtigkeit innerhalb einer Stunde oder im Vergleich zum letzten Messwert um weniger als 5% r.F. ändert; wird angezeigt, wenn sich der Messwert innerhalb einer Stunde oder im Vergleich zum letzten Messwert um 5% r.F. erhöht. wird angezeigt, wenn der Messwert innerhalb einer Stunde oder im Vergleich zum letzten Messwert um 5% r.F.
- Página 31 Abnehmender Gibbous Letztes Quartal Abnehmender Halbmond KALIBRIERUNG Die Baldr-Wetterstationen wurden in unserer Produktionsstätte präzise kalibriert. Wenn Sie jedoch möchten, dass die Daten dieses Produkts mit den Messwerten der Geräte übereinstimmen, denen Sie eher vertrauen oder an die Sie eher gewöhnt sind, können Sie die Innentemperatur-,...
- Página 32 1. Wenn Sie sich im Zeitanzeigemodus befinden, Halten Sie die Taste “▲” gedrückt, um in den Kalibrierungsmodus zu gelangen. 2. Drücken Sie die Taste "SET" und lassen Sie sie wieder los, um zu bestätigen und zur nächsten Einstellung überzugehen: Innentemperatur →Raumfeuchtigkeit→ Barometer →Exit. 3.
-
Página 33: Fehlersuche
FEHLERSUCHE Problem Mögliche Lösung Die Außenablesung FlDas Blinken der Außenlesung ist im Allgemeinen blinkt oder zeigt ein Hinweis auf Funkstörungen. Bindestriche 1. Bringen Sie sowohl den Sensor als auch das Display nebeneinander ins Haus und entfernen Sie die Batterien von jedem. 2. - Página 34 Außentemperatur Erfassungsbereich, wird "LL.L" zur Anzeige auf dem Bildschirm angezeigt. Wenn Ihr BALDR-Produkt nach dem Ausprobieren der Fehlerbehebungsschritte nicht ordnungsgemäß funktioniert, gehen Sie bitte wie folgt vor Kontaktieren Sie den Verkäufer auf Ihrer Bestellseite oder senden Sie eine E-Mail an: service@baldr.com.
- Página 35 Wichtige Platzierungsrichtlinien ● Der Abstand zwischen Haupteinheit und Sender sollte mindestens 1,5 bis 2 Meter (5~6,5 Fuß) von Störquellen wie Computermonitoren oder Fernsehern entfernt sein. ● Um die Reichweite der drahtlosen Kommunikation zu maximieren, platzieren Sie die Geräte fernab von großen metallischen Gegenständen, dicken Wänden, Metalloberflächen oder anderen Objekten, die die drahtlose Kommunikation beeinträchtigen können.
- Página 36 GEWÄHRLEISTUNG BALDR gewährt auf dieses Produkt eine einjährige beschränkte Garantie gegen Herstellungsfehler in Material und Verarbeitung. Der Garantie-Service kann nur von unserer autorisierten Servicestelle durchgeführt werden. Der datierte Originalkaufvertrag ist auf Verlangen als Kaufnachweis bei uns oder unserer autorisierten Servicestelle vorzulegen.
-
Página 37: Unité Principale
VUE D'ENSEMBLE UNITÉ PRINCIPALE 1. Température et humidité du 13. Bouton "SET" canal 1/2/3 Changer de C/F ou entrer 2. Enregistrement max/min du dans la mise à l'heure canal 1/2/3 14. Bouton "MEM" 3. Température et humidité Vérifier ou effacer intérieures l'enregistrement Max/min 4. - Página 38 5. Indication des trois niveaux Effacer les données des de confor capteurs et réenregistrer 6. Prévisions météorologiques 16. Bouton “ ▲” Prévisions météorologiques Température / humidité pour les prochaines 12-24 intérieure et étalonnage heures barométrique ou augmenter 7. Pression barométrique les données Affichage du baromètre en 17.
-
Página 39: Capteur Extérieur
Pôle Choisir positif AVERTISSEMENT : CE PRODUIT CONTIENT UNE PILE BOUTON. SI ELLE EST AVALÉE, ELLE PEUT CAUSER DES BLESSURES GRAVES OU LA MORT EN SEULEMENT 2 HEURES. EN CAS D'INGESTION, CONSULTEZ IMMÉDIATEMENT UN MÉDECIN. CAPTEUR EXTÉRIEUR... -
Página 40: Contenu Du Paquet
1. Feu de signalisation 2. trou de suspension 3. compartiment à piles 4. interrupteur du canal 1-2-3 FEATURES •Un écran LCD aux couleurs claires •DCF Heure radio contrôlée •Prévisions météorologiques pour les 12-24 prochaines heures avec baromètre •Mesures de l'humidité et de la température (℃/℉) •Jusqu'à... -
Página 41: Pour Commencer
POUR COMMENCER BALDR recommande des piles alcalines ou au lithium de haute qualit é pour obtenir les meilleures performances du produit. Les piles lourdes ou rechargeables ne sont pas recommand ées. INSTALLATION DE L'UNITÉ PRINCIPALE Retirez la bande isolante de la pile, puis branchez l'adaptateur à une prise de courant. - Página 42 2. Si l'unité principale est hors de la fenêtre de réception du signal de 3 minutes, vous devez appuyer et maintenir le bouton “CH” pour entrer à nouveau dans la réception du signal. INSTALLATION DE L'UNITÉ PRINCIPALE Lors de la mise sous tension ou de la réinitialisation, l'écran LCD s'affiche à...
- Página 43 boutons, vous pouvez appuyer et maintenir le bouton " ▼/RCC " pour quitter la réception RCC. Affichage du symbole RCC : a. Lors de la réception du signal, le symbole RCC " " clignote avec "1HZ". b. Lorsque le signal est reçu avec succès, l'écran LCD affiche le symbole RCC complet "...
- Página 44 8. Appuyez sur " SET " pour sélectionner l'année. Appuyez sur le bouton “▲” or “ ▼/RCC ” pour ajuster la valeur. 9. Appuyez sur " SET " pour sélectionner le format d'affichage du mois et de la date. Réglage par défaut : D/M. Appuyez sur le bouton “▲”...
-
Página 45: Fonction De Répétition (Snooze)
2. Appuyez sur le bouton “▲” or “ ▼/RCC ” pour ajuster les données; maintenez le bouton “▲” or “ ▼/RCC ” enfoncé pour changer rapidement les valeurs par 8 étapes. 3. L'ordre de réglage est le suivant : Heure → Minute→Intervalle de répétition →... -
Página 46: Directives De Fonctionnement
3. Lorsque l'alarme sonne, le son de l'alarme ascendante "Bibi" dure 2 minutes si elle ne fonctionne pas. DIRECTIVES DE FONCTIONNEMENT ENREGISTREMENT MAX ET MIN 1. Appuyez sur le bouton "MEM" pour vérifier la température et l'humidité maximales, la valeur s'affiche pendant 5 secondes. 2. - Página 47 4. Indication par des flèches des changements de température : s'affiche lorsque la température change moins que 1℃ dans l'heure qui suit ou par rapport à la dernière lecture ; s'affiche lorsque la lecture augmente par 1℃ dans l'heure qui suit ou par rapport à...
-
Página 48: Pression Barométrique
PRESSION BAROMÉTRIQUE 1. Gamme de baromètre : 850-1050 hPa/mb (646-798 mmHg,25.1- 31 inHg ). 2. Flèche indiquant les changements de pression barométrique: s'affiche lorsque la pression change de moins de 2 hPa dans les trois heures ou par rapport à la dernière lecture. s'affiche lorsque la pression augmente de 2 hPa dans les trois heures ou par rapport à... -
Página 49: Moon Phase
Pleine Lune décroissante CALIBRAGE Les stations météorologiques de Baldr ont été calibrées avec précision dans notre usine de fabrication, mais si vous souhaitez que les données de ce produit soient cohérentes avec la lecture de l'équipement auquel vous êtes plus habitué... - Página 50 4. Plage d'étalonnage de la température intérieure: ± 5 ℃; Plage d'étalonnage de l'humidité intérieure: ± 10% HR; Plage d'étalonnage du baromètre: ± 10 hPa. 5. Pendant le réglage, vous pouvez appuyer sur le bouton “MEM” pour effacer toutes les valeurs de correction. 6.
- Página 51 à la plage de détection, "LL.L" la température s'affiche à l'écran pour indication. extérieure Si votre produit BALDR ne fonctionne pas correctement après avoir essayé les étapes de dépannage, veuillez contactez le vendeur sur votre page de commande ou envoyez un courriel à : service@baldr.com.
-
Página 52: Instruction De Placement
INSTRUCTION DE PLACEMENT Les capteurs BALDR sont sensibles aux conditions ambiantes. L'emplacement correct de l'unité principale et du capteur extérieur est essentiel à la précision et à la performance de ce produit. Placement de l'unité principale Placez l'appareil principal dans un endroit sec,exempt de poussière et de saleté. - Página 53 GARANTIE BALDR offre une garantie limitée de 1 an sur ce produit contre les défauts de fabrication du matériel et de la fabrication. Le service de garantie ne peut être effectué que par notre centre de service agréé.
- Página 54 à l'installation. Pour bénéficier du service de garantie, l'acheteur doit contacter le centre de service désigné par BALDR pour la détermination du problème et la procédure de service. Merci pour votre choix des produits BALDR!
-
Página 55: Unità Principale
SOMMARIO UNITÀ PRINCIPALE 1. Temperatura e Umidità del 13. Pulsante “ SET ” Canale 1/2/3 Interruttore C/F o entrare 2. Registrazione max/min del nell'impostazione dell'ora Canale 1/2/3 14. Pulsante “ MEM ” 3. Temperatura e umidità Controllare o cancellare le interna registrazioni di Max/min 4. - Página 56 5. Indicazione di tre livelli di Cancellare i dati dei sensori comfort e ripetere la registrazione 6. Previsioni del tempo 16. Pulsante “ ▲” Previsioni del tempo per le Temperatura / umidità interna prossime 12-24 ore e calibrazione barometrica o 7.
-
Página 57: Sensore Esterno
Polo Togliere positivo ATTENZIONE: QUESTO PRODOTTO CONTIENE UNA BATTERIA A BOTTONE. SE VIENE INGERITA, POTREBBE CAUSARE GRAVI LESIONI O LA MORTE IN SOLE 2 ORE. IN QUESTO CASO, RIVOLGERSI IMMEDIATAMENTE AD UN MEDICO. SENSORE ESTERNO... -
Página 58: Caratteristiche
1. Luce di segnalazione 2. Foro per appendere 3. Vano batteria 4. Interruttore di canale 1-2-3 CARATTERISTICHE • Schermo LCD a colori • Orologio radiocontrollato DCF • Previsioni del tempo per le prossime 12-24 ore con barometro • Misure per l'umidità e la temperatura interna ed esterna (℃/℉) •... -
Página 59: Installazione Dell'unità Principale
INIZIO BALDR consiglia di utilizzare batterie alcaline o agli ioni di litio di alta qualità per garantire la massima prestazione del prodotto. Si sconsiglia l'uso di batterie ricaricabili o ad alta resistenza. INSTALLAZIONE DELL'UNITÀ PRINCIPALE Rimuovere la striscia isolante della batteria, inserire l'adattatore in una presa di corrente. - Página 60 2. Se l'unità principale è fuori dalla finestra di ricezione del segnale di 3 minuti, è necessario premere e tenere premuto il pulsante “CH ” per accedere nuovamente alla ricezione del segnale. IMPOSTAZIONE DELL'UNITÀ PRINCIPALE Al momento dell'accensione o in fase di ripristino, lo schermo LCD si illumina per 3 secondi con il suono "BI".
- Página 61 * Visualizzazione del simbolo RCC: a. Quando si riceve il segnale , l'icona “ ” lampeggerà con “1HZ”. b. Quando il segnale viene ricevuto con successo, il display LCD mostrerà l'icona RCC “ ” completa e uscirà dalla ricezione RCC. c.
-
Página 62: Funzione Di Allarme
8. Premere “ SET ” per selezionare Anno. Premere il pulsante “▲” oppure “▼/RCC” per regolare il valore. 9. Premere " SET " per selezionare il formato di visualizzazione Mese e Data. Impostazione predefinita: G/M. Premere il pulsante “▲” oppure “▼/RCC” per selezionare il formato M/G o G/M. (M: Mese , G: Giorno) 10. -
Página 63: Funzione Snooze
2. Premere il pulsante “▲” o “▼/RCC” per regolare i dati; tenere premuto il pulsante “▲” o “▼/RCC” per cambiare rapidamente i valori di 8 passi. 3. L'ordine di impostazione è: Ora → Minuti → Tempo intervallo Snooze →Uscire. 4. Intervallo di posticipo: è possibile impostare 5 ~ 60 minuti, impostazione predefinita: 5 minuti. - Página 64 3. Quando l'allarme stia suonando, il suono crescente dell'allarme "Bibi" durerà per 2 minuti se non viene eseguita alcuna operazione. LINEE GUIDA PER IL FUNZIONAMENTO REGISTRAZIONE DEI MASSIMI E DEI MINIMI 1. Premere il pulsante "MEM" per controllare la temperatura e l'umidità...
- Página 65 4. Freccia di segnalazione per le variazioni di temperatura: verrà visualizzata quando la temperatura cambia meno di 1℃ entro un'ora o rispetto all'ultima lettura; verrà visualizzato quando la lettura aumenta di 1℃ entro un'ora o rispetto all'ultima lettura. verrà visualizzato quando la lettura diminuisce di 1℃ entro un'ora o rispetto all'ultima lettura.
-
Página 66: Pressione Barometrica
PRESSIONE BAROMETRICA 1. Range del barometro: 850-1050 hPa/mb (646-798 mmHg, 25.1-31 inHg ). 2. Indicazione della freccia per i cambiamenti della pressione atmosferica: verrà visualizzato quando la pressione cambia di meno di 2 hPa entro tre ore o rispetto all'ultima lettura. verrà... -
Página 67: Moon Phase
Pericolo crescente Luna piena CALIBRAZIONE Le stazioni meteorologiche Baldr sono state calibrate con precisione presso il nostro stabilimento di produzione, ma se si desidera che i dati di questo prodotto siano coerenti con la lettura delle apparecchiature a cui si è più abituati, è possibile calibrare manualmente i valori di temperatura interna, umidità... - Página 68 4. Intervallo di calibrazione della temperatura interna: ± 5 ℃; Intervallo di calibrazione dell'umidità interna: ± 10% RH; Intervallo di calibrazione del barometro: ± 10 hPa. 5. Durante l'impostazione, è possibile premere il pulsante "MEM" per cancellare tutti i valori di correzione. 6.
- Página 69 "LL.L". Se il prodotto BALDR non funziona correttamente dopo aver provato le fasi di risoluzione dei problemi, si prega di contattare il venditore sulla pagina dell'ordine o di inviare un'e-mail a: service@baldr.com.
- Página 70 ISTRUZIONI PER IL COLLOCAMENTO I sensori BALDR sono sensibili alle condizioni ambientali circostanti. Il corretto posizionamento sia dell'unità principale che del sensore esterno è fondamentale per la precisione e le prestazioni di questo prodotto. Posizionamento dell'unità principale Posizionare l'unità principale in un'area asciutta e priva di sporco e polvere.
- Página 71 è necessario, per un trattamento speciale, l'immondizia. GARANZIA BALDR offre una garanzia limitata di 1 anno su questo prodotto contro i difetti di materiale e produzione. Il servizio di garanzia può essere effettuato solo dal nostro centro di assistenza.
- Página 72 Per ricevere il servizio di garanzia, l'acquirente deve contattare il servizio designato da BALDR per l'identificazione del problema e la procedura in servizio. Grazie per aver scelto i prodotti BALDR!
-
Página 73: Unidad Principal
GENERALIDADES UNIDAD PRINCIPAL 1. Temperatura y humedad 14. Botón “ MEM ” del canal 1/2/3 Comprobar o borrar el 2. Registro máx./mín. del registro de máx./mín. canal 1/2/3 15. Botón “ CH ” 3. Temperatura y humedad Borrar los datos de los interior sensores y volver a 4. - Página 74 5. Tres indicaciones de nivel 16. Botón “ ▲” de confort Temperatura / humedad 6. Pronóstico del tiempo interior y calibración Pronóstico del tiempo para barométrica o aumentar los las próximas 12-24 horas datos 7. Presión Barométrica 17. Botón “ ▼/RCC ” Visualización del barómetro función RCC o disminuir los en mmHg, inHg o hPa/mb...
-
Página 75: Sensor Exterior
Polo Sacar positivo ADVERTENCIA: ESTE PRODUCTO CONTIENE UNA PILA DE BOTÓN. SI SE INGIERE, PUEDE CAUSAR LESIONES GRAVES O LA MUERTE EN SOLO 2 HORAS. SOLICITE ATENCIÓN MÉDICA INMEDIATAMENTE EN CASO DE INGESTIÓN. SENSOR EXTERIOR... -
Página 76: Características
1. Luz de señal 2. Agujero para colgar 3. Compartimento de la batería 4. Interruptor del canal 1-2-3 CARACTERÍSTICAS • Pantalla LCD a color nítido • Reloj radiocontrolado DCF • Pronóstico del tiempo para las próximas 12-24 horas con barómetro •... -
Página 77: Instalación De La Unidad Principal
INICIO BALDR recomienda pilas alcalinas o de litio de alta calidad para obtener un mejor rendimiento del producto. No se recomienda el uso de pilas recargables o de alta potencia. INSTALACIÓN DE LA UNIDAD PRINCIPAL Retire la tira aislante de la batería y conecte el adaptador a la corriente eléctrica. -
Página 78: Configuración De La Unidad Principal
2. Si la unidad principal no tiene una ventana de recepción de señal de 3 minutos, deberá mantener pulsado el botón “CH ” para volver a recibir la señal. CONFIGURACIÓN DE LA UNIDAD PRINCIPAL Cuando se encienda o se restablezca, la pantalla LCD se iluminará... -
Página 79: Configuración Manual
5. Durante la recepción, no sucederá nada si presiona otros botones, presione y mantenga presionado el botón “ ▼/RCC” para salir de la recepción RCC. * Visualización del símbolo RCC: a. Al recibir la señal, el símbolo RCC “ ” parpadeará con “1HZ”. b. - Página 80 7. Presione " SET " para seleccionar Minutos. Presione el botón “▲” o “ ▼/RCC” para ajustar el valor. 8. Presione " SET " para seleccionar Año. Presione el botón “▲” o “ ▼/RCC” para ajustar el valor. 9. Presione " SET " para seleccionar el formato de visualización de Mes y Fecha.
-
Página 81: Función De Alarma
FUNCIÓN DE ALARMA Configuración de la Hora de la Alarma 1. Presione y mantenga presionado el botón “ ” para entrar en la configuración de la hora de la alarma. 2. Presione el botón “▲” o “ ▼/RCC” para ajustar los datos; si mantiene presionado el botón “▲”... -
Página 82: Pautas De Funcionamiento
2. O cuando la alarma esté sonando, pulse el botón superior para activar la función de repetición de alarma. La alarma volverá a sonar en el intervalo de repetición como lo configuró antes. Y el símbolo “ ” parpadeará en la pantalla para indicar el modo de repetición. - Página 83 2. Rango de visualización de la temperatura interior:-10℃ ~ 50.0℃ (14℉ ~ 122℉ ); para una temperatura inferior a -10℃ , la lectura será: “LL.L”; para una temperatura superior a +50℃, la lectura será: “HH.H". 3. Rango de visualización de la temperatura exterior: -40℃ ~60℃ (-40℉...
-
Página 84: Presión Barométrica
se mostrará cuando la humedad cambie a menos del 5% RH en una hora o comparado con la última lectura; se mostrará cuando la lectura aumente un 5% RH en una hora o comparado con la última lectura. se mostrará cuando la lectura disminuya un 5% RH en una hora o comparado con la última lectura. -
Página 85: Alerta De Helada
Creciente menguante Luna llena CALIBRACIÓN Las estaciones meteorológicas de Baldr fueron calibradas con precisión en nuestra planta de fabricación, pero si desea que los datos de este producto sean coherentes con la lectura del equipo en el que más confía o al que está más... -
Página 86: Luz De Fondo Ajustable
acostumbrado, puede calibrar manualmente los valores de temperatura, humedad y presión barométrica interiores. 1. Estando en el modo de visualización de la hora,presione y mantenga presionado el botón “▲ ” para ingresar al modo de calibración. 2. Pulse y suelte el botón "SET" para confirmar y pasar al siguiente ajuste: Temperatura interior →... -
Página 87: Resolución De Problemas
RESOLUCIÓN DE PROBLEMAS Problema Posible Solución Durante la lectura El parpadeo durante la lectura al aire libre es exterior parpadea generalmente una indicación de interferencias o muestra guiones inalámbricas. 1. Lleve el sensor y la pantalla al interior, uno al lado del otro y retire las baterías de cada uno. -
Página 88: Instrucción De Colocación
"LL.L" interior y/o exterior aparecerá en pantalla. Si su producto BALDR no funciona correctamente después de intentar las medidas de resolución de problemas, por favor contacte con el vendedor en su página de pedidos o envíe un correo electrónico a: service@baldr.com. - Página 89 Importantes pautas de colocación ● La distancia entre la unidad principal y el transmisor debe ser de al menos 5~6.5 pies (1.5~2 metros) de distancia de cualquier fuente de interferencia como monitores de computadora o televisores. ● Para maximizar el alcance inalámbrico, coloque las unidades lejos de objetos metálicos grandes, paredes gruesas, superficies metálicas u otros objetos que puedan limitar la comunicación inalámbrica.
-
Página 90: Garantía
GARANTÍA BALDR ofrece una garantía limitada de 1 año para este producto contra defectos en material y fabricación. El servicio de garantía sólo puede ser llevado a cabo por nuestro centro de servicio. aprobado. El original de la factura de venta fechada debe ser presentado a petición como prueba de compra en... - Página 91 service@baldr.com...