Publicidad
Idiomas disponibles
Idiomas disponibles
Enlaces rápidos
EXTRACTEUR DE BOUGIES DE
PRÉCHAUFFAGE DÉFORMÉS
DEFORMED HEATER PULLER
ABZIEHER FÜR VERFORMTE
GLÜHKERZEN
TREKKER VOOR VERVORMDE
GLOEIBOUGIES
EXTRACTOR DE ELEMENTO
CALENTADOR DEFORMADO
ESTRATTORE DI RISCALDATORE IN
CASO DI DEFORMAZIONE
EXTRATOR DE VELAS DE PRÉ-
AQUECIMENTO DEFORMADAS
NARZĘDZIE DO USUWANIA
DEFORMOWANYCH ŻARNIKÓW
ŚWIEC ŻAROWYCH
NU-DCR.HR.100_0216.indd 1
Notice d'instructions
Instructions manual
Bedienungsanleitung
Gebruiksaanwijzing
DCR.HR-100
Guia de instrucciones
Istruzioni per l'uso
Manuel de instruções
Instrukcją obsługi
2/9/2016 9:18:57 AM
Publicidad

Resumen de contenidos para Facom DCR.HR-100
- Página 1 Notice d’instructions Instructions manual Bedienungsanleitung Gebruiksaanwijzing DCR.HR-100 Guia de instrucciones Istruzioni per l’uso Manuel de instruções Instrukcją obsługi EXTRACTEUR DE BOUGIES DE PRÉCHAUFFAGE DÉFORMÉS DEFORMED HEATER PULLER ABZIEHER FÜR VERFORMTE GLÜHKERZEN TREKKER VOOR VERVORMDE GLOEIBOUGIES EXTRACTOR DE ELEMENTO CALENTADOR DEFORMADO...
- Página 2 NU-DCR.HR.100_0216.indd 2 2/9/2016 9:18:59 AM...
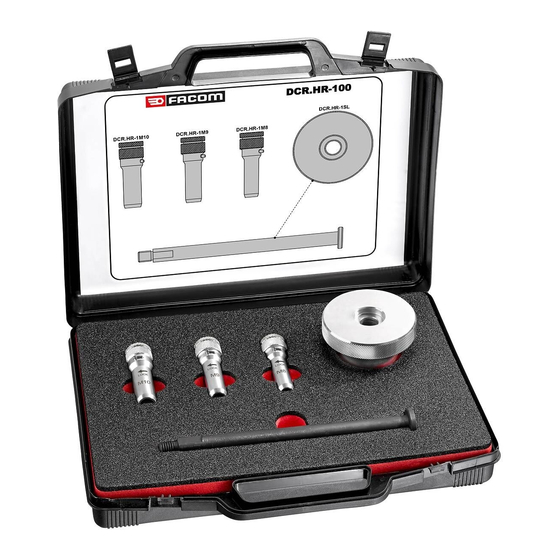
- Página 3 Lorsque la bougie de préchauffage est déformée, il est impossible de la déposer de la culasse après l’avoir dévissée ! Le meilleur moyen de déposer la bougie de préchauf- fage est d’utiliser l’outil FACOM DCR.HR-100. COMMENT L’UTILISER : Dévisser la bougie de préchauffage avec la clé adaptée.
- Página 4 Verrouiller la douille. Introduire la bougie Ouvrir la douille. dans la douille. Le visser sur la Tirer la bougie. Monter l’extracteur à douille. inertie. L’opération est terminée. NU-DCR.HR.100_0216.indd 4 2/9/2016 9:19:07 AM...
- Página 5 When the electrode heater is deformed it’s impossible to remove it from the cylinder head after it is unscrewed. To remove the heater the best way is using the FACOM DCR.HR-100. HOW USE IT : Unscrew the heater with the adapted wrench. Use the right tools : B.10R8D...
- Página 6 Lock the clamp. Insert the clamp on Open, the clamp. to the heater. Screw it on the Pull the heater. Mount the slide clamp. hammer. Job done. NU-DCR.HR.100_0216.indd 6 2/9/2016 9:19:13 AM...
- Página 7 Wenn die Elektrode der Glühkerze verformt ist, kann sie nach dem Lösen nicht aus dem Zylinderkopf genommen werden! Die beste Möglichkeit zum Entfernen der Glühkerze ist der FACOM DCR.HR-100. SO FUNKTIONIERT’S: Die Glühkerze mit dem entsprechenden Schlüssel lösen. Die richtigen Werkzeuge verwenden: B.10R8D...
- Página 8 Das Spannfutter Das Spannfutter Die Glühkerze in festziehen. öffnen. das Spannfutter einführen. Den Gleithammer Die Glühkerze Den Gleithammer auf das Spannfutter herausziehen. montieren. schrauben. Fertig. NU-DCR.HR.100_0216.indd 8 2/9/2016 9:19:20 AM...
- Página 9 Wanneer de gloeibougie vervormd is, kan deze na het losdraaien niet uit de cilinderkop verwijderd worden! De beste manier voor het demonteren van de gloeibougie is het gereedschap FACOM DCR.HR-100 te gebruiken. HOE DEZE TE GEBRUIKEN: Schroef de gloeibougie los met de juiste sleutel.
- Página 10 Vergrendel de dop. Plaats de bougie in Open de dop. de dop. Schroef deze vast Trek aan de Monteer de op de dop. bougie. slagtrekker. De operatie is voltooid. NU-DCR.HR.100_0216.indd 10 2/9/2016 9:19:26 AM...
-
Página 11: Modo De Empleo
¡Si el electrodo calentador está deformado, resultará imposible extraerlo del cabezal del cilindro una vez desenroscado! Para retirar el elemento calentador, lo mejor es utilizar una FACOM DCR.HR-100. MODO DE EMPLEO: Desenrosque el elemento calentador con la llave adecuada. Emplee las herramientas adecuadas: B.10R8D : para elemento calentador de 8 mm... - Página 12 Cierre la abrazadera. Inserte el calentador Abra la abrazadera. en la abrazadera. Atorníllelo a la Tire del calentador. Monte el martillo abrazadera. deslizante. Tarea terminada. NU-DCR.HR.100_0216.indd 12 2/9/2016 9:19:32 AM...
-
Página 13: Per Estrattore A Percussione Con Martello
Se il riscaldatore a elettrodi si deforma, sarà impossibile rimuoverlo dalla testa del cilindro dopo averlo svitato! Per rimuovere il riscaldatore, si raccomanda di utilizzare il modello FACOM DCR.HR-100. ISTRUZIONI D’USO: Svitare il riscaldatore utilizzando la chiave adatta. Utilizzare gli strumenti adatti: B.10R8D : per il riscaldatore da 8 mm... - Página 14 Chiudere il morsetto. Inserire il riscaldatore Aprire il morsetto. nel morsetto. Avvitarlo sul morsetto. Estrarre il riscaldatore. Montare il martello scorrevole. Fatto. NU-DCR.HR.100_0216.indd 14 2/9/2016 9:19:38 AM...
- Página 15 Quando a vela de pré-aquecimento está deformada, é impossível removê-la da cabeça do cilindro após desaparafusá-la! A melhor forma de remover a vela de pré-aquecimento é utilizar o FACOM DCR.HR-100. COMO UTILIZÁ-LO: Desaparafuse a vela de pré-aquecimento com a chave adaptada.
- Página 16 Bloqueie o fixador. Introduza a vela de Abra o fixador. pré-aquecimento no fixador. Aparafuse-o no Retire a vela de pré- Monte o martelo de fixador. aquecimento. extração. Trabalho concluído. NU-DCR.HR.100_0216.indd 16 2/9/2016 9:19:45 AM...
-
Página 17: Sposób Użytkowania
Co się dzieje ze zdeformowanym żarnikiem: Jeżeli żarnik zostanie zdeformowany to niemożliwe jest usunięcie go z głowicy cylindra po jego odkręceniu! Najlepszym sposobem na usunięcie żarnika jest użycie zestawu FACOM DCR.HR-100. SPOSÓB UŻYTKOWANIA: Odkręcić żarnik odpowiednim kluczem. Używać właściwych narzędzi: : dla żarnika 8 mm... - Página 18 Zamknąć zacisk. Umieścić żarnik w Otworzyć zacisk. zacisku. Przykręcić go do Wyciągnąć żarnik. Zamontować młotek zacisku. bezwładnościowy. Czynność zakończona. NU-DCR.HR.100_0216.indd 18 2/9/2016 9:19:51 AM...
- Página 19 NOTA NU-DCR.HR.100_0216.indd 19 2/9/2016 9:19:51 AM...
- Página 20 NEDERLAND T +32 (0)15 47 39 30 Tél: 0800 236 236 2 Facom.Belgium@sbdinc.com Fax: 0800 237 60 20 Facom.Netherlands sbdinc.com FACOM Nordic ASIA The Stanleyworks( Shanghai) Co., DANMARK Flöjelbergsgatan 1c Ltd 8/F,Lujiazui Fund Tower No.101, FINLAND SE-431 35 Mölndal, Sweden...


