Publicidad
Enlaces rápidos
NEDERLANDS
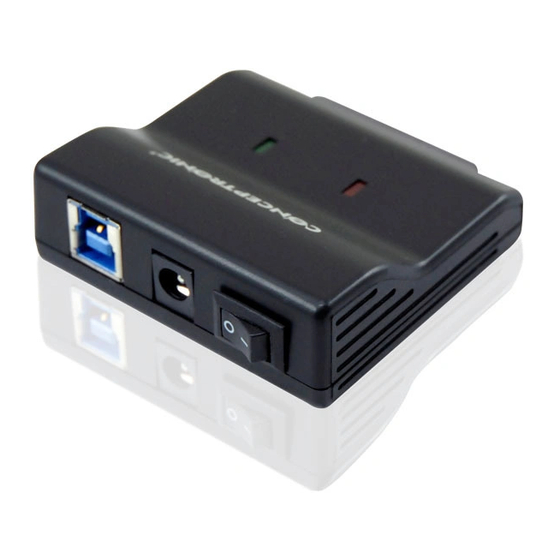
Conceptronic CSATA23U3
1. Product overzicht
Nr
Beschrijving
A
SATA aansluiting
B
Power LED (Groen)
C
USB activiteits-LED (Rood)
D
Power schakelaar
E
DC ingang (12v)
F
USB 3.0 aansluiting
2. Installatie en gebruik
Zet uw computer aan.
Sluit een SATA apparaat (harde schijf, SSD, optisch station) aan op de SATA aansluiting [A]
van de CSATA23U3.
Sluit de meegeleverde spanningsadapter aan op de DC ingang [E] van de CSATA23U3 en op
een vrij stopcontact.
Sluit de meegeleverde USB 3.0 kabel aan op de USB 3.0 aansluiting [F] van de CSATA23U3
en op een vrije USB 3.0 poort op uw computer.
Zet de CSATA23U3 aan met de power schakelaar [D].
De CSATA23U3 en het aangesloten SATA apparaat zullen automatisch gedetecteerd en
geïnstalleerd worden door Windows. Er is geen stuurprogramma installatie benodigd.
Na de installatie is het aangesloten SATA apparaat gereed voor gebruik.
NB: De CSATA23U3 kan ook op een computer met USB 2.0 of USB 1.1 poorten gebruikt
worden, echter zal dan de doorvoersnelheid lager liggen.
NB: Wanneer u een nieuwe en ongebruikte harde schijf aansluit op de CSATA23U3 kan het
voorkomen dat de harde schijf niet getoond wordt als nieuw station op uw computer. U
dient de nieuwe harde schijf eerst te partitioneren en formatteren alvorens u deze kunt
gebruiken.
Veel plezier met het gebruik van uw
Conceptronic SATA naar USB 3.0 adapter!
ENGLISH
Conceptronic CSATA23U3
1. Product overview
Nr
Description
A
SATA connector
B
Power LED (Green)
C
USB activity LED (Red)
D
Power switch
E
DC input (12v)
F
USB 3.0 connector
2. Installation & usage
Turn on your computer.
Connect a SATA device (hard disk, SSD, optical drive) to the SATA connector [A] of the
CSATA23U3.
Connect the included power supply to the DC input [E] of the CSATA23U3 and to a free wall
outlet.
Connect the included USB 3.0 cable to the USB 3.0 connector [F] of the CSATA23U3 and to
a free USB 3.0 port on your computer.
Turn on the CSATA23U3 with the power switch [D].
The CSATA23U3 and the connected SATA device will be recognized and installed automatically
by Windows. No driver installation is required.
When the installation is finished, the connected SATA device is ready to use.
Note: The CSATA23U3 can also be used on a computer with USB 2.0 or USB 1.1 ports, but the
data transfer speed will be lower.
Note: If you connect a new and unused hard disk to the CSATA23U3, the hard disk will not
appear as a new drive letter on your computer. You need to partition and format a
new and unused hard disk before you can use it.
Enjoy the use of your
Conceptronic SATA to USB 3.0 adapter!
Conceptronic CSATA23U3
!! COVER !!
www.conceptronic.net
ESPAÑOL
Conceptronic CSATA23U3
1. Descripción del producto
Nº
Descripción
A
Conector SATA
B
LED de encendido (Verde)
C
LED de actividad USB (Rojo)
D
Interruptor de alimentación
E
Entrada de corriente continua (DC) (12 V)
F
Conector USB 3.0
2. Instalación y utilización
Encienda el ordenador.
Conecte el dispositivo SATA deseado (disco duro o unidad SSD u óptica) al conector SATA
[A] del CSATA23U3.
Conecte la fuente de alimentación incluida a la entrada de corriente continua (DC) [E] del
CSATA23U3 y a un enchufe de pared disponible.
Conecte el cable USB 3.0 incluido al conector USB 3.0 [F] del CSATA23U3 y a un puerto USB
3.0 libre de su ordenador.
Encienda el CSATA23U3 con el interruptor [D].
Windows reconocerá e instalará automáticamente el CSATA23U3 y el dispositivo SATA
conectado. No se necesita instalar ningún driver.
Una vez finalizada la instalación, el dispositivo SATA conectado estará listo para ser utilizado.
Nota: El CSATA23U3 también puede utilizarse con un ordenador con puertos USB 2.0 o USB
1.1, pero la velocidad de transferencia de datos será menor.
Nota: Si conecta un disco duro nuevo y sin haber sido utilizado al CSATA23U3, el disco duro
no aparecerá como una letra de unidad nueva en su ordenador. Para poder utilizar un
disco duro completamente nuevo, antes deberá particionarlo y formatearlo.
¡Disfrute del uso de su
adaptador de SATA a USB 3.0 de Conceptronic!
Publicidad

Resumen de contenidos para Conceptronic CSATA23U3
- Página 1 CSATA23U3. [A] del CSATA23U3. Connect the included power supply to the DC input [E] of the CSATA23U3 and to a free wall Conecte la fuente de alimentación incluida a la entrada de corriente continua (DC) [E] del outlet.
- Página 2 Collegare il cavo USB 3.0 al connettore USB 3.0 [F] del CSATA23U3 e a una porta USB 3.0 Ligue o cabo USB 3.0 incluído à ficha USB 3.0 [F] do CSATA23U3 e a uma porta USB 3.0 disponibile del computer.


