Tabla de contenido
Publicidad
Idiomas disponibles
Idiomas disponibles
Enlaces rápidos
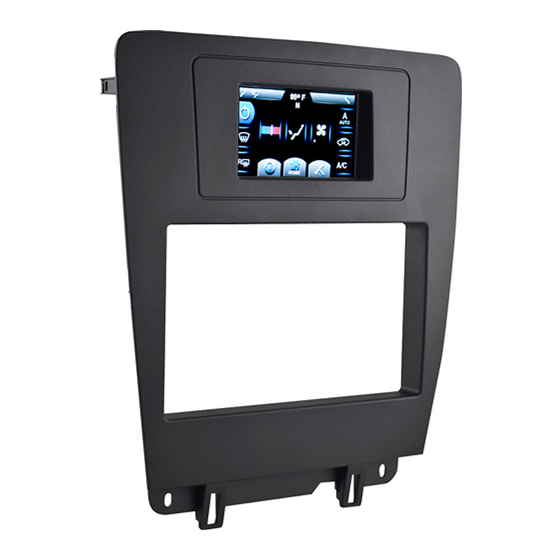
INSTALLATION INSTRUCTIONS FOR PART 99-5826CH
KIT FEATURES
• ISO DIN Head unit provision with pocket
• DIN Head unit provision with pocket
• DDIN Head unit provision
• Painted charcoal to match factory finish
• Touchscreen climate controls
KIT COMPONENTS
• A) Radio Trim Panel • B) Radio Housing • C) ISO Brackets • D) ISO Trim Plate • E) DDIN Brackets
• F) DDIN Trim Plate • G) Pocket • H) (4) Panel Clips • I) A/C Harness • J) 4-pin Trigger Harness
A
WIRING & ANTENNA CONNECTIONS (Sold Separately)
Wiring Harness: • XSVI-5520-Nav Ford interface 2006-up
Antenna Adapter: • 40-CR10 Chrysler/GM antenna adapter 2002-up
Panel Removal Tool • Phillips Screwdriver • Small Flat Blade Screwdriver
APPLICATIONS
Ford Mustang 2010-up
99-5826CH
B
C
F
G
TOOLS REQUIRED
METRA. THE WORLD'S BEST KITS.™
1-800-221-0932
© COPYRIGHT 2004-2011 METRA ELECTRONICS CORPORATION
D
E
H
I
J
metraonline.com
Publicidad
Tabla de contenido

Manuales relacionados para Metra 99-5826CH


Resumen de contenidos para Metra 99-5826CH
- Página 1 INSTALLATION INSTRUCTIONS FOR PART 99-5826CH APPLICATIONS Ford Mustang 2010-up 99-5826CH KIT FEATURES • ISO DIN Head unit provision with pocket • DIN Head unit provision with pocket • DDIN Head unit provision • Painted charcoal to match factory finish • Touchscreen climate controls KIT COMPONENTS •...
-
Página 2: Tabla De Contenido
– Climate Controls Screen 13-19 Caution Metra recommends disconnecting the negative battery terminal before beginning any installation. All accessories, switches, and especially air bag indicator lights must be plugged in before reconnecting the battery or cycling the ignition. *NOTE: Refer also to the instructions included with the aftermarket radio. -
Página 3: Dash Disassembly
99-5826CH Dash Disassembly 1. Unclip and remove the trim panel surrounding the shifter including the cup holders. (Figure A) 2. Remove (2) 9/32” screws from the bottom of the radio panel then unclip and remove the panel. (Figure B) 3. Remove (4) Phillips screws securing the radio. -
Página 4: Kit Assembly
Kit Assembly 99-5826CH ISO DIN head unit provision with pocket 1. Locate the factory wiring harness in the dash. Metra recommends using the proper mating adapters from Metra and AXXESS to integrate your new radio. Re-connect the negative battery terminal and test the unit for proper operation. -
Página 5: Ddin Head Unit Provision
Kit Assembly 99-5826CH DDIN head unit provision 1. Locate the factory wiring harness in the dash. Metra recommends using the proper mating adapters from Metra and AXXESS to integrate your new radio. Re-connect the negative battery terminal and test the unit for proper operation. -
Página 6: Din Head Unit Provision With Pocket
Kit Assembly 99-5826CH DIN head unit provision with pocket 1. Locate the factory wiring harness in the dash. Metra recommends using the proper mating adapters from Metra and AXXESS to integrate your new radio. Re- connect the negative battery terminal and test the unit for proper operation. -
Página 7: Touch Screen
Touch Screen 99-5826CH Home Screen 1. Takes you to the climate control screen 2. Takes you to the SYNC information screen 3. Takes you to the tools screen SYNC Screen (if SYNC is equipped) Any time you press the SYNC button (icon 2) it will take you to the SYNC information screen. -
Página 8: Tools Screen
Touch Screen 99-5826CH Tools Screens 1. Brightness button Pressing this will take you to the brightness menu where you will be able to adjust the nighttime brightness level of the touch screen. - Página 9 Touch Screen 99-5826CH Tools Screens 2. Info button The info button will give you information about what options our kit detects in the vehicle and give you the current version number of the touch screen. To Reset: Press and hold the reset button for 10-seconds to relearn the vehicle.
- Página 10 Touch Screen 99-5826CH Tools Screens 3. Color button Pressing this button will take you to the skin color menu. Once in this menu you will be able to choose from 12 different skins. Once you have selected your new skin simply touch the home button for changes to take effect.
- Página 11 Pressing this button will take you to the Trigger switch screen. Here you will be able to turn on and off lines 1 through 3. (All outputs are latched) Wiring of 4-pin Trigger harness (Metra recommends using a relay (part # E-123) on every output wire.
- Página 12 Touch Screen 99-5826CH Tools Screens 5. Compass button (if compass equipped) Pressing this button will take you to the Compass calibration menu. Once in this menu please refer to your owner’s manual for further instructions.
-
Página 13: Climate Controls Screen
Touch Screen 99-5826CH Climate Controls Single Zone NOTE: Items that are active are shaded 1. Status Bar – Shows current status of the HVAC controls 2. On/Off – Turns A/C on or off 3. Front Defrost – Turns on front defrost 4. - Página 14 Touch Screen 99-5826CH Climate Controls Temperature Screen Once in the temperature screen you will have an arrow up and down button which will raise or lower the temperature in the vehicle. The line on the colored graph will move each time the arrow is pressed.
- Página 15 Touch Screen 99-5826CH Climate Controls Fan Speed Once in the fan speed screen you will be able to adjust the fan speed by tapping the smaller fan for lowering the fan speed or the larger fan for increasing the fan speed. Once you have selected your desired speed press the “climate home”...
- Página 16 Touch Screen 99-5826CH Climate Controls Dual Zone Climate (single zone mode) 1. Status Bar – Shows current status of the HVAC controls 2. On/Off – Turns A/C on or off 3. Front Defrost – Turns on front defrost 4. Rear Defrost – Turns on rear defrost 5.
- Página 17 Touch Screen 99-5826CH Climate Controls Temperature Screen Note: Temperature range is from 60 to 90 degrees Once in the temperature screen you will have an arrow up and down button which will raise or lower the temperature in the vehicle, giving you a numerical temperature reading of the desired temperature.
- Página 18 Touch Screen 99-5826CH Climate Controls Heated and Cooled seats (if equipped) Note: Once set information will show up on the status bar To access the heated and cooled seats menu you must tap the air flow mode button. Once in that mode you will see the driver and passenger side heated and cooled seat option (if your vehicle has those options equipped).
- Página 19 Touch Screen 99-5826CH Climate Controls Dual Zone In order to turn on and off dual zone (if equipped) you must enter the temperature adjust mode by pressing icon 11. Once there you can turn dual zone on or off by pressing the Dual zone button in the middle of the screen.
- Página 20 INSTALLATION INSTRUCTIONS FOR PART 99-5826CH METRA. THE WORLD’S BEST KITS.™ metraonline.com 1-800-221-0932 © COPYRIGHT 2004-2011 METRA ELECTRONICS CORPORATION...
-
Página 21: 99-5826Ch
INSTRUCCIONES DE INSTALACIÓN PARA LA PIEZA 99-5826CH APLICACIONES Ford Mustang 2010 y mas 99-5826CH CARACTERÍSTICAS DEL KIT • Provisión de unidad central ISO DIN con bolsillo • Provisión de unidad central DIN con bolsillo • Provisión de unidad central DDIN •... -
Página 22: Pantalla Táctil
13-19 Precaución Metra recomienda desconectar la terminal negativa de la batería antes de iniciar cu- alquier instalación. Todos los accesorios, interruptores y especialmente las luces del indicador de las bolsas de aire deben estar conectados antes de reconectar la batería o ciclar la ignición. -
Página 23: Desmontaje Del Tablero
99-5826CH Desmontaje del tablero 1. Desenganche y retire el panel de moldura que rodea la palanca de velocidades, incluyendo los portavasos. (Figura A) 2. Retire los (2) tornillos de 9/32” de la parte inferior del panel del radio y luego desenganche y retire el panel. -
Página 24: Ensamble Del Kit 99-5826Ch
Provisión de unidad central ISO DIN con bolsillo 1. Ubique el arnés de cableado de fábrica en el tablero. Metra recomienda el uso de los adaptadores de acoplamiento adecuados de Metra y AXXESS para integrar su nuevo radio. Vuelva a conectar la terminal negativa de la batería y pruebe la unidad para verificar... -
Página 25: Provisión De Unidad Central Ddin
Ensamble del kit 99-5826CH Provisión de unidad central DDIN 1. Ubique el arnés de cableado de fábrica en el tablero. Metra recomienda el uso de los adaptadores de acoplamiento adecuados de Metra y AXXESS para integrar su nuevo radio. Vuelva a conectar la terminal negativa de la batería y pruebe la unidad para verificar... -
Página 26: Provisión De Unidad Central Din Con Bolsillo
Ensamble del kit 99-5826CH Provisión de unidad central DIN con bolsillo 1. Ubique el arnés de cableado de fábrica en el tablero. Metra recomienda el uso de los adaptadores de acoplamiento adecuados de Metra y AXXESS para integrar su nuevo radio. Vuelva a conectar la terminal negativa de la batería y pruebe la unidad para verificar... -
Página 27: Pantalla De Inicio
Pantalla táctil 99-5826CH Pantalla de inicio 1. Lo lleva a la pantalla de control de clima 2. Lo lleva a la pantalla de información SYNC 3. Lo lleva a la pantalla de herramientas Pantalla SYNC (si se incluye SYNC en el equipamiento) Siempre que presione el botón SYNC ( icono 2), lo llevará... -
Página 28: Pantallas De Herramientas
Pantalla táctil 99-5826CH Pantallas de herramientas 1. Botón de brillo Presionar este botón lo llevará al menú de brillo, donde podrá ajustar el nivel de brillo para la noche de la pantalla táctil. - Página 29 Pantalla táctil 99-5826CH Pantallas de herramientas 2. Botón de información El botón de información le dará información acerca de las opciones que nuestro kit detecta en el vehículo y le dará el número de versión actual de la pantalla táctil.
- Página 30 Pantalla táctil 99-5826CH Pantallas de herramientas 3. Botón de color Presionar este botón lo llevará al menú de color de carátula. Una vez que se encuentra en este menú, podrá elegir una de las 12 diferentes carátulas. Una vez que haya seleccionado su nueva carátula, simplemente toque el botón de inicio para que los cambios se...
- Página 31 Presionar este botón lo llevará al menú de interruptor de gatillo. Aquí podrá encender y apagar las líneas 1 a la 3. (Todas las salidas están cerradas) Cableado del arnés gatillo de 4-pins. Metra recomienda utilizar un relé (No. de parte E-123) en cada cable de salida.
- Página 32 Pantalla táctil 99-5826CH Pantallas de herramientas 5. Botón de brújula (si está equipado con brújula) Presionar este botón lo llevará al menú de calibración de brújula. Una vez que se encuentre en este menú, consulte instrucciones adicionales en su manual de propietario.
-
Página 33: Controles De Clima
Pantalla táctil 99-5826CH Controles de clima Zona única NOTA: Los elementos activos aparecen sombreados 1. Barra de estatus - Muestra el estatus actual de los controles HVAC 2. Encendido/apagado - Enciende o apaga el aire acondicionado 3. Descongelamiento frontal - Enciende el descongelamiento frontal 4. - Página 34 Pantalla táctil 99-5826CH Controles de clima Pantalla de temperatura Una vez que se encuentre en la pantalla de temperatura, tendrá un botón de flecha hacia arriba y hacia abajo que elevará o disminuirá la temperatura dentro del vehículo. La línea de la gráfica de color se moverá...
- Página 35 Pantalla táctil 99-5826CH Controles de clima Velocidad del ventilador Una vez que se encuentre en la pantalla de velocidad del ventilador, podrá ajustar la velocidad del ventilador tocando el ventilador más pequeño para disminuir la velocidad o el ventilador más grande para aumentar la velocidad. Una vez que haya seleccionado su velocidad deseada, presione el botón “inicio del clima”...
- Página 36 Pantalla táctil 99-5826CH Controles de clima Clima de zona dual (modo de zona sencilla) 1. Barra de estatus - Muestra el estatus actual de los controles HVAC 2. Encendido/apagado - Enciende o apaga el aire acondicionado 3. Descongelamiento frontal - Enciende el descongelamiento frontal 4.
- Página 37 Pantalla táctil 99-5826CH Controles de clima Pantalla de temperatura Nota: El rango de temperatura es de 60 a 90 grados Una vez que se encuentre en la pantalla de temperatura, tendrá un botón de flecha hacia arriba y hacia abajo que elevará o disminuirá la temperatura dentro del vehículo, dándole una lectura numérica de la temperatura deseada.
- Página 38 Pantalla táctil 99-5826CH Controles de clima Asientos con enfriamiento y calefacción (si se incluyen en el equipamiento) Nota: Una vez que haya configurado la información, ésta aparecerá en la barra de estatus. Para acceder al menú de asientos con enfriamiento y calefacción, debe tocar el botón de modo de flujo de aire.
- Página 39 Pantalla táctil 99-5826CH Controles de clima Zona dual Para encender y apagar la zona dual (si se cuenta con dicho equipamiento), debe entrar al modo de ajuste de temperatura presionando el icono 11. Una vez que se encuentre ahí, puede encender o apagar la zona dual presionando el botón de zona dual en la parte central de la pantalla.
- Página 40 INSTRUCCIONES DE INSTALACIÓN PARA LA PIEZA 99-5826CH METRA. THE WORLD’S BEST KITS.™ metraonline.com 1-800-221-0932 © COPYRIGHT 2004-2011 METRA ELECTRONICS CORPORATION...