Tabla de contenido
Publicidad
Idiomas disponibles
Idiomas disponibles
Enlaces rápidos
INSTALLATION INSTRUCTIONS FOR PART 99-9309
2009-up Mini Cooper Clubman
99-9309
KIT FEATURES
•
ISO DIN Head unit provision with pocket
•
DDIN Head unit provision
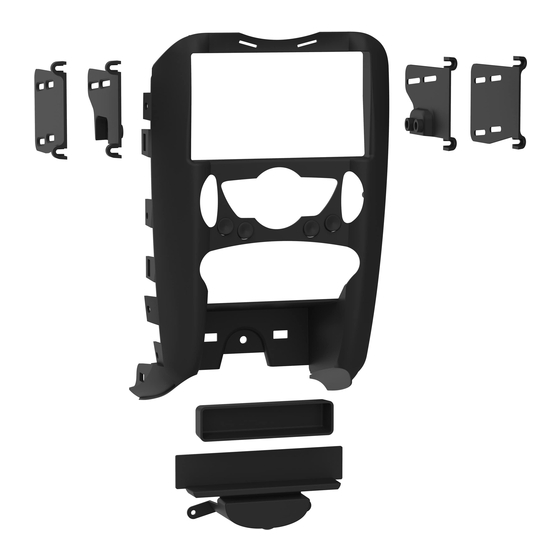
KIT COMPONENTS
• A) Radio Housing • B) ISO Brackets • C) DDIN Brackets • D) Storage Pocket
• E) Climate Controla Button Covers • F) Speedometer Blank-Out Panel
• G) (8) #8 3/8" Phillips Screws
A
• Phillips Screwdriver • Panel Removal Tool • Small Flat Blade Screwdriver
• Socket Wrench • T-20 Torx Drivers • T-30 Torx Drivers
METRA. THE WORLD'S BEST KITS.™
1-800-221-0932
© COPYRIGHT 2004-2010 METRA ELECTRONICS CORPORATION
APPLICATIONS
2007-2008 Mini Cooper
(All Excluding Convertible)
2009-up Mini Cooper
C
B
E
F
WIRING & ANTENNA CONNECTIONS (Sold Separately)
• 40-EU10 European Antenna Adapter 2006-up
• BMRC-01 BMW/Mini Interface
TOOLS REQUIRED
(All)
D
G
metraonline.com
Publicidad
Tabla de contenido

Manuales relacionados para Metra 99-9309


Resumen de contenidos para Metra 99-9309
- Página 1 INSTALLATION INSTRUCTIONS FOR PART 99-9309 APPLICATIONS 2007-2008 Mini Cooper (All Excluding Convertible) 2009-up Mini Cooper (All) 2009-up Mini Cooper Clubman 99-9309 KIT FEATURES • ISO DIN Head unit provision with pocket • DDIN Head unit provision KIT COMPONENTS • A) Radio Housing • B) ISO Brackets • C) DDIN Brackets • D) Storage Pocket •...
- Página 2 • ISO DIN Head Unit Provision ....7 • DDIN / Stacked ISO DIN Head Unit Provision ..8 CAUTION: Metra recommends disconnecting the negative battery terminal before beginning any installation. All accessories, switches, and especially air bag indicator lights must be plugged in before reconnecting the battery or cycling the ignition.
- Página 3 99-9309 DASH DISASSEMBLY MINI COOPER Open the upper glove box and remove the (2) screw covers from the left and right side. (Fig. A) Remove (2) T-20 Torx screws from under the left side cover on the speedometer panel and (1) from under the right side cover on the a/c vent.
- Página 4 99-9309 DASH DISASSEMBLY MINI COOPER Remove (2) T-20 Torx screws from the passenger side a/c vent facing the door then unclip the vent and let it hang. (Fig. D) Remove (2) T-30 Torx screws securing the tachometer to the steering column and let hang. (Fig. D) Unclip and remove the painted panel behind the tachometer.
- Página 5 99-9309 DASH DISASSEMBLY MINI COOPER Remove the (2) screw covers inside the vent above the speedometer then remove the (2) T-20 Torx screws uncovered. (Fig. G) Remove the speedometer trim panel and disconnect hazard switch. (Fig. H) Remove (3) T-20 Torx from under drive knee bolster and remove panel.
- Página 6 99-9309 DASH DISASSEMBLY MINI COOPER Remove (3) T-20 Torx from cup holders in center console. Unclip shifter and handbrake boots and remove connectors from 12-volt outlet and buttons in front of shifter. Lift console and remove. (Fig. J) Unclip center stack and unplug connectors from climate controls, aux jack and window switches.
- Página 7 99-9309 DASH DISASSEMBLY MINI COOPER Remove (3) T-20 Torx from speedometer and (2) from radio chassis. (Fig. M) Unplug speedometer and radio chassis. Remove assembly. Remove (4) T-20 Torx from rear of speedometer and remove radio display/control panel from cluster.
- Página 8 99-9309 KIT PREPARATION MINI COOPER Place blank out plate from kit in speedometer and secure using (4) T-20 Torx removed in step 19. (Fig. A) On vehicles without automatic climate control place button blanks in kit before securing climate/window controls in kit using (4) T-20 Torx removed in step (16).
-
Página 9: Iso Din Head Unit Provision
(Fig. C) Locate the factory wiring harness and antenna plug in the dash. Metra recommends using the proper mating adapters from Metra and/or AXXESS. Reassemble dash in reverse order of... - Página 10 ISO head units to the assembly using the screws supplied with the radio. (Fig. B) Locate the factory wiring harness and antenna plug in the dash. Metra recommends using the proper mating adapters from Metra and/or AXXESS. Reassemble dash in reverse order of...
- Página 11 • Adaptador de antena europeo 40-EU10 2006 y modelos posteriores • BMRC-01 BMW/Miniinterfaz HERRAMIENTAS REQUERIDAS •Destornillador Phillips •Herramienta para retirar paneles •Destornillador de hoja plana pequeño •Llave de tubo •Destornilladores Torx T-20 y T-30 METRA. THE WORLD’S BEST KITS.™ 1-800-221-0932 metraonline.com © COPYRIGHT 2004-2010 METRA ELECTRONICS CORPORATION...
-
Página 12: Desmontaje Del Tablero
DIN ISO apiladas ......8 PRECAUCIÓN: Metra recomienda desconectar el terminal negativo de la bat- ería antes de comenzar cualquier instalación. -
Página 13: 99-9309 Desmontaje Del Tablero
99-9309 DESMONTAJE DEL TABLERO MINI COOPER Abra la guantera superior y retire las (2) tapas de los tornillos de los lados izquierdo y derecho. (Fig. A) Retire (2) tornillos de cabeza Torx T-20 de la parte inferior de la tapa del lado izquierdo en el panel del velocímetro y (1) de la parte... - Página 14 99-9309 DESMONTAJE DEL TABLERO MINI COOPER Retire (2) tornillos de cabeza Torx T-20 de la rejilla de ventilación del aire acondicionado del lado del pasajero orientada hacia la puerta y, luego, desenganche la rejilla de ventilación y deje que cuelgue. (Fig. D) Retire (2) tornillos de cabeza Torx T-30 que sujetan el tacómetro a la columna...
- Página 15 99-9309 DESMONTAJE DEL TABLERO MINI COOPER Retire las (2) tapas de los tornillos que están dentro de las rejillas de ventilación arriba del velocímetro y, luego, retire los (2) tornillos de cabeza Torx T-20 descubiertos. (Fig. G) Retire el panel de terminación del velocímetro y desconecte el interruptor...
- Página 16 99-9309 DESMONTAJE DEL TABLERO MINI COOPER Retire (3) tornillos de cabeza Torx T-20 de los portavasos en la consola central. Desenganche las cubiertas de protección de la palanca de velocidades y del freno de mano, y retire los conectores de la toma de...
- Página 17 99-9309 DESMONTAJE DEL TABLERO MINI COOPER Retire (3) tornillos de cabeza Torx T-20 del velocímetro y (2) del chasis del radio. (Fig. M) Desenchufe el velocímetro y el chasis del radio. Retire el conjunto. Retire (4) tornillos de cabeza Torx de la parte trasera del velocímetro y...
-
Página 18: 99-9309 Kit De Preparación
KIT DE PREPARACIÓN 99-9309 MINI COOPER Coloque la placa ciega del kit en el velocímetro y sujétela usando (4) tornillos de cabeza Torx T-20 que retiró en el paso 19. (Fig. A) En los vehículos sin control de clima automático, coloque las piezas ciegas... -
Página 19: 99-9309 Montaje Del Kit
Metra recomienda usar los adaptadores de acoplamiento adecuados de Metra y/o AXXESS. Vuelva a montar el tablero en forma inversa al desmontaje usando el panel de terminación del radio 99-9309 en lugar del panel apilado central de fábrica. -
Página 20: Din Dobles/Accesorio Para Unidades Centrales Din Iso Apiladas
Metra recomienda usar los adaptadores de acoplamiento adecuados de Metra y/o AXXESS. Vuelva a montar el tablero en forma inversa al desmontaje usando el panel de terminación del radio 99-9309 en lugar del panel apilado central de fábrica.