Tabla de contenido
Publicidad
Idiomas disponibles
Idiomas disponibles
Enlaces rápidos
KN09-00065A (Ver.1.2)
◈ Information
This installation guide contains quick information required for the product installation. Refer
to the User's Manual in the website that comes with the product for detailed installation
instructions. The website contains the following information.
1. Manual: User's, Bluetooth & Wi-Fi Connection, SLCS Programming, Code Pages,
Software
2. Driver: Windows, OPOS, Linux & Mac CUPS
3. SDK: Android, Linux, Windows, iOS
4. Utility: Net Configuration Tool, Unified Label Utility-II
5. Label Design: Label Artist-II
We at BIXOLON Co., Ltd. maintain ongoing efforts to enhance and upgrade the functions
and quality of all our products. In following, product specifications and/or user manual
content may be changed without prior notice.
◈ Content Confirmation
XM7-40/XM7-40R
Battery Pack
Printer
Belt Strap
Installation Guide
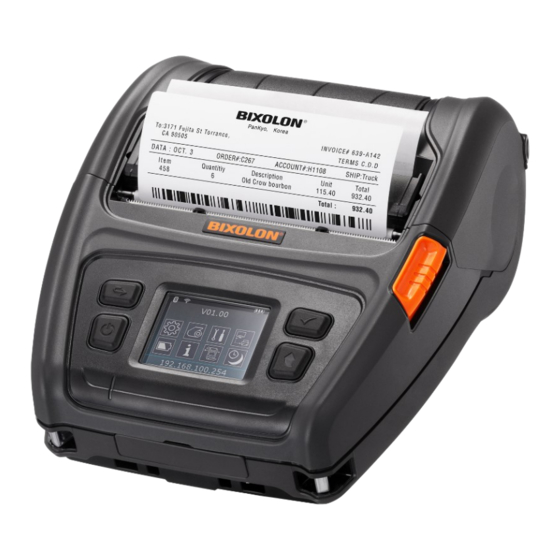
◈ Product Part Names
Paper Cover
Peeler
Menu Move Button
Power Button
LCD
Charge
Indication LED
Cover Open Button
Shoulder Strap Ring
Menu Select Button
Outer Terminal Cover
Paper Feed Button
◈ Installation and Charging
Battery
Installation
Since the battery is partially changed at the time of purchase, charge the battery
prior to product use. (Use the AC/DC adapter or the optional
Single/Quad battery charger.)
Media
Installation
Battery
③
Charging
②
①
The printer may incur serious damage if the AC/DC adapter provided by BIXOLON
is not used. BIXOLON is not legally liable for any such damages.
(The voltage and electrical current specifications of the printer and battery charger
must match.)
Printer Installation Guide
AC/DC Adapter
Power Cord
Guide Disks
(for 12mm (0.47 inch)
inner diameter)
Hole for mounting belt strap
Battery Pack
Interface Cap
Power Port
Cable Port
1) Insert the battery in the bottom of
the printer, and ensure that you align
the battery hook properly.
2) Push the battery into the slot until
you hear it snap in place.
1) Press the Open button to open the
media cover.
2) After keeping the media holder wide
as shown, in the figure insert the
media as shown. (Remove the empty
media core.)
3) Check the orientation of the media
when inserting it into the printer.
4) Pull out the media as shown and
close the media cover.
1) Turn off the printer power.
2) Connect the power cord ② to the
AC/DC adapter ① and then connect
AC power.
3) Open the external interface cap in the
direction of ③.
4) Connect the AC/DC adapter to the
power port.
Mobile Printer XM7-40/XM7-40R
Belt Strap
Installation
◈ Control Panel Usage
Power Button
Media Feed Button
• Power Button
This button is used to turn the printer on, off, to move to main menu or
to operate the action.
1) When the printer is off, press this button for approximately 2 seconds to turn on
the power.
2) When the printer is on, press this button for approximately 2 seconds to turn off
the power.
3) Pressing this button while the LCD menu is being operated moves to the main
menu or the action selected in the menu is operated.
• Media Feed Button
This button is used to feed the media manually or return to the previous step.
1) Press and hold this button while the printer is booting to print a self-test page.
2) Press this button in the standby mode to feed the media.
3) Press this button to return to the previous menu.
• Menu Move Button
This button is used to move the LCD menu.
Press this button to move the LCD menu from the top left to the bottom right.
• Menu Select Button
This button is used to select the LCD menu.
Press this button to select the LCD menu or save the selected settings to the printer.
◈ Self-test
Run the self-test to check the setting information when you are setting up the printer for the
first time or if there is a problem.
If no issue is found with the printer after running the self-test, examine the other devices or
peripherals and software. This function is independent of such other devices and software.
• Self-Test Instructions
1) Turn the printer power on and go to the Tool > Print Printer Config menu on the LCD
2) Press the power button(Print) to run the self-test.
3) The printer settings information is printed on the first page, and the wireless interface
information is printed on the next page.
4) After the wireless interface information is printed, the self-test is automatically
terminated.
◈ Peripherals Connection
Refer to the Bluetooth & Wi-Fi Connection Manual for detailed information on its
connection. You can check the bluetooth environment (authentication, encryption,
connection mode) and the wireless LAN environment (IP, SSID, authentication,
encryption) via the self-test page.
①
②
The interface cable that can be connected to the printer is Serial/USB cable provided
by BIXOLON(optional) or USB Type-C cable supporting USB2.0.
1) Insert the belt strap screw into the belt
strap hole.
2) Use a coin to tighten the belt strap screw.
As shown in the image.
Menu Move Button
Menu Select Button
1. Bluetooth & Wireless LAN Connection
1) The printer can be connected to devices
equipped with Bluetooth communication
capacity (PDAs, PCs, etc.).
2) Use the Bluetooth connection function
supported by the device to connect to the
printer.
3) The printer can be connected to other
stations, such as PDAs and PCs supporting
wireless LAN communication in Ad-hoc
mode, Soft AP mode and AP in
Infrastructure mode.
2. Interface Cable Connection
1) Open the Interface Cap ①.
2) Connect the external communication cable
② to the cable port of the printer.
3) Connect the interface cable to the USB port
of the device (PDAs, PCs, etc.).
Publicidad
Tabla de contenido

Manuales relacionados para Bixolon XM7-40


Resumen de contenidos para Bixolon XM7-40
- Página 1 4. Utility: Net Configuration Tool, Unified Label Utility-II 5. Label Design: Label Artist-II We at BIXOLON Co., Ltd. maintain ongoing efforts to enhance and upgrade the functions and quality of all our products. In following, product specifications and/or user manual...
-
Página 2: Product Specifications
RIFD Programming Manual. Utility programs and manuals can be downloaded from the (Add.) 7~8F, (Sampyeong-dong), 20, Pangyoyeok-ro241beon-gil, Bundang-gu, Seongnam- BIXOLON website (www.bixolon.com). If the RFID transponder position is set incorrectly and the RFID coding is si, Gyeonggi-do, 13494, Korea (ROK) not done correctly, you need to reset the position of the RFID transponder in the utility program or the printer (Tel.) +82-31-218-5500... - Página 3 XM7-40/XM7-40R ◈ & , SLCS ◈ : Windows, OPOS, Linux & Mac CUPS 3. SDK: Android, Linux, Windows, iOS : Net Configuration Tool , Unified Label Utility-II : Label Artist-II • ◈ , LCD 3) LCD AC/DC XM7-40/XM7-40R • , LCD 3) LCD 12mm (0.47 inch))
- Página 4 ) 13494, 20 ( ) 7~8 ) +82-31-218-5500 ● ) BIXOLON America Inc. 13705 Cimarron Ave Gardena, CA 90249 50℃ ) +1-858 764 4580 ● ) BIXOLON Europe GmbH, Tiefenbroicher Weg 35 40472 Dü sseldorf ) +49 (0)211 68 78 54 0...
- Página 5 4) Verbinden Sie den AC/DC-Adapter mit ② dem Stromversorgungsanschluss. Der Drucker kann stark beschädigt werden, wenn der durch BIXOLON Co. Ltd Das Schnittstellenkabel, das mit dem gelieferte AC-DCAdapter nicht verwendet wird. Fü r solche Schäden ist BIXOLON Drucker verbunden werden kann ist vom Typ Seriell/USB-Kabel, das von Co.
-
Página 6: Produktspezifikationen
Händler. ● U.S. Office 2. Der Akku darf nur mit dem angegebenen Ladegerät (optional erhältlich) von BIXOLON geladen (Add.) BIXOLON America Inc. 13705 Cimarron Ave Gardena, CA 90249 werden. Die Verwendung eines falschen Ladegeräts kann zu Ü berhitzen, Entzü nden und/oder (Tel.) +1-858 764 4580... - Página 7 3. SDK : Android, Linux, Windows, iOS 4. Utilitaire : Net Configuration Tool , Unified Label Utility-II 5. Conception d’étiquette : Label Artist-II Chez BIXOLON, nous nous efforçons à améliorer en continu les fonctions et la qualité de nos Bouton Alimentation Bouton pour se Bouton de sélection de...
-
Página 8: Caractéristiques Du Produit
● Bureaux aux Etats-Unis 2. Rechargez la batterie uniquement à l'aide du chargeur indiqué (et fourni en option) par BIXOLON (Adr) BIXOLON America Inc., 3171 Fujita St, Torrance, CA 90505 L'utilisation d'un mauvais chargeur peut se traduire par une surchauffe, une combustion et/ou (Tél.) +1-858 764 4580... - Página 9 Consulte el software y los documentos proporcionados en la secció n de descargas del sitio 2) Utilice una moneda para apretar el tornillo del cinturó n web de BIXOLON (http://www.bixolon.com) para obtener más informació n sobre có mo de la correa del cinturó n. Como se muestra realizar la configuració n.
-
Página 10: Especificaciones Del Producto
RFID. Para obtener más informació n, consulte el Manual de programación de RIFD. instalar el producto. Los programas de utilidad y los manuales se pueden descargar del sitio web de BIXOLON (www.bixolon.com). Si la posició n del transpondedor RFID está configurada incorrectamente y la Si hay un problema con el producto, comuníquese con el lugar de...