Tabla de contenido
Publicidad
Idiomas disponibles
Idiomas disponibles
Enlaces rápidos
Model No.:
608817
608818 – PAC
TENNANT COMPANY
701 NORTH LILAC DRIVE
MINNEAPOLIS, MN 55422
MAILING ADDRESS:
TENNANT COMPANY
P.O. BOX 1452
MINNEAPOLIS, MN 55440–1452
NOBLES CUSTOMER SERVICE:
1–800–365–6625
FAX: 1–800–678–4240
TECHNICAL SUPPORT:
1–800–522–7839 EXT. 5356
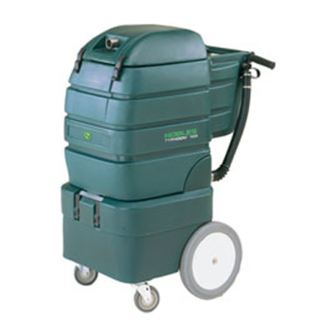
Typhoon
Batería en aspiración húmeda/seca
Home
Find... Go To..
ENGLISH - ESPAÑOL
t
Wet/Dry Battery Vacuum
Operator and Parts Manual
Manual del Operador y Piezas
Rev. 01 (10-03)
16B
608819
Publicidad
Capítulos
Tabla de contenido

Manuales relacionados para Nobles Typhoon 16B 608817


Resumen de contenidos para Nobles Typhoon 16B 608817
- Página 1 608818 – PAC TENNANT COMPANY 701 NORTH LILAC DRIVE MINNEAPOLIS, MN 55422 MAILING ADDRESS: TENNANT COMPANY P.O. BOX 1452 MINNEAPOLIS, MN 55440–1452 NOBLES CUSTOMER SERVICE: 1–800–365–6625 FAX: 1–800–678–4240 608819 TECHNICAL SUPPORT: Rev. 01 (10-03) 1–800–522–7839 EXT. 5356 Home Find... Go To..
-
Página 2: Tabla De Contenido
E1999, 2003 Tennant Company Printed in the U.S.A. subsidiaries. Nobles is a registered United States trademark of Tennant Company. Typhoon is a United States trademark of Tennant Company. This machine will provide excellent service. However, the best results will be obtained at minimum costs if: The machine is operated with reasonable care. -
Página 3: Safety Precautions
OPERATION The following information signals potentially SAFETY PRECAUTIONS dangerous conditions to the operator or equipment: FOR SAFETY: This machine is intended for commercial use. It is designed for wet/dry vacuuming in an indoor 1. Do not operate machine: environment and is not constructed for any other –... -
Página 4: Warning Labels
OPERATION WARNING LABELS The warning labels appear on the machine in the locations indicated. Replace labels if they become damaged or illegible. WARNING LABEL – LOCATED ON TOP OF MACHINE. WARNING LABEL – LOCATED ON BACK SIDE OF MACHINE. WARNING: FAILURE TO FOLLOW THESE WARNINGS MAY RESULT IN: PERSONAL INJURY, ELECTROCUTION,... -
Página 5: Machine Components
OPERATION MACHINE COMPONENTS 1. Bag Compartment Cover 2. Vacuum Hose Snout 3. Control Grips 4. 109 cm (43 in) Vacuum Hose 10. Machine ON/OFF Switch 5. Vacuum Bag Compartment / Recovery Tank 11. Drain Hose 6. Battery Compartment 12. Squeegee Kit Lift Pedal (Optional) 7. -
Página 6: Machine Installation
OPERATION 2. Open battery compartment, unlatch lower latches and carefully tilt upper housing backwards to floor. MACHINE INSTALLATION Remove loose battery cables at bottom of compartment (Figure 1). UNCRATING MACHINE Carefully check carton for signs of damage. Report damages at once to carrier. Check Machine Contents to ensure package is complete. - Página 7 OPERATION 3. Remove two unused squeegee mounting screws 8. Slide pedal between the two mounting arms on from bottom of machine. back of machine. Align and insert clevis pin through arms and slot in pedal, secure with cotter 4. Install squeegee mounting bracket as shown. pin (Figure 6).
-
Página 8: Machine Setup
OPERATION MACHINE SETUP WET VACUUMING 1. Open machine cover and remove vacuum bag from recovery tank (Figure 9). FIG. 11 ATTENTION: Always make sure that a bag is in place before dry vacuuming. Operating machine without bag in place will damage vacuum motor. This damage is NOT covered by warranty. -
Página 9: Operating Accessory Tools
OPERATION 2. Activate the ON/OFF switch. OPERATING ACCESSORY TOOLS 3. Begin operating by pushing and pulling machine in either direction. 1. Connect 3m (10 ft) vacuum hose to machine cover snout. 4. During operation, the float shut-off screen will automatically stop water intake when recovery 2. -
Página 10: Charging Batteries
OPERATION 3. After draining recovery tank, open cover and 4. Before charging, check the fluid level (A) in each thoroughly rinse out tank with clean water. battery cell. If the battery plates (B) are exposed, add just enough distilled water to cover plates. DO 4. -
Página 11: Machine Maintenance
OPERATION 7. The charger will automatically begin charging and ATTENTION: Always have float shut–off screen in shut off when fully charged. place before operating. During wet operation, the float shut–off screen protects the vacuum motor 8. When disconnecting charger, always unplug from water. -
Página 12: Battery Maintenance
OPERATION SPECIFIC GRAVITY BATTERY BATTERY MAINTENANCE at 275C (805F) CHARGE 1.265 100% CHARGED WARNING: Keep Sparks And Open Flame 1.223 75% CHARGED Away. Keep Battery Hood Open When Charging. 1.185 50% CHARGED FOR SAFETY: When servicing machine, wear 1.148 25% CHARGED protective gloves and safety glasses when handling batteries or battery cables. -
Página 13: Storing Machine
OPERATION STORING MACHINE RECOMMENDED STOCK ITEMS Before storing the machine perform the following Refer to the Parts List section in this manual for instructions below: recommended stock items. Stock Items are clearly identified with a bullet preceding the parts description. 1. -
Página 14: Machine Specifications
OPERATION MACHINE SPECIFICATIONS Model TYPHOONt 16B LENGTH 840 mm (33 in) WIDTH 530 mm (21 in) HEIGHT 1090 mm (43 in) WEIGHT / WEIGHT WITH BATTERIES 41 Kg (90 lbs) / 107 Kg (235 lbs) RECOVERY TANK CAPACITY 60.75 L (16 Gal) VACUUM BAG CAPACITY Cloth 15.5 cubic liters (0.44 bushels) Paper 22.7 cubic liters (0.65 bushels) -
Página 15: Operación
OPERACIÓN Este manual se entrega con cada nueva máquina. Incluye instrucciones necesarias de operación y DATOS DE LA MAQUINA mantenimiento y una lista ilustrada de piezas. Lea completamente este manual para entender la máquina, antes de intentar operar o prestar Por favor complete al momento de la instalación para referencia futura. -
Página 16: Medidas De Seguridad
OPERACIÓN PARA SEGURIDAD: MEDIDAS DE SEGURIDAD 1. No opere la máquina: – Con líquidos inflamables o cerca de los vapores inflamables ya que puede ocurrir Esta máquina es para el uso comercial. Se ha una explosión o fuego explosivo. diseñado para aspiración húmeda/seca en un –... -
Página 17: Etiquetas De Advertencia
OPERACIÓN ETIQUETAS DE ADVERTENCIA Las etiquetas de advertencia aparecen en la máquina en las ubicaciones indicadas. Reemplace las etiquetas si se dañan o son ilegibles. ETIQUETA DE ADVERTENCIA – Situado en la parte trasera de la máquina. ETIQUETA DE ADVERTENCIA – Situado en la parte trasera de la máquina. -
Página 18: Componentes De La Máquina
OPERACIÓN COMPONENTES DE LA MÁQUINA 1. Tapa del compartimento de la bolsa 2. Tubo de la manguera de aspiración 3. Mandos de control 4. Manguera de aspiración de 109 cm (43 in) 10. Interruptor de ENCENDIDO/APAGADO de la 5. Compartimento de la bolsa de aspiración / máquina. -
Página 19: Instalación De La Máquina
OPERACIÓN 1. Coloque el interruptor de ENCENDIDO/APAGADO en la posición de INSTALACIÓN DE LA MÁQUINA apagado (OFF). ATENCIÓN: Asegúrese de que los depósitos estén vacíos antes de abrirlos. DESEMPAQUE DE LA MÁQUINA 2. Abra el compartimento de la batería, quite los pestillos inferiores y incline hacia atrás el soporte Inspeccione cuidadosamente la caja por señales de superior hasta el suelo cuidadosamente. -
Página 20: Adicion De Equipo Escurridor Opcional
OPERACIÓN ADICION DE EQUIPO ESCURRIDOR OPCIONAL NOTA: La instalación del conjunto es más sencilla si las baterías no están instaladas. Sin embargo, el conjunto también puede instalarse con las baterías instaladas. 1. Retire las bolsas de aspiración y/o vacíe el depósito de recuperación. -
Página 21: Preparación De La Máquina
OPERACIÓN ASPIRACIÓN EN SECO 1. Abra la tapa del la máquina e instale la bolsa de tela del filtro, asegúrese de que el borde de la bolsa están adecuadamente instalado en la corona del compartimento (Figura 11). Para una fácil eliminación de los desperdicios y para aumentar la vida útil de la bolsa del filtro de tela, utilice una bolsa de papel con la bolsa de tela. -
Página 22: Operación De La Máquina
OPERACIÓN Durante la aspiración de líquidos, el filtro del flotador de cierre automático detendrá OPERACIÓN DE LA MÁQUINA automáticamente la entrada de agua cuando el depósito de la disolución esté lleno (consulte el apartado de VACIADO DEL DEPÓSITO DE PARA SEGURIDAD: No opere la máquina a menos RECUPERACIÓN). -
Página 23: Vaciado Del Depósito De Recuperación
OPERACIÓN 5. Para elevar la escobilla de goma, pise el pedal hasta que se inmovilice en la posición de CAMBIO DE BATERIAS transporte (Figura 14). Para prolongar vida de la batería, recargue SOLAMENTE las baterías después de un total de 30 minutos o más de uso. -
Página 24: Mantenimiento De La Máquina
OPERACIÓN 4. Antes de cargar, inspeccione el nivel de flúido (A) NOTA: Una vez que el cargador está conectado, la en cada celda de la batería. Si las placas de la máquina es inoperable. batería (B) están expuestas, agregue justo lo 7. -
Página 25: Mantenimiento Semanal
OPERACIÓN ATENCION: Siempre tenga el tamiz de apagado Para la inspección de las escobillas de carbón del flotador en su lugar antes de operar. Durante consulte con su Centro Autorizado de Servicio. el funcionamiento húmedo, el tamiz de apagado PARA SEGURIDAD: Al prestar servicio a la del flotador protege el motor de vacío del agua. -
Página 26: Transporte De La Máquina
OPERACIÓN 3. Coloque un bloque detrás de cada ruedas traseras para evitar que la máquina ruede. 4. Coloque correas de amarre sobre el tope de la máquina para evitar que vuelque. Puede ser necesario instalar soportes de amarre en el piso de su acoplado o camión. -
Página 27: Localización De Fallas
OPERACIÓN LOCALIZACIÓN DE FALLAS PROBLEMA CAUSA SOLUCIÓN Sin electricidad. Interruptor de Consulte con el Centro de Servicio. ENCENDIDO/APAGADO defectuoso. Las baterías necesitan ser cargadas. Consultar el apartado de CARGA DE LAS BATERÍAS. Batería(s) defectuosa. Reemplace la batería(s). Cable flojo de la batería. Ajuste los cables flojos. -
Página 28: Especificaciones De La Máquina
OPERACIÓN ESPECIFICACIONES DE LA MÁQUINA Modelo TYPHOONt 16B LARGO 840 mm (33 in) ANCHO 530 mm (21 in) ALTO 1090 mm (43 in) PESO / PESO CON BATERÍAS 41 Kg (90 lbs) / 107 Kg (235 lbs) CAPACIDAD DEL DEPÓSITO DE RECUPERACIÓN 60.75 L (16 Gal) CAPIDAD DE BOLSA DE ASPIRACIÓN Trapo 15.5 L... -
Página 29: Electrical Diagram
ELECTRICAL DIAGRAMS DIAGRAMAS ELECTRICAS SWITCH HANDLE VACUUM MOTOR CHARGER PLUG 12 VOLT 12 VOLT BATTERY BATTERY BLACK JUMPER Typhoont 16B (10–03) Home Find... Go To.. -
Página 30: Parts List
PARTS LIST LISTA DE PIEZAS TANK GROUP CONJUNTO DEL TANQUE 11 10 Typhoont 16B (10–03) Home Find... Go To.. - Página 31 HANDLE, GREEN 140003 WASHER, 1/4x1 FENDER DSWITCH, ROCKER 608605 600654 DECAL, DASH 200823 GRIP, HANDLE 608185 LABEL, NOBLES LOGO 1006890 BRACKET, DRAIN HOSE HANGER 608494 DECAL, ”TYPHOON 16B” 140825 SCREW, #6X1/2 PANPHL 140504 NUT, CONDUIT, 1/2 NPT 140231 SCREW, 3/8–16X1–1/2 HEXHD...
-
Página 32: Base Group
PARTS LIST LISTA DE PIEZAS BASE GROUP GRUPO BASE 29,30 Typhoont 16B (10–03) Home Find... Go To.. - Página 33 PARTS LIST LISTA DE PIEZAS BASE GROUP GRUPO BASE PART # DESCRIPTION QTY. PART # DESCRIPTION QTY. 230950 BRACKET, SQUEEGEE 140015 WASHER, 5/16 LOCK 140016 WASHER, 1/4 LOCK 140226 SCREW, 5/16–18X5/8 HEXHD 01696 SCREW, 1/4–20X1/2 HEXHD 01696 SCREW, 1/4–20X1/2 HEXHD 605387 CONNECTOR 140016...
-
Página 34: Options
OPTIONS OPCIONES SQUEEGEE KIT ASSEMBLY PIEZAS DE LA RASQUETA DE CAUCHO Factory installed on machine. Instalado en fábrica en la máquina. Typhoont 16B (10–03) Home Find... Go To.. - Página 35 OPTIONS OPCIONES SQUEEGEE KIT ASSEMBLY PIEZAS DE LA RASQUETA DE CAUCHO PART # DESCRIPTION QTY. PART # DESCRIPTION QTY. ∇ 190108 KIT, SQUEEGEE, 685 MM (27 IN) 100150 GASKET, SQUEEGEE 190972 KIT, SQUEEGEE, 864 MM (34 IN) 230725.BK PLATE, REAR, 685 MM (27 IN) 190958 KIT, SQUEEGEE, 1016 MM (40 IN) 230669.BK...
-
Página 36: Wet/Dry Tool Kit
OPTIONS OPCIONES WET/DRY TOOL KIT KIT DE HERRAMIENTA SECO MOJADO PART # DESCRIPTION QTY. PART # DESCRIPTION QTY. ∇ DKIT, VACUUM & FLOOR, ∇ 4 DTOOL, FLOOR & RUG, 605178 14043 406 MM (16 IN) 406 MM (16 IN) ∇ 1 DWAND, TWO BEND ALUMINUM DBRUSH, REPLACEMENT 6108.1... -
Página 37: Dry Tool Kit
OPTIONS OPCIONES DRY TOOL KIT KIT DE HERRAMIENTA SECO PART # DESCRIPTION QTY. PART # DESCRIPTION QTY. ∇ DKIT, FLOOR & VACUUM, ∇ 2 DTOOL, FLOOR & RUG, 605177 605136 279 MM (11 IN) DRY 279 MM (11 IN) ∇ 1 DWAND, TWO BEND ALUMINUM DBRUSH, REPLACEMENT 6108.1... -
Página 38: Floor & Carpet Tool Kit
OPTIONS OPCIONES FLOOR & CARPET TOOL KIT KIT DE HERRAMIENTA PARA LOS PISOS Y LA ALFOMBRA PART # DESCRIPTION QTY. PART # DESCRIPTION QTY. ∇ DKIT, FLOOR/CARPET TOOL ∇ 2 DSQUEEGEE ASSEMBLY, 190142 13840 PUSH/PULL, 355 MM (14 IN) ∇ 1 DWAND, TWO BEND, 2PC 190722 DBLADES, REPLACEMENT (SET/4) -
Página 39: Wet Pick-Up Tool Kit
OPTIONS OPCIONES WET PICK–UP TOOL KIT KIT DE HERRAMIENTA MOJADO PART # DESCRIPTION QTY. PART # DESCRIPTION QTY. ∇ DKIT, WET PICK–UP DHOSE, VAC, 1–1/2X3 M (10 FT) 190928 160481 ∇ 1 DWAND, TWO BEND ALUMINUM DCONNECTOR, 1–1/2 VAC HOSE 6108.1 160451 DRING, LOCK...