
Manuales relacionados para Klarstein ICEWIND PLUS SMART


Resumen de contenidos para Klarstein ICEWIND PLUS SMART
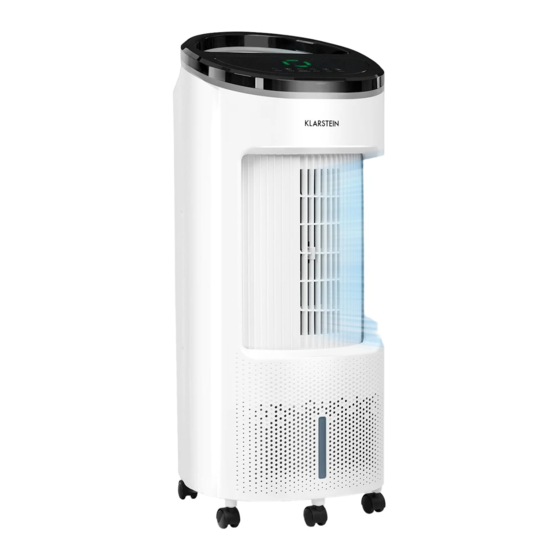
- Página 1 ICEWIND PLUS SMART Luftkühler Air Cooler Enfriador de aire Rafraîchisseur d’air Raffreddatore d’aria 10040209 10040210 10040211 10040212 www.klarstein.com...
-
Página 3: Tabla De Contenido
Sehr geehrter Kunde, wir gratulieren Ihnen zum Erwerb Ihres Gerätes. Lesen Sie die folgenden Hinweise sorgfältig durch und befolgen Sie diese, um möglichen Schäden vorzubeugen. Für Schäden, die durch Missachtung der Hinweise und unsachgemäßen Gebrauch entstehen, übernehmen wir keine Haftung. Scannen Sie den folgenden QR-Code, um Zugriff auf die aktuellste Bedienungsanleitung und weitere Informationen rund um das Produkt zu erhalten. -
Página 4: Sicherheitshinweise
SICHERHEITSHINWEISE • Prüfen Sie vor der Benutzung die angegebene Spannung auf dem Typenschild. Schließen Sie das Gerät nur an Steckdosen an, die der Spannung des Geräts entsprechen. Halten Sie das Kabel fern von heißen Oberflächen und scharfkantigen • Gegenständen. • Verlegen Sie das Kabel nicht unter einem Teppich und decken Sie es auch nicht mit anderen Gegenständen oder Stoffen ab. - Página 5 • Während des Betriebs befeuchtet das Gerät die Umgebungsluft. Vermeiden Sie jedoch zu hohe Luftfeuchtigkeit. Wir empfehlen Ihnen eine Luftfeuchtigkeit zwischen 40-50 %. Zu hohe Luftfeuchtigkeit kann zu Schimmel oder gesundheitlichen Problemen führen. Stellen Sie das Gerät nur auf Untergründe, die unempfindlich gegenüber •...
-
Página 6: Geräteübersicht
GERÄTEÜBERSICHT Obere Abdeckung Fernbedienung Bedienfeld Rückseite Fernbedienungssensor Filter Dekorativer Ring Filterrahmen Luftauslass Wassertank Frontschale Netzkabel Rollen... -
Página 7: Bedienfeld Und Tastenfunktionen
BEDIENFELD UND TASTENFUNKTIONEN Ein/Aus Timer einstellen: 1, 2, 4, 8 h (Stunden) Luftbefeuchtung oder Verdunstungskühlung Schwingen Modus: Normal > Natürlich ( ) > Schlafmodus ( Windgeschwindigkeit: hoch > mittel > niedrig > leise... -
Página 8: Installation Und Bedienung
INSTALLATION UND BEDIENUNG Vor dem ersten Gebrauch Entfernen Sie das komplette Verpackungsmaterial und lesen Sie sich die Anleitung komplett durch. Das Gerät ist sofort gebrauchsfertig. Gerät einschalten Sobald das Gerät eingeschaltet wird, gehen alle Anzeigen kurz an. Ein zweifaches Signal ertönt, der Luftauslass bewegt sich vom aktuellen Winkel auf 0° zurück und das Gerät wechselt in den Standby-Modus. -
Página 9: Weitere Funktionen
• Luftbefeuchtung oder Verdunstungskühlung: Drücken Sie im Betriebszustand die Taste, um die Wasserpumpe im Gerät ein-/ auszuschalten. • Schwingen: Drücken Sie auf die Taste, um das Gerät nach rechts und links schwingen zu lassen. Drücken Sie die Taste erneut, um die Schwingfunktion zu beenden. - Página 10 WLAN-Funktion • Halten Sie im Betriebsmodus die Windmodus-Taste 5 Sekunden lang gedrückt. Nachdem ein Piepton ertönt, blinkt die WLAN-Anzeigeleuchte ca. 5 Sekunden lang schnell auf und die App-Vernetzung kann im Standardmodus konfiguriert werden. Wenn innerhalb von 3 Minuten keine Verbindung hergestellt wurde, geht die WLAN-Anzeige aus.
- Página 11 • Nach dem Aktivieren der Trockenwind-Funktion blinkt die Anzeige der höchsten Geschwindigkeitsstufe und wird in einer Frequenz von 0,5 Sekunden abwechselnd ein- und ausgeschaltet. Die Funktion wird nach 20 Minuten automatisch beendet. • Wenn die Trockenwind-Funktion aktiviert wird, werden alle anderen Funktionen deaktiviert.
-
Página 12: Gerätesteuerung Per Smartphone
GERÄTESTEUERUNG PER SMARTPHONE Wenn Sie Ihr Klarstein-Gerät in Ihr heimisches WLAN einbinden, können Sie es ganz bequem über die dazugehörige Klarstein-App bedienen. Die App ermöglicht es Ihnen, nicht nur das Gerät über Ihr Smartphone fernzusteuern, sondern bietet Ihnen zudem Zugang zu Rezepten und weiterführenden Informationen. - Página 13 Fehlerbehebung bei Verbindungsproblemen Wenn Ihr Klarstein-Gerät im WLAN nicht gefunden werden kann, überprüfen Sie Folgendes: Das Gerät ist nicht eingesteckt. Stellen Sie sicher, dass Ihr Gerät an eine Steckdose angeschlossen ist. Das Gerät befindet sich nicht im Kopplungsmodus. Stellen Sie sicher, dass die WiFi-Anzeige (LED) auf dem Bedienfeld des Smart-Geräts blinkt, wie in der...
-
Página 14: Reinigung Und Pflege
REINIGUNG UND PFLEGE Hinweis: Schalten Sie das Gerät vor der Reinigung, Reparatur und Wartung aus und ziehen Sie den Stecker. Reinigung • Wenn sich zu viele Fremdkörper oder Staub an der Gitterabdeckung und den Rotoren des Lufteinlasses auf der Rückseite des Geräts absetzen, wird der Windeffekt beeinträchtigt. - Página 15 Legen Sie den Wasserfilter für kurze Zeit in eine warme Seifenlösung. Spülen Sie den Wasserfilter anschließend gründlich mit klarem Wasser ab. Setzen Sie die Filter in umgekehrter Reihenfolge wieder ein. Der Filter im Wassertank kann, falls erforderlich, mit warmem Wasser abgespült werden.
-
Página 16: Hinweise Zur Entsorgung
HINWEISE ZUR ENTSORGUNG Wenn es in Ihrem Land eine gesetzliche Regelung zur Entsorgung von elektrischen und elektronischen Geräten gibt, weist dieses Symbol auf dem Produkt oder auf der Verpackung darauf hin, dass dieses Produkt nicht im Hausmüll entsorgt werden darf. Stattdessen muss es zu einer Sammelstelle für das Recycling von elektrischen und elektronischen Geräten gebracht werden. -
Página 17: Technical Data
Dear Customer, Congratulations on purchasing this device. Please read the following instructions carefully and follow them to prevent possible damages. We assume no liability for damage caused by disregard of the instructions and improper use. Scan the QR code to get access to the latest user manual and more product information. -
Página 18: Safety Instructions
SAFETY INSTRUCTIONS • Before use, check the voltage indicated on the nameplate. Ensure that you only connect the appliance to sockets with the appropriate voltage. • Keep the cable away from hot surfaces and sharp objects. • Do not lay the cable under a carpet or cover it with other objects or fabrics. Lay the cable so that no one falls over it or gets caught on it. - Página 19 During operation, the unit humidifies the ambient air. However, avoid too high • humidity. We recommend a humidity of between 40-50%. Excessive humidity can lead to mould or health problems. • Only place the unit on surfaces that are insensitive to moisture and high humidity.
-
Página 20: Device Overview
DEVICE OVERVIEW Top cover Remote control Control panel Back side Remote control sensor Filter Decorative ring Filter frame Air outlet Water tank Front shell Power cable Rollers... -
Página 21: Control Panel And Button Functions
CONTROL PANEL AND BUTTON FUNCTIONS On/Off Setting the timer: 1, 2, 4, 8 h Humidification or evaporative cooling Swing Mode: Normal > Natural ( ) > Sleep mode ( Wind speed: high > medium > low > quiet... -
Página 22: Installation And Operation
INSTALLATION AND OPERATION Before first use Remove all packing material and read the instructions completely. The unit is ready for use immediately. Switching on the appliance As soon as the unit is switched on, all displays come on briefly. A double signal sounds, the air outlet moves back from the current angle to 0°... -
Página 23: Other Functions
OTHER FUNCTIONS Memory function • When the unit is switched on again after an interruption of the power supply or a power failure, a beep sounds 10 times (once per second), with no screen display and no action performed. After 30 seconds, the unit returns to the function that was set before it was switched off (all functions, except sleep mode, are restored when it is switched on again, including the new function for protection against unintentional long-term operation). - Página 24 Notes on the WiFi function If the unit is switched off again within 10 seconds of being switched on, the WiFi indicator light returns to the state before it was switched off. If the unit is switched off after 10 seconds, the WiFi indicator light goes off and the unit goes into standby mode.
-
Página 25: Device Control By Smartphone
Make sure your smartphone is connected to the same WiFi network that your Klarstein device is to be connected to. Open the Klarstein app. Sign in to your account. If you do not have an account, sign up in the Klarstein app. Follow the instructions from the app. - Página 26 Firewall settings of your WiFi network; the firewall setting of your WiFi network may not allow the Klarstein app to configure the WiFi settings on your smart device. Please make sure that you are not using a public WiFi network, e.g.
-
Página 27: Cleaning And Care
CLEANING AND CARE Note: Switch the device off and unplug it before cleaning, repairing or maintenance. Cleaning • If too much foreign matter or dust settles on the grille cover and the air inlet rotors at the back of the unit, the wind effect will be impaired. It is therefore recommended to clean them at least every two months. - Página 28 Storage • If the device will not be used for a long time, unplug it from the mains and pack it away to prevent dust from getting into the housing. • After packing, store it in a dry, ventilated place. Changing the battery of the remote control •...
-
Página 29: Disposal Considerations
DISPOSAL CONSIDERATIONS If there is a legal regulation for the disposal of electrical and electronic devices in your country, this symbol on the product or on the packaging indicates that this product must not be disposed of with household waste. Instead, it must be taken to a collection point for the recycling of electrical and electronic equipment. -
Página 31: Fiche Technique
Cher client, chère cliente, Toutes nos félicitations pour l’acquisition de ce nouvel appareil. Lisez attentivement les indications suivantes et suivez-les pour éviter d'éventuels dommages. Nous ne saurions être tenus pour responsables des dommages dus au non-respect des consignes et à la mauvaise utilisation de l’appareil. -
Página 32: Consignes De Sécurité
CONSIGNES DE SÉCURITÉ Vérifiez la tension indiquée sur la plaque signalétique avant utilisation. • Connectez l'appareil uniquement à des prises qui correspondent à sa tension. • Tenez le câble éloigné des surfaces chaudes et des objets pointus. Ne faites pas passer le cordon sous un tapis et ne le recouvrez pas d'autres •... - Página 33 L'appareil humidifie l'air ambiant pendant le fonctionnement. Cependant, • évitez une humidité excessive. Nous recommandons une humidité entre 40 et 50 %. Une humidité excessive peut entraîner des problèmes de moisissure ou de santé. Placez l'appareil uniquement sur des surfaces insensibles à l'eau et à une •...
-
Página 34: Aperçu De L'appareil
APERÇU DE L'APPAREIL Cache supérieur Télécommande Dos de l'appareil Panneau de commande Capteur de télécommande Filtre Cadre de filtre Anneau décoratif Évacuation d'air Réservoir d'eau Coque frontale Câble secteur Roulettes... -
Página 35: Panneau De Commande Et Fonctions Des Touches
PANNEAU DE COMMANDE ET FONCTIONS DES TOUCHES Marche/arrêt Réglage de la minuterie : 1, 2, 4, 8 h Humidification de l'air ou refroidissement par évaporation Oscillation Mode : Normal > Naturel ( ) > Sommeil ( Vitesse de ventilation : Haut > Moyen > Faible > silencieux... -
Página 36: Installation Et Utilisation
INSTALLATION ET UTILISATION Avant la première utilisation Retirez tout le matériel d'emballage et lisez entièrement les instructions. L'appareil est immédiatement prêt à l'emploi. Pour allumer l'appareil Lorsque l'appareil est mis en marche, tous les indicateurs s'allument brièvement. Un double signal sonore retentit, la sortie d'air se déplace de l'angle actuel à 0° et l'appareil passe en mode veille. -
Página 37: Autres Fonctions
Humidification de l'air ou rafraîchissement par évaporation : en mode de • fonctionnement, appuyez sur la touche pour activer/désactiver la pompe à eau dans l'appareil Oscillation : appuyez sur la touche pour faire osciller l'appareil vers la droite • et vers la gauche. Appuyez une nouvelle fois sur la touche pour quitter la fonction. - Página 38 Fonction Wifi • En mode de fonctionnement, maintenez la touche de mode de ventilation 5 secondes. Après un bip, le voyant Wifi clignote rapidement pendant environ 5 secondes et la mise en réseau de l'application peut être configurée en mode standard . Si aucune connexion n'est établie dans les 3 minutes, le voyant Wifi s'éteint.
- Página 39 • Lorsque la fonction vent sec est activée, toutes les autres fonctions sont désactivées. • Une fois cette fonction activée, toutes les touches sont désactivées, sauf la touche marche/arrêt. Si vous appuyez sur la touche marche/arrêt avant la fin des 20 minutes, •...
-
Página 40: Contrôle De L'appareil Par Smartphone
CONTRÔLE DE L'APPAREIL PAR SMARTPHONE Si vous intégrez votre appareil Klarstein à votre Wi-Fi domestique, vous pouvez le contrôler confortablement à l'aide de l'application Klarstein associée. L'application vous permet non seulement de contrôler l'appareil à distance sur votre smartphone, mais vous donne également accès à des recettes et à d'autres informations. - Página 41 Vérifiez les paramètres du pare-feu de votre réseau WiFi. Le paramétrage de pare-feu de votre réseau Wi-Fi peut ne pas permettre à l'application Klarstein de configurer les paramètres Wi-Fi sur votre appareil connecté. Veuillez vous assurer que vous n'utilisez pas un réseau WiFi public, par ex. aéroports, dortoirs, entreprises, etc.
-
Página 42: Nettoyage Et Entretien
NETTOYAGE ET ENTRETIEN Remarque : Avant le nettoyage, l'entretien et la maintenance, éteignez l'appareil et débranchez la fiche de la prise. Nettoyage • Si trop de corps étrangers ou de poussière se déposent sur le couvercle de la grille et sur les rotors de l'entrée d'air à l'arrière de l'appareil, l'effet du vent sera altéré. - Página 43 Placez le filtre à eau dans une solution savonneuse chaude pendant quelques instants. Rincez ensuite soigneusement le filtre à eau à l'eau claire. Remettez les filtres en place dans l'ordre inverse. Le filtre du réservoir d'eau peut, si nécessaire, être rincé à l'eau chaude. Rangement Si vous n'utilisez pas l'appareil pendant une longue période, débranchez le •...
-
Página 44: Informations Sur Le Recyclage
INFORMATIONS SUR LE RECYCLAGE Si l'élimination des appareils électriques et électroniques est réglementée dans votre pays, ce symbole sur le produit ou sur l'emballage indique qu'il ne doit pas être mis au rebut avec les ordures ménagères. Vous devez l'acheminer vers un point de collecte pour le recyclage des appareils électriques et électroniques. -
Página 45: Datos Técnicos
Estimado cliente: Le felicitamos por la adquisición de este producto. Lea atentamente el siguiente manual y siga cuidadosamente las instrucciones de uso con el fin de evitar posibles daños. La empresa no se responsabiliza de los daños ocasionados por un uso indebido del producto o por haber desatendido las indicaciones de seguridad. -
Página 46: Indicaciones De Seguridad
INDICACIONES DE SEGURIDAD • Antes de utilizar el aparato, compruebe la tensión en la placa técnica del mismo. Conecte el aparato a tomas de corriente que se adecuen a su tensión. Mantenga el cable alejado de superficies calientes y objetos afilados. •... - Página 47 Durante el funcionamiento, el aparato humidifica el aire ambiente. Sin • embargo, hay que evitar el exceso de humedad. Recomendamos una humedad entre 40-50 %. Un exceso de humedad puede provocar moho o problemas de salud. Coloque la unidad sólo en superficies que no sean sensibles a la humedad. •...
-
Página 48: Vista General Del Aparato
VISTA GENERAL DEL APARATO Tapa superior Mando a distancia Panel de control Parte trasera Sensor del mando a distancia Filtro Marco del filtro Anillo decorativo Salida del aire Depósito de agua Carcasa frontal Cable de alimentación Ruedas... -
Página 49: Panel De Control Y Botones
PANEL DE CONTROL Y BOTONES Encender/apagar Ajustar el temporizador: 1, 2, 4, 8 h (horas) Humidificación o refrigeración evaporativa Oscilación Modo: Normal > Natural ( ) > Modo de reposo ( cuatro velocidades: Alto > Medio > Bajo > mínima... -
Página 50: Instalación Y Funcionamiento
INSTALACIÓN Y FUNCIONAMIENTO Antes del primer uso Retire todo el material de embalaje y lea completamente las instrucciones. La unidad está lista para ser utilizada inmediatamente. Encender el aparato Al encender el aparato, todas las pantallas se encienden brevemente. Suena una señal doble, la salida de aire retrocede del ángulo actual a 0°... -
Página 51: Otras Funciones
Humidificación o refrigeración por evaporación: En el modo de • funcionamiento, pulse el botón para activar/desactivar la bomba de agua de la unidad • Swing: Pulse el botón para girar la unidad a la derecha y a la izquierda. Pulse de nuevo el botón para detener la función de oscilación. - Página 52 Función WiFi • En el modo de funcionamiento, mantenga pulsado el botón de modo de viento durante 5 segundos. Después de que suene un pitido, la luz indicadora de WLAN parpadea rápidamente durante unos 5 segundos y se puede configurar la red App en el modo estándar . Si no se establece ninguna conexión en 3 minutos, el indicador wifi se apaga.
- Página 53 • Tras activar la función de viento seco, el indicador del nivel de velocidad más alto parpadea y se enciende y apaga alternativamente con una frecuencia de 0,5 segundos. La función se termina automáticamente después de 20 minutos. • Cuando se activa la función de viento seco, se desactivan todas las demás funciones.
-
Página 54: Control Del Aparato A Través Del Smartphone
CONTROL DEL APARATO A TRAVÉS DEL SMARTPHONE Si conecta su aparato Klarstein a la red wifi de su casa, podrá manejarlo cómodamente a través de la aplicación «Klarstein». La aplicación no solo permite controlar el aparato a distancia a través del teléfono inteligente, sino que también da acceso a recetas y a más información. - Página 55 Solución de problemas de conexión Si su aparato Klarstein no se conecta a la red wifi, compruebe lo siguiente: El aparato no está enchufado. Asegúrese de que su dispositivo esté conectado a un enchufe. El aparato no se encuentra en modo sincronización. Asegúrese de que el indicador de WiFi (LED) parpadea en el panel de control del dispositivo inteligente, tal y como se describe en las instrucciones "Restablecer la...
-
Página 56: Limpieza Y Cuidado
LIMPIEZA Y CUIDADO Nota: Apague y desenchufe el aparato antes de proceder a su limpieza, reparación y mantenimiento. Limpieza Si se depositan demasiadas materias extrañas o polvo en la cubierta de la • rejilla y en los rotores de entrada de aire de la parte posterior de la unidad, el efecto del viento se verá... - Página 57 Coloque el filtro de agua en una solución jabonosa tibia durante un periodo corto tiempo. A continuación, aclare bien el filtro de agua con agua limpia. Sustituya los filtros en orden inverso. El filtro del depósito de agua puede enjuagarse con agua caliente si es necesario.
-
Página 58: Indicaciones Sobre La Retirada Del Aparato
INDICACIONES SOBRE LA RETIRADA DEL APARATO Si en su país existe una disposición legal relativa a la eliminación de aparatos eléctricos y electrónicos, este símbolo estampado en el producto o en el embalaje advierte de que no debe eliminarse como residuo doméstico. -
Página 59: Dati Tecnici
Gentile cliente, la ringraziamo per l'acquisto del dispositivo. La preghiamo di leggere attentamente le seguenti istruzioni per l'uso e di seguirle per evitare possibili danni. Non ci assumiamo alcuna responsabilità per danni scaturiti da una mancata osservanza delle avvertenze di sicurezza e da un uso improprio del dispositivo. -
Página 60: Avvertenze Di Sicurezza
AVVERTENZE DI SICUREZZA Prima dell'utilizzo, controllare la tensione indicata sulla targhetta del • dispositivo. Collegare il dispositivo solo a prese elettriche con tensione corrispondente a quella indicata. Tenere il cavo lontano da superfici calde e oggetti con bordi taglienti. • •... - Página 61 Durante il funzionamento, il dispositivo umidifica l'aria. Evitare un livello di • umidità dell'aria troppo elevato. Consigliamo un'umidità tra il 40 e il 50%. Un'umidità dell'aria eccessiva può causare muffa o problemi di salute. Posizionare il dispositivo solo su superfici resistenti al bagnato e all'umidità •...
-
Página 62: Descrizione Del Dispositivo
DESCRIZIONE DEL DISPOSITIVO Copertura superiore Telecomando Pannello di controllo Lato posteriore Sensore del telecomando Filtro Telaio del filtro Anello decorativo Uscita dell'aria Serbatoio dell'acqua Alloggiamento anteriore Cavo di alimentazione Rotelle... -
Página 63: Pannello Di Controllo E Tasti Funzione
PANNELLO DI CONTROLLO E TASTI FUNZIONE On/Off Impostare il timer: 1, 2, 4, 8 h (ore) Umidificazione o raffreddamento evaporativo Oscillazione Modalità: Normale > Naturale ( ) > Notturna( Velocità di ventilazione: alta > media > bassa > silenziosa... -
Página 64: Installazione E Utilizzo
INSTALLAZIONE E UTILIZZO Avvertenze per il primo utilizzo Rimuovere tutto il materiale d'imballaggio e leggere il manuale d'uso. Il dispositivo è subito pronto all'uso. Accendere il dispositivo Non appena si attiva il dispositivo, tutti le spie si accendono brevemente. Vengono emessi due segnali acustici, l'uscita dell'aria torna dall'inclinazione attuale a 0°... -
Página 65: Ulteriori Funzioni
Umidificazione o raffreddamento evaporativo: in modalità operativa, • premere il tasto per accendere/spegnere la pompa dell'acqua nel dispositivo. • Oscillazione: premere il tasto per far oscillare il dispositivo a destra e a sinistra. Premere nuovamente il tasto per disattivare la funzione di oscillazione. - Página 66 Funzione WiFi • Tenerlo premuto il tasto della modalità di ventilazione per 5 secondi in modalità operativa. Dopo un segnale acustico, la spia del WiFi lampeggia rapidamente per circa 5 secondi e il collegamento in rete dell'app può essere configurato in modalità standard . Se non viene stabilito nessun collegamento entro 3 minuti, la spia del WiFi si spegne.
- Página 67 • Quando la funzione di ventilazione a secco è attivata, tutte le altre funzioni sono disattivate. Dopo l'attivazione di questa funzione, tutti i tasti sono disattivati tranne On/ • Off. Se si preme On/Off prima che siano trascorsi i 20 minuti, il dispositivo si •...
-
Página 68: Controllo Del Dispositivo Con Smartphone
CONTROLLO DEL DISPOSITIVO CON SMARTPHONE Se si collega il dispositivo Klarstein con la rete Wi-Fi di casa, è possibile utilizzarlo comodamente con l’apposita app di Klarstein. La app non permette solo di controllare il dispositivo a distanza con lo smartphone, ma offre anche accesso a utili informazioni. - Página 69 Correzione degli errori in caso di problemi di connessione Se non è possibile trovare il dispositivo Klarstein nella rete WiFi, controllare i seguenti punti: La spina non è collegata. Assicurarsi che il dispositivo sia collegato a una presa elettrica. Il dispositivo non si trova in modalità di accoppiamento. Assicurarsi che l'indicazione WiFi (LED) sul pannello di controllo del dispositivo smart lampeggi come descritto alla voce "Resettare le impostazioni WiFi"...
-
Página 70: Pulizia E Manutenzione
PULIZIA E MANUTENZIONE Nota: prima della pulizia e della manutenzione, spegnere il dispositivo e staccare la spina. Pulizia Se sul coperchio a griglia e sui rotori dell'ingresso dell'aria sul retro del • dispositivo si depositano troppi corpi estranei o polvere, viene compromessa l'efficacia della ventilazione. - Página 71 Mettere il filtro dell'acqua in una soluzione saponosa calda per un breve periodo. Sciacquare poi il filtro dell'acqua. Riposizionare i filtri in ordine inverso. Se necessario, il filtro nel serbatoio può essere risciacquato con acqua calda. Stoccaggio • Se il dispositivo non viene usato per lunghi periodi di tempo, staccare la spina e imballarlo per evitare che penetri polvere nell'alloggiamento.
-
Página 72: Avviso Di Smaltimento
AVVISO DI SMALTIMENTO Se nel vostro Paese sono vigenti regolamenti legislativi relativi allo smaltimento di dispositivi elettrici ed elettronici, questo simbolo sul prodotto o sull'imballaggio indica che non è consentito smaltire questo prodotto nei rifiuti casalinghi. Il dispositivo deve invece essere portato in un centro di raccolta per il riciclaggio di dispositivi elettrici ed elettronici.