Tabla de contenido
Publicidad
Idiomas disponibles
Idiomas disponibles
Enlaces rápidos
OPERATOR'S MANUAL
MANUEL D'UTILISATION
MANUAL DEL OPERADOR
18 vOLT bAckPAck PAINTER
SySTèME DE PEINTURE DORSAL
DE 18 v
Máquina para pintar tipo Mochila
DE 18 v
P635
AccEPTS ALL ONE+ bATTERy PAckS
cOMPATIbLE AvEc TOUS LE PILES ONE+
acEpta toDoS loS paquEtES DE BatErÍaS onE+
Your product has been engineered and manufactured to our high standard for dependability, ease of operation, and opera-
tor safety. When properly cared for, it will give you years of rugged, trouble-free performance.
WARNING:
To reduce the risk of injury, the user must read and understand the operator's manual before using
this product.
Thank you for your purchase.
SaVE thiS Manual For FuturE rEFErEncE
Cette produit a été conçue et fabriquée conformément aux strictes
normes de fiabilité, simplicité d'emploi et sécurité d'utilisation.
Correctement entretenu, cet outil vous donnera des années de
fonctionnement robuste et sans problème.
AvERTISSEMENT :
blessures, l'utilisateur doit lire et veiller à bien comprendre le
manuel d'utilisation avant d'employer ce produit.
Merci de votre achat.
cONSERvER cE MANUEL POUR
FUTURE RÉFÉRENcE
Pour réduire les risques de
Su producto ha sido diseñado y fabricado de conformidad con
nuestras estrictas normas para brindar fiabilidad, facilidad de
uso y seguridad para el operador. Con el debido cuidado, le
brindará muchos años de sólido funcionamiento y sin problemas.
ADvERTENcIA:
el usuario debe leer y comprender el manual del operador antes
de usar este producto.
Le agradecemos su compra.
GUARDE ESTE MANUAL PARA
FUTURAS cONSULTAS
Para reducir el riesgo de lesiones,
Publicidad
Capítulos
Tabla de contenido

Manuales relacionados para Ryobi P635


Resumen de contenidos para Ryobi P635
- Página 1 SySTèME DE PEINTURE DORSAL DE 18 v Máquina para pintar tipo Mochila DE 18 v P635 AccEPTS ALL ONE+ bATTERy PAckS cOMPATIbLE AvEc TOUS LE PILES ONE+ acEpta toDoS loS paquEtES DE BatErÍaS onE+ Your product has been engineered and manufactured to our high standard for dependability, ease of operation, and opera- tor safety.
-
Página 2: Tabla De Contenido
The replacement power tool will be covered by the limited warranty for the balance of the two year period from the date of the original purchase. What thiS WarrantY coVErS: This warranty covers all defects in workmanship or materials in your RYOBI power ®... -
Página 3: Important Safety Instructions
IMPORTANT SAFETy INSTRUcTIONS WARNING: To reduce the risk of skin injection: WARNING: Do not aim the nozzle at, or spray any person or animal. SaVE thESE inStructionS. To reduce the risks of fire or explosion, electric shock, and the injury to per- ... -
Página 4: Specific Safety Rules
SPEcIFIc SAFETy RULES never start the machine if ice has formed in any part of keep guards in place and in working order. Never oper- the equipment. ate the tool with any guard or cover removed. Make sure all guards are operating properly before each use. - Página 5 SPEcIFIc SAFETy RULES Disconnect battery pack from tool or place the batteries can explode in the presence of a source switch in the locked or off position before making of ignition, such as a pilot light. To reduce the risk of any adjustments, changing accessories, or storing serious personal injury, never use any cordless product the tool.
-
Página 6: Symbols
SyMbOLS The following signal words and meanings are intended to explain the levels of risk associated with this product. SyMbOL SIGNAL MEANING Indicates an imminently hazardous situation, which, if not avoided, will result DANGER: in death or serious injury. Indicates a potentially hazardous situation, which, if not avoided, could result WARNING: in death or serious injury. -
Página 7: Features
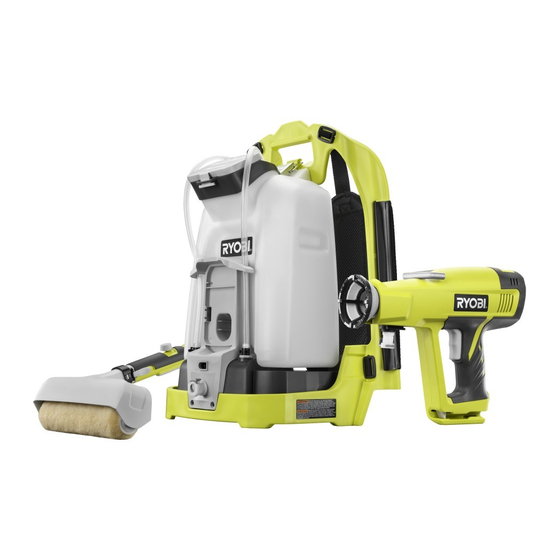
FEATURES PRODUcT SPEcIFIcATIONS Flow Rate .............. 5.5 GPH Motor ..............18 Volt DC Roller Coverage ..........58 sq. ft./min. Charger Input........120 V, 60 Hz, AC only Tank Size ..............1.5 gal. kNOW yOUR bAckPAck PAINTER SPRAy TIPS See Figure 1, page 15. The two spray tips provided allow you to choose between The safe use of this product requires an understanding of three different spray patterns −... - Página 8 ASSEMbLy aSSEMBlinG thE paint rollEr WARNING: See Figure 4, page 15. Place roller caps in each end of the paint roller. Do not attempt to modify this product or create acces- sories not recommended for use with this product. Any Align pins in the end of each roller cap to the holes inside such alteration or modification is misuse and could result the roller head.
-
Página 9: Operation
Open the lid of the backpack tank. This product will accept Ryobi One+ 18 V lithium-ion Carefully pour up to 1.5 gallons of paint or stain into the battery packs and Ryobi One+ 18 V nickel-cadmium battery tank. -
Página 10: Operating The Sprayer
OPERATION Chest strap should be tightened or loosened until adjusted Connect the DC power cord of the sprayer into the outlet to a comfortable operating position. on the backpack unit. to adjust waist strap assembly: Place the motor switch in the forward position. Waist strap should be tightened or loosened until adjusted ... - Página 11 OPERATION SElEctinG thE propEr SpraY tip opEratinG thE rollEr See Figure 13, page 16. See Figures 14 - 15, page 17. Install the battery pack into the backpack unit. Use the 1 in. round fan tip for latex paints, ...
-
Página 12: Maintenance
MAINTENANcE Install the battery pack in the backpack unit. WARNING: If you were using the sprayer, spray the solution onto a piece of cardboard or other scrap material. Continue When servicing, use only identical replacement parts. spraying until all the solution is used. Then disconnect the Use of any other parts may create a hazard or cause DC power cord from both the sprayer and the backpack product damage. - Página 13 MAINTENANcE Replace the spray tip and rotate clockwise to secure. To replace: Remove the battery pack from the backpack unit. to clEan thE paint rollEr: Rotate the spray tip counterclockwise and remove. Lift and remove the paint roller from the paint roller assembly.
-
Página 14: Troubleshooting
trouBlEShootinG PRObLEM cAUSE POSSIbLE SOLUTION Motor does not run. Battery is not charged. Charge battery. Motor overheats. Piston has seized up. Thoroughly clean the sprayer using long- term storage cleaning instructions in the Maintenance section of this manual. Continuous spray operation. Release trigger at the end of each pass to allow the motor to cool. - Página 15 POLITIQUE D’ÉCHANGE DE 30 JOURS : En cas de défaillance due à des vices de matériaux ou de fabrication au cours des 30 jours suivant la date d’achat, l’acheteur pourra faire réparer tout outil électrique RyObI au titre de cette garantie ®...
-
Página 16: Instructions Importantes Concernant La Sécurité
INSTRUCTIONS IMPORTANTES CONCERNANT LA SÉCURITÉ AVERTISSEMENT : Pour réduire les risques d’injection: AVERTISSEMENT : Ne pas orienter la buse ou pulvériser en direction des personnes ou des animaux. CONSERVER CES INSTRUCTIONS. Pour réduire les risques d’incendie ou d’explosion, choc électrique, et la ... -
Página 17: Règles De Sécurité Particulières
RÈGLES DE SÉCURITÉ PARTICULIÈRES Garder l’outil sec, propre et exempt d’huile ou de Maintenir tous les dispositifs de protection en place graisse.Toujours utiliser un chiffon propre pour le et en bon état de fonctionnement. Ne jamais utiliser nettoyage. Ne jamais utiliser de liquide de freins, d’essence l’outil avec des couvercles ou dispositifs de protection ou de produits à... - Página 18 RÈGLES DE SÉCURITÉ PARTICULIÈRES Toujours débrancher le pulvérisateur, éteindre l’unité Ne pas placer les outils électriques sans fil ou leurs et relâcher la pression avant de procéder à l’entretien piles à proximité de flammes ou d’une source de ou au nettoyage de l’embout ou du dispositif de chaleur.
-
Página 19: Symboles
SYMBOLES Les termes de mise en garde suivants et leur signification ont pour but d’expliquer le degré de risques associé à l’utilisation de ce produit. SYMBOLE SIGNAL SIGNIFICATION Indique une situation extrêmement dangereuse qui, si elle n’est pas évitée, DANGER : aura pour conséquences des blessures graves ou mortelles. -
Página 20: Caractéristiques
CARACTÉRISTIQUES FICHE TECHNIQUE Moteur ................ 18 V c.c. Débit ............20,81 l/h (5,5 gal/h) Alimentation du chargeur ....120 V, c.a. seulement, 60 Hz Couverture du rouleau ....17,7 m (58 pi ) par minute Taille du réservoir ..........5,68 l (1,5 gal) BIEN CONNAîTRE SON SYSTÈME DE PEINTURE CONSEILS SUR LA PULVÉRISATION DORSAL... - Página 21 ASSEMBLAGE ASSEMBLAGE DU ROULEAU à PEINDRE AVERTISSEMENT : Voir la figure 4, page 15. Si des pièces manquent ou sont endommagées, ne pas Placer les capuchons de rouleau à chaque extrémité du rouleau à peindre. utiliser ce produit avant qu’elles aient été remplacées. Le fait d’utiliser ce produit même s’il contient des pièces Aligner les goupilles se trouvant à...
-
Página 22: Utilisation
Ouvrir le couvercle du réservoir de l’unité dorsale. Verser soigneusement 5,68 l (1,5 gal) de peinture ou de Les piles au lithium ion de Ryobi sont conçues de manière à teinture dans le réservoir. protéger les piles au lithium ion et à maximiser l’autonomie des piles. - Página 23 UTILISATION AJUSTEMENT DU HARNAIS ET DES Choisir l’embout de pulvérisation qui procure la forme de jet désirée. Voir Choisir l’embout de pulvérisation SANGLES DE FIXATION à LA TAILLE approprié. Les sangles doivent être réglées à une position confortable Installer le bloc-piles dans l’unité dorsale. avant de démarrer l’unité.
- Página 24 UTILISATION UTILISATION DU ROULEAU ATTENTION : Voir les figures 14 et 15, page 17. Installer le bloc-piles dans l’unité dorsale. Il est important de bien nettoyer le pistolet après chaque utilisation ou au moment de changer de couleur. Le fait ...
-
Página 25: Entretien
ENTRETIEN Remplir le réservoir de peinture d’eau tiède (dans le cas AVERTISSEMENT : d’enduits au latex) ou de diluant de formule blanche Klean-Strip® (dans le cas d’enduits à base d’huile). Utiliser exclusivement des pièces d’origine pour les Réinstaller le réservoir et replacer le couvercle. S’assurer réparations. - Página 26 ENTRETIEN REMPLACEMENT DE L’ENSEMBLE VALVE DE Pour réassembler l’unité : PULVÉRISATEUR DANS LE PISTOLET Placer une pellicule de lubrifiant sur le piston. Replacer le ressort sur le piston. Voir la figure 21, page 17. Insérer l’ensemble piston et ressort dans la partie arrière La valve de pulvérisateur fait en sorte que la peinture ou du logement de la pompe.
-
Página 27: Dépannage
DÉPANNAGE PROBLÈME CAUSE SOLUTION POSSIBLE Motor does not run. La pile n’est pas chargée. Charge requise. Le moteur surchauffe. Le piston est grippé. bien nettoyer le pistolet en suivant les instructions de nettoyage en vue d’un entreposage à long terme présentées à la section Entretien du présent manuel. -
Página 28: Introducción
One World Technologies, Inc., garantiza sus herramientas eléctricas con las siguientes condiciones: POLÍTICA DE INTERCAMBIO A LOS 30 DÍAS: Durante los primeros 30 días a partir de la fecha de compra, usted puede solicitar servicio al amparo de esta garantía o puede intercambiar cualquier herramienta eléctrica RYOBI que no funcione correctamente ®... -
Página 29: Instrucciones De Seguridad Importantes
INSTRUCCIONES DE SEGURIDAD IMPORTANTES ADVERTENCIA: Para reducir el riesgo de inyección: ADVERTENCIA: No apunte la boquilla ni rocíe en dirección a personas ni animales. GUARDE ESTAS INSTRUCCIONES. Para reducir el riesgo de incendio o explosión, descanga eléctrica, y la ... -
Página 30: Reglas De Seguridad Específicas
REGLAS DE SEGURIDAD ESPECÍFICAS No utilice la herramienta si el interruptor no apaga. Mantenga las protecciones en su lugar y en buenas Lleve todo interruptor defectuoso a un centro de servicio condiciones de trabajo. Nunca utilice la herramienta autorizado para que lo reparen. - Página 31 REGLAS DE SEGURIDAD ESPECÍFICAS El plástico puede provocar chispas. Nunca No coloque herramientas de baterías ni las baterías utilice plástico para cercar un área de rociado. mismas cerca del fuego o del calor. De esta manera No use protecciones de plástico al rociar materiales se reduce el riesgo de explosiones y de lesiones.
-
Página 32: Símbolos
SÍMBOLOS Las siguientes palabras de señalización y sus significados tienen el objeto de explicar los niveles de riesgo relacionados con este producto. SÍMBOLO SEÑAL SIGNIFICADO Indica una situación peligrosa inminente, la cual, si no se evita, causará la muerte PELIGRO: o lesiones serias. -
Página 33: Características
CARACTERÍSTICAS ESPECIFICACIONES DEL PRODUCTO Caudal ..........20,81 lph (5,5 GPH) Motor ............18 V, corr. cont Cobertura del rodillo ....17,7 m (58 pies cuad.)/min. Corriente de entrada del cargador ..120 V, sólo corr. alt, 60 Hz. Tamaño del tanque ........5,68 l (1,5 gal.) CONOZCA SU MÁQUINA PARA PINTAR TIPO PUNTAS DE ROCIADO MOCHILA... - Página 34 ARMADO ARMADO DEL RODILLO PARA PINTAR ADVERTENCIA: Vea la figura 4, página 15. Coloque las tapas del rodillo en cada extremo del rodillo Si falta o está dañada alguna pieza, no utilice este para pintar. producto sin haber reemplazado la pieza. Usar este producto con partes dañadas o faltantes puede causar Alinee los pasadores en el extremo de cada tapa del lesiones serias al operador.
-
Página 35: Funcionamiento
El tanque de la mochila tiene capacidad para hasta 5,68 l (1,5 gal.). Las baterías de iones de litio Ryobi de 18 V están diseñadas con características que protegen las celdas de iones de litio Retire el paquete de baterías, si está instalado. - Página 36 FUNCIONAMIENTO Cuando se configura el interruptor en posición de marcha unidad para guardarlo para obtener instrucciones sobre atrás, la máquina extrae nuevamente la pintura por los cómo desarmar el rociador para tener acceso al pistón. tubos de pintura y esta fluye hacia el tanque y deja menos ...
- Página 37 FUNCIONAMIENTO Para cambiar la dirección de la punta ancha en Cuando termine, desconecte el cordón de corriente de CC, después configure el interruptor en la posición de abanico: marcha atrás esto permite la pintura que no haya utilizado Afloje ligeramente la punta ancha en abanico girándola vuelva a tanque de la mochila.
-
Página 38: Mantenimiento
MANTENIMIENTO Vuelva a colocar toda la pintura o el tinte que no haya ADVERTENCIA: utilizado en su contenedor original. Llene el tanque con agua templada (después de usar Al dar servicio a la unidad, sólo utilice piezas de repuesto idénticas. - Página 39 MANTENIMIENTO REEMPLAZO DEL CONJUNTO DE VÁLVULA NOTA: Asegúrese de restregar bien dentro de la abertura del alojamiento de la bomba de tal manera que no queden ATOMIZADORA restos de materiales de pintura o tinte. Vea la figura 21, página 17. Para volver a armar la unidad: La válvula atomizadora provoca que el material de pintura o Coloque una línea de lubricante en el pistón.
-
Página 40: Corrección De Problemas
CORRECCIÓN DE PROBLEMAS PROBLEMA CAUSA POSIBLE SOLUCIÓN El motor no funciona. La batería no está cargada. Cargue la batería. El motor se recalienta. El pistón está agarrotado. Limpie bien el rociador según las instrucciones de limpieza para guardarlo durante un largo período que figuran en la sección Mantenimiento de este manual. - Página 41 Fig. 1 Fig. 4 A - Roller cap (capuchon du rouleau, tapa del rodillo) B - Paint roller (rouleau à peindre, rodillo para pintar) C - Pins (goupilles, pasadores) D - Roller head (tête du rouleau, cabezal del rodillo) A - Roller handle (poignée du rouleau, mango del rodillo) A - Power paint sprayer (pulvérisateur de I - Battery pack (bloc-piles, paquete de...
- Página 42 Fig. 6 Fig. 9 Fig. 13 A - Motor switch (interrupteur du moteur, A - Paint supply tube connector (raccord du tube interruptor del motor) d’alimentation en peinture, conector del tubo B - Forward (marche avant, marcha adelante) de suministro de pintura) C - Reverse (marche arrière, marcha atrás) B - Quick-connect main outlet (prise principale à...
- Página 43 Fig. 14 Fig. 16 Fig. 19 PLaCe LINe OF LUbRICaNT ON PISTON SHaFT (PLaCeR UNe PeLLICULe de LUbRIFIaNT SUR L’aRbRe de PISTON, PLaCeR UNe PeLLICULe de LUbRIFIaNT SUR L’aRbRe de PISTON) A - Flow valve (valve de contrôle du débit, válvula Fig.
- Página 44 • Prior to requesting service or purchasing replacement parts, please obtain your model and serial number from the product data plate. P635 • MODEL NUMBER ____________________ • SERIAL NUMBER ____________________ • HOw tO OBtAIN REpLAcEMENt pARtS: Replacement parts can be purchased online at www.ryobitools.com or by calling 1-800-525-2579. Replacement parts can also be obtained at one of our authorized service centers.