Tabla de contenido
Publicidad
Idiomas disponibles
Idiomas disponibles
Enlaces rápidos
USING THE KITCHEN HUB™
Hardware . . . . . . . . . . . . . . . . . . . . . . . . . . . . . . . . .5
Control Features . . . . . . . . . . . . . . . . . . . . . . . . . . .5
Wi-Fi . . . . . . . . . . . . . . . . . . . . . . . . . . . . . . . . . . . . 6
Heat Sensor . . . . . . . . . . . . . . . . . . . . . . . . . . . . . . 6
Screen Moisture Protection System . . . . . . . . . 6
CARE AND CLEANING
Filters . . . . . . . . . . . . . . . . . . . . . . . . . . . . . . . . . . . .7
Surfaces . . . . . . . . . . . . . . . . . . . . . . . . . . . . . . . . . .8
Write the model and serial
numbers here:
Model # _________________
Serial # _________________
You can find them on a label
on the inside of the unit behind
the filters.
GE is a trademark of the General Electric Company. Manufactured under trademark license.
. . . . . . . . . . . . . .3
. . . 9
. . . . . . . . . 29
. . . . . . . . . . . . . . 30
. . . . . . . . . . . . . . . . . . . . . . . 31
. . . . . . . . . . . . . 32
OWNER'S MANUAL &
INSTALLATION
INSTRUCTIONS
UVH1301
ESPAÑOL
Para consultar una version en
español de este manual de
instrucciones, visite nuestro sitio de
internet GEAppliances.com.
49-2000492 Rev. 2 05-19 GEA
Publicidad
Capítulos
Tabla de contenido
Solución de problemas

Manuales relacionados para GE KITCHEN HUB UVH1301


Resumen de contenidos para GE KITCHEN HUB UVH1301
-
Página 1: Tabla De Contenido
GEAppliances.com. Serial # _________________ You can find them on a label on the inside of the unit behind the filters. GE is a trademark of the General Electric Company. Manufactured under trademark license. 49-2000492 Rev. 2 05-19 GEA... - Página 2 THANK YOU FOR MAKING GE APPLIANCES A PART OF YOUR HOME. Whether you grew up with GE Appliances, or this is your first, we’re happy to have you in the family. We take pride in the craftsmanship, innovation and design that goes into every GE Appliances product, and we think you will too.
-
Página 3: Safety Information
IMPORTANT SAFETY INFORMATION READ ALL INSTRUCTIONS BEFORE USING THE APPLIANCE WARNING WARNING TO REDUCE THE RISK OF FIRE, TO REDUCE THE RISK OF INJURY ELECTRIC SHOCK OR INJURY TO PERSONS, TO PERSONS IN THE EVENT OF A RANGE TOP OBSERVE THE FOLLOWING: GREASE FIRE, OBSERVE THE FOLLOWING*: A. - Página 4 IMPORTANT SAFETY INFORMATION READ ALL INSTRUCTIONS BEFORE USING THE APPLIANCE NOTE: This equipment has been tested and found which can be determined by turning the equipment to comply with the limits for a Class B digital device, off and on, the user is encouraged to try to correct the pursuant to part 15 of the FCC Rules.
-
Página 5: Hardware
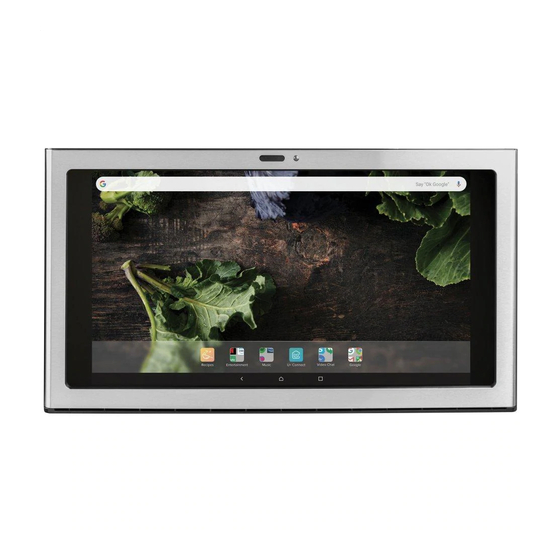
Hardware Front Camera Screen 8 : 5 0 25 °F | L Speaker br ua ry 12 M on da y, Fe Volume Button On/Off Swipe up on the screen to access controls. Goo gle Sky pe U+ Con nec Mu sic Blu e Ap ron Ent erta inm... -
Página 6: Wi-Fi
Wi-Fi Connecting your Wi-Fi Connect Enabled Appliance Your GE Appliances Kitchen Hub™ is recommended to be connected to Wi-Fi. Use the Setup Wizard to connect unit to Wi-Fi. Heat Sensor This unit is equipped with a heat sensor that will... -
Página 7: Filters
Filters Be sure the circuit breaker is off and all surfaces are cool before cleaning or servicing any interior part of the unit. Metal Grease Filter The metal filters trap grease during cooking. The filters must ALWAYS be in place when the unit is in use. -
Página 8: Surfaces
Keepers Friend Soft Cleanser™ follow the link below or scan the QR Code. barkeepersfriend.com/ge Painted Surfaces and Black Stainless Color (on some models) Do not use a steel wool pads or other abrasive NOTE: When cleaning, take care not to come in contact cleaners;... -
Página 9: Installation Instructions
Installation Kitchen Hub™ Instructions UVH1301 If you have questions, call GE Appliances at 800.GE.CARES (800.432.2737) or visit our website at: GEAppliances.com In Canada: 800.561.3344 or visit GEAppliances.ca BEFORE YOU BEGIN WARNING TO REDUCE THE RISK OF FIRE, Read these instructions completely and carefully. -
Página 10: Important Safety Instructions
Installation Instructions IMPORTANT SAFETY INSTRUCTIONS GROUNDING INSTRUCTIONS CAUTION For personal safety, the This appliance must be grounded. In the event of an mounting surface must be capable of supporting electrical short circuit, grounding reduces the risk of the cabinet load of this 75 pound product. electric shock by providing an escape wire for the CAUTION electric current. -
Página 11: Mounting Space
Installation Instructions MOUNTING SPACE Bottom edge of NOTES: cabinet needs more from and free of obstructions. max. the cooking surface or If you are going to vent your unit to the outside, top surface see Installation Types 2A or 2C for cabinet and wall of gas grates, preparation. -
Página 12: Tools And Materials Required
Installation Instructions TOOLS AND MATERIALS REQUIRED PARTS NEEDED FOR INSTALLATION (NOT SUPPLIED) 1 Wall or Roof Cap (for ducted venting only) All Metal Ductwork (for ducted venting only) DAMAGE – SHIPMENT/INSTALLATION Safety glasses • If the unit is damaged in shipment, return the Pencil and tape measure unit to the store in which it was bought for repair or replacement. -
Página 13: Advance Planning
Installation Instructions PARTS INCLUDED ADVANCE PLANNING ADDITIONAL PARTS Duct Install Planning (for outside exhaust only) PART QUANTITY Top Cabinet Template To maximize the ventilation performance of the vent system: Rear Wall 1. Minimize the duct run length and number of ≤... - Página 14 Installation Instructions 1. PLACEMENT OF THE MOUNTING PLATE REMOVING THE KITCHEN HUB™ FINDING THE WALL STUDS FROM THE CARTON/REMOVING THE MOUNTING PLATE Remove the packaging CAUTION Wear gloves to protect against Wall sharp edges. Studs 1. Open the box and fold back all four carton flaps fully against the carton sides.
- Página 15 Installation Instructions 1. PLACEMENT OF THE MOUNTING PLATE (Cont.) DETERMINING MOUNTING PLATE LOCATION UNDER YOUR CABINET Plate Position – flat bottom cabinet Plate Position – recessed cabinet bottom Mounting Plate Tabs Touching the Mounting Plate Back Frame of the Tabs Touching Cabinet the Cabinet Bottom...
- Página 16 Installation Instructions 1. PLACEMENT OF THE MOUNTING PLATE (Cont.) ALIGNING THE MOUNTING PLATE 30” Hole B Draw a Hole A Vertical Line on Wall from Center of Top Cabinet Hole D Hole C Area E Notch CAUTION NOTE: Holes C and D are inside area E. If neither Wear gloves to protect against C nor D is in a stud, find a stud somewhere in area sharp edges.
-
Página 17: Installation Types
Installation Instructions 2. INSTALLATION TYPES (Choose A, B or C) This appliance is designed for adaptation to the NOTE: Select the type of ventilation required for your following 3 types of ventilation: installation and proceed to that section. This unit is shipped assembled for outside top exhaust. -
Página 18: Outside Top Exhaust
Installation Instructions A. OUTSIDE TOP EXHAUST (Vertical Duct) INSTALLATION OVERVIEW A1. Attach Mounting Plate to Wall A2. Prepare Top Cabinet A3. Adjust Blower Exhaust A4. Install Exhaust Adaptor A5. Mount the Kitchen Hub™ A6. Connect Ductwork A7. Finalize Installation ATTACH THE MOUNTING PLATE ATTACH THE MOUNTING PLATE TO THE WALL TO THE WALL (Cont.) - Página 19 Installation Instructions A. OUTSIDE TOP EXHAUST (Vertical Duct) (Cont.) ASSEMBLE AND INSTALL ADJUST BLOWER EXHAUST ADAPTOR The unit is shipped in the top exhaust configuration. If configuration is not in the top exhaust direction, Screws follow the steps below. CAUTION Damper Wear gloves to protect against sharp edges.
- Página 20 Installation Instructions A. OUTSIDE TOP EXHAUST (Vertical Duct) (Cont.) MOUNT THE KITCHEN HUB™ MOUNT THE KITCHEN HUB™ (Cont.) 3. Insert 2 self-aligning screws(1/4" - 28 x 3-1/4") through top-center cabinet hole. Turn two full turns on each screw. Cabinet Front Cabinet Bottom Shelf CAUTION Filler Block...
- Página 21 Installation Instructions A. OUTSIDE TOP EXHAUST (Vertical Duct) (Cont.) CONNECTING DUCT WORK 1. Extend the house duct down to connect to the exhaust adaptor. 2. Seal exhaust duct joints using duct tape. FINALIZE INSTALLATION Plug in the unit. 49-2000492 Rev. 2...
- Página 22 Installation Instructions B. RECIRCULATING (Non-Vented Ductless) INSTALLATION OVERVIEW B1. Attach Mounting Plate to Wall B2. Prepare Top Cabinet B3. Adjust Blower Exhaust B4. Mount the Kitchen Hub™ B5. Filters B6. Finalize Installation ATTACH THE MOUNTING PLATE ATTACH THE MOUNTING PLATE TO THE WALL TO THE WALL (Cont.) CAUTION...
-
Página 23: Important
Installation Instructions B. RECIRCULATING (Non-Vented Ductless) ADJUST BLOWER EXHAUST MOUNT THE KITCHEN HUB™ The unit is shipped in the top venting mode exhaust configuration. The vertical deflector plate should be repositioned to the angled position. 1. Remove damper mounting plate and diverter. CAUTION To avoid the risk of personal injury (back injury or other injuries due to... - Página 24 Installation Instructions B. RECIRCULATING (Non-Vented Ductless) (Cont.) MOUNT THE KITCHEN HUB™ FILTERS (Cont.) 1. Remove grease filter and install a charcoal filter on each side of the motor as shown below. through outer top cabinet holes. Turn two full turns on each screw. Cabinet Front Cabinet Bottom Shelf Filler Block...
-
Página 25: Outside Back Exhaust
Installation Instructions C. OUTSIDE BACK EXHAUST (Horizontal Duct) INSTALLATION OVERVIEW C1. Prepare Rear Wall C2. Attach Mounting Plate to Wall C3. Prepare Top Cabinet C4. Adjust Blower Exhaust C5. Assemble and Install Adapter C6. Mount the Kitchen Hub™ C7. Finalize Installation PREPARING THE REAR WALL ATTACH THE MOUNTING PLATE FOR OUTSIDE BACK EXHAUST... - Página 26 Installation Instructions C. OUTSIDE BACK EXHAUST (Horizontal Duct) (Cont.) USE TOP CABINET TEMPLATE ADJUST BLOWER EXHAUST FOR PREPARATION OF TOP The unit is shipped in the top exhaust configuration. CABINET To adjust the unit to back exhaust remove damper mounting plate and reposition such that opening is You need to drill holes for the top support screws and in the back of the unit.
- Página 27 Installation Instructions C. OUTSIDE BACK EXHAUST (Horizontal Duct) (Cont.) MOUNT THE KITCHEN HUB™ MOUNT THE KITCHEN HUB™ (Cont.) CAUTION To avoid the 2. Rotate front of unit up against cabinet bottom. risk of personal injury (back 3. Insert 2 self-aligning screws (1/4”-28 x 3-1/4”) injury or other injuries due to through top-center cabinet hole.
- Página 28 Installation Instructions MAKE UP AIR TECHNOLOGY Note to Installers and Inspectors: This product comes equipped with a simple installation feature that limits maximum CFM levels in order to comply with certain local codes or regulations. This installation method may not be necessary for all installations, please refer to your local codes for further guidelines.
-
Página 29: Troubleshooting Tips
Using smaller duct pipe will cause reduced venting. Minimize the duct run length and number of transitions and elbows. GE Appliances service technicians cannot correct this issue if installed improperly. Fan fails to circulate Obstructions in duct work. -
Página 30: Limited Warranty
GE Appliances with information on your appliance. If you do not want your appliance data to be sent to GE Appliances, please advise your technician not to submit the data to GE Appliances at the time of service. -
Página 31: Accessories
Accessories Looking For Something More? GE Appliances offers a variety of accessories to improve your cooking and maintenance experiences! Refer to the Consumer Support page for phone numbers and website information. The following products and more are available: Parts Make-up Air Kit... -
Página 32: Consumer Support
Have a question or need assistance with your appliance? Try the GE Appliances Website 24 hours a day, any day of the year! You can also shop for more great GE Appliances products and take advantage of all our on-line support services designed for your convenience. - Página 33 GEAppliances.com. No de série : _____________ Ces numéros se trouvent sur une étiquette à l’intérieur de l’appareil, derrière les filtres. GE est une marque déposée de General Electric Company. Fabriqué avec l’autorisation de la marque. 49-2000492 Rev. 2 05-19 GEA...
- Página 34 Nous sommes fiers du savoir-faire, de l’innovation et de l’esthétique qui composent chaque appareil GE Appliances, et nous pensons que vous le serez aussi. Dans cette optique, nous vous rappelons que l’enregistrement de votre électroménager vous assure la communication de renseignements importants sur le produit et la garantie lorsque vous en avez besoin.
-
Página 35: Consignes De Sécurité Importantes
CONSIGNES DE SÉCURITÉ IMPORTANTES VEUILLEZ LIRE TOUTES LES CONSIGNES AVANT D’UTILISER L’APPAREIL AVERTISSEMENT AVERTISSEMENT RESPECTEZ LES RÈGLES POUR RÉDUIRE LE RISQUE DE SUIVANTES AFIN DE RÉDUIRE LE RISQUE D’INCENDIE, BLESSURES LORS D’UN INCENDIE CAUSÉ PAR UN FEU D’ÉLECTROCUTION ET DE BLESSURES : DE GRAISSE, RESPECTEZ LES RÈGLES SUIVANTES* : A. - Página 36 CONSIGNES DE SÉCURITÉ IMPORTANTES VEUILLEZ LIRE TOUTES LES CONSIGNES AVANT D’UTILISER L’APPAREIL REMARQUE : Cet équipement a été testé et déclaré conforme nuisibles à la réception de la radio ou de la télévision, qui aux limites d’un appareil numérique de classe B, conformément peuvent être déterminées en éteignant et en rallumant à...
-
Página 37: Quincaillerie
Quincaillerie Caméra frontale Écran 8 : 5 0 25 °F | L Haut-parleur br ua ry 12 M on da y, Fe Bouton de volume Balayez l’écran pour accéder aux commandes. Goo gle Sky pe U+ Con nec Mu sic Blu e Ap ron Ent erta inm Rec ipe s... -
Página 38: Wi-Fi
Wi-Fi Connexion de votre appareil active par Wi-Fi Connect Nous recommandons de connecter votre module Kitchen Hub™ de GE Appliances à un réseau Wi-Fi. Utilisez l’assistant de configuration pour connecter votre appareil au réseau Wi-Fi. Capteur thermique Cet appareil est équipé d’un capteur thermique qui activera Si le VENTILATEUR est ÉTEINT et que des températures... -
Página 39: Filtres
Filtres Assurez-vous que le disjoncteur est désarmé et que toutes les surfaces sont froides avant de nettoyer ou d’effectuer l’entretien de toute pièce à l’intérieur de l’appareil. Filtre à graisse métallique Les filtres métalliques capturent la graisse pendant la cuisson. Ces filtres doivent TOUJOURS être installés lorsque vous utilisez l’appareil. -
Página 40: Surfaces
Friend Soft Cleanser™, cliquez sur le lien ci-dessous ou balayez le code à barres 2D. barkeepersfriend.com/ge Surfaces peintes ou acier inoxydable de couleur noir (sur certains modèles) N’utilisez pas de tampon en laine d’acier; ces derniers REMARQUE : Pendant le nettoyage, évitez de toucher les érafleront la surface. -
Página 41: Instructions D'installation
Kitchen Hub™ d’installation UVH1301 Si vous avez des questions, appelez GE Appliances au 1 800 GE CARE (1 800 432 2737) ou visitez notre site Web à : GEAppliances.com Au Canada : GEAppliances.ca ou composez le 800 561 3344 AVANT DE COMMENCER... -
Página 42: Mesures De Sécurité Importantes
Instructions d’installation MESURES DE SÉCURITÉ IMPORTANTES CONSIGNES DE MISE À LA TERRE ATTENTION Pour votre sécurité, la surface de Cet appareil doit être mis à la terre. En cas de courtcircuit, montage de l’armoire doit pouvoir supporter le poids le fil de mise à la terre limite le risque de choc électrique de 34 kilos (75 livres) de ce produit. -
Página 43: Espace De Montage
Instructions d’installation ESPACE DE MONTAGE Le bord inférieur REMARQUES : de l’armoire doit être à plus de L’espace entre les armoires doit avoir une largeur de 76 cm (30 po) 33 cm 76 cm (30 po) et sans obstructions. de la surface (13 po) max. -
Página 44: Outils Et Matériaux Requis
Instructions d’installation OUTILS ET MATÉRIAUX REQUIS PIÈCES REQUISES POUR L’INSTALLATION (NON FOURNIS) 1 chapeau pour mur ou toit (pour conduit de ventilation seulement) Tous les systèmes de conduits métalliques (pour ventilation par conduit seulement) Lunettes de sécurité Crayon et ruban à mesurer BRIS –... - Página 45 Instructions d’installation PIÈCES FOURNIES PLANIFICATION AVANT-PROJET PIÈCES SUPPLÉMENTAIRES Planification d’installation de conduit (pour évacuation vers l’extérieure seulement) PIÈCE QUANTITÉ Gabarit pour armoire supérieure l’extérieur. Pour maximiser le rendement de ventilation du système de circulation : Gabarit pour ≤ 1. Minimisez le longueur du conduit et le nombre de ≤...
-
Página 46: Installation De La Plaque De Montage
Instructions d’installation 1. INSTALLATION DE LA PLAQUE DE MONTAGE A DÉBALLAGE DU MODULE REPÉRAGE DES MONTANTS KITCHEN HUB™ ET RETRAIT DE LA PLAQUE DE MONTAGE Déballage ATTENTION Portez des gants pour vous protéger des arêtes tranchantes. Montants 1. Ouvrez la boite et rabattez les quatre rabats contre les côtés de la boite. -
Página 47: Installation De La Plaque De Montage (Suite)
Instructions d’installation 1. INSTALLATION DE LA PLAQUE DE MONTAGE (suite) DÉTERMINATION DE L’EMPLACEMENT DE LA PLAQUE DE MONTAGE SOUS L’ARMOIRE Position de la plaque – dessous d’armoire plat Position de la plaque – dessous d’armoire en retrait Languettes Languettes de plaque de de plaque montage touchant de montage... -
Página 48: Dalignement De La Plaque De Montage
Instructions d’installation 1. INSTALLATION DE LA PLAQUE DE MONTAGE (suite) ALIGNEMENT DE LA PLAQUE DE MONTAGE 76 cm (30 po) Trou B Tracez une ligne Trou A verticale sur le mur à partir du centre de l’armoire supérieure. Trou D Trou C Zone E Encoche... -
Página 49: Types D'installation
Instructions d’installation 2. TYPES D’INSTALLATION (choisissez A, B ou C) Cet appareil a été conçu pour s’adapter à l’un des trois (3) REMARQUE : Choisissez le type de ventilation requis pour types de ventilation : votre installation et consultez le chapitre correspondant. Une évacuation supérieure vers l’extérieur est installée sur A. -
Página 50: A1 Fixation De La Plaque De Montage Au Mur
Instructions d’installation A. ÉVACUATION SUPÉRIEURE VERS L’EXTÉRIEUR (conduit vertical) SURVOL DE L’INSTALLATION A1. Fixation de la plaque de montage au mur A2. Préparation de l’armoire supérieure A3. Mise au point du ventilateur d’aspiration A4. Installation du manchon d’évacuation A5. Montage du module Kitchen Hub™ A6. - Página 51 Instructions d’installation A. ÉVACUATION SUPÉRIEURE VERS L’EXTÉRIEUR (conduit vertical) (suite) ASSEMBLAGE ET INSTALLATION MISE AU POINT DU VENTILATEUR DU MANCHON D’ASPIRATION Cet appareil est livré avec une configuration d’évacuation sur le dessus. Suivez les étapes ci-dessous si la configuration n’est pas dans le sens d’une évacuation sur le dessus. Registre ATTENTION Portez des gants pour vous...
- Página 52 Instructions d’installation A. ÉVACUATION SUPÉRIEURE VERS L’EXTÉRIEUR (conduit vertical) (suite) MONTAGE DU MODULE MONTAGE DU MODULE KITCHEN HUB™ KITCHEN HUB™ (suite) 3. Insérez les deux (2) vis de mécanique à alignement le trou central de l’armoire supérieure. Tournez chaque vis sur deux (2) tours complets. Face d’armoire Tablette inférieure d’armoire Cale...
- Página 53 Instructions d’installation A. ÉVACUATION SUPÉRIEURE VERS L’EXTÉRIEUR (conduit vertical) (suite) RACCORDEMENT DU SYSTÈME DE CONDUITS 1. Étirez le conduit domestique vers le bas pour le raccorder au manchon d’évacuation. 2. Scellez les joints de conduits d’évacuation avec du ruban à conduit. ACHÈVEMENT DE L’INSTALLATION Branchez l’appareil dans la prise de courant.
-
Página 54: B1 Fixation De La Plaque De Montage Au Mur
Instructions d’installation B. RECYCLAGE D’AIR (sans conduit de ventilation) SURVOL DE L’INSTALLATION B1. Fixation de la plaque de montage au mur B2. Préparation de l’armoire supérieure B3. Mise au point du ventilateur d’aspiration B4. Montage du module Kitchen Hub™ B5. Filtres B6. - Página 55 Instructions d’installation B. RECYCLAGE D’AIR (SANS CONDUIT DE VENTILATION) MISE AU POINT DU VENTILATEUR MONTAGE DU MODULE D’ASPIRATION KITCHEN HUB™ Cet appareil est livré avec une configuration d’évacuation vers le haut. La plaque verticale du déflecteur doit être replacée en inclinaison. 1.
-
Página 56: Achèvement De L'installation
Instructions d’installation B. RECYCLAGE D’AIR (SANS CONDUIT DE VENTILATION) (suite) MONTAGE DU MODULE FILTRES KITCHEN HUB™ (suite) 1. Retirez le filtre à graisse et installez le filtre au charbon de chaque côté du moteur, comme montré ci-dessous. 3. Insérez les deux (2) vis de mécanique à alignement le trou central de l’armoire supérieure. -
Página 57: C2 Fixation De La Plaque De Montage Au Mur (Suite)
Instructions d’installation C. ÉVACUATION ARRIÈRE VERS L’EXTÉRIEUR (conduit horizontal) SURVOL DE L’INSTALLATION C1. Préparation du mur arrière C2. Fixation de la plaque de montage au mur C3. Préparation de l’armoire supérieure C4. Mise au point du ventilateur d’aspiration C5. Assemblage et installation du manchon C6. - Página 58 Instructions d’installation C. ÉVACUATION ARRIÈRE VERS L’EXTÉRIEUR (conduit horizontal) (suite) UTILISATION DU GABARIT MISE AU POINT DU VENTILATEUR D’ARMOIRE POUR LA D’ASPIRATION PRÉPARATION DE L’ARMOIRE Cet appareil est livré avec une configuration d’évacuation SUPÉRIEURE vers le haut. Pour mettre l’appareil au point avec l’évacuation arrière, retirez la plaque de montage du Vous devez percer des trous pour les vis de support registre et replacez-la de manière à...
- Página 59 Instructions d’installation C. ÉVACUATION ARRIÈRE VERS L’EXTÉRIEUR (conduit horizontal) (suite) MONTAGE DU MODULE MONTAGE DU MODULE KITCHEN HUB™ KITCHEN HUB™ (suite) 2. Tournez le devant de l’appareil vers le haut, contre le ATTENTION Il faut deux bas de l’armoire. personnes pour installer ce 3.
- Página 60 Instructions d’installation TECHNOLOGIE D’AIR D’APPOINT Remarque aux installateurs et inspecteurs : Ce produit est livré avec une caractéristique d’installation simple limitant les niveaux maximum en mètre cube par minute (pied cube par minute) afin de répondre à certains codes ou règlements locaux. Cette méthode d’installation n’est pas utilisée pour toutes les installations.
- Página 61 L’utilisation d’un conduit plus petite diminue la ventilation. Diminuez la distance du parcours du conduit et le nombre de transitions et de coudes. Le service de techniciens de GE Appliances ne peut pas corriger le problème si l’installation est inadéquate.
-
Página 62: Garantie Limitée
GE Appliances de diagnostiquer rapidement toute défaillance de votre électroménager et à GE Appliances d’améliorer la qualité de ses produits. Si vous ne souhaitez pas transmettre les données de votre appareil à GE Appliances, veuillez aviser votre technicien de s’en abstenir au moment de la visite de service. -
Página 63: Accessoires
Accessoires Vous êtes à la recherche d’autres articles? GE Appliances propose une variété d’accessoires afin d’améliorer votre expérience de cuisson et d’entretien! Reportez-vous à la page du Soutien au consommateur pour des renseignements sur l’accessibilité téléphonique et en ligne. Les produits suivants et d’autres encore sont offerts : Pièces... -
Página 64: Soutien Au Consommateur
Procurez-vous une prolongation de garantie GE Appliances et informez-vous des rabais spéciaux en vigueur pendant la durée de votre garantie. Vous pouvez vous la procurer en ligne en tout temps. Les services GE Appliances seront toujours disponibles après l’expiration de la garantie. Aux États-Unis : GEAppliances.com/extended-warranty ou composez le 800.626.2224 durant les heures normales de bureau. - Página 65 Nº de Modelo ____________ Nº de Serie ______________ Los encontrará en una etiqueta en la parte interior detrás de los filtros. GE es una marca registrada de General Electric Company. Fabricado bajo licencia de marca. 49-2000492 Rev. 2 05-19 GEA...
- Página 66 GRACIAS POR HACER QUE GE APPLIANCES SEA PARTE DE SU HOGAR. Ya sea que haya crecido usando GE Appliances, o que ésta es su primera vez, nos complace tenerlo en la familia. Sentimos orgullo por el nivel de arte, innovación y diseño de cada uno de los electrodomésticos de GE Appliances, y creemos que usted también.
-
Página 67: Información De Seguridad
INFORMACIÓN IMPORTANTE DE SEGURIDAD LEA TODAS LAS INSTRUCCIONES ANTES DE USAR ESTE ELECTRODOMÉSTICO ADVERTENCIA ADVERTENCIA PARA REDUCIR EL RIESGO PARA REDUCIR EL RIESGO DE DE INCENDIO, DESCARGA ELÉCTRICA O LESIONES A LESIONES A PERSONAS EN CASO DE UN INCENDIO PERSONAS, CUMPLA CON LOS SIGUIENTES PUNTOS: DE GRASA SOBRE UNA ESTUFA, CUMPLA CON LOS SIGUIENTES PUNTOS*: A. -
Página 68: Cómo Retirar La Película Protectora De Envío Y La Cinta De Embalaje
INFORMACIÓN IMPORTANTE DE SEGURIDAD LEA TODAS LAS INSTRUCCIONES ANTES DE USAR ESTE ELECTRODOMÉSTICO NOTA: Este equipo ha sido probado y cumple con los límites de radio o televisión, lo que puede comprobar encendiendo y establecidos para un dispositivo digital de clase B, de acuerdo apagando el equipo, se aconseja al usuario intentar corregir la con la parte 15 de la Normativa de la FCC. -
Página 69: Equipo
Equipo Cámara Frontal Pantalla 8 : 5 0 25 °F | L Parlante br ua ry 12 M on da y, Fe Botón de Volumen Encendido/ Apagado Deslícese hacia arriba de la pantalla para acceder a los controles. Goo gle Sky pe U+ Con nec Mu sic... -
Página 70: Wi-Fi
Wi-Fi Conexión de su Electrodoméstico con Acceso Autorizado a la Conexión Wi-Fi Se recomienda conectar al WiFi su Cocina Kitchen Hub™ de GE Appliances. Use el Asistente de Instalación para conectar la unidad al Wi-Fi. Sensor de Calor La unidad está equipada con un sensor de calor que activará... -
Página 71: Filtros
Filtros Asegúrese de que el disyuntor esté apagado y que todas las superficies estén frías antes de limpiar o realizar el servicio técnico de cualquier parte de la unidad. Filtro de grasa metálico Los filtros metálicos atrapan la grasa durante la cocción. Los filtros SIEMPRE deberán estar en sus posiciones cuando la unidad se encuentre en uso. -
Página 72: Superficies
Para o visite a nuestro distribuidor local de piezas del servicio recibir un cupón para una muestra de autorizado de GE Appliances. Bar Keepers Friend Soft Cleanser™, ingrese al siguiente link o escanee el Código QR. -
Página 73: Instrucciones De Instalación
Instrucciones Cocina Kitchen Hub™ de instalación UVH1301 Ante cualquier duda, llame a GE Appliances al 800.GE.CARES (800.432.2737) o visite nuestro sitio Web en: GEAppliances.com En Canadá: Llame al 800.561.3344 o visite GEAppliances.ca. ANTES DE COMENZAR ADVERTENCIA PARA REDUCIR EL RIESGO Lea estas instrucciones por completo y con DE INCENDIO, DESCARGA ELÉCTRICA O LESIONES A... -
Página 74: Instrucciones Importantes De Seguridad
Instrucciones de Instalación INSTRUCCIONES IMPORTANTES DE SEGURIDAD INSTRUCCIONES DE CONEXIÓN A PRECAUCIÓN Por razones de seguridad, la TIERRA superficie de montaje deberá poder soportar la carga Este electrodoméstico deberá estar conectado a tierra. del gabinete, además del peso agregado de este En caso de que se produzca un cortocircuito, la conexión producto de entre 75 libras, a tierra reduce el riesgo de descarga eléctrica, brindando... -
Página 75: Espacio De Montaje
Instrucciones de Instalación ESPACIO DE MONTAJE La parte inferior NOTAS: del gabinete Máx. necesita estar de 13 estar libre de obstrucciones. la superficie Si hará que la unidad ventile hacia afuera, consulte los de cocinado o de la parte Tipos de Instalación 2A o 2C para la preparación del superior de las gabinete y la pared. -
Página 76: Partes Incluidas
Instrucciones de Instalación HERRAMIENTAS Y MATERIALES PIEZAS NECESARIAS PARA LA REQUERIDOS (NO SUMINISTRADOS) INSTALACIÓN 1 Tapa de Pared o Techo (para ventilación con conducto únicamente) Todo el Conducto Metálico (para ventilación con conducto únicamente) Gafas de seguridad Lápiz y cinta métrica DAÑO –... -
Página 77: Planificación Previa
Instrucciones de Instalación PARTES INCLUIDAS PLANIFICACIÓN PREVIA PIEZAS ADICIONALES Planificación para la Instalación con Conducto (para salida externa únicamente) PARTE CANTIDAD Determine la ubicación exacta de la campana Plantilla del de ventilación. Gabinete Superior Planifique el recorrido de la salida de ventilación hacia el exterior. -
Página 78: Colocación Del Plato De Montaje
Instrucciones de Instalación 1. COLOCACIÓN DEL PLATO DE MONTAJE RETIRO DE LA COCINA KITCHEN BÚSQUEDA DEL MONTAJE DE HUB™ DEL CARTÓN / RETIRO PARED DEL PLATO DE MONTAJE Retire el embalaje PRECAUCIÓN Use guantes para protegerse de los externos filosos. Montaje de Pared 1. -
Página 79: Cdeterminación De La Placa De Montaje Debajo De Su Gabinete
Instrucciones de Instalación 1. COLOCACIÓN DEL PLATO DE MONTAJE (Cont.) DETERMINACIÓN DE LA PLACA DE MONTAJE DEBAJO DE SU GABINETE Posición de la Placa – gabinete inferior plano Posición de la Placa – gabinete inferior hueco Las Lengüetas Las lengüetas de la Placa de de la Placa de Montaje Tocan la... -
Página 80: Dalinee La Placa De Montaje
Instrucciones de Instalación 1. COLOCACIÓN DEL PLATO DE MONTAJE (Cont.) ALINEE LA PLACA DE MONTAJE Agujero B Dibuje una Agujero A Línea Vertical en la Pared desde el Centro a la Parte Superior del Gabinete Agujero D Agujero C Area E Ranura PRECAUCIÓN NOTA: Los agujeros C y D están dentro del área E. -
Página 81: Tipos De Instalación
Instrucciones de Instalación 2. TIPOS DE INSTALACIÓN (Elija A, B o C) Este electrodoméstico está diseñado para ser adaptado NOTA: Seleccione el tipo de ventilación requerida para a los 3 siguientes tipos de ventilación: su instalación y proceda a dicha sección. Esta unidad se envía ensamblada para una salida de ventilación A. -
Página 82: Visión General De La Instalación
Instrucciones de Instalación A. ESCAPE SUPERIOR EXTERIOR ( Conducto Vertical) VISIÓN GENERAL DE LA INSTALACIÓN A1. Adjunte la Placa de Montaje a la Pared A2. Prepare el Gabinete Superio A3. Ajuste la Salida de Ventilación del Calefactor A4. Instale el Adaptador del Escape A5. -
Página 83: A4 Ensamble E Instale El Adaptador
Instrucciones de Instalación A. ESCAPE SUPERIOR EXTERIOR Conducto Vertical) (Cont.) ENSAMBLE E INSTALE EL AJUSTE LA SALIDA DEL ADAPTADOR CALEFACTOR Tornillos La campana es enviada con la configuración de salida de ventilación superior. Si la configuración no se encuentra en la dirección de salida de ventilación superior, siga los Regulador siguientes pasos. -
Página 84: Importante
Instrucciones de Instalación A. ESCAPE SUPERIOR EXTERIOR Conducto Vertical) (Cont.) MONTE LA COCINA KITCHEN HUB™ MONTE LA COCINA KITCHEN HUB™ (Cont.) través de los agujeros del gabinete superior central. Dé dos giros completos a cada tornillo. Frente del Gabinete Estante Inferior del Gabinete Bloque de relleno PRECAUCIÓN A fin de evitar el riesgo de... -
Página 85: A6 Conexión Del Conducto
Instrucciones de Instalación A. ESCAPE SUPERIOR EXTERIOR Conducto Vertical) (Cont.) CONEXIÓN DEL CONDUCTO 1. Extienda el conducto del hogar para poder conectarlo al adaptador del escape. 2. Selle las juntas del conducto de escape usando cinta para conductos. FINALICE LA INSTALACIÓN Enchufe la unidad. -
Página 86: Recirculación (Sin Conductos No Ventilados)
Instrucciones de Instalación B. RECIRCULACIÓN (Sin Conductos No Ventilados) VISIÓN GENERAL DE LA INSTALACIÓN B1. Adhera La Placa De Montaje A La Pared B2. Prepare el Gabinete Superior B3. Ajuste la Salida de Ventilación del Calefactor B4. Monte la cocina Kitchen Hub™ B5. -
Página 87: Recirculación
Instrucciones de Instalación B. RECIRCULACIÓN (Sin Conductos No Ventilados) (Cont.) AJUSTE EL MOTOR DEL MONTE LA COCINA KITCHEN HUB™ CALENTADOR La unidad es enviada con la configuración de salida de ventilación superior. La placa del deflector vertical deberá ser reposicionada en la ubicación angulada. 1. -
Página 88: B6 Finalice La Instalación
Instrucciones de Instalación B. RECIRCULACIÓN (Sin Conductos No Ventilados) (Cont.) MONTE LA COCINA KITCHEN HUB™ FILTROS (Cont.) 1. Retire el filtro de grasa e instale el filtro de carbón a cada lado del motor, como se muestra a continuación. través de los agujeros del gabinete superior externo. Dé... -
Página 89: C1 Preparación De La Pared Trasera Para El Escape Externo Trasero
Instrucciones de Instalación C. ESCAPE EXTERIOR TRASERO (Conducto Horizontal) VISIÓN GENERAL DE LA INSTALACIÓN C1. Prepare la Pared Trasera C2. Adjunte la Placa de Montaje a la Pared C3. Prepare el Gabinete Superior C4. Ajuste la Salida de Ventilación del Calefactor C5. -
Página 90: C4 Ajuste La Salida Del Calefactor
Instrucciones de Instalación C. ESCAPE EXTERIOR TRASERO (Conducto Horizontal) (Cont.) USE LA PLANTILLA DEL AJUSTE LA SALIDA DEL GABINETE SUPERIOR PARA LA CALEFACTOR PREPARACIÓN DEL GABINETE La unidad es enviada con la configuración de salida de SUPERIOR ventilación superior. A fin de ajustar la unidad a la salida de ventilación trasera, retire la placa de montaje del Es necesario hacer agujeros para los tornillos del soporte regulador y vuelva a posicionar la misma de modo que la... -
Página 91: C7 Finalice La Instalación
Instrucciones de Instalación C. ESCAPE EXTERIOR TRASERO (Conducto Horizontal) (Cont.) MONTE LA COCINA KITCHEN HUB™ MONTE LA COCINA KITCHEN HUB™ (Cont.) PRECAUCIÓN A fin de 2. Gire el frente de la unidad contra la parte inferior del evitar el riesgo de lesión personal gabinete. -
Página 92: Tecnología De Reposición De Aire
Instrucciones de Instalación TECNOLOGÍA DE REPOSICIÓN DE AIRE Nota para los Instaladores e Inspectores: Este producto está equipado con una función de instalación simple que limita los niveles máximos de CFM, a fin de cumplir con ciertos códigos o regulaciones locales. Es posible que este método de instalación no sea necesario en todas las instalaciones;... -
Página 93: Consejos Para La Solución De Problemas
Minimice la longitud del conducto y el número de transiciones y codos. Los técnicos de GE Appliances no pueden corregir este problema si hay una instalación inadecuada. El ventilador no hace Obstrucciones en el conducto. -
Página 94: Limitada Garantía
Para realizar el servicio técnico de su electrodoméstico, se podrá requerir el uso de datos del puerto de abordaje para su diagnóstico. Esto da al técnico del servicio de fábrica de GE Appliances la habilidad de diagnosticar de forma rápida cualquier problema con su electrodoméstico, y de ayudar a GE Appliances a mejorar sus productos al brindarle a GE Appliances la información sobre su... -
Página 95: Accesorios
Accesorios ¿Busca Algo Más? ¡GE Appliances ofrece una variedad de accesorios para mejorar sus experiencias de cocción y mantenimiento! Para acceder a números telefónicos e información de sitios Web, consulte la página de Soporte para el Consumidor. Estos y otros productos están disponibles: Piezas Kit de Aire de Reposición... -
Página 96: Soporte Para El Consumidor
En Canadá: Prodsupport.mabe.ca/crm/Products/ProductRegistration.aspx Servicio Programado El servicio de reparación de expertos de GE Appliances está a sólo un paso de su puerta. Conéctese a través de Internet y programe su servicio a su conveniencia cualquier día del año. En EE.UU.: GEAppliances.com/service o comuníquese al 800.432.2737 durante el horario de atención comercial.