Tabla de contenido

Manuales relacionados para asalvo TRIO ROMA


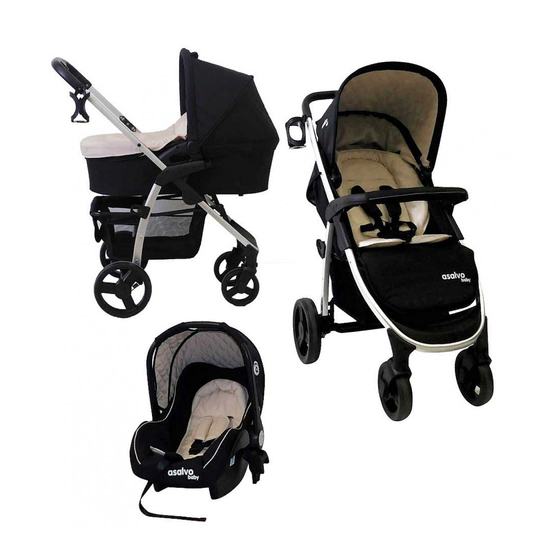
Resumen de contenidos para asalvo TRIO ROMA
- Página 1 MANUAL DE INSTRUCCIONES INSTRUCTION MANUAL FOR USE Hasta · Up to · até 15 kgs. Conforme a la normativa EN 1888:2012 In compliance with EN 1888:2012 www.asalvo.com www.clubasalvo.com...
-
Página 2: Requisitos De Seguridad Y Peligros
¡POR FAVOR LEA CUIDADOSAMENTE ESTE MANUAL DE INSTRUCCIONES Y MANTÉNGALOS EN UN LUGAR SEGURO PARA FUTURAS REFERENCIAS! ESTE CONTIENE INFORMACIÓN IMPORTANTE, INSTRUCCIONES Y RECOMENDACIONES RELATIVAS A LA SILLA Y A SU USO SEGURO. Este set contiene: • Silla de bebé, destinada a niños con una edad comprendida entre los 0 y los 36 meses y que no pese más de 15 kg. - Página 3 REQUISITOS DE SEGURIDAD Y PELIGROS 5. Siempre monte el capazo mirando hacia delante. 6. Use los productos solo con el propósito con el que fueron fabricados. 7. El montaje inicial, plegado y desplegado debe ser realizado solo por un adulto. 8.
- Página 4 REQUISITOS DE SEGURIDAD Y PELIGROS Toda carga sobre el manillar, burbuja, y respaldo o a un lado de la silla afectará a su estabilidad. ¡No sobrecargue la silla! Si lo hace, esta podría balancearse y herir al niño. 20. No coloque artículos en la parte de arriba del carro, incluso estando plegado, mientras los almacena o los transporta, ya que esto puede dañar los productos. 21.
-
Página 5: Montaje Y Funciones Del Carro
MONTAJE Y FUNCIONES DEL CARRO Este carro está suministrado parcialmente montado. De cara a completar el montaje, no necesita ninguna herramienta. siga exactamente las instrucciones dadas y compruebe las imágenes. Por favor, tenga en cuenta que en la mayoría de casos después de completar una operación, oirá... -
Página 6: Desplegado Del Carro
DESPLEGADO DEL CARRO FIG. 2 FIG. 3 Coloque el chasis plegado del carro en una superficie plana y libere el gancho de fijación (fig.2). Agarre el manillar del carro y tire hacia arriba (fig.3), hasta que el carro esté completamente desplegado y escuche un clic. -
Página 7: Ruedas Delanteras
RUEDAS DELANTERAS FIG. 5 FIG. 6 Inserte presionando levemente cada rueda delantera en sus respecti- vos enchufes como se muestra en la fig.5, hasta que escuche un clic. Compruebe si la rueda está bien instalada intentado sacarlo hacia afuera. Para desmontar cada rueda delantera presione el botón de liberación rápida de la rueda (fig. -
Página 8: Movimiento Recto Y Giratorio Ruedas Delanteras
MOVIMIENTO RECTO Y GIRATORIO RUEDAS DELANTERAS Las ruedas delanteras pueden girar (360º) o moverse rectas. Movimiento recto de las ruedas delanteras Las ruedas delanteras se moverán solo en sentido recto, cuando eleve el nivel C en cada rueda delantera (fig.7ª). Movimiento giratorio de las ruedas delanteras Presione hacia abajo el nivel C (fig.7-B) en cada rueda delantera de cara a activar la función giratoria. -
Página 9: Unidad De Asiento (I)
UNIDAD DE ASIENTO (I) FIG. 10 FIG. 11 FIG. 12 1. Montaje del asiento Libere los cinturones bajo el asiento separando las corres de velcro (fig.10). Inserte el textil del asiento cuidadosamente en el chasis tal y como se muestra en la fig.11. Asegúrese de que los broches están co- rrectamente fijados en sus aberturas correspondientes del interior del manillar. -
Página 10: Unidad De Asiento (Ii)
UNIDAD DE ASIENTO (II) FIG. 15 FIG. 16 FIG. 17 FIG. 18 2. Desmontaje del asiento Libere los cinturones de debajo de la unidad de asiento separando las correas de velcro (fig.15) y separando los cinturones (fig.16). Presio- ne hacia arriba los broches de ambos lados del manillar (fig. 17-1) y saque el textil del asiento del chasis. -
Página 11: Ajuste Del Respaldo
ALMOHADILLA La almohadilla le proporcionará un confort adiciones a tu bebé. Para colocar la almohadilla, inserte los cinturones de los hombros y del pecho a través de las aberturas correspondientes de la almohada. AJUSTE DEL RESPALDO FIG. 21 FIG. 22 Usando un mecanismo puede ajustar las posiciones del respaldo. - Página 12 CAPOTA FIG. 24 FIG. 25 FIG. 26 FIG. 27 Para montar la capota, alinee los dos extremos de los mecanismos al tubo del chasis y deslícelos hasta que escuche un clic y éstos estén fijados. (fig.24). Puede abrir o cerrar la capota, tirando o presionando con la mano (fig. 25-1, 2).
-
Página 13: Dispositivos De Aparcamiento
DISPOSITIVOS DE APARCAMIENTO FIG. 29 El carro está equipado con dispositivos de aparcamiento que blo- quean el movimiento de ambas ruedas traseras de simultáneamente. Presione hacia abajo con su pie el pedal del freno para bloquear el dispositivo de aparcamiento. (fig.29A). Asegúrese de que el sistema de aparcamiento está... -
Página 14: Cinturones De Seguridad
CINTURONES DE SEGURIDAD El carro está equipado con un arnés de 5 puntos. El uso de los arneses es necesario cuan- do el niño es capaz de sentarse solo sin ayuda y cuando em- piece a ser capaz de levantarse con las manos o las rodillas. -
Página 15: Reposavasos
REPOSAVASOS Alinee el posavasos con los broches del lado derecho del manillar y presione ha- cia abajo para ajustarlo. (fig.35). ¡ATENCIÓN! No deje el reposavasos des- atendido, especialmente cuando hay lí- quidos calientes dentro del vaso. Bajo determinadas circunstancias (superficies inclinadas o superficies con cuestas) el líquido podría derramarse y herir al niño. -
Página 16: Plegado Del Carro
PLEGADO DEL CARRO FIG. 36 FIG. 37 El carro puede ser plegado con o sin la unidad de asiento montada. Para plegar el carro, accione los dispositivos de aparcamiento (fig.38). Presione el botón (fig.36) en el manillar del carro. Mientras presione el botón, presione el otro botón del mecanismo de bloqueo en la dirección, como muestra la fig.36. -
Página 17: Montaje Y Funciones Del Capazo
MONTAJE Y FUNCIONES DEL CAPAZO FIG. 39 FIG. 40 FIG. 41 El capazo está destinado a bebés recién nacidos, superiores a 6 meses y que no pesen más de 9 kg, y que no puedan sentarse por sí solos, arrodillarse, darse la vuelta o ponerse sobre sus manos o rodillas. ¡ATENCIÓN! Deje de usar el capazo cuando el bebé... - Página 18 CUBREPIÉS El cubrepiés debe colocarse en el capazo tal y como se muestra en la fig. 39. En la parte de abajo puede fijarlo con correas de velcro y en la parte superior – usando los elásticos y los botones. (fig.39). CAPOTA El textil de la capota está...
-
Página 19: Retirada Del Capazo Del Chasis Del Carro
RETIRADA DEL CAPAZO DEL CHASIS DEL CARRO FIG. 45 FIG. 46 FIG. 47 ¡ATENCIÓN! SIEMPRE ACCIONE LOS DISPOSITIVOS DE APARCAMIENTO MIENTRAS DESINSTALA EL CAPAZO DEL CAPAZO. Para retirar el capazo del chasis, presione simultáneamente los dos boto- nes para liberar rápidamente el capazo, (45-1), tire del capazo (fig.45-2) y retírelo del chasis (fig.46). - Página 20 ADAPTADORES PARA EL ASIENTO FIG. 49 FIG. 50 FIG. 51 El asiento puede ser instalado en el chasis de la silla mediante adap- tadores (fig.49). Posicione cada adaptador a sus aperturas correspon- dientes y fíjelos al asiento mediante una ligera presión, hasta que oiga un clic y los adaptadores estén estables.
-
Página 21: Reglas Para El Cuidado Y Mantenimiento (Ii)
RETIRAR EL ASIENTO DEL CHASIS DEL CARRO FIG. 54 FIG. 55 Para retirar el asiento del chasis, eleve simultáneamente las dos pa- lancas para una liberación rápida del adaptador (fig.54) y extraigas el asiento del chasis. guarde las palancas hacia atrás. ¡IMPORTANTE! TODAS LAS INSTRUCCIONES DE USO Y MANTENIMIEN- TO DEL ASIENTO ESTÁN EN UN MANUAL SEPARADO, SUMINISTRADO POR PAQUETE DEL ASIENTO DEL COCHE. - Página 22 Exterior: 100% polyester Exterior: 100% polyester Interior: 100% polyester Interior: 100% polyester Gracias POR ADQUIRIR UN www.clubasalvo.com PRODUCTO ASALVO. Por favor, vísita nuestro blog del Síguenos “Club Asalvo” y hazte socio para poder disfrutar de promociones, regalos y noticias exclusivas.
- Página 23 INSTRUCTION MANUAL FOR USE...
- Página 24 PLEASE READ CAREFULLY THIS INSTRUCTION MANUAL AND KEEP IT IN A SAFE PLA- CE FOR FUTURE REFERENCE! IT CONTAINS IMPORTANT INFORMATION, INSTRUCTIONS AND RECOMMENDATIONS FOR THE STROLLER AND ITS SAFE USAGE This set contains: • Baby stroller, suitable for a child aged 0-36 months and weight up to 15 kg. • Carry cot, suitable for a newborn baby to 6 months, weighing up to 9 kg, who cannot sit unaided, roll over or push up on its elbows and knees. The seat is equipped with a 5-point harness for the safety of the child.
- Página 25 SAFETY REQUIREMENTS AND WARNINGS 6. Use the product only for the purpose they were made. 7. Initial assembly, folding and unfolding to be done only by an adult! 8. Before each use check the good working order of the stroller and carrycot and the stability of the assembly of the parts (seat unit, canopy, backrest, bumper and handle) in the desired position! Discontinue usage if you find worn out or loose joints, damaged or missing parts! There is a big risk of injury of the child!
- Página 26 SAFETY REQUIREMENTS AND WARNINGS 21. Do not place items with long strings around your child’s neck and do not attach additional strings to toys to avoid strangulation. 22. Do not place an additional mattress in the cot thicker than 15mm! 23.
-
Página 27: Parts List
ASSEMBLY AND FUNCTIONS OF STROLLER Este carro está suministrado parcialmente montado. De cara a This stroller is supplied partially assembled. In order to complete the assembly, you don’t need any tools. Follow exactly the instructions given and check the pictures. Please, note that in most cases after the completion of an operation you will hear a clicking sound. -
Página 28: Unfolding The Stroller
UNFOLDING THE STROLLER FIG. 2 FIG. 3 Place the folded frame of the stroller on a flat surface and release the fixing hook (fig. 2). Grab the handle of the stroller and pull it up (fig.3), until the stroller is fully unfolded and you hear a click (fig.4). FIG. -
Página 29: Front Wheels
FRONT WHEELS FIG. 5 FIG. 6 IInsert with light pressure each front wheel in the front wheel sockets as shown in fig.5, until you hear a click. Check if the wheel is well ins- talled by trying to pull it out. To dismount each front wheel press the wheel quick release button (fig.6-1) and pull the wheel (fig.6-2). -
Página 30: Rear Wheels
SWIVEL AND STRAIGHT MOTION OF THE FRONT WHEELS The front wheels can swivel (at 360º) or move straight. Straight motion of the front wheels The front wheels will move only straight, when you lift up level C on each front wheel (fig.7A). - Página 31 SEAT UNIT (I) FIG. 10 FIG. 11 FIG. 12 1. Assembly of the seat Release the belts under the seat unit by separate the Velcro straps (fig.10). Insert the seat fabric carefully onto the frame as fig.11 shows. Place both pins into the corresponding openings from inside the handle. Press downwards until pins are fixed (fig.12).
- Página 32 SEAT UNIT (II) FIG. 15 FIG. 16 FIG. 17 FIG. 18 2. Disassembly of the seat Release the belts under the seat unit by separating the Velcro straps (fig.15) and separate the belts (fig.16). Pull upwards the pins from both sides of handle (fig. 17-1) and release the seat fabric from the frame (fig.
-
Página 33: Backrest Adjustment
SOFT PAD soft pad will bring additional comfort to your baby. To put the soft pad, insert the shoulder and waist belts through the corresponding ope- nings of the pad. BACKREST ADJUSTMENT FIG. 21 FIG. 22 Using a mechanism you can adjust the po- sitions of backrest. - Página 34 CANOPY FIG. 24 FIG. 25 FIG. 26 FIG. 27 To assemble the canopy, align its two ends to mechanisms to the frame tube and slide them until you hear a click and they are fixed. (fig.24). You can open or close the canopy, as pulling or pushing it by hand (fig. 25-1,2).
- Página 35 PARKING DEVICES FIG. 29 Stroller is equipped with parking devices that block the motion of both rear wheels simultaneously. Press down with your foot the brake pedal in order to engage the par- king device (fig.29.A). Make sure that the parking system is engaged. When you push the stroller gently it should remain still.
- Página 36 SAFETY BELTS The stroller is equipped with a 5-point harness. Using har- nesses is necessarily, when child can sit alone without help or start pushing up on hands or knees. ATTENTION! Always use the FIG. 30 safety belts when the child is inside the stroller, even for a short period of time.
-
Página 37: Cup Holder
CUP HOLDER Align the cup holder to the pin on the right side of the handle and press downwards to fix it (fig.35). ¡ATENCIÓN! Do not leave the cup holder unattended, especially when there are hoy liquids inside the cup! Under certain circumstances (uneven surfaces or sur- faces with slopes) liquid may spill and FIG. - Página 38 FOLDING OF STROLLER FIG. 36 FIG. 37 stroller can be folded with or without mounted seat unit. To fold the stroller, apply the parking devices (fig.38). Press the but- ton (fig.36-1) on stroller’s handle. While you are pressing the button, press other button of locking mechanism in direction, shown in fig.
- Página 39 ASSEMBLY AND FUNCTIONS OF THE CARRY COT FIG. 39 FIG. 40 FIG. 41 Carry cot is suitable for newborn babies, aged up to 6 months and weighting more than 9 kg, who cannot sit unaided, kneels, roll over or pushing on hands or knees. ATTENTION! stop using the carry cot when the baby starts to sit unaided, kneels or roll over.
- Página 40 FOOT COVER Foot cover must be placed on carry cot as fig. 39 shows. In down part you can fix it with Velcro straps and in upper part - by using elastic and buttons (fig.39). CANOPY Canopy´s fabric is attached to the handle of carry cot by zippers and to carry cot by velcro straps.
- Página 41 REMOVING OF THE CARRY COT FIG. 45 FIG. 46 FIG. 47 ATTENTION! ALWAYS APPLY PARKING DEVICES WHILE DESINSTALLING THE CARRY COT FROM THE FRAME. To remove the carry cot from the frame, press simultaneously the two buttons for quick release of the cot (fig. 45-1), pull put the cot (fig.45-2) and remove it from the frame (fig.46).
- Página 42 ADAPTORS FOR CAR SEAT FIG. 49 FIG. 50 FIG. 51 Car seat can be installed on stroller’s frame by adaptors (fig.49). Posi- tion each of adaptors to the corresponding opening and fix to the car seat with light pressure, until you hear a click and adaptors are stable (fig.50).
- Página 43 REMOVING OF THE CAR SEAT FROM THE STROLLER FRAME FIG. 54 FIG. 55 To remove the car seat from the frame, lift simultaneously the two le- vers for quick release of the adaptor (fig.54) and pull out the car seat from the frame.
- Página 44 REGLAS PARA EL CUIDADO Y MANTENIMIENTO (II) 8. Do not use abrasive, bleach, ammonia, spirit or other aggressive detergents. 9. After cleaning always leave the stroller and carry cot to fully dry and after that use it or store it. 10. Always store your stroller indoors. The effect of the environment – sea air, road covered with salt, acid rains, etc., as well as storing in the open air lead to corrosion.
- Página 45 Imported by Estar Asalvo S.L. CIF B91234286 C/3, PI Fridex · 41500 · Alcalá de Guadaíra · Sevilla · Tfno. 902 360 516 Fax: 955 631 205 · email: info@asalvo.com www.asalvo.com www.clubasalvo.com...
- Página 46 especialistas en bebés felices y mamás tranquilas...