Tabla de contenido
Publicidad
Idiomas disponibles
Idiomas disponibles
Enlaces rápidos
INSTALLATION INSTRUCTIONS FOR PART 95-3302 or 99-3302
GM multi-kit 2004-2012
KIT FEATURES
95-3302:
• Double DIN radio provision
• Stacked ISO DIN radio provision
• Painted to match factory dash
99-3302:
• DIN radio provision with pocket
• ISO radio provision with pocket
• Painted to match factory dash
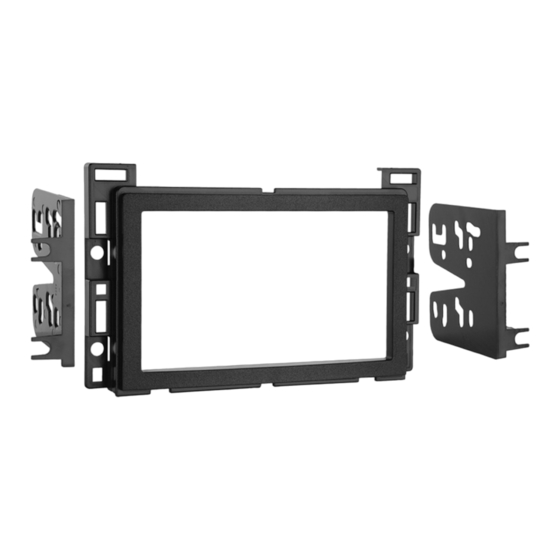
KIT COMPONENTS
95-3302: • A1) Double DIN housing • B1) Double DIN brackets
99-3302: • A2) Radio housing • B2) DIN spacer • C2) Trim plate • D2) ISO brackets
A1
B1
METRA. The World's best kits.
APPLICATIONS
See application list inside
INST-3302
A2
B2
C2
™
1-800-221-0932
WIRING & ANTENNA CONNECTIONS (sold separately)
Wiring Harness:
• Visit www.metraonline.com for specific
interface applications
Antenna Adapter:
• 40-CR10 - Chrysler antenna adapter 2002-up
• 40-GM10 - GM antenna adapter 1988-up
TOOLS REQUIRED
• Small flat blade screwdriver • Panel removal tool
• Phillips screwdriver • Socket set • Cutting tool
D2
CAUTION: Metra recommends disconnecting the
negative battery terminal before beginning any
installation. All accessories, switches, and especially
air bag indicator lights must be plugged in before
reconnecting the battery or cycling the ignition.
NOTE: Refer to the instructions included with the
aftermarket radio.
metraonline.com
© COPYRIGHT 2004-2011 METRA ELECTRONICS CORPORATION
Publicidad
Capítulos
Tabla de contenido

Manuales relacionados para Metra 95-3302


Resumen de contenidos para Metra 95-3302
- Página 1 • Painted to match factory dash KIT COMPONENTS 95-3302: • A1) Double DIN housing • B1) Double DIN brackets 99-3302: • A2) Radio housing • B2) DIN spacer • C2) Trim plate • D2) ISO brackets CAUTION: Metra recommends disconnecting the negative battery terminal before beginning any installation.
-
Página 2: Tabla De Contenido
- Double DIN radio provision (95-3302) ............12 99-3303 instead. a replacement driver information center with programming capabilities. - Stacked ISO DIN radio provision (95-3302) ..........13 95-3302 & 99-3302 **Malibu and G6 only: The Driver Information The 99-3303 does not allow for Double DIN - DIN radio provision with pocket (99-3302) ..........14... -
Página 3: Dash Disassembly
Dash Disassembly Chevrolet Cobalt 2005-2010 Pontiac G5 2007-2009 1. Unclip and remove trim panel from above 4. Unclip and remove trim panel surrounding radio glove box. (Figure A) and climate controls. (Figure D) 5. Remove (4) 9/32 screws securing radio. Unplug 2. -
Página 4: Chevrolet Equinox 2005-2006/Pontiac Torrent 2006
Dash Disassembly Chevrolet Equinox 2005-2006 Chevrolet HHR Pontiac Torrent 2006 2006-2011 1. Unsnap panel below power 1. Unclip and remove entire panel window switch and remove. surrounding radio and climate controls including the A/C vents. Note: This allows you to unplug (Figure A) the window switch easier. -
Página 5: Chevrolet Malibu 2004-2007
Dash Disassembly Chevrolet Malibu 2004-2007 1. Unclip and remove wood grain/painted trim pieces from both sides of steering wheel. (Figure A) 2. Unclip and remove side panel from driver’s side of dash with door open and remove (2) 7mm screws. (Figure B) 3. -
Página 6: Chevrolet Malibu 2008-2012
Dash Disassembly Chevrolet Malibu 2004-2007 Chevrolet Malibu 2008-2012 5. Unclip and remove side panel from passenger side of dash with door open and remove (2) 7mm screws from behind panel. (Figure E) 1. Unsnap and remove shifter trim. (Figure A) 6. -
Página 7: Pontiac G6 2005-2010/G6 2009.5-2010
Dash Disassembly Chevrolet Malibu Pontiac G6 2005-2010/G6 2009.5-2010 2008-2012 1. Open glove box and remove (6) screws from outer edge and then unclip and remove box. (Figure A) 2. Remove (4) screws from panel below steering column. Unclip and remove panel. (Figure B) 3. -
Página 8: Pontiac Solstice 2006-2009
Dash Disassembly Pontiac Solstice 2006-2009 1. (A) Manual transmission: 2. Unclip and remove passenger assist handle trim panel. (Figure D) Lift up the lower edge of the instrument panel 3. Remove (2) bolts securing the passenger assist cluster trim plate enough to reach underneath and release the shift boot trim ring retaining tabs. -
Página 9: Saturn Aura 2007-2009
Dash Disassembly Saturn Aura 2007-2009 Saturn Ion 2006-2007 1. Unclip and remove shifter trim ring. 1. Unclip radio trim panel. (Figure A) (Figure A) 2. Unplug connectors from trim panel and remove panel. (Figure B) 2. Unclip and remove the center 3. -
Página 10: Saturn Sky 2006-2009
Dash Disassembly Saturn Sky 2006-2009 1. Unclip and remove side panel from driver’s side of dash with door open and remove (2) 7mm screws. (Figure A) 2. Remove (2) 7mm screws from bottom edge of panel below steering wheel, unclip panel and remove panel. 3. -
Página 11: Saturn Vue 2006-2007
Dash Disassembly Saturn Vue 2006-2007 1. Grasp the front edge of the shifter trim panel and 3. Pull upward on the panel to release the remaining 6. Remove (4) screws securing the radio. Unplug and pull outward and upward. (Figure A) clips, and remove trim panel. -
Página 12: Kit Assembly
Metra recommends using the proper mating screws supplied with the head unit. (Figure B) adapter from Metra or AXXESS. Re-connect the Cut the two top holes off (Figure A) (Figure B) -
Página 13: Stacked Iso Din Radio Provision (95-3302)
1. Slide the stacked ISO DIN units into the trim plate bracket assembly and secure 3. Locate the factory wiring harness in the dash. Metra recommends using the the units to the kit using the screws supplied with the head units. -
Página 14: Din Radio Provision With Pocket (99-3302)
Cut top two holes off 4. Locate the factory wiring harness in the dash. Metra recommends using the proper mating adapter from Metra or AXXESS. Re-connect the negative battery terminal and test the unit for proper operation. 5. Reassemble dash in reverse order of disassembly. -
Página 15: Iso Radio Provision With Pocket (99-3302)
5. Locate the factory wiring harness in the dash. Cut top two holes off Metra recommends using the proper mating adapter from Metra or AXXESS. Re-connect the negative battery terminal and test the unit for proper operation. 6. Reassemble dash in reverse order of disassembly. - Página 16 INSTALLATION INSTRUCTIONS FOR PART 95-3302 or 99-3302 NOWLEDGE IS OWER Enhance your installation and fabrication skills by enrolling in the most recognized and respected mobile electronics school in our industry. Log onto www.installerinstitute.com or call 800-354-6782 for more information and take steps toward a better tomorrow.
-
Página 17: Herramientas Requeridas
• Herramienta toma de corriente • Cortador COMPONENTES DEL KIT 95-3302: • A1) Alojamiento doble DIN • B1) Soportes doble DIN 99-3302: • A2) Alojamiento del radio • B2) Espaciador DIN • C2) Placa de moldura • D2) Soportes ISO PRECAUCIÓN: Metra recomienda desconectar el terminal... -
Página 18: Aplicaciones
OnStar utilice 99-3303. todos los parámetros. Un kit alternativo, el 99-3303, incluye un centro de información del - Provisión de radio DIN ISO vertical (95-3302) ........13 95-3302 & 99-3302 conductor de reemplazo con capacidades de **Malibu and G6 only: El Centro de Información - Provisión de radio DIN con bolsillo (99-3302) ........14... -
Página 19: Desmontaje Del Tablero
Desmontaje del tablero Chevrolet Cobalt 2005-2010 Pontiac G5 2007-2009 1. Desenganche y retire el panel de la moldura de moldura a la derecha del interruptor de arriba de la guantera. (Figura A) encendido. (Figura C) 2. Desenganche el borde superior del panel debajo 4. -
Página 20: Chevrolet Equinox 2005-2006/Pontiac Torrent 2006
Desmontaje del tablero Chevrolet Equinox 2005-2006 Chevrolet HHR Pontiac Torrent 2006 2006-2011 1. Suelte a presión el panel debajo 1. Desenganche y retire todo el panel del interruptor de la ventana que rodea el radio y los controles eléctrica y retire. del clima, incluyendo las rejillas del aire acondicionado. -
Página 21: Chevrolet Malibu 2004-2007
Desmontaje del tablero Chevrolet Malibu 2004-2007 1. Desenganche y retire las piezas de moldura de veta de madera/pintadas de ambos lados del volante. (Figura A) 2. Desenganche y retire el panel lateral del lado del conductor del tablero con la puerta abierta y retire los (2) tornillos de 7mm. -
Página 22: Chevrolet Malibu 2008-2012
Desmontaje del tablero Chevrolet Malibu 2004-2007 Chevrolet Malibu 2008-2012 5. Desenganche y retire el panel lateral del lado del conductor del tablero con la puerta abierta y retire los (2) tornillos de 7mm detrás del panel. (Figura E) 1. Suelte y retire la moldura de la palanca de velocidades. -
Página 23: Pontiac G6 2005-2010/G6 2009.5-2010
Desmontaje del tablero Chevrolet Malibu Pontiac G6 2005-2010/G6 2009.5-2010 2008-2012 1. Abra la guantera y retire los (6) tornillos del borde exterior, luego desenganche y retire la guantera. (Figura A) 2. Retire los (4) tornillos del panel debajo de la columna de dirección. -
Página 24: Pontiac Solstice 2006-2009
Desmontaje del tablero Pontiac Solstice 2006-2009 1. (A) Transmisión manual: velocidades. (Figura C) 2. Desenganche y retire el panel de moldura de el Levante el borde inferior de la placa de la moldura del conjunto del panel de instrumentos lo suficiente mango de asistencia del pasajero. -
Página 25: Saturn Aura 2007-2009
Desmontaje del tablero Saturn Aura 2007-2009 Saturn Ion 2006-2007 1. Desenganche y retire el aro de 1. Desenganche el panel de moldura del radio. (Figura A) la moldura de la palanca de velocidades. (Figura A) 2. Desconecte los conectores del panel de la moldura y retire el panel. -
Página 26: Saturn Sky 2006-2009
Desmontaje del tablero Saturn Sky 2006-2009 1. Desenganche y retire el panel lateral del lado del conductor del tablero con la puerta abierta y retire los (2) tornillos de 7mm. (Figura A) 2. Retire los (2) tornillos de 7mm del borde inferior del panel debajo del volante, desenganche el panel y retírelo. -
Página 27: Saturn Vue 2006-2007
Desmontaje del tablero Saturn Vue 2006-2007 1. Sostenga el borde delantero del panel de la 3. Jale hacia arriba el panel para liberar el resto de los 6. Retire los (4) tornillos que sostienen el radio. ganchos y retire el panel de la moldura. Desconecte y retire el radio. -
Página 28: Ensamble Del Kit
4. Ubique el arnés del cableado de fábrica al desmontaje. soporte de la placa de la moldura y sujete la unidad en el tablero. Metra recomienda usar el adaptador al kit con los tornillos suministrados con la unidad de acoplamiento adecuado de Metra o AXXESS. -
Página 29: Provisión De Radio Din Iso Vertical (95-3302)
1. Deslice las unidades ISO DIN verticales en el ensamble de soporte de la placa 3. Ubique el arnés del cableado de fábrica en el tablero. Metra recomienda usar el de la moldura y sujete las unidades al kit con los tornillos suministrados con las adaptador de acoplamiento adecuado de Metra o AXXESS. -
Página 30: Ensamble Del Kit 99-3302
Cortar los 2 agujeros superiores del radio. (Figura D) 4. Ubique el arnés del cableado de fábrica en el tablero. Metra recomienda usar el adaptador de acoplamiento adecuado de Metra o AXXESS. Vuelva a conectar el terminal negativo de la batería y pruebe la unidad para verificar que... -
Página 31: Provisión De Radio Iso Con Bolsillo (99-3302)
(Figura C) Cortar los 2 agujeros superiores 5. Ubique el arnés del cableado de fábrica en el tablero. Metra recomienda usar el adaptador de acoplamiento adecuado de Metra o AXXESS. Vuelva a conectar el terminal negativo de la batería y pruebe la unidad para verificar que... - Página 32 INSTALLATION INSTRUCTIONS FOR PART 95-3302 o 99-3302 EL CONOCIMIENTO ES PODER Mejore sus habilidades de instalación y NOWLEDGE IS OWER fabricación inscribiéndose en la escuela de Enhance your installation and fabrication skills by enrolling in the most recognized and respected dispositivos electrónicos móviles más reconocida...