Tabla de contenido
Publicidad
Idiomas disponibles
Idiomas disponibles
Enlaces rápidos
Publicidad
Tabla de contenido

Manuales relacionados para Saitek PRO FLIGHT CESSNA YOKE SYSTEM


Resumen de contenidos para Saitek PRO FLIGHT CESSNA YOKE SYSTEM
- Página 1 Pro Flight Cessna Yoke sYstem ® officially licensed Cessna Product ®...
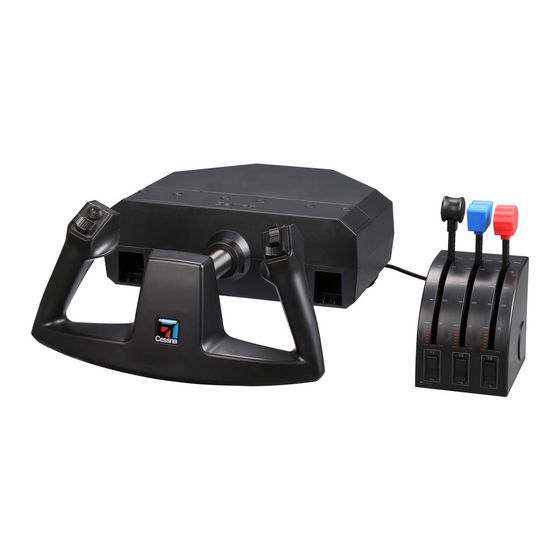
- Página 2 PRO FLIGHT CESSNA YOKE SYSTEM FLIGHT YOKE AND 3 LEVER QUADRANT MODUAL PRO FLIGHT CESSNA RUDDER PEDALS FLIGHT PEDALS WITH TOE BRAKES PRO FLIGHT CESSNA TRIM WHEEL OFFICIALLY LICENSED CESSNA PRODUCT OFFICALLY LICENSED CESSNA PRODUCTS FROM SAITEK PRO FLIGHT AVILABLE AT: WWW.SAITEK.COM 68-17211-37759...
-
Página 3: Tabla De Contenido
ENGLISH INtroductIoN INStaLLING tHE FLIGHt YokE aNd tHrottLE QuadraNt drIvErS aNd SoFtwarE INStaLLatIoN For uSErS oF wINdowS® xp aNd 7, 32- aNd 64-bIt drIvErS aNd SoFtwarE INStaLLatIoN For uSErS oF wINdowS® vISta aNd 7, 32- aNd 64-bIt ENabLING Your coNtroLLEr IN GamES proGrammING Your pro FLIGHt coNtroLLEr wItH Smart tEcHNoLoGY proGrammING SoFtwarE FraNÇaIS INtroductIoN... - Página 4 4-WAY ROCKER SWITCH Accurate ergonomic thumb control 3 interrupteurs permettent de disposer de 6 commandes 3 Schalter bieten zusammen 6 Steuerelemente THROTTLE/PITCH/MIXTURE CONTROLS 3 interruttori combinati per realizzare 6 controlli Los 3 interruptores se combinan para ofrecer 6 mandos Authentic lever control Contrôle parfait des leviers 8-WAY HAT SWITCH Authentische Hebelsteuerung...
-
Página 5: Introduction
PC flight simulation software. Saitek and Cessna have teamed up to provide you with the most authentic flight controls for your home cockpit. This product has been built using genuine design data from the world’s most popular plane manufacturer. - Página 6 Use the integrated USB Hub on the side of the Pro Flight Yoke to easily connect other controllers from the Saitek Pro Flight range, such as additional Pro Flight Throttle Quadrants, Pro Flight Yoke or other peripherals.
-
Página 7: Drivers And Software Installation For Users Of Windows® Vista And 7, 32- And 64-Bit
USB ports, and then click Next. 5. At the Driver Setup screen, click Next to test your controller. 6. When the Saitek Controller screen appears, try out all of your controller’s controls to determine if it is working properly. When you have finished, click OK. -
Página 8: Enabling Your Controller In Games
USB ports and then click Next. 5. At the Driver Setup screen, click Next to test your controller. 6. When the Saitek Controller screen appears, try out all of your controller’s controls to determine if it is working properly. When you have finished, click OK. - Página 9 Click on the Deadzones tab of the Properties window. You can adjust the deadzones (i.e., the distance of pedal travel which doesn’t result in a corresponding in-game rudder movement) of the Pro Flight Cessna Yoke by clicking on the deadzone axes and dragging the deadzone indicators to the desired level.
- Página 10 A good tip before launching your sim is to move all the axes on the controller through their full range of movement a few times. This will Mode 1,2,3 ensure the controller is correctly calibrated. mIcroSoFt FLIGHt SImuLator To set up a button in FS2004 and FSX: •...
- Página 11 • Locate the axis function you want to set to your controller from the list displayed. Left- click it once, and then select the Change Assignment option. • When the Change Assignment window appears, move the axis on the controller that you want to control the selected function.
-
Página 12: Programming Your Pro Flight Controller With Smart Technology Programming Software
corresponds to this movement and then select roll from the list. • Repeat this process for the throttle lever and any other lever you want to assign to the Throttle Quadrant. To set up a button in X-Plane: • Open X-Plane, and move your cursor to the top of the screen to reveal the menu. •... - Página 13 • Special game setups available as “Profiles” from the Saitek website and on the Smart Technology CD • Download the latest version of Smart Technology Programming Software from the Saitek website ruNNING tHE Smart tEcHNoLoGY proGrammING SoFtwarE A. Click on Start, then All Programs, and then look for Smart Technology in your list of programs.
- Página 14 proGrammING From the programming tab, you can mimic your controller to directly copy any of the keyboard commands that are used in your favorite games. The commands are then saved in what we call a Profile. When you click on the programming tab, you will be presented with a high resolution image of the controller you are going to program on the left, and going down the right side of the screen you will see a list of command boxes called “Cells.”...
- Página 15 coNtact uS Clicking on Contact Us will open your default browser and direct it to the contact information page; from here you can choose from a list of contacts. Eu dEcLaratIoN oF coNFormItY: As required, certain of these products have been tested and conform to the requirements of the European Union Directives 2002/95/EC, 2002/96/EC, and 2004/108/EC.
-
Página 16: Introduction
PC. Saitek et Cessna ont fait équipe pour vous proposer les commandes de vol les plus réalistes pour votre cockpit à... - Página 17 Utilisez le concentrateur USB intégré situé sur le côté du manche à volant Pro Flight pour connecter facilement les autres contrôleurs de la gamme Pro Flight de Saitek, tels que des blocs de manette des gaz Pro Flight supplémentaires, des pédales de...
- Página 18 USB dans l’un des ports USB de l’ordinateur, puis cliquez sur Next. 5. Dans l’écran de démarrage du pilote, cliquez sur Next pour tester le contrôleur. 6. Lorsque l’écran du contrôleur Saitek apparaît, essayez toutes les commandes de votre contrôleur afin de déterminer s’il fonctionne correctement. Lorsque vous avez terminé, cliquez sur OK.
-
Página 19: Installation Des Pilotes Et Du Logiciel Pour Les Utilisateurs De Windows® Vista Et 7, 32 Et 64 Bits
USB dans l’un des ports USB de l’ordinateur, puis cliquez sur Next. 5. Dans l’écran de démarrage du pilote, cliquez sur Next pour tester le contrôleur. 6. Lorsque l’écran du contrôleur Saitek apparaît, essayez toutes les commandes de votre contrôleur afin de déterminer s’il fonctionne correctement. Lorsque vous avez terminé, cliquez sur OK. - Página 20 Les utilisateurs de Windows 7 devront naviguer via le bouton Démarrer vers : Jeux > Outils > Périphériques d’entrée. Ouvrez la fenêtre Contrôleurs de jeu et le manche à volant Cessna Saitek Pro Flight doit apparaître. Cliquez sur Propriétés pour faire apparaître l’écran de test. Cliquez sur l’onglet Tester.
- Página 21 faisant glisser les indicateurs de non-sensibilité sur le niveau souhaité. Pour tester les nouveaux paramètres, cliquez sur l’onglet Tester ou jouez à un jeu de simulation de vol. coNFIGurEz votrE coNtrôLEur pro FLIGHt daNS LE LoGIcIEL dE SImuLatIoN dE voL Assurez-vous que le manche à...
- Página 22 le bouton du contrôleur que vous souhaitez affecter à cet événement. Le numéro du bouton d’affich era dans la fenêtre, cliquez ensuite sur OK pour confirmer. Pour configurer un axe dans FS2004/FSX : • Dans FSX, cliquez sur Paramètres > Commandes > Axes de commande. Dans FS2004 allez dans Paramètres >...
- Página 23 x-pLaNE Pour configurer un axe dans X-Plane : • Ouvrez X-Plane, et déplacez le curseur en haut de l’écran, afin de révéler le menu. • Cliquez sur Paramètres > Manette de jeu et équipement, et sélectionnez l’onglet Axe. • Pour définir la commande de pas, déplacez le manche à volant en avant et en arrière.
-
Página 24: Programmation De Votre Contrôleur Pro Flight Avec Le Logiciel Smart Technology Programming Software
• Configurations de jeu spéciales disponibles en tant que « Profiles » sur le site Web de Saitek et sur le CD Smart Technology • Téléchargez la dernière version du logiciel Smart Technology Programming Software sur le site Web de Saitek ExécutIoN du LoGIcIEL Smart tEcHNoLoGY proGrammING SoFtwarE... - Página 25 C. Cliquez avec le bouton droit sur l’icône du contrôleur à côté de votre horloge, et cliquez sur Profile Editor from the list. Une fois que le logiciel ST est ouvert, vous allez voir apparaître un écran de « Conseil »...
-
Página 26: Contactez-Nous
aFFIcHEr LES coNSEILS Lorsque vous cliquez dessus, l’écran de conseil va apparaître ; il s’agit du même écran que celui qui apparaît lors de la toute première fois que vous exécuter le logiciel ST et vous pouvez parcourir tous les conseils à partir de cet écran si vous le souhaitez. téLécHarGEr LES pILotES Et LE LoGIcIEL Un clic sur ce lien ouvre votre navigateur par défaut et le dirige vers la page de téléchargement des pilotes et du logiciel. -
Página 28: Einführung
Das Pro Flight Cessna Yoke ermöglicht maximalen Realismus, da es präzise Lenkbewegungen und eine große Anzahl von Tastensteuerfunktionen für PC-Flugsimulationssoftware bietet. Die Zusammenarbeit von Saitek und Cessna bietet Ihnen die authentischsten Steuergeräte für Ihr Cockpit am PC. Dieses Produkt wurde auf der Grundlage echter Designdaten des populärsten Flugzeugherstellers der Welt... -
Página 29: Treiber- Und Software Installation Für Benutzer Von Windows® Xp, 32- And 64-Bit
Triebwerken zu erstellen. Verwenden Sie den integrierten USB-Hub an der Seite des Pro Flight Yoke, um andere Geräte aus der Pro Flight Produktpalette von Saitek anzuschließen, wie beispielsweise zusätzliche Pro Flight Throttle Quadrants, Pro Flight Rudder Pedals oder andere Peripheriegeräte. -
Página 30: Treiber- Und Software Installation Für Benutzer Von Windows® Vista Und 7 32-Bit Und 64-Bit
Sie den Bildschirmanweisungen. Wenn Sie sich später registrieren möchten, dann markieren Sie dieses Feld nicht. 9. Um die Installation zu beenden, klicken Sie auf Fertig stellen. Ihr Saitek Controller ist nun spielbereit! trEIbEr- uNd SoFtwarE INStaLLatIoN Für bENutzEr voN wINdowS® vISta uNd 7 32-bIt uNd 64-bIt 1. - Página 31 Sie auf OK, wenn Sie fertig sind. 7. Klicken Sie auf dem folgenden Software-Setupbildschirm auf Next. Ein Popupfenster wird mit der Meldung angezeigt, ob Sie der Software von Saitek vertrauen möchten. Klicken Sie auf Yes und dann auf Next.. 8. Nach Abschluss der Installation erhalten Sie die Option Run Profile Editor, die Ihnen die Programmierumgebung anzeigt.
-
Página 32: Testen Und Einstellen Ihres Controllers
Anwender von Windows 7 klicken auf Start und dann auf Spiele > Extras > Eingabegeräte. Wenn Sie das Fenster Gamecontrollers öffnen, sollten Sie das Saitek Pro Flight Cessna Yoke sehen. Klicken Sie auf „Eigenschaften“, um den Testbildschirm zu öffnen. Klicken Sie auf die Registerkarte „Test“. - Página 33 koNFIGurIErEN SIE IHrEN pro FLIGHt coNtroLLEr IN IHrEr FLIGHtSIm-SoFtwarE Vergewissern Sie sich, dass Ihr Yoke an den PC angeschlossen ist, bevor Sie die Flugsimulations-Software starten, da das Programm sonst den Controller nicht entdeckt. Es ist zu empfehlen, vor dem Start des Programms alle Achsen des Controllers mehrmals durch den ganzen Bewegungsbereich zu bewegen.
- Página 34 So belegen Sie in FS2004/FSX eine Achse: • In FSX klicken Sie auf Einstellungen > Achsen Kontrollachsen. In FS2004 gehen Sie Mode 1,2,3 zu Einstellungen > Zuweisungen > Joystick-Achsen. • Vergewissern Sie sich, dass der richtige Controller im Dropdown-Menü Controller-Typ gewählt wurde (Joystick-Typ in FS2004).
- Página 35 • Sie müssen für alle Hebelachsen, die Sie zugewiesen haben, sicherstellen, dass sie eine Empfindlichkeit von 100 % (ganz rechts) und eine Nullzone von 0 % (ganz links) haben. x-pLaNE So belegen Sie in X-Plane eine Achse: • Starten Sie X-Plane und bewegen Sie den Cursor zur Oberseite des Bildschirms, um das Menü...
- Página 36 • Drücken Sie die Taste am Yoke, der Sie einen der FlugSim-Befehle zuweisen wollen. Indem Sie die Taste drücken, teilen Sie X-Plane mit, dass Sie sich jetzt mit dieser Taste beschäftigen. • Klicken Sie mit der Maus auf den runden Knopf neben dem Namen des Befehls. •...
-
Página 37: Ausführen Der Smart Technology Programming Software
Nachdem die Achsen eingerichtet wurden, gehen Sie zum Kalibrierfenster (In FS2004 gehen Sie zu Empfindlichkeiten). Wählen Sie die Ruderpedale aus und anschließend „Advanced Controls“. Stellen Sie sicher, dass die Empfindlichkeit für beide Bremsachsen auf 75 % bis 80 % eingestellt ist und dass die Nullzonen für beide auf 0 % eingestellt sind. - Página 38 Ausführung der Software). Über diesen Bildschirm erhalten Sie nützliche Informationen zur Profilsoftware. Wenn dieser Bildschirm nicht angezeigt werden soll, wenn Sie die ST-Software starten, deaktivieren Sie das kleine Kontrollkästchen in der Ecke des Hinweisbildschirms. Der Hinweisbildschirm kann geschlossen werden, indem Sie auf das OK-Symbol unten rechts klicken.
-
Página 39: Eu-Konformitätserklärung
SHow tIpS Klicken sie darauf, um den Hinweisbildschirm anzuzeigen. Dies ist derselbe Bildschirm, der angezeigt wird, wenn Sie die ST-Software zum ersten Mal öffnen. Sie können über diesen Bildschirm alle Tipps durchgehen. dowNLoad drIvErS aNd SoFtwarE Wenn Sie auf diesen Link klicken, wird die Seite zum Herunterladen von Treibern und Software in Ihrem Standardbrowser geöffnet. -
Página 40: Introduzione
PC con simulazioni di volo. Saitek e Cessna si sono unite per offrire autentici controlli di volo sul cruscotto Questo prodotto è stato realizzato con dati di progettazione reali, forniti dal più... -
Página 41: I Installazione Dei Driver E Del Software Per Utenti Di Windows® Xp A 32 E A 64 Bit
Utilizzare l’hub USB integrato, posto sulla parte laterale della cloche Pro Flight Yoke per collegare facilmente altri controller della gamma Saitek pro Flight, come il modulo Pro Flight Throttle Quadrant, la pedaliera Pro Flight Rudder Pedals o altre periferiche. -
Página 42: Installazione Dei Driver E Del Software Per Utenti Di Windows® Vista E 7, A 32 E A 64 Bit
USB in una delle porte USB del computer, quindi fare clic su Next. 5. Alla schermata Installazione driver, fare clic su Next per provare il controller. Non appena viene visualizzata la schermata Controller Saitek, 6. Nella schermata di Installazione software seguente, fare clic su Next e seguire le istruzioni a schermo. -
Página 43: Attivazione Del Controller Nei Giochi
USB del computer, quindi fare clic su Next. 5. Alla schermata Installazione driver, fare clic su Next per provare il controller. 6. Non appena viene visualizzata la schermata Controller Saitek, provare tutti i comandi del Controller per verificarne il corretto funzionamento. Al termine, fare clic su OK. - Página 44 • Gli utenti Windows 7 devono navigare mediante il pulsante Start in: Giochi > Strumenti > Dispositivi di input. Aprire la finestra Controller di gioco e verrà visualizzata la cloche Saitek Pro Flight Cessna Yoke. Fare clic su Proprietà per richiamare la schermata di test. Fare clic sulla scheda Test.
- Página 45 coNFIGurazIoNE dEL coNtroLLEr pro FLIGHt aLL’INtErNo dEL SoFtwarE FLIGHt SIm Prima di avviare il software sim assicurarsi che la cloche sia collegata al PC, altrimenti il programma non riuscirà a rilevare il controller. Un buon accorgimento prima di avviare il simulatore è quello di spostare tutti gli assi del controller per l’arco di movimento completo un paio di volte.
- Página 46 Per impostare un pulsante in FS2004 e in FSX: Mode 1,2,3 • In FSX fare clic su Impostazioni > Controlli > Pulsanti/Tasti. In FS2004 andare a Impostazioni > Assegnazioni > Pulsanti/Tasti. • Verificare che sia selezionato il controller corretto nel menu a discesa chiamato Tipo di Controller (Tipo di joystick in FS2004).
- Página 47 dell’asse verrà visualizzata nella finestra, quindi fare clic su OK per confermare. Se si imposta una leva di comando sul modulo Throttle Quadrant, come miscela o un acceleratore supplementare, occorre effettuare anche le seguenti impostazioni. • In FSX fare clic su Impostazioni > Controlli > Calibrazione. In FS2004 andare a Impostazioni >...
- Página 48 • Ripetere il procedimento per la leva dell’acceleratore e per qualsiasi altra leva si desideri assegnare al modulo Throttle Quadrant. Per impostare un pulsante in X-Plane: • Aprire X-Plane e spostare il cursore verso la parte superiore dello schermo per vedere il menu.
-
Página 49: Programmazione Del Controller Pro Flight Con Il Software Smart Technology
assi dei freni. • Infine, fare clic sull’asse della barra di comando ed effettuare un movimento di comando, in modo che la finestra Modifica assegnazione rilevi l’asse della barra. Sono solo tre gli assi che devono essere impostati sui pedali; se ne sono presenti di più... - Página 50 • Programmazione di movimenti speciali con sofisticate funzionalità di temporizzazione • Impostazioni di gioco speciali disponibili come “Profiles” dal sito Web Saitek e sul CD Smart Technology • Download dell’ultima versione di Smart Technology Programming Software dal sito Web Saitek ESEcuzIoNE dI Smart tEcHNoLoGY proGrammING SoFtwarE A.
- Página 51 prodotto La pagina di prodotto è la pagina principale visualizzata non appena viene aperto per la prima volta il software Smart Technology (come illustrato sopra). Qualunque hardware collegato al computer sarà automaticamente rilevato e visualizzato sullo schermo. Poiché è sempre in prima posizione nell’elenco dell’hardware collegato, la Pro Flight Yoke verrà...
- Página 52 dowNLoad dEI proFILI dI GIoco Facendo clic su questo link si aprirà il browser predefinito, che porterà alla pagina di download dei profili. Da questa pagina, scegliere il controller; quindi verrà visualizzato un elenco di profili già pronti, adatti agli ultimi giochi. LEGGErE IL maNuaLE dI proGrammazIoNE St Il manuale di programmazione ST completo verrà...
-
Página 54: Introducción
PC. Saitek y Cessna se han unido para ofrecerte el control de vuelo más auténtico para tu cabina de mando en casa. Este producto ha sido creado a partir de datos auténticos de los fabricantes de aviones más... -
Página 55: Instalación De Drivers Y Software Para Usuarios De Windows® Xp, 32- Y 64-Bit
Utiliza el concentrador USB integrado que hay en la lateral del Pro Flight Yoke para conectar fácilmente otros mandos de la gama Saitek Pro Flight, como cuadrantes Pro Flight Throttle Quadrant adicionales, pedales Pro Flight Rudder Pedals u otros periféricos. -
Página 56: Instalación De Drivers Y Software Para Usuarios De Windows® Vista Y 7, 32- Y64-Bit
USB de su ordenador, y luego haga clic en Next. 5. En la pantalla Driver Setup, haga clic en Next para probar su mando. 6. Cuando aparezca la pantalla Saitek Controller, pruebe todos los controles de su mando para determinar que funcionan correctamente. Cuando haya terminado, haga clic en OK. -
Página 57: Activar El Mando En Los Juegos
USB de su ordenador, y luego haga clic en Next. 5. En la pantalla Driver Setup, haga clic en Next para probar su mando. 6. Cuando aparezca la pantalla Saitek Controller, pruebe todos los controles de su mando para determinar que funcionan correctamente. Cuando haya terminado, haga clic en OK. - Página 58 > Dispositivos de entrada. Abre la ventana Dispositivos de juego, donde debería aparecer Saitek Pro Flight Cessna. Haz clic en Propiedades para que aparezca la pantalla de prueba. Haz clic en la pestaña Prueba. Si mueves el Yoke, debería haber una respuesta en esta ventana; si hay respuesta, significa que el Yoke funciona correctamente Haz clic en la pestaña Deadzones (zonas muertas) de la ventana Propiedades.
- Página 59 SImuLador dE vuELo dE mIcroSoFt Para configurar un botón en FS2004 y FSX: • En FSX haz clic en Configuración > Controles > Botones/Teclas. En FS2004 ve a Configuración > Asignaciones > Botones/Teclas. Mode 1,2,3 • Comprueba que esté seleccionado el mando correcto en el menú...
- Página 60 • Cuando aparezca la ventana Cambiar asignación, mueve el eje del mando que desees que controle la función seleccionada. El nombre del eje se mostrará en la ventana. A continuación haz clic en OK para confirmar. Si estás configurando un mando por palanca para el Throttle Quadrant, como mezcla o acelerador extra, deberán realizarse también los siguientes ajustes.
- Página 61 derecha. Localiza la barra de movimiento que se corresponda con este movimiento y luego selecciona Balanceo de la lista. • Repite este proceso para la palanca de aceleración y para cualquier otra palanca que desees asignar al Throttle Quadrant. Para configurar un botón en X-Plane: •...
-
Página 62: Programar Su Mando Pro Flight Con El Software De Programación Smart Technology
• Asegúrate de que las casillas de la columna Revertir estén marcadas para ambos frenos. • Por último, haz doble clic en Eje del timón y realiza el movimiento del timón para que la ventana Cambiar asignación detecte el eje del timón. Estos son los únicos tres ejes que deben configurarse para los pedales;... - Página 63 Programa movimientos especiales con sofisticadas características de tiempo • Ajustes especiales para juegos disponibles como “Profiles” desde el sitio web de Saitek y en el CD de Smart Technology • Descargue la última versión del software de programación Smart Technology desde el sitio web de Saitek EjEcutar EL SoFtwarE dE proGramacIóN Smart tEcHNoLoGY...
-
Página 64: Programación
producto La página del producto es la pantalla principal que aparece cuando el software de Smart Technology se abre por primera vez (como se muestra arriba). Cualquier hardware de Pro Flight conectado a su ordenador se detectará y mostrará automáticamente en esa pantalla. Dado que siempre están en la primera posición de la lista de hardware conectado, los pedales Pro Flight Yoke siempre aparecerán en la página del producto del software, aunque no haya ningún hardware de Pro Flight conectado físicamente a su ordenador. - Página 65 dowNLoad GamE proFILES (dEScarGar pErFILES dE juEGoS) Al hacer clic en este enlace se abrirá su navegador por defecto y le dirigirá a la página de descarga de perfiles. Desde esta página, escoja su mando y aparecerá una lista de perfiles predefinidos que coincidirán con los últimos juegos.
- Página 67 PRO FLIGHT CESSNA YOKE SYSTEM FLIGHT YOKE AND 3 LEVER QUADRANT MODUAL PRO FLIGHT CESSNA RUDDER PEDALS FLIGHT PEDALS WITH TOE BRAKES PRO FLIGHT CESSNA TRIM WHEEL OFFICIALLY LICENSED CESSNA PRODUCT OFFICALLY LICENSED CESSNA PRODUCTS FROM SAITEK PRO FLIGHT AVILABLE AT: WWW.SAITEK.COM 68-17211-37759...
- Página 68 © 2011 Mad Catz Interactive Asia Limited (MCIA). Pro Flight logo, the Saitek logo, Mad Catz and the Mad Catz logo are trademarks or registered trademarks of Mad Catz, Inc., and/or its affiliated companies. Cessna emblems, logos, and body designs are trademarks of Textron Innovations Inc. and are used under license by Mad Catz Inc.