Schlage ND‑Serie Instrucciones De Instalación
Ocultar thumbs
Ver también para ND‑Serie:
- Instrucciones de instalación (4 páginas) ,
- Instrucciones y especificaciones sobre el cableado (3 páginas) ,
- Manual de instrucciones (2 páginas)
Publicidad
Idiomas disponibles
Idiomas disponibles
P517-381
Adjustment
Installation Preparation
Door preparation:
For door preparation use the template included in the package with the
lock. For additional information, visit the website www.allegion.com/us.
IMPORTANT – LOCK TIMING
LOCK TIMING is the positioning and adjustment of internal lock
L
components.
Functions not listed below do not require timing.
L
THE FOLLOWING LOCKING FUNCTIONS MUST BE TIMED:
ND60 (including XN12-001)
ND72 (including XN12-002 and XN12-003)
ND70
ND73
ND95
ND97
See ND‑Series Timing Guide (P517‑432) in package.
For additional assistance, contact Product Support at
Outside
Lever
Chassis
Plate
Latch
Strike
ND75
ND93
ND25x70
ND70x80
1-877-671-7011.
ND‑Series
Anti‑Rotation
Plate
Optional Spacer
for 1³⁄₈" Door (2)
1
Install latch
The bevel must face toward the door stop.
ND94
Pin wrench
Mounting
Screws (2)
Inside Spring
Cage
Actual Size
Installation Instructions
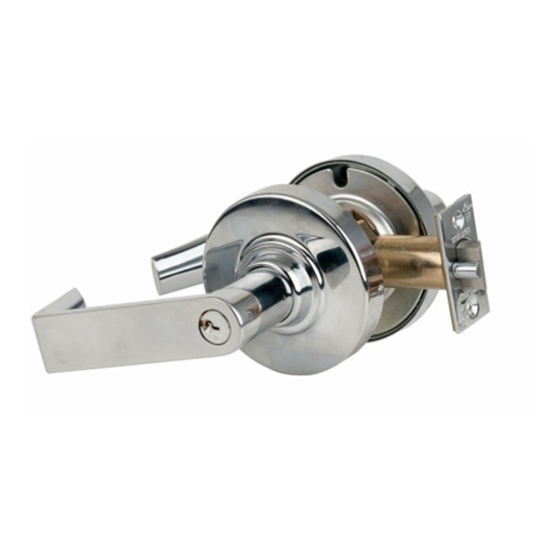
Cylinder Options
Full Size IC (FSIC)
Small Format (SFIC)
Standard Cylinder
Inside Lever
Rose
ND53 Function shown
Publicidad
Tabla de contenido

Manuales relacionados para Schlage ND‑Serie


Resumen de contenidos para Schlage ND‑Serie
- Página 1 ND‑Series P517-381 Installation Instructions Cylinder Options Full Size IC (FSIC) Pin wrench Outside Small Format (SFIC) Lever Chassis Standard Cylinder Adjustment Anti‑Rotation Plate Plate Mounting Screws (2) Inside Lever Rose Latch Optional Spacer for 1³⁄₈” Door (2) Inside Spring Strike Cage ND53 Function shown...
- Página 2 Door Thickness Adjustment NOTE: If door thickness insert is missing, align the adjustment plate to marks on chassis: • For ” thick doors, NO ADJUSTMENT IS REQUIRED. Continue to step 2. 1³⁄₄ • For 1 ” thick doors, install the optional spacers (see steps 2 and 4). ³⁄₈...
- Página 3 Install chassis/outside lever assembly Install anti‑rotation plate Latch prongs fi t between slide and slide clip. Align the tab with the indent on the hub. Indent Optional spacer 1³⁄₈” (35 mm) thick door ONLY Indent Anti‑rotation Slide clip plate Latch prongs Optional spacer 1³⁄₈”...
-
Página 4: Customer Service
Install inside lever Check lock function Firmly push on until lever catch engages. If a keyed function does not work properly, refer to the ND‑Series Timing Guide (P517‑432) in this package to determine proper adjustment of locks that require timing. Lock functions that require timing are listed on page 1. -
Página 5: Sincronización De La Cerradura Guide De Synchronisation De La Serrure
ND‑Series Instrucciones de Instalación Instructions d’Installation Se muestra el ND53 Opciones de cilindros Manija ND53 illustré Options de cylindre Exterior Llave de espiga Levier Núcleo IC de tamaño grande Clé à ergot Extérieur Barillet interchangeable grande Placa a ajuste Plaque de réglage Núcleo IC de tamaño pequeño Barillet interchangeable petit Chasis... - Página 6 Ajuste del gorosor de la puerta Vuelva a orientar y colocar el inserto de espesor de la puerta. Réglage de l’épaisseur de la porte Réorientez l’écrou rapporté de l’épaisseur de la porte et replacez‑le. • Para puertas de 44 mm de espesor, no se requiere NINGÚN AJUSTE. Continuar al paso 2.
- Página 7 Vuelva a instalar la placa de ajuste. Instale el chasis/manija exterior Remettre la plaque de réglage. Installer le châssis/levier extérieur Ajuste hasta que el inserto de espesor de la puerta ingrese en la Los dientes del pestillo ajustan entre el deslizador y el gancho lateral. muesca en la placa de ajuste (o alinee como se describe anteriormente).
-
Página 8: Servicio Al Cliente
Instale la placa antirrotación Instale la manija interior Installer la plaque anti‑rotation Installer le levier intérieur Alinee el diente con la muesca en el núcleo. Presione fi rmemente hasta que entre la traba de la manija. Aligner la languette avec la fente sur le collet. Poussez fermement jusqu’à...