Publicidad
Idiomas disponibles
Idiomas disponibles
Enlaces rápidos
SERVICE MANUAL
Repair Kit KK-5008
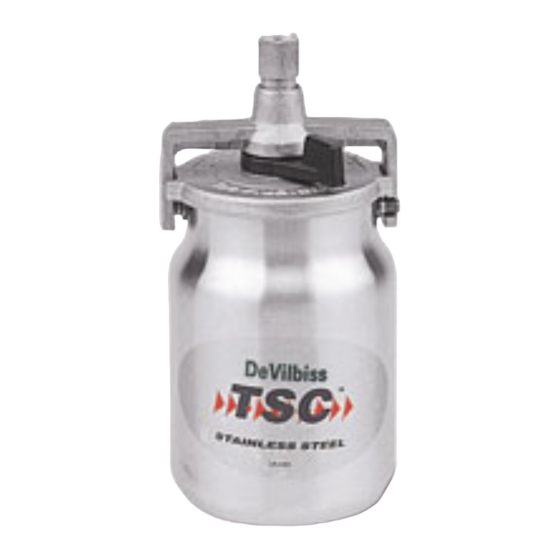
TSC-595 STAINLESS STEEL
DRIP FREE SUCTION CUP
Important: Before using this
e q u i p m e n t , r e a d a l l s a f e t y
precautions and instructions.
Retain for future use.
Figure 1
Product is covered by U.S.A. Patent Nos.
287.994, 4,760,753
DESCRIPTION
Model:
TSC-595
Thread Size:
3/4" NPS
Weight:
20 ounces
The TSC-595 stainless steel, 1 quart capac-
ity cup has a unique, two position valve
which permits selection of either a drip
free spraying mode or a conventional
open vent mode.
The stainless steel cup is designed for use with
corrosive type materials, such as waterbornes.
This cup is also suitable for use with finishes
containing halogenated hydrocarbon solvents.
In the drip free position, air is directed
through the vent in the lid to a channel
beneath the gasket before entering the
cup at the valve. This allows the cup to
be tilted when full without dripping paint
through the vent. The cup can also be in-
verted momentarily while spraying without
leaking.
The open position isolates the channel
and opens a direct vent into the cup.
The position of the valve is indicated by
alignment of the hole in the valve slot with
the marks cast on the lid. These positions
are identified as "O" for vent open and
"D/F" for Drip Free.
SB-4-395-E (10/2014)
INSTALLATION
1. Position yoke at right angle to gun body with vent hole in lid toward rear and lever
of cam (3) toward front of gun.
2. Fasten cup lid assembly to gun by attaching nut (2), see Figure 4, to fluid inlet nipple
on gun. Tighten nut with wrench.
3. Strain material to be sprayed through a 60-90 mesh screen before pouring into cup.
4. Engage pins on cup into yoke and tighten yoke by moving lever of cam clockwise.
OPERATION
Open Vent Mode "O"- To operate in the open vent mode, rotate the valve with a
screwdriver or coin so that the hole in the valve slot is aligned with the "O" on the lid.
See Figure 2.
If the valve slot hole should plug while operating in the "O" vent mode, use a pointed
tool such as a nail or drill bit to probe through the valve slot hole to clear away the obstruction.
Figure 2 - Open Vent Mode
Lid Top
Channel
Vent Hole
(Do Not Probe)
Drip Free Mode "D/F" - To operate in the drip free mode, rotate the valve with a
screwdriver or coin so that the hole in the valve slot is aligned with the "D/F" on the
lid. See Figure 3.
Do not probe through the channel vent hole at any time. Do not probe through
the valve slot hole while the valve is in the "D/F" position. These holes are
sealed by a gasket and gasket damage could result. See Figures 2 and 3.
Figure 3 - Drip Free Model
Lid Top
Channel
Vent Hole
(Do Not Probe)
Valve Movement - Do not forcibly rotate the valve. If it will not move freely, soak in
solvent or remove the lid assembly from the cup and press down on the top of the valve
until it breaks free. The valve has free travel vertically of about 1/8". This can be used
to push out the gasket.
1 / 6
Lid Underside
Gasket
Channel
Channel
Valve slot
Vent Hole
hole can be
probed to clean.
Gasket shown par-
tially removed
Valve in Open Position
!
CAUTION
Lid Underside
Valve slot
hole sealed -
(Do Not Probe)
Gasket shown
partially removed.
Valve in Drip Free
Position
EN
Publicidad

Manuales relacionados para DeVilbiss TSC-595


Resumen de contenidos para DeVilbiss TSC-595
- Página 1 Drip Free Mode "D/F" - To operate in the drip free mode, rotate the valve with a The TSC-595 stainless steel, 1 quart capac- screwdriver or coin so that the hole in the valve slot is aligned with the "D/F" on the ity cup has a unique, two position valve lid.
- Página 2 In this part sheet, the words WARNING, CAUTION and NOTE are used to emphasize important safety information as follows: WARNING NOTE CAUTION Hazards or unsafe practices which Hazards or unsafe practices which could result in severe personal Important installation, operation or could result in minor personal injury, injury, death or substantial property maintenance information.
- Página 3 MAINTENANCE Cleaning Procedures: 1. Empty paint from cup and add small amount of clean solvent. The Lid Repair/Replacement: amount required will vary with different coatings and solvents. 1. To replace a damaged part, use a 5/16 inch Allen wrench to loosen 2.
- Página 4 Figure 4 Apply sealant to first two threads (Loctite #262). Yoke PARTS LIST Ind. Ref. Replacement Description Parts Part No. Req'd. — ADAPTER, 1/2" NPS (M) — NUT, 3/8" NPS (F) — TGC-407-1-K3 DRIP FREE VALVE AND GASKET (KIT OF 3) TGC-9-K5 TRI SEAL LID GASKET (KIT OF 5)
- Página 5 NOTES SB-4-395-E (10/2014) 5 / 6...
-
Página 6: Warranty Policy
WARRANTY POLICY DeVilbiss products are covered by Finishing Brands one year materials and workmanship limited warranty. The use of any parts or accessories, from a source other than Finishing Brands, will void all warranties. For specific warranty information please contact the closest Finishing Brands location listed below. - Página 7 Peso: 20 onzas Válvula en posición Abierta La cubeta TSC-595 de acero inoxidable de un Modo libre de goteo "D/F" – Para hacer funcionar en el modo libre de goteo, haga girar cuarto de galón de capacidad tiene una válvula la válvula con un desarmador o con una moneda de manera que el orificio en la ranura de...
-
Página 8: Medidas Preventivas
En esta hoja de piezas, las palabras ADVERTENCIA, PRECAUCIÓN y NOTA se emplean para enfatizar información de seguridad importante de la siguiente forma: NOTA ADVERTENCIA PRECAUCIÓN Prácticas peligrosas o inseguras que Prácticas peligrosas o inseguras que Información importante de pueden ocasionar lesiones pueden ocasionar lesiones personales instalación, operación o personales graves, la muerte o daño... - Página 9 MANTENIMIENTO Procedimientos de limpieza: 1. Vacíe la pintura de la cubeta y agregue una cantidad pequeña de Reparación/Reemplazo de la tapa: solvente limpio. La cantidad necesaria varía según los diferentes recubrimientos y solventes. 1. Para reemplazar una pieza dañada, use una llave Allen de 5/16 pulg. para aflojar y retirar el adaptador (1).
- Página 10 Figura 4 Aplique sellador a las dos primeras roscas (Loctite #262). Varilla de unión LISTA DE PIEZAS Núm. de Núm. de Núm. la pieza de Descripción piezas de ref. repuesto requeridas — ADAPTADOR, 1/2" NPS (M) — TUERCA, 3/8" NPS (H) —...
- Página 11 NOTAS SB-4-395-E (10/2014) MX-5 / 6...
-
Página 12: Política De Garantías
POLÍTICA DE GARANTÍAS Los productos DeVilbiss están cubiertos por la garantía limitada de materiales y mano de obra por un año de Finishing Brands. El uso de cualquier pieza o accesorio de una fuente que no sea Finishing Brands, anulará todas las garantías. Para obtener información específica sobre la garantía, favor ponerse en contacto con el local de Finishing Brands más cercano a usted entre los listados a continuación.