Publicidad
sauder.com
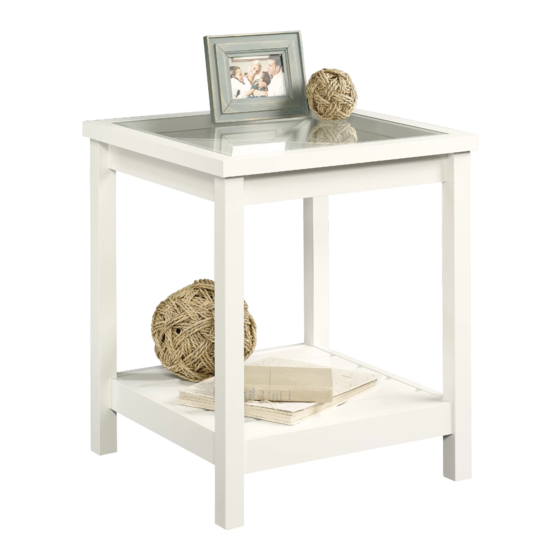
Side Table
Cottage Road Collection | 416136
Need help? Visit Sauder.com to view video assembly tips or chat with a live rep.
Prefer the phone? Call 1-800-523-3987.
Share your journey!
Gets on your couch' s
good side.
NOTE: THIS INSTRUCTION
BOOKLET CONTAINS IMPORTANT
SAFETY INFORMATION.
PLEASE READ AND KEEP FOR
FUTURE REFERENCE.
English pg 1-15
Français pg 16-18
Español pg 19-21
Lot # 359210
02/19/14
Purchased: __________________
Be sure to give us a ring before
making any returns. 1-800-523-3987
Publicidad
Tabla de contenido

Manuales relacionados para Sauder 416136


Resumen de contenidos para Sauder 416136
- Página 1 Cottage Road Collection | 416136 NOTE: THIS INSTRUCTION BOOKLET CONTAINS IMPORTANT SAFETY INFORMATION. Need help? Visit Sauder.com to view video assembly tips or chat with a live rep. PLEASE READ AND KEEP FOR FUTURE REFERENCE. Prefer the phone? Call 1-800-523-3987.
- Página 2 Assembly Tools Required Part Identifi cation No. 2 Phillips Screwdriver Tip Shown Actual Size Hardware Identifi cation Assembly Steps 5-15 Hammer Not actual size Français 16-18 Español 19-21 Skip the power trip. Safety This time. Warranty Page 2 416136 www.sauder.com/services...
-
Página 3: Part Identifi Cation
TOP STRETCHER (4) FRONT BOTTOM STRETCHER (2) SIDE BOTTOM STRETCHER (2) RIGHT FRONT/LEFT REAR LEG (2) LEFT FRONT/RIGHT REAR LEG (2) INSIDE SHELF SLAT (3) OUTSIDE SHELF SLAT (2) LONG BRACE (1) SHORT BRACE (2) GLASS TOP (1) www.sauder.com/services 416136 Page 3... - Página 4 HIDDEN CAM - 38 CAM DOWEL - 22 CAM SCREW - 16 WOOD DOWEL - 6 ANGLE BRACKET - 4 GLUE - 1 LONG METAL PIN - 1 CAM COVER - 16 WHITE 7/16" LARGE HEAD SCREW - 8 Page 4 416136 www.sauder.com/services...
- Página 5 Insert the metal end of the CAM CAM DOWELS DOWEL into the HIDDEN CAM. into these parts. Arrow Hole The arrow in the HIDDEN CAM must point toward the hole in the edge of the board. www.sauder.com/services 416136 Page 5...
- Página 6 Step 2 Turn sixteen CAM SCREWS (8F) into the LEGS (E and F). å Remember: Righty tighty. Lefty loosey. (16 used) Page 6 416136 www.sauder.com/services...
- Página 7 BOTTOM STRETCHERS (D) to the LEGS (E and F). Tighten eight HIDDEN CAMS. Surface with HIDDEN CAMS Edge with CAM DOWELS Surface with Edge with HIDDEN CAMS holes Surface with HIDDEN CAMS Edge with CAM DOWELS Edge with holes Surface with HIDDEN CAMS www.sauder.com/services 416136 Page 7...
- Página 8 Tighten Risk of damage or Arrow injury. HIDDEN CAMS must be completely Arrow Maximum tightened. HIDDEN 210 degrees CAMS that are not completely tightened may loosen, and parts may separate. To Minimum completely tighten: 190 degrees Page 8 416136 www.sauder.com/services...
- Página 9 Fasten the OUTSIDE SHELF SLAT (H) to the SIDE å BOTTOM STRETCHER (D). Tighten two HIDDEN CAMS. i t h f a c S u r D E N H I D Maximum Arrow 210 degrees Minimum 190 degrees www.sauder.com/services 416136 Page 9...
- Página 10 Tighten two HIDDEN CAMS. Top LEGS in this diagram Edge with CAM DOWELS Suface with HIDDEN CAMS Edge with CAM DOWELS Surface without HIDDEN CAMS Bottom LEGS in this diagram Maximum Arrow 210 degrees Minimum 190 degrees Page 10 416136 www.sauder.com/services...
- Página 11 Fasten the TOP MOLDING (A) to the TOP å STRETCHERS (B). Tighten eight HIDDEN CAMS. NOTE: The inside edges of the TOP MOLDING and TOP å STRETCHERS will not be even. Maximum Arrow 210 degrees Minimum 190 degrees www.sauder.com/services 416136 Page 11...
- Página 12 Step 8 Push a CAM COVER (19P) onto the HIDDEN CAMS å located in the TOP STRETCHERS (B). (16 used) Page 12 416136 www.sauder.com/services...
- Página 13 Push the other SHORT BRACE (J) onto the LONG METAL å PIN that is now through the LONG BRACE. Place the BRACES (I and J) inside the TOP å STRETCHERS (B) to rest on the TOP MOLDING (A). www.sauder.com/services 416136 Page 13...
- Página 14 Fasten four ANGLE BRACKETS (44G) to the corners of the å TOP STRETCHERS (B) to hold the BRACES (I and J) in place. Use eight WHITE 7/16" LARGE HEAD SCREWS (89S). WHITE 7/16" LARGE HEAD SCREW (8 used in this step) (4 used) Page 14 416136 www.sauder.com/services...
- Página 15 NOTE: Please read the back pages of the instruction å booklet for important safety information. This completes assembly. Clean with your favorite å furniture polish or a damp cloth. Wipe dry. And to celebrate, why not share your success story? 40 lbs. 40 lbs. www.sauder.com/services 416136 Page 15...
-
Página 16: Liste De Pièces
élément et conserver le livret pour future référence. MOULURE SUPÉRIEURE ........1 EXCENTRIQUE ESCAMOTABLE ....38 Pour contacter Sauder BARRE SUPÉRIEURE ..........4 CHEVILLE D'EXCENTRIQUE ......22 en ce qui concerne cet BARRE INFÉRIEURE AVANT .......2 VIS D'EXCENTRIQUE ..........16 élément, faire référence... - Página 17 Attention: Risque des dégâts ou blessures. Les Excentriques Escamotables doivent être serrés à bloc. Les Excentriques Escamotables que ne sont pas serrées à bloc peuvent desserrer et les pièces peuvent séparer. Pour serrer à bloc, faire tourner l'excentrique escamotable de 210 degrés. www.sauder.com/services 416136 Page 17...
- Página 18 Enfoncer l’ a utre ENTRETOISE COURTE (J) sur la LONGUE GOUPILLE EN MÉTAL qui se trouve maintenant à travers l'ENTRETOISE LONGUE. Mettre les ENTRETOISES (I et J) à l’intérieur des BARRES SUPÉRIEURES (B) pour les faire reposer sur la MOULURE SUPÉRIEURE (A). Page 18 416136 www.sauder.com/services...
-
Página 19: Lista De Partes
EXCÉNTRICO ESCONDIDO ......38 et conserver le livret pour future référence. BARRA SUPERIOR ..............4 PASADOR DE EXCÉNTRICO ......22 Pour contacter Sauder BARRA INFERIOR DELANTERA .........2 BIELA DE EXCÉNTRICO ........16 en ce qui concerne cet BARRA INFERIOR LATERAL ..........2 15F PASADOR DE MADERA .........6... - Página 20 Precaución: Riesgo de daños o heridas. Los Excéntricos Escondidos deben apretarse completamente. Los Excéntricos Escondidos que no se aprieten completamente se afl ojarán y las partes pueden separarse. Para apretar completamente, atornille el excéntrico escondido 210 grados. Page 20 416136 www.sauder.com/services...
- Página 21 Empuje la otra RIOSTRA CORTA (J) en la ESPIGA LARGA DE METAL que ahora ha pasado a través de la RIOSTRA LARGA. Colocar las RIOSTRAS (I y J) al interior de las BARRAS SUPERIORES (B) para que se apoye en la MOLDURA SUPERIOR (A). www.sauder.com/services 416136 Page 21...
- Página 22 Además, el peso y la ubicación del tubo de imagen tienden a causar la inestabilidad de televisores y son propensos a inclinarse hacia adelante. Page 22 416136 www.sauder.com/services...
-
Página 23: Garantie Limitée De 5 Ans
à compter de la date d'achat la première fois et qui sont signalés à Sauder dans les limites de couverture de la contre tout défaut de matériaux ou de fabrication des composantes de mobilier Sauder. - Página 24 Dear Valued Customer: So, how did it go? Thanks so much for choosing Sauder® furniture. I hope the Set a world record for speed? purchase and assembly process was a positive experience Feeling good about yourself? and you feel good about the furniture you just built. If you Nice.