Tabla de contenido
Publicidad
Idiomas disponibles
Idiomas disponibles
Enlaces rápidos
Publicidad
Capítulos
Tabla de contenido

Manuales relacionados para SPORTSTECH KS350


Resumen de contenidos para SPORTSTECH KS350
- Página 1 KS350 Klimmzugstange...
- Página 3 Sehr geehrter Kunde, wir freuen uns, dass Sie sich für ein Gerät aus der SPORTSTECH Produktpalette entschieden haben. SPORTSTECH Sportgeräte bieten Ihnen hohe Qualität und neue Technologie. Um die Leistungsfähigkeit des Gerätes voll nutzen zu können und viele Jahre Freude an Ihrem Gerät zu haben, lesen Sie bitte vor der Inbetriebnahme und dem Beginn des Trainings dieses Benutzerhandbuch sorgfältig durch und verwenden Sie das Gerät den Anweisungen entsprechend.
- Página 4 Aufbau, Benutzung, Abbau. 1. QR-Code scannen 2. Videos anschauen 3. Schnell und sicher starten Link zu den Videos: https://service.innovamaxx.de/ks350_video Uns gibt es auch auf Social Media! Hol dir die neuesten Produktinfos, Trainingsinhalte uvm. auf unserer: Instagram-Seite Facebook-Seite https://www.instagram.com/sportstech.de https://www.facebook.com/sportstech.de...
-
Página 5: Tabla De Contenido
INHALTSVERZEICHNIS WICHTIGE SICHERHEITSHINWEISE ................6 EXPLOSIONSZEICHNUNG/ERSATZTEILLISTE ..............7 MONTAGEANLEITUNG ....................8 ÜBUNGSVORSCHLÄGE ....................12 ENTSORGUNG ......................14... -
Página 6: Wichtige Sicherheitshinweise
BITTE DIESE BEDIENUNGSANLEITUNG AN EINEM SICHEREN PLATZ AUFBEWAHREN. Es ist wichtig, vor der Montage und Nutzung des KS350 das gesamte Handbuch zu lesen. Sichere und effiziente Nutzung kann nur erreicht werden, wenn das KS350 ord- nungsgemäß montiert, gewartet und verwendet wird. Es liegt in Ihrer Verantwortung zu gewährleisten, dass alle Benutzer des KS350 über alle Vorsichtsmaßnahmen und... -
Página 7: Explosionszeichnung/Ersatzteilliste
EXPLOSIONSZEICHNUNG/ERSATZTEILLISTE Unter folgendem Link finden Sie die Explosionszeichnung und die Ersatzteile-Liste: https://service.innovamaxx.de/ks350_spareparts... -
Página 8: Montage Des Gerätes
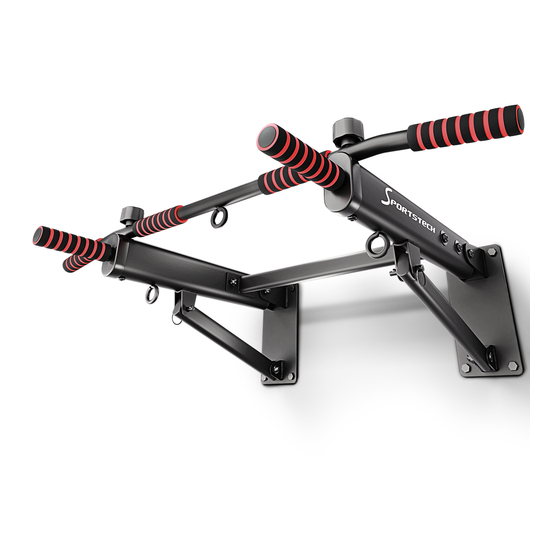
MONTAGEANLEITUNG Montage des Gerätes: Schritt 1 Nehmen Sie die Montageplatte mit den U-Profilen und schrauben Sie den Hauptrahmen am großen U-Profil fest, mit der Schraube M10x60 und der Mutter. Befestigen Sie die kleine Stützstange mit der Schraube M10x35 und der Mutter an der Unterseite des Hauptrahmens. - Página 9 Schritt 3 Montieren Sie die Rahmenverbindung zwischen den beiden Hauptrahmen mit den Schrauben M10x55 und Muttern. Ziehen Sie die Schrauben mit den beigelegten Werk- zeugen fest. Schritt 4 Setzen Sie die Griffstange oben auf den Hauptrahmen und befestigen Sie diese mit den Schrauben M10x115, Unterlegscheiben und Griffmuttern.
-
Página 10: Montage An Der Wand
Montage an der Wand: Vor der Installation prüfen Sie bitte aus welchem Ma- terial Ihr gewünschter Montageort besteht und ob er tragfähig ist. Altbauwohnungen bestehen fast immer aus Ziegelmauerwerk somit ist die Montage einer Klimm- zugstange an der Wand durchaus möglich. Jüngere Wohnhäuser aus Ziegelmauerwerk, Gasbeton, Kalksandstein sind bestens für die Montage einer Klimmzugstange geeignet. - Página 11 Montage an der Wand: Sie finden eine Bohrschablone als Montagehilfe im Karton. Diese können Sie zum Anzeichnen der Bohrlöcher verwenden. Überprüfen Sie, ob die Maße der Scha- blone mit der fertig montierten Klimmzugstange übereinstimmen! Überprüfen Sie Ausrichtung und Bohrungen gewissenhaft, bevor Sie bohren! Die Klimmzugstange wird an der Wand an den dafür vorgesehenen Halterungen angebracht.
-
Página 12: Übungsvorschläge
ÜBUNGSVORSCHLÄGE Neben dem typischen Klimmzug sind u.a. folgende Übungen mit der Klimmzugstange von Sportstech möglich. Dehnübungen Dehnen Sie Ihren Körper ausreichend vor und nach den Übungen, um Krämpfe oder Verletzun- gen vorzubeugen. 1. Knie- und Hüftdehnung Halten Sie die Klimmzugstange mit Ihren Händen in entgegen-... - Página 13 3. Oberkörperdehnung Halten Sie sich an der Klimm- zugstange fest, beugen Sie langsam die Knie und halten Sie Ihren Kopf nach vorne geneigt. Heben Sie Ihre Füße vom Bo- den und bleiben Sie einige Zeit in dieser Position. 4. Bauchtraining Halten Sie sich an der Klimm- zugstange fest, die Arme sind fast komplett gestreckt.
-
Página 14: Entsorgung
ENTSORGUNG Recyclingkreislauf Verpackungsmaterialien können wieder dem Rohstoffkreislauf zugeführt werden. Entsorgen Sie die Verpackung gemäß den aktuellen Bestimmungen. Informationen erhalten Sie bei den Rückgabe- und Sammelsystemen Ihrer Gemeinde. - Página 15 Dear customer, We are pleased you chose a device from the SPORTSTECH product range. SPORTSTECH sports equip- ment offers you high quality and new technology. In order to fully use the potential of your device and be able to enjoy it for many years, please read this manual carefully before starting up and beginning of training, and use the device according to the instruc- tions.
- Página 16 1. Scan the QR code 2. Watch videos 3. Start fast and safely Link to the videos: https://service.innovamaxx.de/ks350_video We are also on social media! Get the latest product information, training content and much more on our: Instagram-page Facebook-page https://www.instagram.com/sportstech.de https://www.facebook.com/sportstech.de...
- Página 17 TABLE OF CONTENTS IMPORTANT SAFETY INFORMATION ................18 EXPLODED DRAWING/SPARE PARTS LIST ..............19 ASSEMBLY INSTRUCTIONS ..................20 EXERCISE SUGGESTIONS ................... 24 DISPOSAL ........................ 26...
-
Página 18: Important Safety Information
It is important to read this entire manual before assembling and using the KS350. Safe and efficient use can only be achieved if the KS350 is assembled, maintained and used properly. It is your responsibility to ensure that all users of the KS350 are informed of all warnings and precautions. -
Página 19: Exploded Drawing/Spare Parts List
EXPLODED DRAWING/SPARE PARTS LIST At the following link you will find the exploded drawing and the spare parts list: https://service.innovamaxx.de/ks350_spareparts... -
Página 20: Assembly Instructions
ASSEMBLY INSTRUCTIONS Installation of the device: Step 1 Take the mounting plate with the U-profiles and screw the main frame to the large U-profile with the M10x60 screw and a nut. Attach the small support rod to the underside of the main frame with the M10x35 screw and nut. - Página 21 Step 3 Assemble the frame connection between the two main frames with 4 screws M10x55 and nuts. Tighten the screws with the tools provided. Step 4 Place the handle bar on top of the main frame and secure it with the M10x115 screws, washers and handle nuts.
-
Página 22: Mounting On The Wall
Mounting on the wall: Prior to installation, please check of which material your desired installation location is made and whether it is resilient. Older buildings are almost always made of brickwork, so the installation of a pull-up bar on the wall is quite possible. - Página 23 Mounting on the wall: You will find a drilling guide template displayed in the box as an assembly aid. These can be used to mark the required drill holes. Check if the dimensions of the template match the ready-mounted chin-up bar! Check alignment and drilling points thoroughly before drilling! The pull bar is attached to the wall at the brackets provided for this purpose.
-
Página 24: Exercise Suggestions
EXERCISE SUGGESTIONS Apart from the typical pull-up, with this pull-up bar by Sportstech you can also do the following types of exercises. Stretching exercises Stretch your body sufficiently before and after the exercises to prevent cramps or injuries. 1. Knee and Hip Stretching... - Página 25 3. Upper Body Stretching Hold the pull-up bar firmly with your hands, bend your knees slowly, and keep your head til- ted forward. Lift your feet off the floor and stay in this position for some time. 4. Abdominal workout Hold on to the pull-up bar, the arms are almost completely stretched.
-
Página 26: Disposal
DISPOSAL Recycling loop Packaging material can be conveyed back to the raw material cycle. Dispose of packaging material in accordance with legal provisions. Information can be retrieved from the return or collections systems of your community. - Página 27 Estimado cliente, Nos complace que haya elegido un dispositivo de la línea de productos SPORTSTECH. Las máquinas de deporte de SPORTSTECH ofrecen una gran calidad y una tecnología innovadora. Con el fin de usar todo el potencial de su dispositivo y para que pueda disfrutarlo durante muchos años, por favor lea este manual cuidadosamente antes de comenzar a ejercitarse, y use el dispositivo de acuer- do a las instrucciones.
- Página 28 Montaje, Utilizar, Desmontaje. 1. Escanear el código QR 2. Ver vídeos 3. Comienza rápido y seguro Enlace a los videos: https://service.innovamaxx.de/ks350_video ¡También estamos en redes sociales! Obtenga la última información sobre nuestros productos, entrenamientos y mucho más aquí: Instagram Facebook https://www.instagram.com/sportstech.de https://www.facebook.com/sportstech.de...
- Página 29 CONTENIDO INSTRUCCIONES DE SEGURIDAD IMPORTANTES ............30 DIBUJO DE EXPLOSIÓN/LISTA DE REPUESTOS ............31 INSTRUCCIONES DE ENSAMBLAJE ................32 SUGERENCIAS DE EJERCICIOS ................... 36 DESECHO ......................... 38...
-
Página 30: Instrucciones De Seguridad Importantes
GUARDE ESTE MANUAL EN UN LUGAR SEGURO PARA REFERENCIA. Es importante leer la totalidad de este manual antes de ensamblar y usar la KS350. Solo se podrá conseguir un uso efectivo y seguro si la KS350 se ensambla, se mantiene y se usa adecuadamente. -
Página 31: Dibujo De Explosión/Lista De Repuestos
DIBUJO DE EXPLOSIÓN/LISTA DE REPUESTOS En el siguiente enlace encontrarás el dibujo de explosión y la lista de repuestos: https://service.innovamaxx.de/ks350_spareparts... -
Página 32: Instrucciones De Ensamblaje
INSTRUCCIONES DE ENSAMBLAJE Instalación del dispositivo: Paso 1 Tome la placa de montaje con los perfiles en U y atornille el marco principal al perfil en U grande con el tornillo M10x60 y una tuerca. Fije la pequeña barra de soporte a la parte inferior de la estructura principal con el tor- nillo M10x35 y la tuerca. - Página 33 Paso 3 Monte la conexión de la estructura entre los dos marcos principales con 4 tornillos M10x55 y tuercas. Apriete los tornillos con las herramientas suministradas. Paso 4 Coloque el manillar sobre la estructura principal y fíjelo con los tornillos M10x115, las arandelas y las tuercas del manillar.
-
Página 34: Montaje Sobre La Pared
Montaje sobre la pared: Antes de la instalación, por favor revise de qué mate- rial está hecho su lugar deseado de instalación y si es resistente. Los edificios más antiguos casi siempre están hechos de ladrillo, así que la instalación de una barra para dominadas en la pared es posible. - Página 35 Montaje sobre la pared: Dentro de la caja encontrará una guía para realizar taladros que le ayudará a montar. Puede usarla para marcar los orificios a perforar. Compruebe que las di- mensiones de la plantilla coinciden con las dimensiones de la barra de dominadas completamente montada.
-
Página 36: Sugerencias De Ejercicios
SUGERENCIAS DE EJERCICIOS Además de los ejercicios típicos, con esta barra para dominadas de Sportstech también puede hacer los siguientes tipos de ejercicios. Ejercicios de estiramiento Estire su cuerpo suficientemente antes y después de ejercitarse para prevenir calambres o lesiones. -
Página 37: Estiramiento De La Parte Superior Del Cuerpo
Estiramiento de la parte superior del cuerpo Sostenga la barra firmemente con sus manos, doble sus ro- dillas lentamente y mantenga su cabeza inclinada hacia adelante. Levante sus pies desde el suelo y permanezca en esta posición durante algún tiempo. 4. -
Página 38: Desecho
DESECHO Reciclaje loop El material de empaque puede trasladarse de nuevo al ciclo de materias primas. Deshágase del material de empaque de acuerdo a las normativas legales. Puede encontrar información en los sistemas de recolección de su comunidad. - Página 39 FRANÇAIS Cher client, Nous sommes ravis que vous ayez choisi un appareil de la gamme de produits SPORTSTECH. Les équi- pements sportifs SPORTSTECH vous offrent une qualité élevée et une technologie innovante. Afin d'utiliser pleinement le potentiel de votre appareil et de pouvoir l'apprécier pendant de nombreuses années, lisez attentivement ce manuel avant l'utilisation et le début de votre entraînement et utilisez l'ap-...
- Página 40 3. Démarrez rapidement et en toute sécurité Lien vers les vidéos: https://service.innovamaxx.de/ks350_video Vous pouvez aussi nous trouver sur les réseaux sociaux! Retrouve les dernières informations sur les produits, le contenu des entraînements et bien plus encore sur notre: la page Instagram la page Facebook https://www.instagram.com/sportstech.de https://www.facebook.com/sportstech.de...
- Página 41 TABLE DES MATIÈRES INSTRUCTIONS IMPORTANTES DE SÉCURITÉ ............... 42 DESSIN ÉCLATÉ/LISTE DES PIÈCES DE RECHANGE ............43 INSTRUCTIONS D‘ASSEMBLAGE ................. 44 SUGGESTIONS D‘EXERCICE ..................48 MISE AU REBUT ......................50...
-
Página 42: Instructions Importantes De Sécurité
CONSERVER CE MODE D‘EMPLOI DANS UN ENDROIT SÛR il est important de lire la totalité du manuel avant d‘assembler et d‘utiliser le KS350. Une utilisation sécurisée et efficace ne peut être obtenue que si le KS350 est installé, entre- tenu et utilisé dans le respect des règles. Il est de votre responsabilité de vous assurer que tous les utilisateurs du KS350 soient informés de toutes les mesures de précaution... -
Página 43: Dessin Éclaté/Liste Des Pièces De Rechange
DESSIN ÉCLATÉ/LISTE DES PIÈCES DE RECHANGE A l‘adresse suivante A l‘adresse suivante vous trouverez le dessin éclaté vous trouverez le dessin éclaté et la liste des pièces de rechange : et la liste des pièces de rechange : https://service.innovamaxx.de/ks350_spareparts https://service.innovamaxx.de/ks350_spareparts... -
Página 44: Instructions D'assemblage
INSTRUCTIONS D‘ASSEMBLAGE Installation de l‘appareil: Étape 1 Prenez la plaque de montage avec les profilés en U et vissez le cadre principal au grand profilé en U avec la vis M10x60 et un écrou. Fixez la petite tige de support sur la face inférieure du cadre principal à l’aide de la vis M10x35 et de l’écrou. - Página 45 Étape 3 Assemblez la connexion entre les deux cadres principaux avec 4 vis M10x55 et des écrous. Serrez les vis à l‘aide des outils fournis. Étape 4 Placez la barre de préhension sur le dessus du cadre principal et fixez-la avec les vis M10x115, les rondelles et les écrous à...
- Página 46 Montage sur le mur: Avant l‘installation, veuillez vérifiez de quel matériel, l‘installation de votre lieu désirée a été faite et si elle est résiliente. Les anciens bâtiments sont presque toujours construits en briques, l‘installation d‘une barre de traction sur le mur est donc tout à fait possible. Les maisons plus récentes faites en béton, béton gaz, briques de sable et de chaux sont idéales pour l‘installation d‘une barre de traction.
- Página 47 Montage sur le mur: Vous trouverez un gabarit de perçage dans le carton, il vous aidera lors du mon- tage. Vous pouvez l‘utiliser pour marquer les trous de perçage. Vérifiez que les di- mensions du gabarit correspondent à celles de la barre de traction une fois montée ! Vérifiez soigneusement l‘alignement et les trous de perçage avant de percer ! La barre de tirage vers le haut est fixé...
-
Página 48: Suggestions D'exercice
SUGGESTIONS D‘EXERCICE Mise à part la traction typique, avec cette barre de traction de Sport- stech, vous pouvez également effectuer les exercices suivants. Exercices d‘étirement Étirez votre corps suffisamment avant et après les exercices pour éviter les crampes ou les bles- sures. - Página 49 Étirement de la partie supérieure du corps Tenez fermement la barre de traction avec vos mains, pliez vos genoux lentement et main- tenez votre tête inclinée vers l‘avant. Soulevez les pieds du sol et restez dans cette position pendant un certain temps. 4.
-
Página 50: Mise Au Rebut
MISE AU REBUT Chaîne du recyclage Les matériaux d‘emballage peuvent être transportés vers le cycle des matières premières. La disposition des matériaux d‘emballage, conformément aux dispositions légales. Les informations peuvent être récupérées à partir des systèmes de retour ou de collections. - Página 51 MANUALE D’USO ITALIANO Gentile cliente Siamo lieti che abbiate scelto un dispositivo della gamma SPORTSTECH. SPORTSTECH ti offre alta qua- lità e tecnologia innovativa. Per sfruttare a pieno il potenziale del dispositivo e poterlo utilizzare per molti anni, raccomandiamo di leggere attentamente questo manuale prima di iniziare l’allenamento e di utilizzare il dispositivo seguen-...
- Página 52 2. Guarda il video 3. Inizia ad allenarti veloce e sicuro Link per il Video: https://service.innovamaxx.de/ks350_video Ci siamo anche sui social! Scopri le ultime novità sui prodotti, contenuti per l'allenamento e molto altro ancora sul nostro: pagina Instagram pagina Facebook https://www.instagram.com/sportstech.de https://www.facebook.com/sportstech.de...
- Página 53 INDICE INFORMAZIONI IMPORTANTI SULLA SICUREZZA ............54 DISEGNO ESPLOSO/LISTA DEI PEZZI DI RICAMBIO ............55 ISTRUZIONI DI ASSEMBLAGGIO .................. 56 SUGGERIMENTI DI ESERCIZI ..................60 SMALTIMENTO ......................62...
-
Página 54: Informazioni Importanti Sulla Sicurezza
6. Assicurarsi che il dispositivo sia saldamente fissato e attaccato alla parete con gli anco- raggi pesanti forniti prima di utilizzarlo. 7. Il livello di sicurezza della KS350 può essere mantenuto solo la macchina viene rego- larmente esaminata per riscontrare eventuali danni e / o usura. -
Página 55: Disegno Esploso/Lista Dei Pezzi Di Ricambio
DISEGNO ESPLOSO/LISTA DEI PEZZI DI RICAMBIO Al seguente link troverete il disegno esploso e la lista dei pezzi di ricambio: https://service.innovamaxx.de/ks350_spareparts... -
Página 56: Istruzioni Di Assemblaggio
ISTRUZIONI DI ASSEMBLAGGIO Installazione del dispositivo: Fase 1 Prendete la piastra di montaggio con i profili a U e avvitate il telaio principale al profilo a U grande con il bullone M10x60 e un dado. Fissare la piccola asta di supporto alla parte inferiore del telaio principale con il bullone M10x35 e il dado. - Página 57 Fase 3 Montare il collegamento del telaio tra i due telai principali utilizzando 4 bulloni M10x55 e dadi. Stringere i bulloni usando gli strumenti forniti. Fase 4 Posizionare il manubrio sulla parte superiore del telaio principale e fissarlo con i bulloni M10x115, le rondelle e i dadi della maniglia.
- Página 58 Montaggio sulla parete: Prima dell‘installazione, verificare il materiale di costru- zione e la resistenza del luogo di istallazione desidera- Gli edifici più vecchi sono quasi sempre fatti di mattoni, quindi è possibile installare una barra per trazioni sulla parete. Le case di recente costruzione sono fatte in muratura, calcestruzzo poroso, pietra arenaria calcarea e sono ideali per l‘installazione di una barra di trazioni.
- Página 59 Montaggio sulla parete: La mascherina per perforazione funge da aiuto al montaggio. E‘ possibile utilizzarla per disegnare i fori. E‘ opportuno verificare che la dimensione la mascherina sia perfettamente adattata alla barra per trazioni! Verificare l‘allinea- mento dei fori prima di procedere con le forature! La barra di pull-up è...
-
Página 60: Suggerimenti Di Esercizi
SUGGERIMENTI DI ESERCIZI Oltre alle classiche trazioni, con questa barra per trazioni realizzata da Sportstech è possibile fare anche i seguenti esercizi. Esercizi di stretching Allunga il tuo corpo prima e dopo gli esercizi per prevenire i crampi o le lesioni. - Página 61 Esercizi di stretching per la parte superiore del corpo Afferra la barra per trazioni con le mani, piega le ginocchia len- tamente e tieni la testa inclinata in avanti. Solleva i piedi da terra e rimani in questa posizione per un po‘...
-
Página 62: Smaltimento
SMALTIMENTO Riciclaggio dei rifiuti Il materiale di imballaggio può essere trasportato di nuovo al ciclo delle materie prime. Smaltire il materiale di imballaggio in conformità alle disposizioni di legge. Le informazioni possono essere recuperate dai sistemi di ritorno o di raccolta della vostra comunità. - Página 63 GEBRUIKSAANWIJZING NEDERLANDS Geachte klant, We zijn blij dat je een apparaat uit het SPORTSTECH-assortiment hebt gekozen. De sportuitrusting van SPORTSTECH brengt hoogwaardige apparaten met nieuwe technologieën. Lees vóór gebruik deze gebruikershandleiding aandachtig door en gebruik het apparaat zoals aangege- ven. Zo zul je ten volle van de prestaties van het apparaat kunnen profiteren en er vele jaren geniet van hebben.
- Página 64 1. Scan de QR-code 2. Bekijk video‘s 3. Begin snel en veilig Link naar de video's: https://service.innovamaxx.de/ks350_video We zijn ook actief op social media! Raadpleeg voor de meest recente productinformatie, trainingen en nog veel meer, onze: Instagram-pagina Facebook-pagina https://www.instagram.com/sportstech.de https://www.facebook.com/sportstech.de...
- Página 65 INHOUD BELANGRIJKE VEILIGHEIDSINSTRUCTIES ..............66 EXPLOSIETEKENING/ONDERDELENLIJST ..............67 MONTAGE-INSTRUCTIES .................... 68 TRAININGSVOORSTELLEN ..................72 VERWIJDERING ......................74...
-
Página 66: Belangrijke Veiligheidsinstructies
BELANGRIJKE VEILIGHEIDSINSTRUCTIES BEWAAR DEZE HANDLEIDING OP EEN VEILIGE PLAATS. Het is belangrijk om de hele handleiding te lezen voordat je de KS350 installeert en ge- bruikt. Veilig en efficiënt gebruik kan alleen worden bereikt als de KS350 correct wordt geïnstalleerd, onderhouden en gebruikt. Het is jouw verantwoordelijkheid om ervoor te zorgen dat alle gebruikers van de KS350 op de hoogte zijn van alle voorzorgsmaatre- gelen en waarschuwingen. -
Página 67: Explosietekening/Onderdelenlijst
EXPLOSIETEKENING/ONDERDELENLIJST Onder de volgende link vind je de explosietekening en de reserveonderdelenlijst: https://service.innovamaxx.de/ks350_spareparts... -
Página 68: Montage-Instructies
MONTAGE-INSTRUCTIES Het apparaat monteren: Stap 1 Neem de montageplaat met de U-profielen en schroef het hoofdframe aan het grote U-profiel vast met de schroef M10x60 en een moer. Bevestig de kleine steunstang aan de onderkant van het hoofdframe met de schroef M10x35 en de moer. - Página 69 Stap 3 Zet de frameverbinding tussen de twee hoofdframes in elkaar met 4 schroeven M10x55 en moeren. Draai de schroeven vast met het bijgevoegde gereedschap. Stap 4 Plaats de greepstang bovenop het hoofdframe en zet hem vast met de schroeven M10x115, sluitringen en gripmoeren.
-
Página 70: Bevestiging Aan De Muur
Bevestiging aan de muur: Controleer voor installatie uit welk materiaal de ge- wenste installatielocatie bestaat en of deze stabiel is. Oudere woningen zijn bijna altijd gemaakt uit metselwerk, dus het is heel goed mogelijk om een optrek- stang aan de muur te bevestigen. Jongere huizen gemaakt van metselwerk, gasbeton, kalksteen zijn ideaal voor de installatie van de optrekstang. - Página 71 Bevestiging aan de muur: In de doos is een boorsjabloon als montagehulpmiddel. Je kunt het gebruiken om de boorgaten te markeren. Controleer of de afmetingen van het sjabloon over- eenkomen met de vooraf gemonteerde optrekstang! Controleer de uitlijning en de boorgaten nauwkeurig voordat je begint te boren! De optrekstang wordt met de meegeleverde beugels aan de muur bevestigd.
-
Página 72: Trainingsvoorstellen
TRAININGSVOORSTELLEN Naast de typische optrekoefeningen zijn de volgende oefeningen ook mogelijk met de optrekstang van Sportstech. Rekoefeningen Strek je lichaam voldoende uit voor en na de oefeningen om krampen of letsel te voorkomen. 1. Uitrekken van knieën en heupen Houd de optrekstang met beide... - Página 73 3. Uitrekken van het bovenlichaam Houd je stevig vast aan de optrekstang, buig langzaam je knieën en kantel je hoofd naar voren. Til je voeten van de grond en blijf een tijdje in die positie. 4. Buiktraining Houd de optrekstang vast, de armen zijn bijna volledig ge- strekt.
-
Página 74: Verwijdering
VERWIJDERING Recyclingcyclus Verpakkingsmaterialen kunnen worden teruggebracht in de grondstoffenkringloop. Voer de verpakking af volgens de geldende voorschriften. Informatie kan worden verkregen uit de retournerings- en ophaalsystemen van je gemeente. - Página 76 Verkauf durch / Distributed by / Distribuido por / Distribué / Distribuito da / Verkoop via Sportstech Brands Holding GmbH Potsdamer Platz 11 10785 Berlin +49 30 220 663 520 www.sportstech.de...