Publicidad
Enlaces rápidos
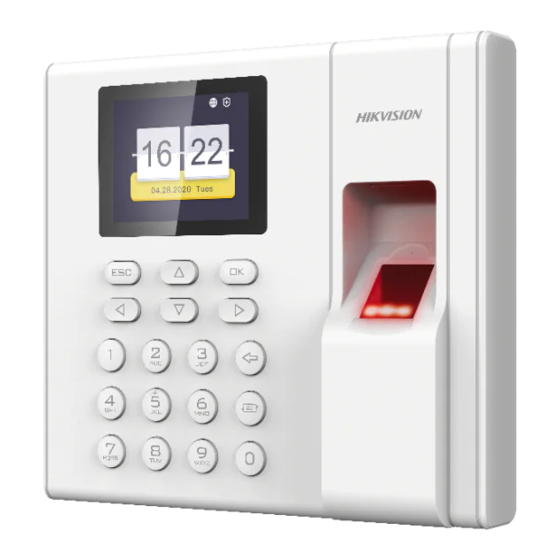
DS-K1A8503 Series
Terminal de de huellas dactilares
Guia rapida
UD12120B-E
©2019 Hangzhou Hikvision Digital Technology Co., Ltd.
It includes instructions on how to use the Product. The software embodied in the
Product is governed by the user license agreement covering that Product.
About this Manual
This Manual is subject to domestic and international copyright protection. Hangzhou
Hikvision Digital Technology Co., Ltd. ("Hikvision") reserves all rights to this manual.
This manual cannot be reproduced, changed, translated, or distributed, partially or
wholly, by any means, without the prior written permission of Hikvision.
Trademarks
and other Hikvision marks are the property of Hikvision and are
registered trademarks or the subject of applications for the same by Hikvision and/or
its affiliates. Other trademarks mentioned in this manual are the properties of their
respective owners. No right of license is given to use such trademarks without express
permission.
Legal Disclaimer
TO THE MAXIMUM EXTENT PERMITTED BY APPLICABLE LAW, THE PRODUCT
DESCRIBED, WITH ITS HARDWARE, SOFTWARE AND FIRMWARE, IS PROVIDED "AS IS",
WITH ALL FAULTS AND ERRORS, AND HIKVISION MAKES NO WARRANTIES, EXPRESS OR
IMPLIED, INCLUDING WITHOUT LIMITATION, MERCHANTABILITY, SATISFACTORY
QUALITY, FITNESS FOR A PARTICULAR PURPOSE, AND NON-INFRINGEMENT OF THIRD
PARTY. IN NO EVENT WILL HIKVISION, ITS DIRECTORS, OFFICERS, EMPLOYEES, OR
AGENTS BE LIABLE TO YOU FOR ANY SPECIAL, CONSEQUENTIAL, INCIDENTAL, OR
INDIRECT DAMAGES, INCLUDING, AMONG OTHERS, DAMAGES FOR LOSS OF BUSINESS
PROFITS, BUSINESS INTERRUPTION, OR LOSS OF DATA OR DOCUMENTATION, IN
CONNECTION WITH THE USE OF THIS PRODUCT, EVEN IF HIKVISION HAS BEEN
ADVISED OF THE POSSIBILITY OF SUCH DAMAGES.
REGARDING TO THE PRODUCT WITH INTERNET ACCESS, THE USE OF PRODUCT SHALL
BE WHOLLY AT YOUR OWN RISKS. HIKVISION SHALL NOT TAKE ANY RESPONSIBILITIES
FOR ABNORMAL OPERATION, PRIVACY LEAKAGE OR OTHER DAMAGES RESULTING
FROM CYBER ATTACK, HACKER ATTACK, VIRUS INSPECTION, OR OTHER INTERNET
SECURITY RISKS; HOWEVER, HIKVISION WILL PROVIDE TIMELY TECHNICAL SUPPORT IF
REQUIRED.
SURVEILLANCE LAWS VARY BY JURISDICTION. PLEASE CHECK ALL RELEVANT LAWS IN
YOUR JURISDICTION BEFORE USING THIS PRODUCT IN ORDER TO ENSURE THAT YOUR
USE CONFORMS THE APPLICABLE LAW. HIKVISION SHALL NOT BE LIABLE IN THE EVENT
THAT THIS PRODUCT IS USED WITH ILLEGITIMATE PURPOSES.
IN THE EVENT OF ANY CONFLICTS BETWEEN THIS MANUAL AND THE APPLICABLE LAW,
THE LATER PREVAILS.
Data Protection
During the use of device, personal data will be collected, stored and processed. To
protect data, the development of Hikvision devices incorporates privacy by design
principles. For example, for device with facial recognition features, biometrics data is
stored in your device with encryption method; for fingerprint device, only fingerprint
template will be saved, which is impossible to reconstruct a fingerprint image.
As data controller, you are advised to collect, store, process and transfer data in
accordance with the applicable data protection laws and regulations, including
without limitation, conducting security controls to safeguard personal data, such as,
implementing reasonable administrative and physical security controls, conduct
periodic reviews and assessments of the effectiveness of your security controls.
1
Apariencia
USB Interface
Área de reconocimiento de
huellas dactilares
155 mm
Display Screen
Keypad
Área de deslizamiento de tarjetas 30 mm
2
Instalacion
La fuerza adicional será igual a tres veces el peso del equipo, pero no menos de 50 N.
El equipo y sus medios de montaje asociados deberán permanecer seguros durante la prueba. Después de la prueba, el equipo, incluida cualquier placa de montaje asociada, no se
Steps:
1. Coloque una plantilla de montaje en la pared a la altura requerida y
taladre 4 orificios de acuerdo con la plantilla de montaje en la pared.
4. Si hay un orificio para el cable en la pared, guíe los cables
desde la pared y conéctelos con las interfaces en el panel
posterior del dispositivo.
Si no hay un orificio para el cable en la pared, conecte los
cables con las interfaces en el panel posterior del
dispositivo y asegúrese de que los cables salgan por la
parte inferior del dispositivo.
5. Alinee los cuatro orificios del panel posterior del
dispositivo con los tornillos fijos y cuelgue el dispositivo en
la pared.
Power
Network
Interface
Interface
Exiting Key
ESC
Direction
Keys
2
3
1
ABC
DEF
4
5
6
GHI
JKL
MNO
Numeric Keys/
7
8
9
Letter Keys
PQRS
TUV
WXYZ
2 Inserte los 4 manguitos de expansión suministrados de los tornillos de fijación (4_KA4
× 22-SUS) en los orificios perforados respectivamente.
3. Fije y apriete los tornillos de expansión en los manguitos de expansión
respetuosamente.
Nota: Reserve de 5,2 mm a 5,5 mm de pernos de expansión fuera de la pared
para colgar el dispositivo.
Descripciones del teclado
OK Key:Presione la tecla y con fi rme las operaciones. Mantenga
la llave durante 3 s para acceder a la interfaz de inicio de sesión.
OK Key
Deleting Key: Presione la tecla para borrar la letra ingresada o
número.Si el dispositivo admite la conexión de una batería de litio,
mantenga pulsado la llave para apagar el dispositivo.
OK
Deleting
Key
0
Editing Key:Presione la tecla para ingresar al estado de edición.
Puede cambiar entre números / minúsculas, números / mayúsculas
Editing Key
y símbolos.
Notes:1. Las imágenes aquí son solo para referencia. Algunos modelos
no admiten la función de deslizamiento de tarjetas. Para obtener más
información, consulte los productos reales.
2. Si habilita la función de estado de asistencia, la tecla OK, la
tecla directonkey y la tecla de salida pueden ser las teclas de
acceso directo del estado de asistencia.
dañará.
Wall
M4 Expansion Bolt
Expansion Sleeve
Publicidad

Manuales relacionados para HIKVISION DS-K1A8503 Serie


Resumen de contenidos para HIKVISION DS-K1A8503 Serie
- Página 1 M4 Expansion Bolt and other Hikvision marks are the property of Hikvision and are registered trademarks or the subject of applications for the same by Hikvision and/or its affiliates. Other trademarks mentioned in this manual are the properties of their respective owners.
- Página 2 Operacion Basic Activacion Activating via Dispositivo Activacion via SADP Activacion via Client Software 1. Descargue el software SADP 1. Obtenga el software cliente del disco suministrado o Device Activation Encienda y conecte el cable de red después de la instalación. del sitio web oficial.