Publicidad
Idiomas disponibles
Idiomas disponibles
Enlaces rápidos
Owner's Manual
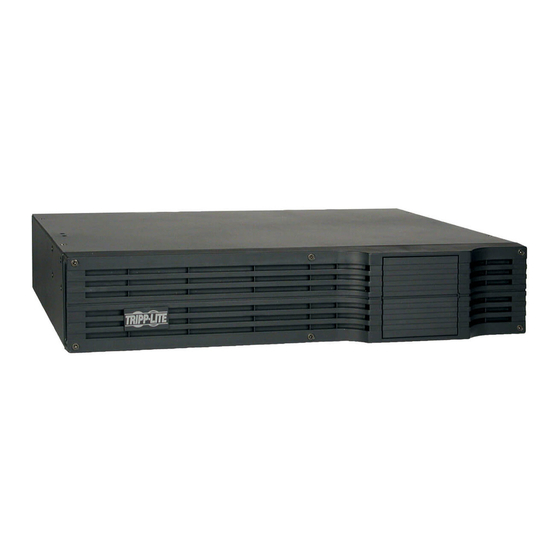
External Battery Packs
24V Battery Packs
BP24V15RT2U, 14AH
BP24V28-2U, 28AH
BP24V36-2US, 36AH
BP24V70-3U, 70AH
Register your product for quicker service and ultimate peace of mind.
You could also win an ISOBAR6ULTRA surge protector-a $100 value!
1111 W. 35th Street, Chicago, IL 60609 USA • www.tripplite.com/support
17-05-067-9336FF.indb 1
BP Series
Not suitable for mobile applications.
48V Battery Packs
BP48V24-2U, 18AH
BP48V27-2US, 27AH
BP48V60RT-3U, 42AH
PROTECT YOUR INVESTMENT!
www.tripplite.com/warranty
Copyright © 2017 Tripp Lite. All rights reserved.
72V Battery Packs
BP72V15-2U, 15AH
BP72V18-2US, 18AH
BP72V28RT-3U, 28AH
1
2
2
4
8
9
10
11
21
31
5/15/2017 2:31:46 PM
Publicidad
Capítulos

Manuales relacionados para Tripp-Lite BP24V15RT2U


Resumen de contenidos para Tripp-Lite BP24V15RT2U
-
Página 1: Tabla De Contenido
Owner’s Manual BP Series External Battery Packs Not suitable for mobile applications. 24V Battery Packs 48V Battery Packs 72V Battery Packs BP24V15RT2U, 14AH BP48V24-2U, 18AH BP72V15-2U, 15AH BP24V28-2U, 28AH BP48V27-2US, 27AH BP72V18-2US, 18AH BP24V36-2US, 36AH BP48V60RT-3U, 42AH BP72V28RT-3U, 28AH BP24V70-3U, 70AH... -
Página 2: Introduction
Plastic enclosures do not require bonding. See below for ground bonding strap requirements: 24V Battery Packs BP24V15RT2U: Plastic enclosure, so ground bonding strap is not required. BP24V28-2U: 12 AWG ground bonding strap BP24V36-2US: 12 AWG ground bonding strap... - Página 3 Important Safety Instructions Securely attach the provided ground strap to the UPS system as illustrated below: • Use of this equipment in life support applications where failure of this equipment can reasonably be expected to cause the failure of the life support equipment or to significantly affect its safety or effectiveness is not recommended.
-
Página 4: Mounting
Mounting (Rack) Mount your rackmount battery pack in either a 4-post or 2-post rack or rack enclosure (see page 6 for 2-post mounting). The user must determine the fitness of hardware and procedures before mounting. If hardware and procedures are not suitable for your application, contact the manufacturer of your rack or rack enclosure. - Página 5 Mounting (Rack) Secure the shelves to the mounting rails permanently using the included screws and cup washers as shown. • For 2U equipment mounting, place 4 screws total at the front and 4 screws total at the back. • For 3U equipment mounting, place 6 screws total at the front and 4 screws total at the back.
- Página 6 Mounting (Rack) Using the included hardware, attach the mounting brackets to the forward mounting holes of the cabinet. The mounting bracket "ears" should face forward. (Some equipment may have pre-installed or integral mounting brackets.) With the aid of an assistant (if necessary), lift your equipment and slide it into the shelves.
- Página 7 Mounting (Rack) 2-Post (Telecom) Mounting Select external battery pack models include the hardware required for 2-post mounting. If this hardware did not come with your unit, a 2-Post Rackmount Installation Kit (Model 2POSTRMKITWM or 2POSTRMKITHD) may be ordered separately. Refer to the illustrations below for specific installation instructions covering 2U, 3U and 4U battery packs.
-
Página 8: Connection
Connection Select battery packs have a polarized plug on an output cord permanently connected to the rear panel. Simply plug the output cord directly into the UPS external battery connector (refer to the UPS manual for external battery connector description and location). -
Página 9: Maintenance
Maintenance Battery packs require no maintenance but should be kept dry at all times. Avoid installation in locations with high heat and/or humidity. The battery packs should be kept fully charged by being connected to an active UPS system, not left in a depleted condition. -
Página 10: Warranty And Product Registration
Warranty and Product Registration 2-Year Limited Warranty Seller warrants this product, if used in accordance with all applicable instructions, to be free from original defects in material and workmanship for a period of 2 years from the date of initial purchase. If the product should prove defective in material or workmanship within that period, Seller will repair or replace the product, at its sole discretion. -
Página 11: Español
Manual del propietario Bancos de batería externas Serie BP No conveniente para los usos móviles. Módulos de Baterías de Módulos de Baterías de Módulos de Baterías de BP24V15RT2U, 14AH BP48V24-2U, 18AH BP72V15-2U, 15AH BP24V28-2U, 28AH BP48V27-2US, 27AH BP72V18-2US, 18AH BP24V36-2US, 36AH... -
Página 12: Introducción
Los gabinetes de plástico no requieren bonding. Para los requisitos de la cinta de conexión a tierra, consulte abajo: Módulos de Baterías de 24V BP24V15RT2U: Gabinete de plástico, por lo que no se requiere Cinta de conexión a tierra. BP24V28-2U: Cinta de conexión a tierra 12 AWG BP24V36-2US: Cinta de conexión a tierra 12 AWG... - Página 13 Instrucciones de seguridad importantes Fija firmemente la Cinta de conexión a tierra suministrada al sistema UPS como se ilustra a continuación: • El uso de este equipo en aplicaciones de soporte de vida en donde la falla de este equipo pueda razonablemente hacer suponer que causará fallas en el equipo de soporte de vida o afecte significativamente su seguridad o efectividad, no está...
-
Página 14: Montaje De 4 Postes
Montaje (Bastidor) Monte su banco de baterías en un bastidor de 2 o 4 postes (vea la página 15] para instalación de 2 postes). El usuario debe determinar la idoneidad de los materiales y accesorios, así como de los procedimientos antes del montaje. Si los materiales y procedimientos no son adecuados para su aplicación, contacte con el fabricante de su bastidor. - Página 15 Montaje (Bastidor) Asegure de manera permanente los estantes a los rieles de montaje usando los tornillos incluidos y las arandelas acopadas como se muestra. • Para montaje de equipos de 2U, coloque 4 tornillos en total en la parte frontal y 4 tornillos en total en la parte posterior.
- Página 16 Montaje (Bastidor) Coloque los soportes de montaje de su equipo en los orificios de montaje delanteros del gabinete usando los accesorios que vienen incluidos con su equipo. Las “orejas” del soporte de montaje deben quedar mirando hacia adelante. (Puede que algunos equipos tengan soportes de montajes preinstalados o integrados.) Con la ayuda de un asistente (en caso de ser necesario), levante su equipo y deslícelo en los estantes.
-
Página 17: Montaje De 2 Postes (Telecomunicaciones)
Montaje (Bastidor) Montaje de 2 postes (Telecomunicaciones) Para instalar módulos de baterías para rack, en racks de 2 postes, se requiere un Juego para Instalación en Rack de 2 postes de Tripp Lite (Modelo 2POSTRMKITWM o 2POSTRMKITHD). Si este Juego no venía con su unidad, puede ser solicitado, por separado. -
Página 18: Conexión
Conexión Los bancos de baterías exclusivos tienen un enchufe polarizado en un cordón de salida permanentemente conectado con el panel posterior. Simplemente conecte el cordón de salida directamente en el conector de la batería externa de su UPS. (Vea su manual del UPS para la descripción y ubicación del conector de la batería externa). -
Página 19: Mantenimiento
Mantenimiento Los bancos de baterías no requieren mantenimiento pero deben mantenerse secos en todo momento. Evite su instalación en lugares con mucho calor o humedad. Los bancos de baterías deben mantenerse completamente cargados mediante su conexión con un sistema UPS activo; no deben dejarse agotados. Las baterías que se dejan descargadas sufrirán una pérdida de capacidad permanente. -
Página 20: Garantía
Garantía Garantía limitada por 1 año El vendedor garantiza este producto, si se usa de acuerdo con todas las instrucciones aplicables, de que está libre de defectos en material y mano de obra por un período de 1 año a partir la fecha de compra inicial. Si el producto prueba ser defectuoso en material o mano de obra dentro de ese período, el vendedor reparará... - Página 21 Externes Série BP Non approprié aux applications mobiles. Modules de batteries de Modules de batteries de Modules de batteries de 24 V 48 V 72 V BP24V15RT2U, 14AH BP48V24-2U, 18AH BP72V15-2U, 15AH BP24V28-2U, 28AH BP48V27-2US, 27AH BP72V18-2US, 18AH BP24V36-2US, 36AH BP48V60RT-3U, 42AH...
-
Página 22: Introduction
être liés. Voir ci-dessous pour les exigences en matière de sangle de mise à la terre. Modules de batteries de 24 V BP24V15RT2U: Boîtier en plastique, donc aucune sangle de mise à la terre n’est requise. BP24V28-2U: Sangle de mise à la terre de 12 AWG BP24V36-2US: Sangle de mise à... - Página 23 Consignes de Sécurité Importantes Fixer solidement en place la sangle de mise à la terre fournie à l’onduleur comme illustré ci-dessous: • Il est déconseillé d'utiliser cet équipement dans des applications médicales où une panne de cet équipement pourrait normalement provoquer la panne de l'équipement de survie ou altérer notablement sa sécurité...
-
Página 24: Montage
Montage (Baie) Monter votre pack de batteries à montage dans baie dans une baie à 4 supports ou 2 supports ou une enceinte de baie (Consulter la page 24 pour le montage avec 2 montants). L'utilisateur doit déterminer l'aptitude du matériel et des procédures avant le montage. Si le matériel et les procédures ne sont pas appropriés pour votre application, contacter le fabricant de votre baie ou de votre enceinte de baie. - Página 25 Montage (Baie) Attacher les étagères aux rails de support de manière permanente en utilisant les vis et les rondelles cuvettes incluses. • Pour le montage du matériel 2U, placer 4 vis en tout à l’avant et 4 vis en tout à l’arrière.
- Página 26 Montage (Baie) Attacher les supports de votre matériel aux trous de montage avant du module à l’aide de la ferrure incluse avec votre matériel. Les « oreilles »du support de fixation devraient faire face vers l’avant. (Du matériel peut avoir des supports de fixation intégrés ou préinstallés.) Faites appel à...
- Página 27 Montage (Baie) Montage à 2 supports (Telecom) Pour installer des blocs batteries à montage sur bâti sur des bâtis 2 postes, vous devez disposer d'un kit d'installation pour montage sur bâti 2 postes de Tripp Lite (modèle 2POSTRMKITWM ou 2POSTRMKITHD). Si votre unité est livrée sans ce kit, il est possible de le commander directement auprès.
-
Página 28: Connexion
Connexion Les packs de batteries de sélection ont une prise polarisée sur un cordon de sortie connecté en permanence au panneau arrière. Brancher simplement le cordon de sortie directement dans le connecteur de batterie externe de votre système d'alimentation continue sans coupure. (Voir le manuel de votre système d'alimentation continue sans coupure pour la description et l'emplacement du connecteur de batterie externe). -
Página 29: Maintenance
Maintenance Les packs de batteries ne nécessitent pas de maintenance, mais doivent rester secs en permanence. Eviter toute installation dans des lieux exposés à des hautes températures et/ ou un degré d'humidité élevé. Les packs de batteries doivent rester complètement chargés en étant connectés à... -
Página 30: Garantie
Garantie Garantie limitée de 1 an Le vendeur garantit que ce produit, s'il est utilisé conformément à toutes les instructions applicables, est exempt de tous défauts de matériaux et de fabrication pour une période de 1 an à partir de la date d'achat initiale. Si le produit s'avère défectueux en raison d'un vice de matériaux ou de fabrication au cours de cette période, le vendeur s'engage à... -
Página 31: English
. Блоки аккумуляторных Блоки аккумуляторных Блоки аккумуляторных батарей на 24 В батарей на 48 В батарей на 72 В BP24V15RT2U, 14AH BP48V24-2U, 18AH BP72V15-2U, 15AH BP24V28-2U, 28AH BP48V27-2US, 27AH BP72V18-2US, 18AH BP24V36-2US, 36AH BP48V60RT-3U, 42AH... - Página 32 соединительным элементом. Пластмассовые корпуса не требуют соединения. Требования к шине заземления см. ниже: Блоки аккумуляторных батарей на 24 В BP24V15RT2U: пластмассовый корпус ― шина заземления не требуется. BP24V28-2U: требуется шина заземления калибра 12 AWG BP24V36-2US: требуется шина заземления калибра 12 AWG BP24V70-3U: требуется...
- Página 33 Надежно прикрепите поставляемую в комплекте шину заземления к корпусу ИБП, как показано на приведенном ниже рисунке: • ...
- Página 34 2 . . 33. . ...
- Página 35 . • 2 . • 3 ...
- Página 36 . . ...
- Página 37 2 Tee 2 Tripp Lite 2 2TT 2TT . ...
- Página 38 . . ...
- Página 39 . . .
- Página 40 1 1 . ...