Publicidad
Enlaces rápidos
WARNINGS:
• TO AVOID FIRE, SHOCK, OR DEATH;
TURN OFF POWER at circuit breaker
or fuse and test that power is off
before wiring!
To Wire:
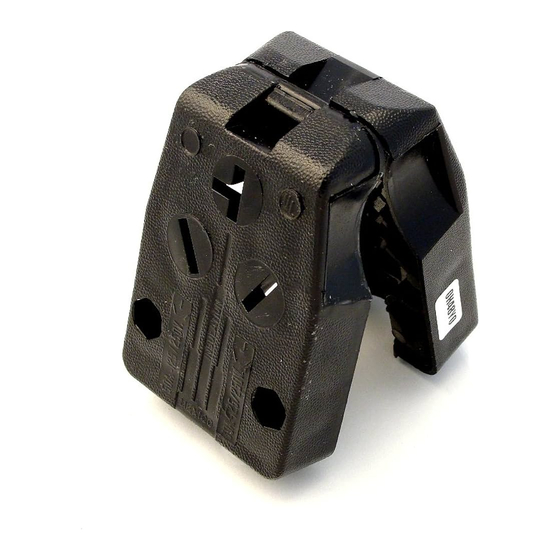
1. Lift cover to maximum open position on hinge or remove completely (refer to Figure 1).
2. For cord diameters greater than .7in., position GREEN strain relief with +.70 DIA. showing. For cord diameters less than .7in., position GREEN strain relief with -.70 DIA. showing
(refer to Figure 2).
3. Strip cord jacket and individual conductors per appropriate STRIPPING DIAGRAM (refer to Figure 3). Trim off all fillers. To ensure proper clamping, only trim off lengths specified.
4. Twist all strands of each conductor tightly together (DO NOT TIN CONDUCTORS), and connect to blade terminals per Figures 4 and 5 and as follows:
NOTE: Terminal screw polarity is designated by screw color.
CAUTION: TERMINAL CLAMPS MUST TIGHTEN ONTO BARE CONDUCTORS, NOT INSULATION.
CAT. NO. 287 ONLY:
Choose wire gauge:
For 30 AMP use #10 to #6 AWG
For 50 AMP use #8 to #6 AWG
A. Connect wires to blade terminals before installation into plug face. Insert only the stripped end of the WHITE conductor into the SILVER-COLORED terminal clamp on "L" blade for
30 amp installations or the SILVER-COLORED terminal clamp on flat blade for 50 amp installations. Tighten terminal clamp screw securely with screw head facing right
(refer to Figure 4A).
B. Insert only the stripped ends of remaining two conductors into BRASS-COLORED terminal clamps on two flat blades and tighten terminal clamp screws securely, with screw heads
facing right and left (refer to Figure 4A).
C. Insert blades into their proper slots in plug face with blade attached to longer WHITE (Neutral) conductor in top slot and remaining two blades in right and left slots on either side.
Verify that terminal screws are tight (refer to Figure 4B).
CAT. NO. 830-T ONLY:
A. Connect wires to blade terminals before installation into plug face. Insert only the stripped end of the BLACK wire to BRASS terminal screw, WHITE wire to WHITE (SILVER)
terminal screw and GREEN (Ground) wire to GREEN hex screw. Loop wires clockwise 3/4 turn around terminal screws with the proper orientation (refer to Figure 5A). The WHITE
wire loop starts under the terminal screw, the BLACK wire loop starts over the terminal screw, and the GREEN wire loop starts over the terminal screw. Tighten terminal clamp
screw securely.
B. Partially install blades with wires connected into their proper slots in the plug face, making sure that the blade with the WHITE wire is inserted in the slot marked "WH" (refer to
Figure 5B). Verify that terminal screws are tight and finish inserting the blades (refer to Figure 5B).
NOTE: There is a built-in rejection feature that will prevent cover from closing completely if blades are not positioned properly. If cover does not close, recheck blades to make sure
they are wired and positioned correctly.
CAUTION: Make sure there are no stray wire strands on any terminal connection.
5. Hold the cover at a 90° angle to the module and snap the hook into place (refer to Figure 1).
6. Close cover and tighten.
Leviton warrants to the original consumer purchaser and not for the benefit of anyone else that this product at the time of its sale by Leviton is free of defects in materials and workmanship under normal and
proper use for two years from the purchase date. Leviton's only obligation is to correct such defects by repair or replacement, at its option. For details visit www.leviton.com or call 1-800-824-3005. This
warranty excludes and there is disclaimed liability for labor for removal of this product or reinstallation. This warranty is void if this product is installed improperly or in an improper environment, overloaded,
misused, opened, abused, or altered in any manner, or is not used under normal operating conditions or not in accordance with any labels or instructions. There are no other or implied warranties of any kind,
including merchantability and fitness for a particular purpose, but if any implied warranty is required by the applicable jurisdiction, the duration of any such implied warranty, including merchantability and
fitness for a particular purpose, is limited to two years. Leviton is not liable for incidental, indirect, special, or consequential damages, including without limitation, damage to, or loss of use of, any
equipment, lost sales or profits or delay or failure to perform this warranty obligation. The remedies provided herein are the exclusive remedies under this warranty, whether based on contract, tort or otherwise.
For Technical Assistance Call: 1-800-824-3005 (USA Only) or 1-800-405-5320 (Canada Only) www.leviton.com
© 2019 Leviton Mfg. Co., Inc.
Angle Plug w/Cord Clamp – 3 Pole, 3-Wire
Rated: 30A-125/250V with "L" Blade • 50A-125/250V with Flat Blade
Travel Trailer Angle Plug – 2-Pole, 3-Wire
CAUTIONS:
• To be installed and/or used in accordance with electrical codes and regulations.
• If you are unsure about any part of these instructions, consult an electrician.
• Use this device with copper or copper clad wire only.
• Cat. No. 287 ONLY – for use with #10 to #6 AWG 3-wire round cord or 10/3 srdt, 8/2-10/1 srdt and 6/2-8/1 flat wire depending on amperage.
• Cat. No. 830-T ONLY – for use with #10 AWG 3-wire insulated cord.
INSTALLATION INSTRUCTIONS
Figure 1 – Cover Position
Figure 1 – Position du couvercle
Figura 1 – Posición de la Cubierta
Figure 3A – Wire Stripping Diagram, Cat. No. 287
Figure 3A – Schéma de dégainage et de dénudage, Nº de cat. 287
Figura 3A – Diagrama de Pelado del No. de Cat. 287
Insulation
Isolant
Aislante
9/16"
(2.4 cm)
Cord Jacket
Gaine du cordon
Copper Strands
Forro del cordón
Brins de cuivre
1-1/16"
Hilos de cobre
(2.7 cm)
1 7/8"
(4.8 cm)
–
º
–
ó
–
º
–
ó
LIMITED 2 YEAR WARRANTY AND EXCLUSIONS
Cat No. 287
Cat. No. 830-T
Rated: 30A-125V
Figure 2 – Clamp Position
Figure 2 – Position de la bride
Figura 2 – Posición de la Abrazadera
Clamp location when
using up to #6 wire
Emplacement de la
bride en présence de
Ubicación de la abrazadera
+.70 DIA.
cuando usa alambre hasta #
Clamp location when
using up to #10 wire
bride en présence de
Ubicación de la abrazadera
cuando usa alambre hasta #10
Figure 3B – Wire Stripping Diagram, Cat. No. 830-T
Figure 3B – Schéma de dégainage et de dénudage, Nº de cat. 830-T
Figura 3B – Diagrama de Pelado del No. de Cat. 830-T
9/16"
(2.4 cm)
Cord Jacket
Gaine du cordon
Forro del cordón
–
–
ó
"L" Blade
W
Lame en «L»
Cuchilla "L"
X
Y
Flat Blade
W
Lame plate
Cuchilla Plana
X
Y
–
–
ó
G
W
-.70 DIA.
Emplacement de la
Insulation
Isolant
Aislante
1.0"
1.0"
(2.54 cm)
(2.54 cm)
Copper Strands
Brins de cuivre
Hilos de cobre
1 3/4"
(4.4 cm)
2 3/4"
(7.0 cm)
º
ó
º
ó
PK-93038-10-02-0D
ENGLISH
PK-93038-10-02-0D
Publicidad

Manuales relacionados para Leviton 287


Resumen de contenidos para Leviton 287
- Página 1 LIMITED 2 YEAR WARRANTY AND EXCLUSIONS Leviton warrants to the original consumer purchaser and not for the benefit of anyone else that this product at the time of its sale by Leviton is free of defects in materials and workmanship under normal and proper use for two years from the purchase date.
- Página 2 Leviton garantiza al consumidor original de sus productos y no para beneficio de nadie más que este producto en el momento de su venta por Leviton está libre de defectos en materiales o fabricación por un período de dos años...