Hayward AquaRite LT Manual Del Usuario
Ocultar thumbs
Ver también para AquaRite LT:
- Manual del usuario (17 páginas) ,
- Manual del usuario (17 páginas)
Tabla de contenido
Publicidad
Idiomas disponibles
Idiomas disponibles
Enlaces rápidos
Publicidad
Tabla de contenido

Manuales relacionados para Hayward AquaRite LT


Resumen de contenidos para Hayward AquaRite LT
- Página 1 ISAQR-LTO-E Rev A GUIDE DE L’UTILISATEUR OWNER’S MANUAL MANUAL DEL USUARIO MANUAL DO UTILIZADOR ANWENDERHANDBUCH GEBRUIKERSHANDLEIDING MANUALE D’USO HAYWARD POOL EUROPE - 1070 Allée des Chênes - CS 20054 Saint Vulbas - 01154 Lagnieu Cedex - France...
- Página 2 AquaRite LT GUIDE DE L'UTILISATEUR CONSERVEZ CE MANUEL POUR UNE CONSULTATION ULTÉRIEURE HAYWARD POOL EUROPE - 1070 Allée des Chênes - CS 20054 Saint Vulbas - 01154 Lagnieu Cedex - France...
- Página 3 8 ans et font l’objet d’une surveillance. Maintenir l’appareil et le câble hors de portée des enfants de moins de 8 ans. • AVERTISSEMENT – N'utiliser que des pièces d'origine Hayward. • AVERTISSEMENT – Si le câble d’alimentation est endommagé, il doit être remplacé par le fabricant, son service après-vente ou des personnes de qualification similaire, afin d’éviter tout...
- Página 4 ENREGISTREMENT Merci d'avoir choisi Hayward. Ce manuel contient des informations importantes relatives au fonctionnement et à l'entretien de votre produit. Le conserver pour vous y reporter ultérieurement. POUR ENREGISTRER VOTRE PRODUIT SUR NOTRE BASE DE DONNÉES, ALLEZ SUR : www.hayward.fr/fr/espace-services/enregistrez-votre-produit ...
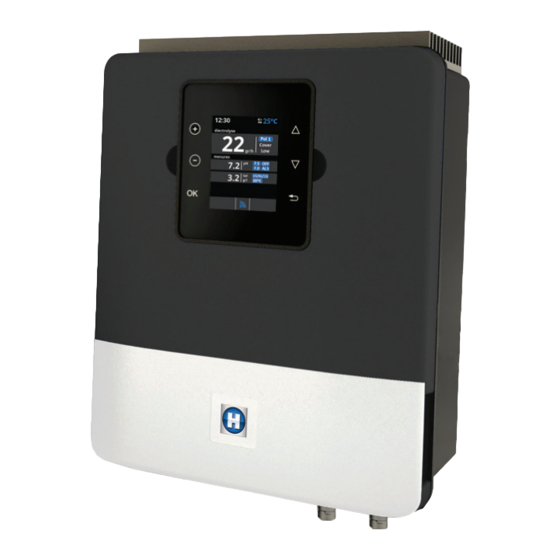
- Página 5 Connexion détecteur de gaz Logement de cellule Fusible 4 A Détecteur de débit/gaz (interne) Fusible 4 A Connexion pH et Rx Interrupteur ON / OFF N’UTILISEZ QUE DES PIÈCES DÉTACHÉES D’ORIGINE HAYWARD Page 4 sur 16 AquaRite LT Rev. A...
-
Página 6: Installation Murale
Tous les composants métalliques de la piscine peuvent êtres raccordés à une même terre suivant la réglementation locale N’UTILISEZ QUE DES PIÈCES DÉTACHÉES D’ORIGINE HAYWARD Page 5 sur 16 AquaRite LT... -
Página 7: Kit Ph Standard / Kit Orp Standard (En Option)
Sonde pH (en option) Sonde Rx (en option) Sonde température (en option) Pompe de dosage acide (en option) Injecteur d’acide (en option) Réservoir d’acide sulfurique (non fourni) N’UTILISEZ QUE DES PIÈCES DÉTACHÉES D’ORIGINE HAYWARD Page 6 sur 16 AquaRite LT Rev. A... -
Página 8: Installation Et Raccordement Électrique
E - F Sortie Tension 230 V °C/°F Non utilisé Connecter le contacteur de débit fourni sur les bornes d’ e ntrées A et C. N’UTILISEZ QUE DES PIÈCES DÉTACHÉES D’ORIGINE HAYWARD Page 7 sur 16 AquaRite LT Rev. A... - Página 9 En cas d’installation horizontale, il faut impérativement ajouter un détecteur de flux mécanique (en option) et adapter la configuration de l’ é quipement. N’UTILISEZ QUE DES PIÈCES DÉTACHÉES D’ORIGINE HAYWARD Page 8 sur 16 AquaRite LT Rev. A...
-
Página 10: Concentration En Sel
à diminuer ensemble. Se reporter au tableau ci-dessous pour déterminer la quantité de stabilisant à ajouter pour porter la concentration à 25 ppm. Ajouter du stabilisant uniquement si nécessaire. Ne pas mettre de stabilisant dans les piscines situées à l’intérieur d’un local. N’UTILISEZ QUE DES PIÈCES DÉTACHÉES D’ORIGINE HAYWARD Page 9 sur 16 AquaRite LT... - Página 11 1,93 2,04 2,16 2,25 20 ppm 0,15 0,19 0,23 0,27 0,31 0,34 0,38 0,42 0,46 0,49 0,53 0,57 0,61 0,64 0,68 0,72 0,75 25 ppm N’UTILISEZ QUE DES PIÈCES DÉTACHÉES D’ORIGINE HAYWARD Page 10 sur 16 AquaRite LT Rev. A...
-
Página 12: Indice De Saturation
L’ e au doit impérativement être équilibrée manuellement AVANT toute mise en marche de l’appareil. Le tableau ci-dessous récapitule les concentrations recommandées par Hayward. Il est important de contrôler votre eau régulièrement et de maintenir ces concentrations afin de limiter la corrosion ou la dégradation des surfaces. -
Página 13: Configuration
Le système enregistre le décompte des fonctionnement), Filtration (début de la filtration). heures de fonctionnement des différents modules et les affiche sur cet écran. N’UTILISEZ QUE DES PIÈCES DÉTACHÉES D’ORIGINE HAYWARD Page 12 sur 16 AquaRite LT Rev. A... - Página 14 Attention : un temps trop important risque de ne pas protéger votre bassin contre les surdosages d’acide et de dégrader vos équipements irrémédiablement. Un temps trop court risque de déclencher des alarmes intempestives AL3 N’UTILISEZ QUE DES PIÈCES DÉTACHÉES D’ORIGINE HAYWARD Page 13 sur 16 AquaRite LT Rev.
- Página 15 Ne pas oublier de vérifier périodiquement (2-3 mois) tous les paramètres de votre eau (Cf tableau) et d’ajuster le point de consigne de redox en suivant les étapes ci-dessus. N’UTILISEZ QUE DES PIÈCES DÉTACHÉES D’ORIGINE HAYWARD Page 14 sur 16 AquaRite LT Rev.
- Página 16 Si après nettoyage, la sonde continue de fournir des valeurs instables, ou nécessite un étalonnage excessif, la remplacer. Entretien et nettoyage de la cellule AquaRite LT Avant de retirer la cellule, couper l’alimentation électrique générale de l’ A quaRite LT. Une fois déposée, examiner l’intérieur de la cellule pour déceler d’...
-
Página 17: Guide De Dépannage
Vérifier que la pompe de filtration fonctionne. Vérifier que rien n’ o bstrue les canalisations (vanne fermée, panier ou préfiltre pleins...). Vérifier le fusible 4A (6). N’UTILISEZ QUE DES PIÈCES DÉTACHÉES D’ORIGINE HAYWARD Page 16 sur 16 AquaRite LT Rev. A... - Página 18 AquaRite LT OWNER'S MANUAL PLEASE KEEP THIS MANUAL FOR FUTURE REFERENCE HAYWARD POOL EUROPE - 1070 Allée des Chênes - CS 20054 Saint Vulbas - 01154 Lagnieu Cedex - France...
- Página 19 Keep the device and the cable out of reach of children younger than 8 years old • WARNING – Use only original Hayward parts. • WARNING – If the power supply cable is damaged, it must be replaced by the manufacturer, the after-sales service or similarly qualified persons to avoid danger.
-
Página 20: For Your Records
REGISTRATION Thank you for choosing Hayward. This manual contains important information regarding the operation and maintenance of your product. Please retain it for reference. TO REGISTER YOUR PRODUCT IN OUR DATABASE, GO TO: www.hayward.fr/en/services/register-your-product --------------------------------------------------------------------------------------------------------------------------------------------------------------------------------------------- For Your Records Record the following information for your convenience:... - Página 21 The chlorine reverts back to sodium chloride. This continuous cycle means that there is no need to treat your pool manually. The AquaRite LT is suitable for treating most residential swimming pools. The quantity of chlorine required to treat a swimming pool correctly varies according to the number of bathers, the rainfall, water temperature and the cleanliness of the pool...
-
Página 22: Wall-Mounted Installation
Caution, acid vapours can cause irreversible damage to your device. Position the treatment product tanks accordingly. The AquaRite LT must be fitted a minimum horizontal distance of 3.5 m (or more, if required by local regulations) from the pool, within 1 m of a protected outlet and within 4.5 m of the planned cell location. - Página 23 Electronic box Electrolysis cell (always vertical) pH probe (optional) Rx probe (optional) Temperature probe (optional) Acid dosing pump (optional) Acid injector (optional) Sulphuric acid container (not supplied) USE ONLY GENUINE REPLACEMENT PARTS Page 6 of 16 AquaRite LT Rev. A...
-
Página 24: Connecting Inputs
For the ORP option, install the ORP card in the RX slot on the motherboard. Electrical installation and wiring Connect the AquaRite LT to a permanent power outlet. • : This circuit must be protected by a residual current device (RCD) (residual current: 30 mA max.). - Página 25 If it is installed horizontally, it is compulsory to add a mechanical flow switch (available as an option) and to suitably adapt the configuration of the device. USE ONLY GENUINE REPLACEMENT PARTS Page 8 of 16 AquaRite LT Rev. A...
- Página 26 The ideal salt concentration is between 2.7 and 3.4 g/l, with 3.2 g/l being the optimum value. If the level is low, determine the volume ) of the pool and add salt in accordance with the following table. A low salt level reduces the efficiency of the AquaRite LT and reduces chlorine production.
- Página 27 1.71 1.82 1.93 2.04 2.16 2.25 20 ppm 0.15 0.19 0.23 0.27 0.31 0.34 0.38 0.42 0.46 0.49 0.53 0.57 0.61 0.64 0.68 0.72 0.75 25 ppm USE ONLY GENUINE REPLACEMENT PARTS Page 10 of 16 AquaRite LT Rev. A...
- Página 28 Chemical water balance The water must be balanced manually BEFORE the device is started up. The following table summarizes the concentrations recommended by Hayward. Your water should be checked regularly to maintain these concentrations and minimize surface corrosion or deterioration.
- Página 29 OPERATION The device is designed to be connected to a protected outlet at all times. The AquaRite LT must not be disconnected unless the pool equipment is undergoing maintenance or the pool is to be closed (wintering). Assuming that the chemical balance of the water is within the recommended ranges, the device can be started up.
- Página 30 Caution: if the interval is too long, your pool may not be protected against acid overdoses and your equipment may be irreversibly damaged. Too short an interval may trip unwanted AL3 alarms. USE ONLY GENUINE REPLACEMENT PARTS Page 13 of 16 AquaRite LT Rev. A...
- Página 31 The redox level tells you the oxidation potential, i.e. the disinfectant capacity of the water. Setting the redox set point is the last step in setting the AquaRite LT. To find the optimum redox level for your pool, follow the steps below: 1) Start up the pool filtration system (the salt in the pool must be evenly dissolved).
- Página 32 Acid washing: This should only be done in severe cases where flushing will not remove most of the deposits. To acid wash, turn off the main power supply to the AquaRite LT. Remove the cell from the piping. In a clean plastic container, make up a solution of water and acetic or phosphoric acid (such as that used to remove scale from a coffee machine).
-
Página 33: Troubleshooting Guide
Check the flow switch. Check that the filter pump is working. Check that the pipes are not obstructed (valve closed, basket or strainer full, etc.). Check 4 A fuse (6). USE ONLY GENUINE REPLACEMENT PARTS Page 16 of 16 AquaRite LT Rev. A... -
Página 34: Conserve Este Manual Para Consultas Ulteriores
AquaRite LT MANUAL DEL USUARIO CONSERVE ESTE MANUAL PARA CONSULTAS ULTERIORES HAYWARD POOL EUROPE - 1070 Allée des Chênes - CS 20054 Saint Vulbas - 01154 Lagnieu Cedex - Francia... - Página 35 Podría producirse un choque eléctrico. Un cable de alimentación deteriorado debe ser reemplazado por el servicio postventa o por personas de cualificación similar, para evitar los peligros. USE SOLO PIEZAS DE REPUESTO ORIGINALES DE HAYWARD Página 2 de 16 AquaRite LT...
-
Página 36: Para Registrar Su Producto En Nuestra Base De Datos, Visite
REGISTRO Gracias por elegir Hayward. Este manual contiene informaciones importantes sobre el funcionamiento y el mantenimiento de su producto. Consérvelo para consultas futuras. PARA REGISTRAR SU PRODUCTO EN NUESTRA BASE DE DATOS, VISITE: www.hayward.fr/es/servicios/registrar-su-producto -------------------------------------------------------------------------------------------------------------------------------------------------------------------------------------------- Para su registro Registre la información siguiente por su propio interés:... -
Página 37: Generalidades
Permite tratar su piscina eficazmente, por electrólisis del agua salada. Para funcionar, el electrolizador necesita una concentración de sal baja (cloruro sódico) en el agua de la piscina. El AquaRite LT desinfecta automáticamente su piscina al convertir la sal en cloro libre, que destruye las bacterias y las algas presentes en el agua. -
Página 38: Instalación Mural
ácido pueden deteriorar irremediablemente su aparato. Coloque los depósitos de productos de tratamiento teniendo esto en cuenta. El AquaRite LT debe ser montado a una distancia horizontal mínima de 3,5 metros de la piscina (incluso más, si la legislación local lo exige), a menos de 1 m de una toma de corriente protegida, y a menos de 4,5 metros del lugar previsto para la célula. -
Página 39: Kit Regulación Ph Estándar / Kit Regulación Orp Estándar (Opción)
Sonda pH (opcional) Sonda Rx (opcional) Sonda temperatura (opcional) Bomba dosificadora de ácido (opcional) Inyector de ácido (opcional) Depósito de ácido sulfúrico (no suministrado) USE SOLO PIEZAS DE REPUESTO ORIGINALES DE HAYWARD Página 6 de 16 AquaRite LT Rev. A... - Página 40 Para la opción ORP, instale la tarjeta ORP en la ranura RX de la tarjeta madre. Instalación y conexión eléctrica Conecte el AquaRite LT en una toma de alimentación eléctrica permanente. • : Este circuito debe estar protegido por un dispositivo diferencial residual (DDR) (corriente residual: 30 mA máx.).
-
Página 41: Flujo De Agua En La Instalación
En caso de que se instale agua horizontalmente, es imprescindible añadir un detector de flujo mecánico (opción) y modificar la configuración del equipo. USE SOLO PIEZAS DE REPUESTO ORIGINALES DE HAYWARD Página 8 de 16 AquaRite LT Rev. A... - Página 42 Un nivel de sal bajo reduce la eficacia del AquaRite LT y origina una disminución de la producción de cloro. Una concentración alta de sal puede originar una avería en el AquaRite LT, y dar un gusto salado al agua de su piscina. La sal de su piscina es regenerada de manera permanente y la pérdida de sal durante la temporada es por lo tanto mínima.
-
Página 43: Cantidad De Sal (Kg) Necesaria Para 3,2 G/L
2,04 2,16 2,25 20 ppm 0,15 0,19 0,23 0,27 0,31 0,34 0,38 0,42 0,46 0,49 0,53 0,57 0,61 0,64 0,68 0,72 0,75 25 ppm USE SOLO PIEZAS DE REPUESTO ORIGINALES DE HAYWARD Página 10 de 16 AquaRite LT Rev. A... - Página 44 El agua debe ser equilibrada imperativamente manualmente ANTES de poner en marcha el aparato. La tabla de abajo indica las concentraciones recomendadas por Hayward. Es importante controlar su agua con regularidad y mantener estas concentraciones, para limitar la corrosión o la degradación de las superficies.
-
Página 45: Funcionamiento
FUNCIONAMIENTO El aparato está estudiado para estar conectado permanentemente a una toma protegida. El AquaRite LT no debe ser desconectado salvo si los equipamientos de la piscina están en fase de mantenimiento o si la piscina debe ser cerrada (invernado). - Página 46 Cuidado: un tiempo demasiado grande podría dejar de proteger su piscina contra los excesos de dosificación de ácido y deteriorar sus equipamientos definitivamente. Un tiempo demasiado corto podría activar alarmas intempestivas AL3. USE SOLO PIEZAS DE REPUESTO ORIGINALES DE HAYWARD Página 13 de 16 AquaRite LT Rev.
- Página 47 El nivel de Redox indica el potencial de oxidación, es decir, el poder desinfectante del agua. La última etapa de ajuste del AquaRite LT consiste en ajustar el punto de ajuste del Redox. Para encontrar el nivel óptimo de Redox de su piscina, siga las etapas siguientes: 1) Ponga en servicio el sistema de filtración de la piscina (la sal en la piscina debe disolverse uniformemente).
- Página 48 Invernado La célula del AquaRite LT, el contactor de caudal y la sonda podrían deteriorarse con el hielo, así como las tuberías de la piscina. En las regiones con períodos largos de frío, vacíe el agua de la bomba, del filtro así como de los conductos de alimentación y de retorno antes del invierno. No retire la caja de control.
- Página 49 Compruebe que la bomba de filtración funciona. Compruebe que no hay nada que obstaculice las canalizaciones (válvula cerrada, cestillo o prefiltro llenos...). Compruebe el fusible 4A (6). USE SOLO PIEZAS DE REPUESTO ORIGINALES DE HAYWARD Página 16 de 16 AquaRite LT...
- Página 50 AquaRite LT MANUAL DO UTILIZADOR GUARDE ESTE MANUAL PARA REFERÊNCIA FUTURA HAYWARD POOL EUROPE - 1070 Allée des Chênes - CS 20054 Saint Vulbas - 01154 Lagnieu Cedex - França...
- Página 51 8 anos de idade e sejam vigiadas. Manter o aparelho e o fio fora do alcance de crianças de idade inferior a 8 anos. • AVISO – Utilizar apenas peças de origem Hayward. • AVISO – Se o cabo de alimentação sofrer danos, deverá ser substituído pelo fabricante, pelo respetivo serviço pós-venda ou por pessoas com qualificações semelhantes para evitar qualquer...
-
Página 52: Para Seu Registo
REGISTO Muito obrigado por escolher a Hayward. Este manual contém informações importantes sobre o funcionamento e a manutenção do seu produto. Conserve-o para referência futura. PARA REGISTAR O SEU PRODUTO NA NOSSA BASE DE DADOS, DIRIJA-SE A: www.hayward.fr/en/services/register-your-product --------------------------------------------------------------------------------------------------------------------------------------------------------------------------------------------- Para seu registo Registe as seguintes informações para referência futura, caso seja necessário:... - Página 53 Permite tratar eficazmente a piscina através da eletrólise da água salgada. Para funcionar, o eletrolisador requer uma fraca concentração de sal (cloreto de sódio) na água da piscina. O AquaRite LT desinfeta automaticamente a piscina convertendo o sal em cloro livre, que destrói as bactérias e as algas presentes na água.
-
Página 54: Instalação Na Parede
O AquaRite LT deve ser montado a uma distância horizontal mínima de 3,5 metros (ou mais, caso a legislação local o exija) da piscina, a menos de 1 m de uma tomada protegida e a menos de 4,5 metros do local previsto para a célula. - Página 55 Sonda de pH (opcional) Sonda de Redox (opcional) Sonda de temperatura (opcional) Bomba doseadora de ácido (opcional) Injetor de ácido (opcional) Recipiente de ácido sulfúrico (não fornecido) UTILIZE APENAS COMPONENTES DE SUBSTITUIÇÃO GENUÍNOS HAYWARD Página 6 de 16 AquaRite LT Rev. A...
- Página 56 Para a opção ORP, instalar a placa ORP na posição RX da placa-mãe. Instalação e ligação elétrica Ligar o AquaRite LT a uma tomada de alimentação elétrica permanente. • : Este circuito deve ser protegido por um dispositivo diferencial de corrente residual (DR) (corrente residual: 30 mA máx.).
- Página 57 Caso a instalação seja feita na água horizontal, é imperativo adicionar um detetor de caudal mecânico (opcional) e adaptar a configuração do equipamento. UTILIZE APENAS COMPONENTES DE SUBSTITUIÇÃO GENUÍNOS HAYWARD Página 8 de 16 AquaRite LT Rev. A...
- Página 58 É, portanto, necessário iniciar o procedimento bem antes de pôr o AquaRite LT a funcionar. Adição de sal: Adicionar o sal várias horas, ou, se possível, 1 dia antes da colocação ao serviço do AquaRite LT. Respeitar o nível de sal indicado.
-
Página 59: Quantidade De Sal (Kg) Necessária Para 3,2 G/L
1,93 2,04 2,16 2,25 20 ppm 0,15 0,19 0,23 0,27 0,31 0,34 0,38 0,42 0,46 0,49 0,53 0,57 0,61 0,64 0,68 0,72 0,75 25 ppm UTILIZE APENAS COMPONENTES DE SUBSTITUIÇÃO GENUÍNOS HAYWARD Página 10 de 16 AquaRite LT Rev. A... - Página 60 A água tem de ser equilibrada manualmente ANTES de o aparelho ser posto a funcionar. A tabela seguinte volta a apresentar as concentrações recomendadas pela Hayward. É importante verificar regularmente a água e manter estas concentrações a fim de limitar a corrosão ou a degradação das superfícies.
-
Página 61: Configuração
FUNCIONAMENTO O aparelho foi concebido para ficar permanentemente ligado a uma tomada protegida. O AquaRite LT não deve ser desligado a não ser que esteja a ser feita a manutenção dos equipamentos da piscina ou que a piscina deva ser fechada (conservação durante o inverno). - Página 62 Atenção: um intervalo demasiado longo poderá não proteger a piscina contra sobredosagens de ácido e danificar irremediavelmente os equipamentos. Um intervalo demasiado curto poderá ativar alarmes AL3 inoportunos. UTILIZE APENAS COMPONENTES DE SUBSTITUIÇÃO GENUÍNOS HAYWARD Página 13 de 16 AquaRite LT...
- Página 63 O nível de redox informa sobre o potencial de oxidação, ou seja, a capacidade de desinfeção da água. A última etapa da programação do AquaRite LT consiste em ajustar o valor de referência do redox. Para determinar o nível ótimo de redox para a sua piscina, siga estas etapas: 1) Pôr a funcionar o sistema de filtração da piscina (o sal na piscina necessita de ser uniformemente dissolvido).
- Página 64 Conservação durante o inverno A célula do AquaRite LT, o interruptor de caudal e a sonda, tal como a canalização da piscina, podem ser danificados pelo gelo. Em regiões sujeitas a longos períodos de frio, é necessário o cuidado de esvaziar a água da bomba, do filtro, bem como das condutas de alimentação e de retorno, antes do inverno.
-
Página 65: Guia De Resolução De Problemas
Verificar se a bomba de filtração está a funcionar. Confirmar que não há qualquer obstrução nas canalizações (válvula fechada, cesto ou pré-filtro cheios...). Verificar o fusível 4 A (6). UTILIZE APENAS COMPONENTES DE SUBSTITUIÇÃO GENUÍNOS HAYWARD Página 16 de 16 AquaRite LT... - Página 66 AquaRite LT ANWENDERHANDBUCH BEWAHREN SIE DIESES HANDBUCH ZUM SPÄTEREN NACHSCHLAGEN AUF HAYWARD POOL EUROPE - 1070 Allée des Chênes - CS 20054 Saint Vulbas - 01154 Lagnieu Cedex - Frankreich...
- Página 67 Benutzer darf von Kindern nur durchgeführt werden, wenn diese mindestens 8 Jahre alt sind und beaufsichtigt werden. Gerät und Kabel außerhalb der Reichweite von Kindern unter 8 Jahren halten. • WARNUNG – Nur Original-Ersatzteile von Hayward verwenden. • WARNUNG – Um Gefahren zu vermeiden ist ein beschädigtes Netzkabel durch den Hersteller, den Kundendienst des Herstellers oder eine qualifizierte Fachkraft auszutauschen.
- Página 68 REGISTRIERUNG Vielen Dank, dass Sie sich für Hayward entschieden haben. Dieses Handbuch enthält wichtige Informationen für Betrieb und Wartung Ihres Produkts. Bitte zur späteren Verwendung aufbewahren. UM IHR PRODUKT IN UNSERER DATENBANK ZU REGISTRIEREN, GEHEN SIE AUF: http://www.hayward-schwimmbad.de/serviceleistungen/melden-sie-ihre-garantie-an --------------------------------------------------------------------------------------------------------------------------------------------------------------------------------------------- Für Ihre Unterlagen...
- Página 69 Es ermöglicht eine effiziente Aufbereitung des Schwimmbeckenwassers durch Salz-Elektrolyse. Für den Betrieb benötigt die Salzelektrolyse-Anlage eine schwache Salzkonzentration (Natriumchlorid) im Schwimmbeckenwasser. AquaRite LT desinfiziert Ihren Swimmingpool vollautomatisch durch Umwandlung von Salz in freies Chlor, das sich im Becken verteilt und Bakterien und Algen im Wasser vernichtet.
- Página 70 Das Gehäuse ist vertikal auf einer ebenen Fläche zu platzieren, die Kabel nach unten orientiert. Da das Gehäuse auch der Wärmeabfuhr dient (Wärmeabfuhr der internen Bauteile), ist es wichtig, dass alle vier Seiten des Gehäuses frei bleiben. AquaRite LT nicht hinter einer Tafel oder in einem geschlossenen Raum montieren.
- Página 71 Timer Filterpumpe* Filter Silex-Sand/Glas/Kieselalgen Umwälzpumpe Elektronikgehäuse Elektrolysezelle (stets vertikal) pH-Sonde (optional) ORP-Sonde (optional) Temperatursonde (optional) Dosierpumpe Säure (optional) Säure-Injektor (optional) Schwefelsäurebehälter (nicht im Lieferumfang enthalten) VERWENDEN SIE NUR ORIGINAL-ERSATZTEILE VON HAYWARD Seite 6 von 16 AquaRite LT Ausg. A...
-
Página 72: Installation Und Elektrischer Anschluss
Polyethylen für die Injektion (zwischen Schlauchpumpe und Injektionsventil) verwenden. Für die Option ORP die ORP-Karte am Steckplatz RX des Motherboards installieren. Installation und elektrischer Anschluss AquaRite LT an eine permanente Stromversorgung anschließen. • : Dieser Stromkreis muss durch einen Fehlerstromschutzschalter (FI) geschützt sein (Fehlerstrom: Max. 30 mA). - Página 73 Rohrleitung zu installieren. durchfluss Bei horizontalem Einbau muss zwingend ein mechanischer Durchflusswächter (optional erhältlich) eingebaut und an die Konfiguration der Anlage angepasst werden. VERWENDEN SIE NUR ORIGINAL-ERSATZTEILE VON HAYWARD Seite 8 von 16 AquaRite LT Ausg. A...
- Página 74 Zeit vor dem Einschalten der AquaRite LT zu starten. Zugabe von Salz: Das Salz mehrere Stunden, wenn möglich einen Tag vor der Inbetriebnahme der AquaRite LT zugeben. Die empfohlene Salzmenge einhalten. Den Salzgehalt 6 bis 8 Stunden nach der Zugabe zum Schwimmbadwasser messen.
- Página 75 1,82 1,93 2,04 2,16 2,25 20 ppm 0,15 0,19 0,23 0,27 0,31 0,34 0,38 0,42 0,46 0,49 0,53 0,57 0,61 0,64 0,68 0,72 0,75 25 ppm VERWENDEN SIE NUR ORIGINAL-ERSATZTEILE VON HAYWARD Seite 10 von 16 AquaRite LT Ausg. A...
- Página 76 Das Wasser unbedingt manuell ins Gleichgewicht bringen, BEVOR das Gerät eingeschaltet wird. In der nachstehenden Tabelle sind die von Hayward empfohlenen Konzentrationen zusammengefasst. Um die Korrosion und eine Beeinträchtigung der Flächen zu begrenzen, ist es wichtig, das Wasser regelmäßig zu kontrollieren und die Konzentrationen auf diesem Niveau zu halten.
-
Página 77: Konfiguration
FUNKTIONSWEISE Das Gerät ist für einen dauerhaften Anschluss an einer geschützten Steckdose konstruiert. Die Anlage AquaRite LT darf nur abgeschaltet werden, wenn die anderen Swimmingpool-Ausrüstungen gewartet werden oder wenn der Pool geschlossen werden muss (über den Winter). Wenn das chemische Gleichgewicht des Wassers innerhalb des empfohlenen Bereichs liegt, kann das Gerät eingeschaltet werden. - Página 78 Achtung: Eine zu lang gewählte Dauer kann dazu führen, dass Ihr Schwimmbecken nicht gegen Säure-Überdosierungen geschützt ist und Ihre Ausrüstung so starkt geschädigt wird, dass sie nicht mehr repariert werden kann. Eine zu kurz gewählte Dauer kann zu Fehlalarmen AL3 führen. VERWENDEN SIE NUR ORIGINAL-ERSATZTEILE VON HAYWARD Seite 13 von 16 AquaRite LT Ausg.
- Página 79 Regulierung der Redoxspannung (optionales Redox-Set) Die Redoxspannung gibt das Oxidationspotenzial, d. h. die Desinfektionskraft des Wassers, an. Der letzte Schritt der Einstellungen von AquaRite LT besteht in der Regelung des Redox-Sollwerts. Zur Ermittlung der optimalen Redoxspannung Ihres Pools führen Sie folgende Schritte aus: 1) Bringen Sie das Filtersystem des Pools in Gang (das Salz im Pool sollte gleichmäßig aufgelöst sein).
- Página 80 Wartung und Reinigung der AquaRite LT-Zelle Vor dem Ausbau der Zelle die allgemeine Stromversorgung der AquaRite LT-Anlage trennen. Nach dem Ausbau, das Innere der Zelle kontrollieren, um eventuelle Kalkspuren (bröckelige oder flockige weißliche Ablagerungen) und an den Platten haftende Verunreinigungen festzustellen.
- Página 81 Den Strömungssensor kontrollieren. Kontrollieren, ob die Filterpumpe funktioniert. Kontrollieren, ob etwas die Leitungen verstopft (Ventil geschlossen, Korb oder Vorfilter voll usw.). Die Sicherung 4A (6) kontrollieren. VERWENDEN SIE NUR ORIGINAL-ERSATZTEILE VON HAYWARD Seite 16 von 16 AquaRite LT Ausg. A...
- Página 82 AquaRite LT GEBRUIKERSHANDLEIDING BEWAAR DEZE GEBRUIKERSHANDLEIDING OM HEM LATER TE KUNNEN RAADPLEGEN HAYWARD POOL EUROPE - 1070 Allée des Chênes - CS 20054 Saint Vulbas - 01154 Lagnieu Cedex - Frankrijk...
- Página 83 8 jaar oud zijn en onder toezicht staan. Houd het toestel en de kabel buiten het bereik van kinderen jonger dan 8 jaar • WAARSCHUWING – Gebruik uitsluitend originele onderdelen van Hayward. • WAARSCHUWING – Als de voedingskabel is beschadigd, moet deze door de fabrikant, de klantenservice of gelijkwaardig bevoegde personen worden vervangen om gevaarlijke situaties te voorkomen.
- Página 84 REGISTRATIE Bedankt dat u voor Hayward gekozen hebt. Deze handleiding bevat belangrijke informatie over de werking en het onderhoud van uw product. Bewaar het voor toekomstig gebruik. OM UW PRODUCT IN ONZE DATABANK TE REGISTREREN, GAAT U NAAR: www.hayward.fr/en/services/register-your-product ...
-
Página 85: Algemene Informatie
Het is geschikt voor het efficiënt behandelen van het water door middel van zoutwaterelektrolyse. Om te functioneren moet de elektrolyzer worden gebruikt in een zwembad met een laag zoutgehalte (natriumchloride). AquaRite LT desinfecteert uw zwembad automatisch door het zout om te zetten in vrije chloor, die de in het water aanwezige bacteriën en algen vernietigt. Het chloor vormt zich opnieuw als natriumchloride. - Página 86 (warmtedispersie van de inwendige onderdelen). Het is daarom belangrijk dat de vier zijden van de behuizing niet afgedekt zijn. AquaRite LT mag niet achter een paneel of in een gesloten ruimte worden gemonteerd.
- Página 87 Timer filterpomp* Filter met zand silex/glas/diatomeeën Recirculatiepomp Elektronische besturingskast Elektrolysecel (altijd verticaal) pH-sensor (optioneel) Rx-sensor (optioneel) Temperatuursensor (optioneel) Zuurdoseerpomp (optioneel) Zuurinjector (optioneel) Zwavelzuurtank (niet meegeleverd) ENKEL ORIGINELE RESERVEONDERDELEN VAN HAYWARD GEBRUIKEN. Pagina 6 van 16 AquaRite LT Rev. A...
- Página 88 Voor de ORP-optie installeert u de ORP-chip in de RX-sleuf van het moederbord. Het apparaat installeren en aansluiten Sluit de AquaRite LT aan op een permanente elektrische aansluiting. • : Dit circuit moet worden beschermd door een differentiaalschakelaar met reststroom (RCD) (reststroom: maximaal 30mA).
- Página 89 In geval van horizontale installatie debiet moet u een mechanische debietsensor (optioneel) toevoegen en de configuratie van het apparaat aanpassen. ENKEL ORIGINELE RESERVEONDERDELEN VAN HAYWARD GEBRUIKEN. Pagina 8 van 16 AquaRite LT Rev. A...
- Página 90 Om het zwembadwater voor te bereiden voor een behandeling met AquaRite LT, moet het een evenwichtige chemische samenstelling hebben en is het nodig om zout toe te voegen. Het zout moet worden toegevoegd VOOR het activeren van de AquaRite LT. Het herstellen van het chemische evenwicht van het zwembad kan soms meerdere uren duren.
- Página 91 1,82 1,93 2,04 2,16 2,25 20 ppm 0,15 0,19 0,23 0,27 0,31 0,34 0,38 0,42 0,46 0,49 0,53 0,57 0,61 0,64 0,68 0,72 0,75 25 ppm ENKEL ORIGINELE RESERVEONDERDELEN VAN HAYWARD GEBRUIKEN. Pagina 10 van 16 AquaRite LT Rev. A...
- Página 92 Water moet absoluut handmatig in evenwicht worden gebracht VOORDAT het apparaat in werking wordt gesteld. Onderstaande tabel geeft de door Hayward aanbevolen gehaltes aan. Het is belangrijk om het water regelmatig te controleren en deze gehaltes te handhaven, om corrosie of verwering van de oppervlakken te beperken.
- Página 93 WERKING Het apparaat is ontworpen om permanent te zijn aangesloten op een beveiligd stopcontact. AquaRite LT mag niet worden losgekoppeld, behalve indien de installaties van het zwembad worden onderhouden of als het zwembad moet worden afgesloten (overwintering). Ervan uitgaand dat het chemisch evenwicht van het water binnen de aanbevolen waarden ligt, kunt u het apparaat inschakelen.
-
Página 94: De Ph Correctie-Tijd Instellen
Let op: bij een te lange tijdsduur kan het gebeuren dat zwembad niet is bestemd tegen een te hoge zuurdosis en kunnen uw installaties hierdoor onherroepelijk worden beschadigd. Bij een te korte tijdsduur kunnen er ontijdige AL3 alarmmeldingen optreden. ENKEL ORIGINELE RESERVEONDERDELEN VAN HAYWARD GEBRUIKEN. Pagina 13 van 16 AquaRite LT Rev. - Página 95 Het redox-niveau informeert u over het oxidatiepotentieel, d.w.z. het desinfecterende vermogen van het water. De laatste stap voor het instellen van de Aquarite LT bestaat uit het regelen van de ingestelde redox-waarde. Ga als volgt te werk om het optimale redox-niveau van uw zwembad te vinden: 1 : Schakel het filtratiesysteem in van het zwembad (het zout moet gelijkmatig in het zwembad zijn opgelost).
-
Página 96: De Sonde Onderhouden
De AquaRite LT cel onderhouden en schoonmaken Voordat u de cel verwijdert, schakelt u eerst de elektrische voeding van de AquaRite LT uit. Nadat de cel is verwijderd, inspecteert u de binnenkant van de cel op eventuele sporen van kalkaanslag (breekbare of vlokkerige aanslag van witte kleur) en op vuil dat zich op de plaatjes heeft opgehoopt. -
Página 97: Probleemoplossing
De debietdetector controleren. Controleer of de filterpomp functioneert. Controleer of de leidingen niet verstopt zijn (gesloten kraan, volle mand of voorfilter enz.). Controleer de zekering 4A (6). ENKEL ORIGINELE RESERVEONDERDELEN VAN HAYWARD GEBRUIKEN. Pagina 16 van 16 AquaRite LT Rev. A... - Página 98 AquaRite LT MANUALE D’USO CONSERVARE IL PRESENTE MANUALE PER FUTURA CONSULTAZIONE HAYWARD POOL EUROPE - 1070 Allée des Chênes - CS 20054 Saint Vulbas - 01154 Lagnieu Cedex - Francia...
- Página 99 8 anni e solo se adeguatamente sorvegliati. Tenere l’apparecchio e il cavo fuori dalla portata di bambini minori di 8 anni • ATTENZIONE – Utilizzare solo parti di ricambio originali Hayward. • ATTENZIONE – Se il cavo di alimentazione è danneggiato, contattare il produttore, il servizio Assistenza Clienti o personale qualificato che si occuperanno della sua sostituzione evitando così...
- Página 100 REGISTRAZIONE Grazie per avere scelto Hayward. Il presente manuale contiene importanti informazioni in merito al funzionamento e alla manutenzione dell'unità. Conservare come riferimento. PER REGISTRARE IL PRODOTTO NEL NOSTRO DATABASE, VISITARE IL SITO: http://www.hayward-piscina.it/servizi/registrazione-della-garanzia --------------------------------------------------------------------------------------------------------------------------------------------------------------------------------------------- Dati da conservare Inserire le seguenti informazioni per praticità:...
- Página 101 Permette di trattare efficacemente l’acqua della piscina tramite elettrolisi dell’acqua salata. Per funzionare, l’ e lettrolizzatore richiede una ridotta concentrazione di sale (cloruro di sodio) nell’acqua della piscina. AquaRite LT disinfetta automaticamente la piscina trasformando il sale in cloro libero che distrugge i batteri e le alghe presenti nell’acqua. Il cloro si ritrasforma in cloruro di sodio. Questo ciclo permanente evita di fare ricorso al trattamento manuale della piscina.
-
Página 102: Installazione A Parete
AquaRite LT deve essere installato a una distanza orizzontale minima di 3,5 metri (o maggiore, se richiesto dalla legislazione locale) dalla piscina, a meno di 1 m da una presa protetta, e a meno di 4,5 metri dalla posizione prevista per l’installazione della cella. - Página 103 Cellula per elettrolisi (sempre in posizione verticale) Sonda pH (opzionale) Sonda Redox (opzionale) Sonda di temperatura (opzionale) Pompa di dosaggio dell’acido (opzionale) Iniettore dell’acido (opzionale) Serbatoio dell’acido solforico (non fornito) UTILIZZARE SOLO PARTI DI RICAMBIO ORIGINALI HAYWARD Pagina 6 di 16 AquaRite LT Rev. A...
- Página 104 Per l’ o pzione ORP, installare la scheda ORP sulla posizione RX della scheda madre. Installazione e collegamento elettrico Collegare AquaRite LT a una presa di alimentazione elettrica fissa. • : Il circuito deve essere protetto da un interruttore differenziale (DDR) (corrente residua : 30mA max).
-
Página 105: Collegamento Della Cellula Al Dispositivo
In caso di installazione in d’acqua orizzontale, è obbligatorio aggiungere un sensore meccanico di portata (opzionale) e adattare la configurazione del dispositivo. UTILIZZARE SOLO PARTI DI RICAMBIO ORIGINALI HAYWARD Pagina 8 di 16 AquaRite LT Rev. A... - Página 106 È pertanto necessario avviare la procedura per tempo prima di mettere in funzione AquaRite LT. Aggiunta del sale: Aggiungere il sale diverse ore, o addirittura 1 giorno prima, se possibile, della messa in funzione di AquaRite LT. Rispettare il livello di sale consigliato.
- Página 107 1,93 2,04 2,16 2,25 20 ppm 0,15 0,19 0,23 0,27 0,31 0,34 0,38 0,42 0,46 0,49 0,53 0,57 0,61 0,64 0,68 0,72 0,75 25 ppm UTILIZZARE SOLO PARTI DI RICAMBIO ORIGINALI HAYWARD Pagina 10 di 16 AquaRite LT Rev. A...
- Página 108 L’acqua deve necessariamente essere equilibrata a mano PRIMA della messa in funzione del dispositivo. La tabella sotto riportata riassume le concentrazioni raccomandate da Hayward. È importante controllare regolarmente l’acqua e rispettare le concentrazioni per prevenire la corrosione o il degrado delle superfici.
- Página 109 FUNZIONAMENTO L’apparecchio è progettato per essere stabilmente collegato a una presa protetta. AquaRite LT non deve essere scollegato dall’alimentazione, salvo nel caso in cui le apparecchiature della piscina siano sottoposte a manutenzione o la piscina debba essere chiusa (svernamento). Supponendo che l’ e quilibrio chimico dell’acqua rispetti i valori consigliati, è possibile mettere in funzione il dispositivo.
- Página 110 Attenzione: con un tempo troppo lungo si rischia di non proteggere efficacemente la piscina contro i sovradosaggi di acido e di danneggiare irrimediabilmente le attrezzature. Con un tempo troppo breve potrebbero innescarsi gli allarmi automatici AL3. UTILIZZARE SOLO PARTI DI RICAMBIO ORIGINALI HAYWARD Pagina 13 di 16 AquaRite LT Rev.
- Página 111 Il livello Redox fornisce informazioni sul potenziale di ossidazione, ovvero sul potere disinfettante dell’acqua. L’ultima fase della regolazione di AquaRite LT consiste nell’impostare il setpoint del Redox. Per trovare il livello ottimale di Redox della piscina, seguire la seguente procedura: 1) Mettere in funzione il sistema di filtraggio della piscina (il sale nella piscina deve essere sciolto in maniera uniforme).
- Página 112 Svernamento La cella di AquaRite LT, il sensore di portata e la sonda potrebbero subire dei danni a causa del gelo, proprio come le tubazioni della piscina. Nelle regioni caratterizzate da lunghi periodi di freddo, rimuovere l’acqua dalla pompa, dal filtro e dai tubi di mandata e di ritorno prima dell’inverno.
-
Página 113: Guida Alla Soluzione Dei Problemi
Verificare che la pompa di filtrazione funzioni correttamente. Verificare che le canalizzazioni non siano ostruite (valvola chiusa, cestello o prefiltro pieni, ecc.). Verificare il fusibile 4A (6). UTILIZZARE SOLO PARTI DI RICAMBIO ORIGINALI HAYWARD Pagina 16 di 16 AquaRite LT... -
Página 114: Garantie Limitée
LIMITED WARRANTY All HAYWARD products are covered for manufacturing defects or material defects for a warranty period of 2 years as of date of pur- chases. Any warranty claim should be accompanied by evidence of purchase, indicating date of purchase. We would therefore advise you to keep your invoice. -
Página 115: Beschränkte Garantie
GARANTIA LIMITADA Os produtos HAYWARD são garantidos contra quaisquer defeitos de fabrico ou de materiais por um período de 2 anos a contar da data de compra. Qualquer pedido ao abrigo da garantia deve ser acompanhado pelo comprovativo de compra, indicando a data de compra. -
Página 116: Garanzia Limitata
GARANZIA LIMITATA Tutti i prodotti HAYWARD sono garantiti contro i difetti di produzione o i difetti sul materiale per un periodo di 2 anni dalla data d’acquisto. Ogni eventuale richiesta di intervento in garanzia deve essere accompagnata da una prova d’acquisto riportante la data. Si consiglia, pertanto, di conservare la fattura o lo scontrino fiscale. - Página 117 Hayward is a registered trademark of Hayward Industries, Inc. © 2017 Hayward Industries, Inc.