Publicidad
sauder.com
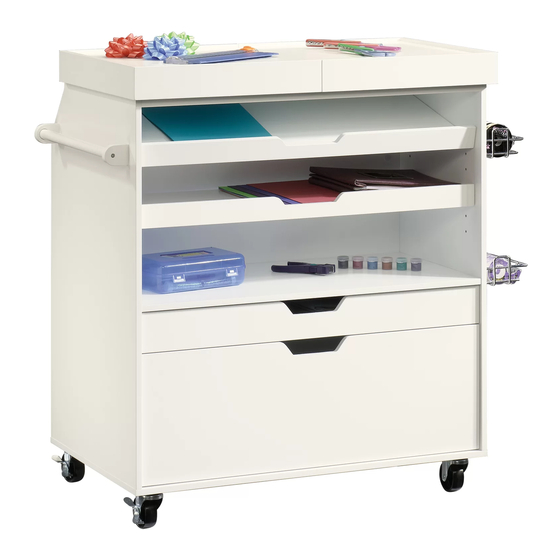
Craft Cart
Craft Pro Series Collection | Model 417047
Need help? Visit Sauder.com to view video assembly tips or chat with a live rep.
Prefer the phone? Call 1-800-445-1527.
Share your journey!
Get your gear a
mobile home.
NOTE: THIS INSTRUCTION
BOOKLET CONTAINS IMPORTANT
SAFETY INFORMATION.
PLEASE READ AND KEEP FOR
FUTURE REFERENCE.
English pg 1-27
Français pg 28-32
Español pg 33-37
Lot #: 514509
Date Purchased: __________________
03/21/18
Be sure to give us a ring before
making any returns. 1-800-445-1527
Publicidad
Tabla de contenido

Manuales relacionados para Sauder Craft Pro 417047

Resumen de contenidos para Sauder Craft Pro 417047
- Página 1 NOTE: THIS INSTRUCTION BOOKLET CONTAINS IMPORTANT SAFETY INFORMATION. PLEASE READ AND KEEP FOR Need help? Visit Sauder.com to view video assembly tips or chat with a live rep. FUTURE REFERENCE. Prefer the phone? Call 1-800-445-1527. English pg 1-27 Français pg 28-32 Español pg 33-37...
- Página 2 ADJUSTABLE SHELF FRONT (2) SMALL DRAWER FRONT (1) TRAY FRONT (1) SMALL DRAWER BACK (1) TRAY UPRIGHT (2) DRAWER BOTTOM (2) TRAY BACK (1) S1 LARGE LEFT DRAWER SIDE (1) TRAY DIVIDER (1) S2 LARGE RIGHT DRAWER SIDE (1) Page 2 www.sauder.com 417047...
-
Página 3: Part Identifi Cation
While not all parts are labeled, some of the parts will have a label or an inked letter on the edge to help distinguish similar parts from each other. Use this part identifi cation to help identify similar parts. 417047 www.sauder.com Page 3... - Página 4 LARGE EXTENSION CLAMP - 4 SLIDE and RAIL - 4 SLIDE and RAIL - 4 SILVER 3/8" PAN HEAD SCREW - 4 LOCKING CASTER - 2 CASTER - 2 CAM COVER - 16 WIRE TRAY - 2 Page 4 www.sauder.com 417047...
- Página 5 Look for this icon. It means a Step 1 video assembly tip is available at www.sauder.com/services/tips Assemble your unit on a carpeted fl oor or on the empty å carton to avoid scratching your unit or the fl oor. Turn forty-four CAM SCREWS (1) into the exact holes å...
- Página 6 SLIDE and RAIL in to fi nd the last center hole in each SLIDE and RAIL. Small section of the EXTENSION SLIDE and RAIL. Use the center hole in each set. SILVER 1/2" FLAT HEAD SCREW (12 used in this step) Remember: Righty tighty. Lefty loosey. Page 6 www.sauder.com 417047...
- Página 7 NOTE: The arrow in the HIDDEN CAM must point toward å the hole in the edge of the board. The arrow must point toward the hole in the edge of the board. Arrow The TRAY FRONT (G) should hang over more on this side. 417047 www.sauder.com Page 7...
- Página 8 Fasten the BACK (C) to the TRAY BOTTOM (D). Tighten å two HIDDEN CAMS. The arrow must point toward the hole in the edge of the board. The indicated arrow on the BACK (C) should point toward the TRAY BOTTOM (D). Arrow Page 8 www.sauder.com 417047...
- Página 9 END (B1). Tighten four HIDDEN CAMS. The arrow must point toward the hole in the NOTE: Be sure the WOOD DOWELS in the LEFT END å edge of the board. insert into the TRAY FRONT. Arrow Arrow 417047 www.sauder.com Page 9...
- Página 10 Arrow two HIDDEN CAMS (2). NOTE: Be sure the WOOD DOWELS in the BACK insert å into the holes in the BACK DIVIDERS. The arrow must point toward the hole in the edge of the board. Page 10 www.sauder.com 417047...
- Página 11 S u r I D D u t H i t h o The arrow must point toward the hole in the f a c S u r edge of the board. 417047 www.sauder.com Page 11...
- Página 12 Insert four WOOD DOWELS (3) into the short edges of the TRAY DIVIDER (J). Then, fasten the TRAY DIVIDER (J) to the å TRAY UPRIGHTS (H). You will need to widen the TRAY UPRIGHTS (H) to get the TRAY DIVIDER (J) in between them. (12 used) Page 12 www.sauder.com 417047...
- Página 13 END (B1). Then on an angle, push the end of the TRAY BACK (I) over the WOOD DOWELS, while working the TRAY UPRIGHT (H) WOOD DOWELS into the back surface of the TRAY BACK (I). (4 used) 417047 www.sauder.com Page 13...
- Página 14 The arrow must point toward the hole in the edge of the board. Arrow For support, place packing foam and magazines here or have a someone hold the SHELF (N) up horizontal until the next step is complete. Page 14 www.sauder.com 417047...
- Página 15 NOTE: Be sure the WOOD DOWELS in the TRAY FRONT, TRAY å BACK, UPPER RAILS and LOWER BACK RAIL insert into RIGHT END. The arrow must point toward the hole in the edge of the board. Arrow Arrow (6 used) Arrow 417047 www.sauder.com Page 15...
- Página 16 BACK (C). Tighten six HIDDEN CAMS. NOTE: Be sure the WOOD DOWELS in the BOTTOM insert å The arrow must point into to LOWER BACK RAIL (M). toward the hole in the edge of the board. Arrow Arrow Arrow Page 16 www.sauder.com 417047...
- Página 17 Step 13 Fasten the WIRE TRAYS (16) to the RIGHT END (B2). Use four å CLAMPS (10) and eight SILVER 1/2" FLAT HEAD SCREWS (9). SILVER 1/2" FLAT HEAD SCREW (8 used in this step) 417047 www.sauder.com Page 17...
- Página 18 Cart. The CASTERS (14) will get fastened near the rear of the Cart. (16 used) The LOCKING CASTERS will SILVER 5/8" PAN HEAD SCREW have a lever to lock the wheels. (16 used in this step) Page 18 www.sauder.com 417047...
- Página 19 NOTE: The EXTENSION SLIDES will be used later for the DRAWERS. å LARGE EXTENSION SLIDE LARGE EXTENSION RAIL Push up on the black lever and pull the SLIDE from the RAIL. SILVER 1/2" FLAT HEAD SCREW (12 used in this step) 417047 www.sauder.com Page 19...
- Página 20 1-3/16" FLAT HEAD SCREWS (5) as shown to the right. Fasten the ROD CAPS (X) to the LEFT END (B1). Use four å SILVER 1-3/16" FLAT HEAD SCREWS (5) as shown in the lower diagram. SILVER 1-3/16" FLAT HEAD SCREW (6 used in this step) Page 20 www.sauder.com 417047...
- Página 21 Insert eight METAL PINS (6) into the holes of your choice in the å ENDS (B1 and B2).. Place the ADJUSTABLE SHELVES (E) on the METAL PINS (6). å The arrow must point toward the hole in the edge of the board. Notch Arrow (8 used) (6 used) 417047 www.sauder.com Page 21...
- Página 22 Insert eight HIDDEN CAMS (2) into the large holes å in the DRAWER SIDES (O1, O2, S1, and S2) and DRAWER BRACES (V). Arrow Arrow Hole The arrow in the HIDDEN CAM must point toward the hole in the edge of the board. Page 22 www.sauder.com 417047...
- Página 23 Fasten the LARGE DRAWER BACK (U) to the LARGE DRAWER SIDES (S1 and S2) and DRAWER BRACE (V). Use six å SILVER 1-9/16" FLAT HEAD SCREWS (4). NOTE: Be sure the DRAWER BOTTOM (R) inserts into the groove in the LARGE DRAWER BACK (U). å 417047 www.sauder.com Page 23...
- Página 24 Fasten the SMALL DRAWER BACK (Q) to the SMALL DRAWER SIDES (O1 and O2) and DRAWER BRACE (V). Use six å SILVER 1-9/16" FLAT HEAD SCREWS (4). NOTE: Be sure the DRAWER BOTTOM (R) inserts into the groove in the SMALL DRAWER BACK (Q). å Page 24 www.sauder.com 417047...
- Página 25 Repeat this step for the small drawer. å SILVER 3/8" PAN HEAD SCREW (4 used in this step) You must start the screw from the inside of the drawer box and into this hole in the EXTENSION SLIDE. 417047 www.sauder.com Page 25...
- Página 26 TOP (A) as shown. Use three SILVER 1/2" FLAT HEAD SCREWS (9) through the indicated holes in each LARGE EXTENSION SLIDE. Repeat this step for the other SLIDING TOP (A). å SILVER 1/2" FLAT HEAD SCREW (12 used in this step) Open end Page 26 www.sauder.com 417047...
- Página 27 This completes assembly. Clean with your favorite furniture polish or a damp cloth. å Wipe dry. And to celebrate, why not share your success story? 20 lbs. 20 lbs. total 10 lbs. 10 lbs. each 20 lbs. 10 lbs. 10 lbs. 25 lbs. (16 used) 417047 www.sauder.com Page 27...
-
Página 28: Liste De Pièces
élément et conserver le livret pour future référence. DESSUS COULISSANT ..........2 VIS D'EXCENTRIQUE ........... 44 Pour contacter Sauder EXTRÉMITÉ GAUCHE ..........1 EXCENTRIQUE ESCAMOTABLE ....44 en ce qui concerne cet EXTRÉMITÉ DROITE ..........1 CHEVILLE EN BOIS ..........38 élément, faire référence... - Página 29 Insérer deux CHEVILLES EN BOIS (3) dans le chant court de la GLISSIÈRE ARRIÈRE INFÉRIEURE (M). Enfoncer les CHEVILLES EN BOIS situées sur l’extrémité de la GLISSIÈRE ARRIÈRE INFÉRIEURE (M) dans les trous de l’EXTRÉMITÉ GAUCHE (B1). 417047 www.sauder.com Page 29...
- Página 30 INFÉRIEURE dans l’EXTRÉMITÉ DROITE. sur les trous dans le DEVANT DE PLATEAU et l’ARRIÈRE DE PLATEAU. Faire tourner une VIS dans ces trous. REMARQUE : Les COULISSES D'EXTENSION seront utilisées ultérieurement pour les TIROIRS. Page 30 www.sauder.com 417047...
- Página 31 ARGENTÉES (15) à travers les CÔTÉS DE TIROIR (S1 et S2) et dans le troisième trou du devant comme l’indique le schéma dans la grande vue. REMARQUE : Les vis doivent être serrées à travers l'intérieur de caisson de tiroir. Répéter cette étape pour le petit tiroir. 417047 www.sauder.com Page 31...
- Página 32 REMARQUE : Prière de lire les informations importantes sur la sécurité fi gurant sur les pages arrière du manuel d’instructions. Ceci complète l'assemblage. Nettoyer à l’ a ide d’une encaustique pour meubles ou d’un chiff on humide. Essuyer. Page 32 www.sauder.com 417047...
-
Página 33: Carrito De Costura
BIELA DE EXCÉNTRICO ........44 et conserver le livret EXTREMO IZQUIERDO ..........1 pour future référence. EXCÉNTRICO ESCONDIDO ......44 Pour contacter Sauder EXTREMO DERECHO ..........1 PASADOR DE MADERA ........38 en ce qui concerne cet DORSO .................1 TORNILLO PLATEADO DE élément, faire référence... - Página 34 Inserte dos PASADORES DE MADERA (3) en el borde corto del RIEL POSTERIOR INFERIOR (M). Inserte los PASADORES DE MADERA en el extremo del RIEL POSTERIOR INFERIOR (M) entre los agujeros en el EXTREMO IZQUIERDO (B1). Page 34 www.sauder.com 417047...
- Página 35 CARA DE BANDEJA y del DORSO DE BANDEJA. Atornille un TORNILLO dentro de estos agujeros. NOTA: Las CORREDERAS DE EXTENSIÓN se utilizarán más tarde para los CAJONES. 417047 www.sauder.com Page 35...
- Página 36 PASO 18 de la ranura del DORSO DE CAJÓN PEQUEÑO (Q). Inserte ocho EXCÉNTRICOS ESCONDIDOS (2) en los agujeros grandes de los LADOS DE CAJÓN (O1, O2, S1 y S2) y las RIOSTRAS DE CAJÓN (V). Page 36 www.sauder.com 417047...
- Página 37 SUPERIOR DESLIZABLE (A), tal como se muestra. Utilice tres TORNILLOS PLATEADOS DE CABEZA PERDIDA de 13 mm (9) a través los agujeros correspondientes indicados de la CORREDERA DE EXTENSIÓN LARGA. Repita este paso para el otro PANEL SUPERIOR DESLIZABLE (A). 417047 www.sauder.com Page 37...
- Página 38 Además, el un televisor. soportar un televisor. peso y la ubicación del tubo de imagen tienden a causar la inestabilidad de televisores y son propensos a inclinarse hacia adelante. Page 38 www.sauder.com 417047...
-
Página 39: Garantía Limitada De 1 Año
à compter de la date d'achat la première fois et qui sont signalés à Sauder dans les limites de couverture de la contre tout défaut de matériaux ou de fabrication des composantes de mobilier Sauder. - Página 40 Dear Valued Customer: So, how did it go? Thanks so much for choosing Sauder® furniture. I hope the Set a world record for speed? purchase and assembly process was a positive experience Feeling good about yourself? and you feel good about the furniture you just built. If you Nice.