Publicidad
Enlaces rápidos
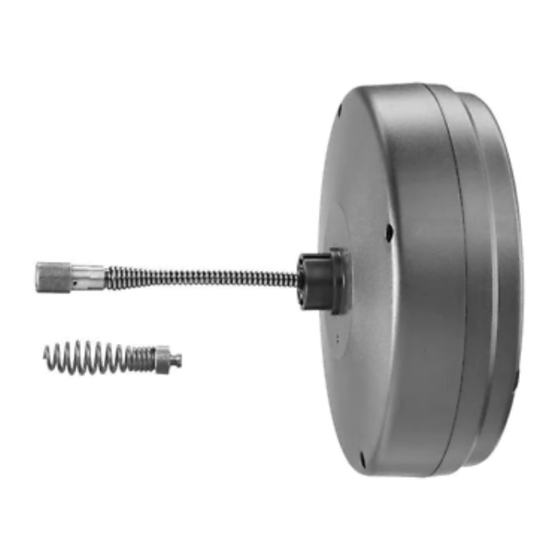
A122AD1 – AUGER DRUM REPLACEMENT
For use with RYOBI P4002 drain auger only.
WARNING
To reduce the risk of injury, user must read and understand
the operator's manual for their drain auger and this instruction
sheet. Always wear eye protection marked to comply with
Z87.1 Ensure compatibility and fit before using this accessory.
Do not use this accessory if a part is damaged or missing.
INSTALLING THE DRUM
See Figures 1 - 2.
Remove the battery pack or power cord from the tool.
Hold the cable and pull the collar back.
Remove the auger tip by sliding it out of the t-slot in the collar.
Pull the feed direction selector collar out and rotate it to the
neutral (N) position.
NOTE: Leave the direction selector collar out. Do not push it
in to lock the collar.
Pull drum latch up to unlock the front portion of the tool.
Hold the drum to prevent it from falling, then move the front
portion of the tool forward (away from the drum) and pivot it
upwards.
Pull the cable through the feed direction selector collar and
into the old drum.
Pull the old drum off the spindle and remove it from the tool.
995000328
8-18-17 (REV:01)
Fig. 1
A
D
Fig. 2
C
A
B
E
C
A - Latch (loquet, pestillo)
B - T-Slot (encoche en T, ranura en T)
C - Auger tip (bout du furet, punta de
la barrena)
E
D - Feed direction selector collar
(collier de sélection du sens
d'alimentation, collar selector de
dirección de alimentación)
E - Cable (câble, cable)
E
D
A - Spindle (broche, husillo)
D
B - Drum (tambour, tambor)
C - Latch (loquet, pestillo)
D - Bumper (tampon, parachoque)
E - Empty slot (fente vide, ranura
vacía)
Place the new drum onto the spindle.
Feed the cable for the new drum through the feed direction
selector collar and toward the front of the tool.
NOTE: There should be a rubber bumper in one of the two
slots near the cable. Prior to securing the drum, verify that the
bumper is in one of the slots.
Lower the front portion of the tool and slide it back into place
(toward the drum).
Push the drum latch down to lock the front portion of the tool
in place.
Ensure the latch, drum, and front portion of the tool are secure
before operating the tool.
WARNING
Once assembled correctly, the drum should be fully seated
on the spindle, the front portion of the tool should be lowered
completely and securely latched, and there should be no
gaps between the front and rear portions of the tool. Use of
a product that may have been improperly assembled could
result in serious personal injury.
INSTALLING AN AUGER TIP
See Figure 1.
Remove the battery pack or power cord from the tool.
Hold the cable and pull the collar back.
Slide the auger tip into into the cable's t-slot.
Push the collar forward so that the tip is secured properly.
Check to see that the tip is secure.
Fig. 3
B
INCORRECT/ INCORRECT/ INCORRECTO
Fig. 4
D
E
A
A - Drum not fully seated on spindle
(tambour n'est pas complètement
inséré sur la broche, tambor no
colocado correctamente en el husillo)
B - Gaps between front and rear of tool
(espaces entre l'avant et l'arrière de
l'outil, espacios entre la parte delantera
y la parte trasera de la herramienta)
CORRECT/ CORRECT/ CORRECTO
B
Publicidad

Manuales relacionados para Ryobi A122AD1


Resumen de contenidos para Ryobi A122AD1
- Página 1 A122AD1 – AUGER DRUM REPLACEMENT Place the new drum onto the spindle. For use with RYOBI P4002 drain auger only. Feed the cable for the new drum through the feed direction selector collar and toward the front of the tool.
- Página 2 BARRENA Coloque el nuevo tambor en el husillo. Para usar solo con la barrena de drenaje RYOBI P4002. Coloque el cable del nuevo tambor atravesando el collar selector de sentido de alimentación y la parte delantera de la herramienta.