Tabla de contenido
Publicidad
Idiomas disponibles
Idiomas disponibles
Enlaces rápidos
NEDERLANDS
In de bijgaande Snelstart handleiding wordt stap voor stap uitgelegd hoe u de
Conceptronic Grab'n'GO 3,5" Media Player met Cardreader kunt gebruiken.
Ingeval van problemen adviseren wij u onze support-site te bezoeken (ga naar:
www.conceptronic.net en klik op 'Support'). Hier vindt u een database met veelgestelde
vragen waar u hoogstwaarschijnlijk de oplossing voor uw probleem kunt vinden.
Heeft u andere vragen over uw product die u niet op de website kunt vinden, neem dan
contact met ons op via e-mail: support@conceptronic.net
Voor meer informatie over Conceptronic producten kunt u terecht op de Conceptronic
website: www.conceptronic.net.
1. Introductie
Voordat u met de bediening van het apparaat begint wordt geadviseerd om deze handleiding
uitvoerig te lezen en te bewaren voor toekomstige naslag.
1.1 Inhoud van de verpakking
Controleer de inhoud van de verpakking voordat u het apparaat aansluit op uw tv of monitor:
• 1x Conceptronic Grab'n'GO 3,5" Media Player met Cardreader
• 1x Afstandsbediening met batterij
• 1x Spanningsadapter (12V DC, 2.5A)
• 1x Audio/Video kabel (Composiet)
• 1x Audio/Video (Composiet) naar SCART kabel
• 1x S-VIDEO naar S-VIDEO kabel
• 1x SPDIF Optische kabel
• 1x USB kabel
• 1x Meertalige Snelstart Handleiding
• 1x Standaard voor CSM3PL
1.2 Mogelijkheden
• Schakelt automatisch tussen PC en Media Speler optie:
Aangesloten op de PC werkt het apparaat als Massa-Opslag Apparaat.
Aangesloten op de TV/Monitor werkt het apparaat als Media Speler.
Conceptronic CSM3PL
Snelstart handleiding
Hartelijk gefeliciteerd met de aanschaf van uw
Conceptronic CSM3PL.
1
Publicidad
Tabla de contenido
Solución de problemas

Manuales relacionados para Conceptronic CSM3PL


Resumen de contenidos para Conceptronic CSM3PL
- Página 1 Conceptronic Grab‘n’GO 3,5” Media Player met Cardreader kunt gebruiken. Ingeval van problemen adviseren wij u onze support-site te bezoeken (ga naar: www.conceptronic.net en klik op ‘Support’). Hier vindt u een database met veelgestelde vragen waar u hoogstwaarschijnlijk de oplossing voor uw probleem kunt vinden.
- Página 2 • NOOIT het apparaat schudden, laten vallen of tegen het apparaat stoten. • Om oververhitting tegen te gaan dient u het apparaat niet af te dekken. • De CSM3PL ondersteunt alleen het FAT / FAT32 bestandssysteem (NTFS wordt niet ondersteund).
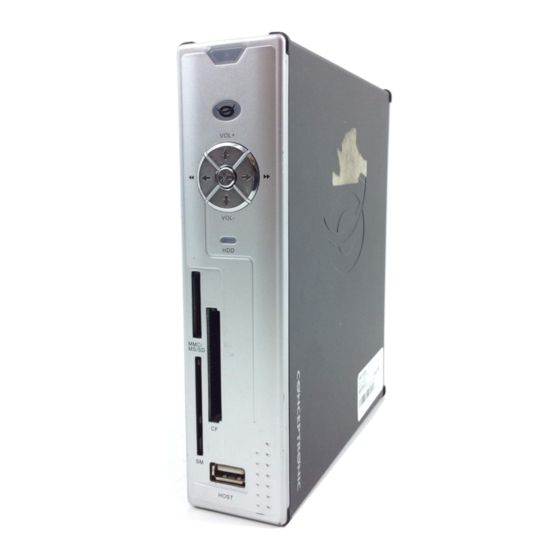
- Página 3 NEDERLANDS Functies van de Grab’n’GO 3,5” Media Player met Cardreader 2.1 Uitleg van de CSM3PL Voorzijde • 1. Ontvanger voor Afstandsbediening 4. HDD LED 7. SM Kaart Slot 2. Spannings-Indicatie LED 5. MMC/MS/SD kaart Slot 8. USB HOST Aansluiting 3. Bedieningsknoppen 6.
- Página 4 Zet uw computer aan. Sluit de spannings-adapter aan op de CSM3PL en een vrij stopcontact. Sluit de USB kabel aan op de CSM3PL en een vrije USB poort op uw computer. De computer zal de CSM3PL automatisch herkennen en installeren, een stationsletter toewijzen en gebruiken als Massa-Opslag Apparaat.
- Página 5 OPMERKING: De Conceptronic CSM3PL kan gebruikt worden met een TV of monitor. Bij gebruik met een TV kunt u gebruik maken van de S-VIDEO, Composiet, Composiet naar SCART of Component uitgang van de CSM3PL. Controleer de handleiding van uw TV voor het selecteren van de juiste ingang voor de CSM3PL.
-
Página 6: Beschrijving Van De Afstandsbediening
NEDERLANDS 4. De Afstandsbediening 4.1 Beschrijving van de afstandsbediening... - Página 7 NEDERLANDS Beschrijving Beschrijving POWER VIDEO Zet apparaat in/uit stand-by stand. Directe toegangknop naar video’s. (AAN/UIT) P / N PHOTO Selecteer het video systeem. (PAL / NTSC) Directe toegangsknop naar foto’s. OUTPUT NEXT Selecteer het Video Uitgangssignaal. Ga naar het volgende bestand / hoofdstuk of ga naar de volgende pagina.
-
Página 8: Belangrijke Informatie
(Indien er maar 1 partitie aanwezig is op de Harde Schijf). Als er een USB apparaat (Bijvoorbeeld een externe harde schijf of USB Stick) of geheugenkaart is aangesloten op de CSM3PL zal het de CSM3PL een Apparaatlijst tonen met de gevonden apparaten. - Página 9 NEDERLANDS 5.2 Uitgebreide bediening Bestandslijst Als er geen externe apparaten zijn aangesloten op de CSM3PL (Alleen de interne harde schijf is aanwezig) zal de Bestandslijst getoond worden op het scherm als de CMED3PLAY met de POWER knop wordt ingeschakeld. Als er meerdere apparaten zijn verbonden (USB stick, geheugenkaart,etc.) zal de Apparaatlijst getoond worden zodra de CSM3PL ingeschakeld wordt.
- Página 10 Codec vereist, welke niet wordt ondersteund door de CSM3PL. Als u een bestand probeert af te spelen welke niet ondersteund wordt zult u de melding “CODEC NOT SUPPORTED” zien op uw scherm.
- Página 11 NEDERLANDS DVD’s afspelen De CSM3PL kan DVD’s van de harde schijf afspelen alsof het een normale DVD is. U kunt gebruik maken van het DVD Menu, de ondertiteling of speektaal wijzigen, etc. Mappenstructuur aanmaken Voor het afspelen van DVD’s op de CSM3PL dient de mappenstructuur correct te zijn aangemaakt.
- Página 12 Instellen van de map “MUSICDIR” voor snelle toegang Om uw CSM3PL geschikt te maken voor het automatische afspelen van muziek, moet je een special map aanmaken wanneer de CSM3PL verbonden is met uw computer. Maak de map ”MUSICDIR” aan in de root van de eerste partitie.
- Página 13 NEDERLANDS Het is ook mogelijk om muziek af te spelen uit de voor gedefinieerde mappen, wanneer het scherm uit is. We adviseren alleen mappen 000 – 009 te gebruiken voor dit onderdeel. Om muziek uit deze mappen af te spleen, geef de digit van de map (0 – 9) en druk op de PLAY/PAUSE knop.
- Página 14 NEDERLANDS Directe toegangsknop naar de “photo” map: U kunt 1 fotomap aanmaken, welke direct benaderd kan worden door te drukken op de PHOTO knop op uw afstandsbediening. Maak een map genaamd “PHOTO ***” (Waar *** verandert kan worden naar wat u zelf wilt) in de root van de harde schijf en plaats fotobestanden in deze map. Wanneer de media speler gestart is en de PHOTO-knop wordt ingedrukt, dan wordt de map automatisch geopend.
-
Página 15: Setup Menu
NEDERLANDS 7. Setup Menu Als het apparaat in STOP stand staat kunt u op de SETUP knop drukken om het SETUP Menu te openen. Gebruik de / / / knoppen om de selectie te wijzigen en druk op de / ENTER knop om de selectie te bevestigen. -
Página 16: Specificaties
NEDERLANDS 7.3 Voorkeuren (Preferences) • VIDEO OUTPUT: Selecteer een video uitgang. Mogelijkheden: S-VIDEO, COMPONENT,P-SCAN YPBPR, VGA en INTERLACE RGB. • OSD LANG: Selecteer een OSD taal. Mogelijkheden: ENGLISH, FRENCH, GERMAN, ITALIAN, PORTUGESE, SPANISH, DUTCH Standaard: ENGLISH • OSD MESSAGE: Selecteer of OSD Berichten worden weergegeven tijdens het afspelen van een bestand. - Página 17 • De MUTE functie is ingeschakeld. Druk op de MUTE knop op de afstandsbediening om de MUTE functie uit te schakelen. • De CSM3PL staat in FF/FR stand. Druk op de PLAY/PAUSE knop op de afstandsbediening om terug te keren naar standaard weergave.
- Página 18 Controleer of de juiste mappenstructuur is gebruikt. De mappenstructuur is beschreven in hoofdstuk 6.1. • De DVD bestanden zijn niet compleet, corrupt of beschadigd. In dit geval is de CSM3PL niet in staat om het afspelen te starten. Tijdens de voorfilmpjes van de DVD blijft het scherm zwart.
-
Página 19: Contents Of The Package
Conceptronic Grab’n’GO 3,5” Media Player with Cardreader. When problems occur, we advise you to go to our support-site (go to www.conceptronic.net and click ‘Support’. Here you will find the Frequently Asked Questions Database. When you have other questions about your product and you cannot find it at our website, then contact us by e-mail: support@conceptronic.net. - Página 20 • To prevent overheating, do not cover the device. • The CSM3PL only supports the FAT / FAT32 File system (NTFS is not supported). Note: When you format the Harddisk to NTFS, it only functions as removable Harddisk for your computer.
-
Página 21: Front View
ENGLISH 2. Functionalities of the Grab’n’GO 3,5” Media Player with Cardreader 2.1 Identify the parts of the CSM3PL Front View • 1. Remote Control Receiver 4. HDD LED 7. SM Card Slot 2. Power LED 5. MMC/MS/SD Card Slot 8. USB HOST Jack 3. -
Página 22: Connecting To Your Computer
3.1 Connecting to your Computer Turn on your computer. Connect the powersupply to the CSM3PL and to the power outlet. Connect the USB Cable to the CSM3PL and your computer. The computer will automatically detect and configure the device, assign new drive letter(s), and then use it as a mass storage device. - Página 23 When using a TV you can use the S-VIDEO, Composite, Composite to SCART or Component output of the CSM3PL. Please check the manual of your TV to select to correct input channel to display the video output of the CSM3PL. If you have used the CSM3PL in VGA mode, please press the OUTPUT button on your remote control to change the VIDEO output again to your TV.
- Página 24 ENGLISH 4. The Remote Control 4.1 Explanation of the Remote Control...
- Página 25 ENGLISH Description Description POWER VIDEO Enter or exit Standby mode. (ON/OFF) Direct Access button to videos. P / N PHOTO Select video system. (PAL / NTSC) Direct Access button to photos. OUTPUT NEXT Select the Video Output Signal. Switch to next file / chapter or page down. SLIDE Enter Music-slide-show mode or step-play.
-
Página 26: Important Remarks
2. Switch the device on with the power switch on the back of the device. The Power LED will become solid blue. The device is now operational. When there is no other device connected to the CSM3PL, it will show the FILE LIBRARY with the contents of your Harddisk (If only 1 partition is present). - Página 27 FILE LIBRARY To change the connected device: If there are more devices connected to the CSM3PL, you can press the MENU button to go to the DEVICE LIST and select a device by pressing / button and the / ENTER button.
- Página 28 If you try to playback a file with a not supported Codec, you will see the message “CODEC NOT SUPPORTED”. DVD Playback The CSM3PL plays DVD’s from the hard disk as if they are a normal DVD. You can navigate through the DVD Menu, choose subtitles, change audio languages, etc. Folder Setup...
- Página 29 / STOP button to end DVD Playback. 6.2 Options how to play & listen to the music Playing Music The Conceptronic CSM3PL has various modes in which you can play music (WAV, MP3 and WMA is supported) To Play Music files: Press Menu and select the correct folder to play music files from.
- Página 30 Setting up the folder “MUSICDIR” for quick access To prepare your CSM3PL to play music automatically you have to create a special folder when you have connected your CSM3PL to your computer. Create the folder ”MUSICDIR” on the root of the first partition.
-
Página 31: Options How To Play & Watch Photos
ENGLISH 6.3 Options how to play & watch photos While playing back photos, you can use the ROTATE button to turn around photos. By default the rotation message of the photos is kept until you turn off the device or switch to standby mode. If you do not want to keep the rotation message, you can disable this function via SETUP MENU ->... - Página 32 ENGLISH 6.4 Operations in file library • Use / button to select a file or folder; (PREV/NEXT) button to page up/page down. If a photo or a video is selected, its preview and information will be shown on the right hand side of the TV screen.
-
Página 33: General Setup
ENGLISH 7. Setup Menu In stop state, press SETUP button to enter SETUP MENU. Press / / / button to move cursor, and press / ENTER button to confirm selection, press SETUP button when finished. 7.1 General setup • ORIENTATION: keep rotation information. Options: ON, OFF Default: ON •... - Página 34 ENGLISH 7.3 Preferences • VIDEO OUTPUT: Set video output. Options: S-VIDEO, COMPONENT,P-SCAN YPBPR, VGA and INTERLACE RGB. Default: S-VIDEO. • OSD LANG: select OSD languages. Options: ENGLISH, FRENCH, GERMAN, ITALIAN, PORTUGESE, SPANISH, DUTCH Default: ENGLISH • OSD MESSAGE: select OSD message during playing back a file.
-
Página 35: Tips & Troubleshooting
• The Audio cable is not connected properly. Make sure the cable is connected correctly to your TV or amplifier. • The CSM3PL is connected with an amplifier, but the amplifier is turned off. Turn on the amplifier. • The audio stream of the MPEG2 or VOB file is invalid. Press the AUDIO button on the remote control to adjust to the proper audio stream. - Página 36 My TV shows a black/white picture instead of colour. • Your TV cannot handle the "Multi" TV-System of the CSM3PL. Use the Setup menu to change the TV System to PAL. (See chapter 7.1). After changing the TV System, turn off and on the CSM3PL.
-
Página 37: Introducción
Si encuentra problemas, le aconsejamos que se dirija a nuestra página web www.conceptronic.net y haga clic en «Support». Aquí encontrará la base de datos de las preguntas más frecuentes o FAQ. Si tiene otras preguntas sobre su producto y no las encuentra en nuestro sitio web, póngase en contacto con nuestro servicio técnico por correo electrónico:... - Página 38 • NUNCA deje caer, sacuda o golpee el dispositivo. • Para evitar su calentamiento, no cubra el dispositivo. • El CSM3PL es compatible únicamente con el sistema de archivos FAT/FAT32 (no es compatible con archivos NTFS). ATENCIÓN: Al formatear el disco duro a NTFS, sólo funciona como disco duro extraíble para su ordenador.
-
Página 39: Partes Del Csm3Pl
ESPAÑOL Funcionalidades del reproductor multimedia Grab‘n’GO 3,5” con lector de tarjetas 2.1 Partes del CSM3PL • Parte frontal 1. Receptor del mando a distancia 4. LED de disco duro 7. Ranura de tarjeta SM 2. LED de encendido 5. Ranura de tarjeta MMC/MS/SD 8. Entrada de host USB 3. -
Página 40: Conexión Al Ordenador
3.1 Conexión al ordenador Encienda el ordenador. Conecte la alimentación al CSM3PL y a la toma de corriente. Conecte el cable USB al CSM3PL y al ordenador. El ordenador detectará automáticamente el dispositivo y lo configurará, le asignará una nueva letra de unidad y luego lo utilizará... - Página 41 Component del CSM3PL. Consulte el manual de su televisor para seleccionar correctamente el canal de entrada y mostrar la salida de vídeo del CSM3PL. Si ha utilizado el CSM3PL en modo VGA, pulse el botón VGA del mando a distancia para volver a cambiar la salida de vídeo en su televisor.
-
Página 42: Descripción Del Mando A Distancia
ESPAÑOL 4. Mando a distancia 4.1 Descripción del mando a distancia... - Página 43 ESPAÑOL Nº Descripción Nº Descripción POWER VIDEO Entrar o salir del modo Standby. (ON/OFF) Botón de acceso directo a los vídeos. P / N PHOTO Seleccionar el sistema de vídeo. (PAL / NTSC) Botón de acceso directo a las fotos. SALIDA SIGUIENTE Seleccionar la señal de salida de vídeo.
-
Página 44: Indicaciones Importantes
Cuando un dispositivo USB (como un disco duro o Flashdrive USB) o una tarjeta de memoria está conectado al CSM3PL, la pantalla mostrará la DEVICE LIST (lista de dispositivos) con todos los dispositivos encontrados. Si el dispositivo conectado contiene una gran cantidad de ficheros, la detección del dispositivo puede tardar un poco. -
Página 45: Funcionamiento Detallado
BIBLIOTECA DE ARCHIVOS Cambiar el dispositivo conectado Si hay más dispositivos conectados al CSM3PL, puede pulsar el botón MENU para acceder a la LISTA DE DISPOSITIVOS (DEVICE LIST) y seleccionar uno de ellos pulsando el botón / y a continuación, el botón (ENTER). - Página 46 NOTA: El CSM3PL es compatible con la mayoría de codecs de vídeo, como XviD, AVI, MPEG2, etc. Sin embargo, es posible que usted necesite para sus archivos algún codec que no incluya el CSM3PL. Si trata de reproducir un archivo con un codec no compatible, aparecerá el mensaje “CODEC...
-
Página 47: Configuración De Carpetas
Cree una carpeta en el disco duro del CSM3PL con el nombre del DVD (por ejemplo, “Mi Película”). Copie la carpeta VIDEO_TS de su DVD en la carpeta de DVD creada en el disco duro del CSM3PL. Una vez realizada la copia, verá la imagen siguiente: Desconecte el CSM3PL de su ordenador y conéctelo a su televisor. -
Página 48: Opciones Sobre Reproducir Y Escuchar Música
ESPAÑOL 6.2 Opciones sobre reproducir y escuchar música Reproducción de música El CSM3PL de Conceptronic ofrece diversos modos de reproducción de música (son compatibles los formatos WAV, MP3 y WMA). Reproducir archivos de música: Pulse el botón MENU y seleccione la carpeta correspondiente donde se encuentran los archivos de música que desea reproducir. -
Página 49: Opciones Sobre La Reproducción Y Visualización De Fotografías
ESPAÑOL Nota: El tiempo entre que se introduce el primer dígito y que aparece el mensaje en pantalla aumentará cuando tenga más datos en su disco duro. 6.3 Opciones sobre la reproducción y visualización de fotografías Durante la visualización de fotografías, puede utilizar el botón ROTATE para girar las fotos. El mensaje de rotación de las fotos se mantiene por defecto hasta que apague el dispositivo o lo configure en modo Stand-by. -
Página 50: Funcionamiento De La Biblioteca De Archivos
ESPAÑOL Botón de acceso directo a su carpeta de fotografías Usted puede crear 1 carpeta de fotografías a la que se puede acceder directamente pulsando el botón PHOTO del mando a distancia. Cree una carpeta con el nombre “PHOTO ***” (donde *** puede cambiarse por lo que usted desee) en la raíz del disco duro y coloque fotos en esta carpeta. -
Página 51: Menú De Configuración
ESPAÑOL 7. Menú de configuración En estado STOP, pulse el botón SETUP para activar el menú de configuración. Pulse el botón / / / para mover el cursor y después pulse el botón (ENTER) para confirmar la selección. Una vez hecho esto, pulse el botón SETUP. 7.1 Configuración general (General setup) •... -
Página 52: Preferencias (Preferences)
ESPAÑOL 7.3 Preferencias (Preferences) • VIDEO OUTPUT (SALIDA DE VÍDEO): Opciones: S-VIDEO, COMPONENT, P-SCAN YPBPR, VGA e INTERLACE RGB. • OSD LANG (IDIOMA EN PANTALLA): Seleccionar el idioma en pantalla: Opciones: INGLÉS, FRANCÉS, ALEMÁN, ITALIANO, PORTUGUÉS, ESPAÑOL, HOLANDÉS Predeterminado: INGLÉS •... -
Página 53: Consejos Y Resolución De Problemas
CSM3PL no funcione correctamente: El LED de encendido no se ilumina • El CSM3PL no está conectado a la toma de alimentación. Conecte el CSM3PL a la toma de corriente. No hay actividad en la pantalla •... - Página 54 Mi televisor muestra la imagen en blanco y negro en lugar de en color. • Su televisor no es compatible con el sistema de TV Multi del CSM3PL. Utilice el Menú de Configuración para cambiar el sistema de TV a PAL (véase el apartado 7.1).
-
Página 55: Declaración De Conformidad Con La Ce
Dirección: Databankweg 7 3821 AL Amersfoort, Países Bajos Declara mediante este documento que el producto Tipo 3,5” Media Player Plus (Serial ATA) Producto CSM3PL Cumple con las siguientes directivas: 89/336/EEC Directiva EMC: Compatibilidad electromagnética 73/23/EEC Directiva sobre bajo voltaje: Material eléctrico destinado a utilizarse con determinados límites de tensión... - Página 56 Verwendung Ihres Conceptronic Grab’n’GO 3,5“ Media Players mit Kartenleser. Sollten irgendwelche Probleme auftreten, empfehlen wir ihnen, auf unsere Support-Seite im Internet zu gehen (www.conceptronic.net) und auf 'Support’ zu klicken. Dort werden sie die "Frequently Asked Questions" Datenbank finden. Falls sie andere Fragen zu ihrem Produkt haben und sie diese nicht auf unserer Website finden können, kontaktieren sie uns bitte per E-Mail: support@conceptronic.net...
- Página 57 • Decken Sie das Gerät nicht ab, um eine Überhitzung zu vermeiden. • Der CSM3PL unterstützt nur das FAT- / FAT32-Dateisystem (NTFS wird nicht unterstützt). ACHTUNG: Wenn Sie die Festplatte mit NTFS formatieren, kann sie nur als Wechselfestplatte für Ihren Computer verwendet werden.
- Página 58 DEUTSCH 2. Functionalities of the Grab’n’GO 3,5” Media Player with Cardreader 2.1 Funktionen des Grab ‘n’ GO 3,5” Media Players mit Kartenleser Vorderseite • 1. Fernbedienungsempfänger 4. Festplatten-LED 7. SM-Kartensteckplatz 2. Power LED 5. MMC-/MS-/SD-Kartensteckplatz 8. USB HOST-Buchse 3. Steuerungstasten 6.
-
Página 59: Anschluss An Den Computer
Der Computer entdeckt und konfiguriert das Gerät automatisch. Er ordnet ihm als Massenspeichergerät einen neuen Laufwerkbuchstaben zu. (Ihr Laufwerk ist mit Dateisystem FAT32 vorformatiert.) Sie können jetzt Filme, Musik, Fotos usw. auf den CSM3PL laden. Trennen des CSM3PL von Ihrem Computer Klicken Sie auf das Symbol “Sicher entfernen” im System-Tray. -
Página 60: Anschluss An Den Fernseher
Ausgänge des CSM3PL verwenden. Sehen Sie bitte im Handbuch Ihres Fernsehers nach, welches der korrekte Eingangskanal für die Videoausgabe des CSM3PL ist. Wenn Sie den CSM3PL im VGA- Modus verwendet haben, betätigen Sie bitte die VGA-Taste auf der Fernbedienung, um die VIDEO-Ausgabe wieder auf den Fernseher umzuschalten. -
Página 61: Beschreibung Der Fernbedienung
DEUTSCH 5. Fernbedienung 4.1 Beschreibung der Fernbedienung... - Página 62 DEUTSCH Beschreibung Beschreibung POWER VIDEO Standby-Modus ein- oder ausschalten. Schaltfläche für Direktzugriff auf Videos (EIN/AUS) P / N FOTO Videosystem auswählen (PAL / NTSC) Schaltfläche für Direktzugriff auf Fotos AUSGANG WEITER Video-Ausgangssignal auswählen. Zur nächsten Datei / zum nächsten Kapitel wechseln oder Bildlauf nach unten SLIDE Musik-Slide-Show-Modus oder Einzelschritt-...
-
Página 63: Wichtige Hinweise
2. Betätigen Sie den Power-Schalter auf der Rückseite des Geräts, um das Gerät einzuschalten. Daraufhin leuchtet die Power-LED-Anzeige blau. Das Gerät ist jetzt betriebsbereit. Wenn kein anderes Gerät am CSM3PL angeschlossen ist, wird die FILE LIBRARY [DATEIBIBLIOTHEK] mit dem Inhalt Ihrer Festplatte angezeigt (wenn nur eine Partition vorhanden ist). -
Página 64: Erweiterter Betrieb
DEVICELIST [GERATELISTE] FILE LIBRARY [DATEIBIBLIOTHEK] Auswahl des angeschlossenen Geräts: Wenn mehrere Geräte an den CSM3PL angeschlossen sind, können Sie durch Drücken der Taste MENU die DEVICE LIST [GERÄTELISTE] aufrufen und durch Drücken der Tasten / und ENTER ein Gerät auswählen. - Página 65 Wenn Sie mehr als einen Ordner erstellen, der mit „VIDEO ***” beginnt, öffnet das Gerät nur den ersten Ordner. HINWEIS: Der CSM3PL unterstützt die meisten Video-Codecs (wie XviD, AVI, MPEG2 usw.). Es ist jedoch möglich, dass Sie Dateien haben, die einen Codec erfordern, der auf dem CSM3PL nicht vorhanden ist.
- Página 66 DEUTSCH DVD-Wiedergabe Der CSM3PL gibt DVDs von einer Festplatte wie normale DVDs wieder. Sie können durch das DVD- Menü navigieren, Untertitel wählen, die Audiosprache ändern usw. Ordner erstellen Um DVDs von Ihrer Festplatte wiedergeben zu können, müssen Sie die DVD-Ordner auf dem CSM3PL korrekt erstellen.
- Página 67 Ordner. Einrichten des Ordners “MUSICDIR” für den Schnellzugriff Um Ihren CSM3PL zum automatischen Abspielen von Musik vorzubereiten, müssen Sie einen speziellen Ordner anlegen, nachdem Sie Ihren CSM3PL an den Computer angeschlossen haben. Legen Sie den Ordner ”MUSICDIR” im Stammverzeichnis der ersten Partition an.
- Página 68 DEUTSCH Um den voreingestellten Musikordner mit einem angeschlossenen Bildschirm zu verwenden, führen Sie bitte folgende Schritte aus, wenn das Gerät in Betrieb ist: Drücken Sie die erste Ziffer des Ordners und warten Sie, bis folgende Nachricht auf Ihrem Bildschirm angezeigt wird: “AUTO PLAY: MP3 -> ___” Drücken Sie die anderen beiden Ziffern des Unterordners, den Sie abspielen möchten.
- Página 69 DEUTSCH Musik-Diashow (Anzeige von Fotos mit Hintergrundmusik) Wählen Sie ein Foto aus und drücken Sie die Taste SLIDE. Wenn Sie die Taste SLIDE nicht drücken, wird die Musik nicht abgespielt und die Bilder als normale Diashow ohne Musik wiedergegeben. Wenn in dem betreffenden Ordner keine Musikdateien vorhanden sind, kann die Funktion SLIDE nicht verwendet werden.
- Página 70 DEUTSCH 6.4 Operationen in der File Library Wählen Sie über die Tasten / eine Datei oder einen Ordner. Über die Tasten (VOR/ZURÜCK) können Sie vor-/zurückblättern. Sobald ein Foto oder ein Video ausgewählt wurde, erscheint eine Voranzeige davon auf der rechten Seite des Fernsehbildschirms. Wenn eine Musikdatei ausgewählt wurde, wird die Musikwiedergabe gestartet und die entsprechenden Informationen werden auf der rechten Seite des Bildschirms angezeigt.
-
Página 71: Screen Saver
DEUTSCH 7. Einstellungsmenü Drücken Sie im STOP-Status die Taste SETUP, um das SETUP MENU aufzurufen. Bewegen Sie mithilfe der Tasten / / / den Cursor und drücken Sie auf die Taste / ENTER, um die Auswahl zu bestätigen. Drücken Sie danach die Taste SETUP. - Página 72 DEUTSCH 7.3 Präferenzen (Preferences) • VIDEOAUSGABE: EINSTELLEN DER VIDEOAUSGABE. Optionen: S-VIDEO, COMPONENT, P-SCAN YPBPR, VGA und INTERLACE RGB. • OSD LANG [ON-SCREEN-DISPLAY SPRACHE]: AUSWAHL DER OSD-SPRACHE. Optionen: ENGLISH, FRANZÖSISCH, DEUTSCH, ITALIENISCH, PORTUGIESISCH, SPANISCH, NIEDERLÄNDISCH Grundeinstellung: ENGLISCH • OSD MESSAGE [OSD-MITTEILUNGEN]: OSD-MITTEILUNG während der Wiedergabe einer Datei auswählen.
- Página 73 Stromversorgung an. Es erscheint keine Anzeige auf dem Display. • Der CSM3PL befindet sich im Standby-Modus. Drücken Sie Taste xx auf der Fernbedienung, um den Standby-Modus zu deaktivieren. • Auf dem Fernseher wurde die falsche Eingangsquelle ausgewählt. Ändern Sie die Eingangsquelle.
- Página 74 My TV zeigt ein Schwarz/Weiß- statt ein Farbbild. • Ihr Fernseher unterstützt das „Multi” TV System des CSM3PL nicht. Ändern Sie das TV-System im Setup- Menü auf PAL. (vgl. Kapitel 7.1). Nachdem Sie das TV-System geändert haben, schalten Sie den CSM3PL aus und wieder ein.
- Página 75 En cas de problèmes, nous vous recommandons de vous adresser à notre service technique (allez à www.conceptronic.net et cliquez sur « support »). Vous trouverez dans cette section la Base de Données des Foires Aux Questions. Si vous avez d’autres questions concernant votre produit et que vous ne trouvez pas la solution sur notre site web, contactez-nous par e-mail : support@conceptronic.net.
-
Página 76: Précautions D'usage
• Pour éviter toute surchauffe, ne couvrez pas l’appareil. • Le CSM3PL n’est compatible qu’avec le système de fichiers FAT / FAT32 (non compatible avec NTFS). ATTENTION: Lorsque vous formatez votre disque dur sur NTFS, il ne fonctionne que comme Disque dur amovible pour votre ordinateur. -
Página 77: Vue Arrière
FRANÇAIS 2. Fonctions du Lecteur multimédia Conceptronic Grab’n’GO 3,5" avec Lecteur de carte 2.1 Identification des composants du CSM3PL Partie avant • 1. Récepteur de Télécommande 4. LED Disque dur 7. Encoche de Carte SM 2. Led d'Alimentation 5. Encoche de Carte MMC/MS/SD 8. - Página 78 à un nouveau lecteur, puis l’utilise comme système de stockage de données. (Votre lecteur est formaté avec le système de fichier FAT 32). Vous pouvez dès à présent enregistrer des films, de la musique, des photos, etc. sur le CSM3PL. Débrancher le CSM3PL de votre ordinateur Cliquez une fois sur l'icône "Retrait en Toute Sécurité"...
- Página 79 SCART ou Composant du CSM3PL. Merci de consulter le manuel de votre téléviseur pour déterminer le bon canal d’entrée permettant d’afficher la sortie vidéo du CSM3PL. Si vous avez utilisé auparavant le CSM3PL avec un moniteur VGA, appuyez sur la touche VGA de votre télécommande pour repasser à...
-
Página 80: Télécommande
FRANÇAIS 4. Télécommande 4.1 Explication des fonctions de la télécommande... - Página 81 FRANÇAIS Nº Description Nº Description POWER VIDEO Entrer ou sortir du mode Standby. (ON/OFF) Bouton d'accès direct aux vidéos. PHOTO Sélectionne le système vidéo. (PAL / NTSC) Bouton d'accès direct aux photos. OUTPUT NEXT Sélectionne le Signal de Sortie Vidéo. Passe au fichier suivant / chapitre ou page précédente.
-
Página 82: Considérations Importantes
Lorsqu'un Dispositif USB (Comme un Disque dur ou un lecteur de mémoire flash USB) ou une Carte de Mémoire est branché sur le CSM3PL, l'écran présente la LISTE du DISPOSITIF avec tous les dispositifs trouvés. Si le dispositif connecté contient une grande quantité de fichiers, le système peut mettre quelques secondes à... - Página 83 5.2 Fonctionnement plus détaillé FILE LIBRARY (répertoires des fichiers) Si aucun dispositif externe n'est branché sur le CSM3PL (seul le disque dur interne est présent), la BIBLIOTHÈQUE DE FICHIERS s’affiche à l’écran de TV lorsque vous appuyez sur le bouton POWER pour entrer en mode de fonctionnement (illustré...
- Página 84 FRANÇAIS Le CSM3PL de Conceptronic est compatible avec les fichiers de sous-titres .SMI, .SRT, .SUB et .SSA. Si le fichier de sous-titre a le même nom que le fichier de vidéo sélectionné (seule l’extension change), le fichier de sous-titre sera automatiquement chargé lorsque le fichier MPEG4 sera reproduit.
- Página 85 FRANÇAIS Lecture de DVD Le CSM3PL lit les DVD à partir du disque dur comme s'il s'agissait d'un DVD normal. Vous pouvez naviguer dans le Menu DVD, choisir les sous-titres, modifier les langues, etc. Configuration des Répertoires Pour lire les DVD de votre Disque dur, vous devez organiser correctement les répertoires DVD sur le CSM3PL.
- Página 86 6.2 Fonctions du mode Play & listen to the music (écouter de la musique) Écouter de la musique Le CSM3PL de Conceptronic dispose de plusieurs modes vous permettant d’écouter de la musique (les formats WAV, MP3 et WMA sont compatibles).
- Página 87 FRANÇAIS Remarque: Plus la quantité de données enregistrées sur votre disque dur est grande, plus le laps de temps entre l'introduction du premier chiffre et l'affichage du message à l'écran sera long. 6.3 Fonctions du mode Play & watch photos (voir des photographies) Pendant la visualisation de photographies, vous pouvez utiliser la touche ROTATE pour en modifier l’orientation.
- Página 88 FRANÇAIS Touche d’accès direct à votre répertoire de photographies Vous pouvez créer 1 répertoire de photographies auquel vous pouvez accéder directement en appuyant sur la touche PHOTO de la télécommande. Créez un répertoire appelé « PHOTO *** » (*** peut être modifié autant de fois que vous le voudrez) dans la racine du disque dur et copiez- y vos fichiers de photographies.
-
Página 89: Menu De Configuration (Set Up)
FRANÇAIS 7. Menu de configuration (SET UP) En mode STOP, appuyez sur la touche SETUP pour entrer dans le menu SETUP. Appuyez sur la touche / / / pour déplacer le curseur, puis appuyez sur la touche / ENTER pour confirmer votre sélection ;... - Página 90 FRANÇAIS 7.3 Préférences (Preferences) • SORTIE VIDÉO : configure la sortie vidéo. Options : S-VIDÉO, COMPONENT,P-SCAN YPBPR, VGA et INTERLACE RGB. • OSD LANG: sélection des langages OSD. Options : ANGLAIS, FRANÇAIS, ALLEMAND, ITALIEN, PORTUGAIS, ESPAGNOL, NÉERLANDAIS Valeur par défaut : ANGLAIS •...
-
Página 91: Conseils & Résolution De Possibles Dysfonctionnements
• La fonction de sourdine Mute est activée. Appuyez sur la touche MUTE de la télécommande pour la désactiver. • Le CSM3PL fonctionne en mode FF/FR. Appuyez sur la touche PLAY/PAUSE de la télécommande pour revenir en mode normal de lecture. - Página 92 Mon écran de TV affiche une image en noir et blanc et pas en couleurs. • Votre TV ne supporte pas le Système TV "Multi" du CSM3PL. Utilisez le menu Setup pour transformer le Système TV en PAL. (Voir chapitre 7.1).
-
Página 93: Contenuto Della Confezione
Se doveste avere altre domande riguardanti il prodotto che non trovate sul nostro sito Web vi preghiamo di contattarci attraverso l’e-mail: support@conceptronic.net Per ulteriori informazioni dei prodotti Conceptronic, la preghiamo di visitare il sito Web della Conceptronic: www.conceptronic.net. 1. Introduzione Prima di utilizzare il prodotto, si consiglia di leggere attentamente il presente manuale e di conservarlo per una successiva consultazione. - Página 94 • NON far cadere, urtare o colpire MAI il dispositivo. • Per evitarne il surriscaldamento, non coprire mai il dispositivo. • Il CSM3PL supporta esclusivamente il file system FAT / FAT32 (NTFS non è supportato). AVVERTENZA: Quando il formato dato al disco rigido è NTFS, il dispositivo funzionerà...
-
Página 95: Pulsanti Di Controllo
ITALIANO 2. Funzionalità del Media Player Grab’n’GO 3,5” con lettore di schede 2.1 Descrizione della parti del CSM3PL Parte frontale • 1. Ricevitore telecomando 4. LED HDD 7. Ingresso schede SM 2. LED di accensione 5. Ingresso schede MMC/MS/SD Card 8. Presa jack USB HOST 3. -
Página 96: Collegamento Su Computer
3. Come collegare il Media player Grab’n’GO 3,5” con lettore di schede. 3.1 Collegamento su computer Accendere computer. Collegare il cavo di alimentazione al CSM3PL e alla presa di corrente. Collegare il cavo USB al CSM3PL e al computer. Il computer rileverà e configurerà automaticamente il dispositivo, gli assegnerà una nuova lettera di unità, dopo di che lo utilizzerà... -
Página 97: Connessione Alla Tv
SCART o Component del CSM3PL.. Consultare il manuale della TV per selezionare il canale d’ingresso corretto per mostrare l’uscita video del CSM3PL. Se il CSM3PL è stato utilizzato in modalità VGA, premere il pulsante del telecomando della VGA per impostare di nuovo l’uscita VIDEO sull’impianto televisivo. -
Página 98: Descrizione Del Telecomando
ITALIANO 4. Il telecomando 4.1 Descrizione del telecomando... - Página 99 ITALIANO Descrizione Descrizione POWER VIDEO Entra o esce della modalità di standby Pulsante di accesso diretto ai video. (ON/OFF) P / N PHOTO Selezione sistema video. (PAL / NTSC) Pulsante di accesso diretto alle foto. OUTPUT NEXT Selezione segnale uscita video. Va la file / capitolo successivo o pagina giù.
-
Página 100: Operazioni Di Base
La periferica è pronta per essere usata. Nel caso in cui non vi sia nessun altro dispositivo collegato al CSM3PL, verrà mostrata la BIBLIOTECA FILE con il contenuto del disco rigido (se solo è presente la partizione 1). - Página 101 ITALIANO 5.2 Operazioni dettagliate Biblioteca file Nel caso in cui non vi sia nessun dispositivo esterno collegato la CSM3PL (in cui è presente solo l’unità disco rigido), sullo schermo della TV apparirà la BIBLIOTECA FILE, dopo aver premuto il pulsante / POWER per entrare in modalità...
- Página 102 NOTA: Sebbene il CSM3PL sia in grado di supportare la maggior parte dei video Codec (come ad esempio XviD, AVI, MPEG2, ecc.), potrebbero esistere comunque file che hanno bisogno di un Codec non compreso nel CSM3PL.
- Página 103 ITALIANO Riproduzione DVD Il CSM3PL riproduce i DVD contenuti nel disco rigido come se si trattasse di DVD normali. Sarà possibile consultarne il menu, selezionarne i sottotitoli, modificarne la lingua, ecc. Configurazione cartella Per riprodurre i DVD contenuti nel disco rigido, sarà necessario configurare correttamente le cartelle DVD nel CSM3PL.
- Página 104 ITALIANO 6.2 Come riprodurre e ascoltare musica: opzioni Riproduzione della musica Il CSM3PL Conceptronic è dotato di diverse modalità per riprodurre la musica (vengono supportati i sistemi WAV, MP3 e WMA) Come riprodurre file musicali: Premere Menu e selezionare la cartella nella quale sono contenuti i file con la musica desiderata.
- Página 105 ITALIANO messaggio sullo schermo: “AUTO PLAY: MP3 -> ___” Premere gli altri due digiti della sottocartella che si vuole ascoltare. È anche possibile riprodurre la musica dalle cartelle predefinite, nel caso in cui lo schermo sia spento. Si consiglia di usare solo le cartelle 000 - 009 per questa opzione. Per riprodurre musica da queste cartelle, premere il digito della cartella (0 –...
- Página 106 ITALIANO È possibile terminare la visualizzazione delle foto premendo una volta il pulsante PLAY/PAUSE (la musica sarà ancora in funzionamento). Premere di nuovo PLAY/PAUSE e la musica verrà interrotta. Premere il pulsante PLAY/PAUSE per riavviare la riproduzione. È possibile impostare l’intervallo di tempo fra una foto e l’altra premendo il pulsante DELAY. L’intervallo di default viene configurato entrando in SETUP MENU ->...
-
Página 107: Menu Di Configurazione
ITALIANO 7. Menu di configurazione Quando il dispositivo è in STOP, premere il pulsante SETUP per entrare nel Menu di configurazione (SETUP MENU). Premere il pulsante / / / per spostare il cursore, dopo di che premere il tasto / ENTER per confermare la selezione;... - Página 108 ITALIANO 7.3 Preferenze (Preferences) • USCITA VIDEO: serve per configurare l’uscita video Opzioni: S-VIDEO, COMPONENT, P-SCAN YPBPR, VGA and INTERLACE RGB. • OSD LANG: serve per selezionare la lingua del dispositivo. Opzioni: INGLESE, FRANCESE TEDESCO, ITALIANO, PORTOGHESE, SPAGNOLO, OLANDESE. Default: INGLESE •...
- Página 109 • Viene riprodotto un file AVI, pero il file contenente i sottotitoli possiede un nome di file diverso. Vedi capitolo 6.1 su come visualizzare i sottotitoli. • Viene riprodotto un file VOB. Il CSM3PL non possiede nessun tipo di supporto per i sottotitoli di file VOB.
- Página 110 Quali sono le schede di memoria supportate dal CSM3PL? • Il CSM3PL è in grado di leggere la maggior parte di famiglie di schede di memoria, come ad esempio: Memory stick (MS), Secure Digital (SD), Schede Multimedia (MMC), Schede Smart Media (SM), Compact Flash (CF), Microdrive (MD).
-
Página 111: Conteúdo Da Embalagem
O Manual de Instalação Rápida incluído fornece-lhe uma explicação passo a passo sobre como usar o Leitor Multimédia de 3,5” Grab’n’GO com Leitor de Placas da Conceptronic. Se tiver algum problema, aconselhamos consultar o nosso site de assistência (vá a www.conceptronic.net e clique em ‘assistência’... - Página 112 • NUNCA deixe cair, abane ou bata com o aparelho. • Para evitar um sobreaquecimento, não cubra o aparelho. • O CSM3PL suporta apenas o sistema de ficheiros FAT / FAT32 (o sistema NTFS não é suportado). ATENÇÃO: Quando formatar o disco rígido para NTFS, este só funciona como disco rígido amovível para o seu computador.
-
Página 113: Vista Traseira
PORTUGUÊS 2. Funcionalidades do Leitor Multimédia de 3,5” Grab ‘n’ GO com Leitor de Placas 2.1 Identificação dos elementos do CSM3PL Parte frontal • 1. Receptor do comando 4. Luz do HDD 7. Ranhura da Placa SM 2. Luz de alimentação 5. - Página 114 3.1 Ligação ao seu computador Ligue o seu computador. Ligue a fonte de alimentação ao CSM3PL e à tomada de parede. Ligue o Cabo USB ao CSM3PL e ao seu computador. O computador vai detectar e configurar automaticamente o dispositivo, atribui-lhe uma nova letra de unidade e depois usa-o como dispositivo de armazenamento.
- Página 115 Componente do CSM3PL. Consulte o manual da sua televisão para seleccionar o canal de entrada correcto para apresentar a saída de vídeo do CSM3PL. Se tiver usado o CSM3PL no modo VGA, carregue no botão VGA do seu comando para voltar a mudar a saída de VÍDEO novamente para Quando usar um monitor, deve usar um cabo de monitor VGA e ligá-lo ao conector de SAÍDA VGA...
- Página 116 PORTUGUÊS 4. O Comando 4.1 Explicação do Comando...
- Página 117 PORTUGUÊS Nº Descrição Nº Descrição POWER VIDEO Para entrar ou sair do modo Standby. (ON/OFF – Botão de acesso directo aos vídeos. Ligar/Desligar) P / N PHOTO Para seleccionar o sistema de vídeo. (PAL/NTSC) Botão de acesso directo às fotografias. OUTPUT NEXT Para seleccionar o Sinal de Saída de Vídeo.
-
Página 118: Funcionamento Básico
(como um disco rígido ou uma memória Flash USB) ou uma Placa de Memória ligada ao CSM3PL, o ecrã vai mostrar a DEVICE LIST (LISTA DE DISPOSITIVOS) com todos os dispositivos encontrados. Se o dispositivo ligado tiver uma grande quantidade de ficheiros, pode demorar um pouco antes de o dispositivo ser detectado. -
Página 119: Funcionamento Detalhado
5.2 Funcionamento detalhado Biblioteca de Ficheiros Se não houver nenhum dispositivo externo ligado ao CSM3PL (só o HDD interno), a FILE LIBRARY (BIBLIOTECA DE FICHEIROS) vai aparecer no ecrã da televisão quando carregar no botão POWER para entrar em funcionamento (como se ilustra na figura seguinte). - Página 120 NOTA: A maioria dos Codecs de Vídeo é suportada pelo CSM3PL (como XviD, AVI, MPEG2, etc.), mas é possível que você tenha ficheiros que necessitem de um Codec que não está incluído no CSM3PL. Se tentar reproduzir um ficheiro que tenha um Codec não suportado, vai-lhe aparecer a...
- Página 121 Crie uma pasta no disco rígido do CSM3PL com o nome do DVD (i.e. “O meu filme”) Copie a pasta VIDEO_TS do seu DVD para a pasta de DVD criada no disco rígido do CSM3PL. Depois da cópia ter terminado, deve ter o aspecto seguinte: Desligue o CSM3PL do seu computador e ligue-o à...
- Página 122 Configuração da pasta “MUSICDIR” para acesso rápido Para preparar o seu CSM3PL para reproduzir música automaticamente, tem de criar uma pasta especial depois de ter ligado o CSM3PL ao seu computador. Crie a pasta “MUSICDIR” na raiz da primeira partição.
- Página 123 PORTUGUÊS Nota: O tempo entre a introdução do primeiro dígito e a mensagem no seu ecrã vai aumentar quando tiver mais dados no seu disco rígido. 6.3 Opções para reproduzir e ver fotografias Quando estiver a reproduzir fotografias, pode usar o botão ROTATE para rodar as fotografias. Por defeito, a mensagem de rotação das fotografias é...
- Página 124 PORTUGUÊS Botão de acesso directo à sua pasta de fotografias Pode criar uma pasta de fotografias, à qual pode aceder directamente carregando no botão PHOTO do comando. Crie uma pasta chamada “PHOTO ***” (em que *** pode ser substituído por aquilo que quiser) na raiz do disco rígido e coloque nessa pasta os ficheiros de fotografias.
- Página 125 PORTUGUÊS 7. Menu de Configuração (Setup) No modo parado, carregue no botão SETUP para entrar no MENU SETUP. Carregue no botão / / / para mover o cursor, e carregue no botão / ENTER para confirmar a selecção, e depois carregue no botão SETUP quando tiver terminado.
-
Página 126: Especificações
PORTUGUÊS 7.3 Preferências (Preferences) • VIDEO OUTPUT (SAÍDA DE VÍDEO): Configurar a saída de vídeo. Opções: S-VIDEO, COMPONENT,P-SCAN YPBPR, VGA e INTERLACE RGB. • OSD LANG (LÍNGUA OSD): seleccionar as línguas OSD. Opções: ENGLISH (INGLÊS), FRENCH (FRANCÊS), GERMAN (ALEMÃO), ITALIAN (ITALIANO), PORTUGESE (PORTUGUÊS), SPANISH (ESPANHOL), DUTCH (HOLANDÊS) Predefinição: ENGLISH (INGLÊS) - Página 127 Use as sugestões seguintes para resolver problemas quando o seu CSM3PL não estiver a funcionar devidamente: A luz de Alimentação não acende • A fonte de alimentação não está ligada ao CSM3PL. Volte a ligar a fonte de alimentação ao CSM3PL. Não há qualquer actividade no visor. •...
- Página 128 A minha televisão mostra uma imagem a preto e branco em vez de a cores. • A sua televisão não suporta o "Multi" TV-System do CSM3PL. Use o menu Setup para mudar o Sistema de TV para PAL. (Ver capítulo 7.1)
- Página 129 Gyakran Ismételt Kérdések adatbázist. Ha termékünkkel kapcsolatban további kérdése lenne, és weboldalunkon nem talál rá választ, forduljon hozzánk e-mailben: support@conceptronic.net. A Conceptronic termékekkel kapcsolatos további információért kérjük tekintse meg a Conceptronic weboldalát: www.conceptronic.net. 1. Bevezetés Az egység üzemeltetése előtt alaposan olvassa el az ismertetőt, majd őrizze meg, mert a jövőben szüksége lehet rá.
- Página 130 • SOSE ejtse le, rázogassa, illetve üsse neki valaminek az eszközt. • A túlmelegedés megelőzése érdekében, ne takarja le az eszközt. • A CSM3PL kizárólag az FAT/ FAT32 fájlrendszert támogatja (az NTFS nem támogatott). VIGYÁZAT: Amikor a merevlemezt NTFS szerint formázza, az csak a számítógép kivehető...
- Página 131 MAGYAR 2. A kártyaolvasóval kiegészülő Grab’n’GO 3,5-hüvelykes médialejátszó funkciói 2.1 A CSM3PL alkatrészeinek azonosítása Homloklap • 1. A távirányító vevőberendezése 4. HDD LED 7. SM kártyabővítőhely 2.Teljesítménykijelző LED 5. MMC/MS/SD kártyabővítőhely 8. USB HOST dugaszhely 3. Parancsgomb 6. CF kártyabővítőhely Parancsgomb •...
- Página 132 A számítógép az eszközt automatikusan észleli és konfigurálja, az új meghajtó-betűjel(ek)et hozzárendeli, majd végül azt háttértárként használja (a meghajtó előre FAT32 fájlrendszerben van formázva). Ezután a CSM3PL-on filmek, zene, fényképek stb. helyezhetők el. A CSM3PL leválasztása a számítógépről Kattintson egyszer a tálcán lévő „biztonságos eltávolítás” ikonra.
- Página 133 TV használatakor használhatja a CSM3PL-nak S-VIDEÓ, összetett, összetett-SCART vagy összetett kimenetét. Ellenőrizze TV-készülékének kézikönyvében, miként kell a CSM3PL videokimenetének megjelenítéséhez a helyes bemeneti csatornát kijelölnie. Ha a CSM3PL-ot VGA módban használja, a VIDEO kimenetnek újból a TV-re történő átállításához nyomja le a VGA gombot a távirányítón.
- Página 134 MAGYAR 4. Távirányító 4.1 A távirányító bemutatása...
- Página 135 MAGYAR Leírás Leírás POWER VIDEO Be-, illetve kilépés készenléti üzemmódból. Közvetlen elérést biztosító gomb a (BE/KI) videofelvételekhez. P / N PHOTO Videorendszer kijelölése. (PAL / NTSC) Közvetlen elérést biztosító gomb fényképekhez. OUTPUT NEXT A videó kimenőjelének kijelölése. Következő fájlhoz/fejezethez ugrás vagy lapozás lefelé.
-
Página 136: Fontos Megjegyzések
2. Az eszközt az annak hátoldalán lévő főkapcsolóval kapcsolhatja be. A teljesítményjelző LED ezután folyamatosan és kéken világít. Innentől fogva az eszköz üzemképes. Ha nincs más eszköz is a CSM3PL-hoz csatlakoztatva, akkor ez a merevlemez a FÁJLKÖNYVTÁRAT fogja mutatni, annak tartalmával együtt (ha csupán egyetlen partíció van). -
Página 137: Device List
5.2 Részletezett műveletek Fájlkönyvtár Ha a CSM3PL-hoz külső eszköz nem csatlakozik (csak belső merevlemezes meghajtó van), a FÁJLKÖNYVTÁR jelenik meg majd a TV-képernyőn, amikor – a működési állapotba lépés érdekében – lenyomja a /POWER gombot (az erre utaló ábrák következnek). - Página 138 Ha egynél több, „VIDEO***”-val kezdődő mappát állít elő, az eszköz csak az első mappát fogja megnyitni. MEGJEGYZÉS: A legtöbb videokodeket a CSM3PL támogatja (például XviD, AVI, MPEG2, stb.), de lehet, hogy vannak olyan kodeket igénylő fájljai is, amely nem része a CSM3PL-nak. Ha nem támogatott kodekes fájl lejátszásával próbálkozik, a következő üzenet fog megjelenni:...
- Página 139 MAGYAR DVD lejátszása A CSM3PL a DVD-ket a merevlemezről úgy játssza le, mintha azok szokványos DVD-k volnának. A DVD menün navigálhat, kiválaszthatja a feliratozást, megváltoztathatja az audió nyelvét stb. Mappa beállítása Ahhoz, hogy a DVD-k merevlemezről lejátszhatók legyenek, a CSM3PL-on megfelelően kell a DVD- mappákat beállítani.
- Página 140 Ha egynél több, „MUSIC***”-kal kezdődő mappát állít elő, az eszköz csak az első mappát fogja megnyitni. A „MUSICDIR” mappa előkészítése gyors eléréshez A CSM3PL-nek a zene automatikus lejátszásához történő előkészítésére különleges mappát kell előállítania, amikor a CSM3PL-t csatlakoztatta már a számítógéphez. Állítsa elő a „MUSICDIR” mappát az első partíció gyökérkönyvtárában.
- Página 141 MAGYAR Megjegyzés: Az első számjegy beütése és az üzenetnek a képernyőn történő megjelenése között eltelt idő megnő, ha több adat van a merevlemezen. 6.3 Lehetőségek fényképfelvételek lejátszásakor és megtekintésekor Fényképfelvételek lejátszásakor a ROTATE gombot használhatja a fényképfelvételek közötti léptetésre. Alapértelmezettként a fényképfelvételek forgatására vonatkozó üzenet egészen az eszköz kikapcsolásáig vagy addig megőrződik, amíg át nem váltanak készenléti üzemmódra.
- Página 142 MAGYAR A TRANS gomb lenyomásával lehet az átmenetet változtatni. A REPEAT gomb lenyomásával pedig ismételten lejátszhatja a felvételeket. A fényképfelvételeket tartalmazó mappa közvetlen elérését biztosító gomb Létrehozhat egy fényképfelvételeket tartalmazó mappát is, ami aztán a távirányítón a PHOTO gomb lenyomásával közvetlenül is elérhető. Állítson elő egy „PHOTO***” elnevezésű mappát (ahol a *** bármire megváltoztatható) a merevlemez gyökérkönyvtárában, majd helyezze el a fényképfelvételeket ebben a mappában.
- Página 143 MAGYAR 7. Beállítás menü Stop helyzetben a SETUP gomb lenyomásával léphet be a SETUP MENU-be. A / / / gomb benyomásával mozgathatja a kurzort és az / ENTER gomb lenyomásával erősítheti meg a kijelölést, amikor pedig végzett, végül lenyomhatja a SETUP gombot.
-
Página 144: Műszaki Jellemzők
MAGYAR Kedvenc beállítások (Preferences) • VIDEO OUTPUT (VIDEÓ KIMENET): A videokimenet beállítása. Lehetőségek: S-VIDEÓ, KOMPONENS, P-SCAN YPBPR, VGA és INTERLACE RGB. • OSD LANG: az OSD-nyelvek beállítására szolgál. Lehetőségek: ENGLISH, FRENCH, GERMAN, ITALIAN, PORTUGESE, SPANISH, DUTCH (ANGOL, FRANCIA, NÉMET, OLASZ, PORTUGÁL, SPANYOL, HOLLAND) Alapértelmezett: ENGLISH (ANGOL) •... - Página 145 Az audiokábel nem megfelelően csatlakozik. Bizonyosodjon meg arról, hogy a kábel megfelelően csatlakozik a TV-hez vagy az erősítőhöz. • A CSM3PL csatlakozik ugyan erősítőhöz, de az erősítő ki van kapcsolva. Kapcsolja be az erősítőt. • Az MPEG2 vagy VOB fájl audio-adatfolyama érvénytelen. A megfelelő audio-adatfolyamra történő...
- Página 146 Ügyelni kell arra, hogy a megfelelő mappastruktúrát használja. A mappastruktúrát az 6.1 fejezet ismerteti. • A DVD-fájlok nem teljesek vagy sérültek. Ha ilyen helyzet áll elő, a CSM3PL nem indítja el a DVD lejátszását. A DVD bemutatófilmjeinek vetítése alatt a képernyő üres.
-
Página 147: Paket Içeriği
Veritabanını bulacaksınız. Ürününüzle ilgili başka sorularınız varsa ve web sitemizde bulamıyorsanız, bize e-posta ile ulaşın: support@conceptronic.net Conceptronic ürünleri ile ilgili daha fazla bilgi için, lütfen Conceptronic Web Sitesini ziyaret edin: www.conceptronic.net 1. Giriş Üniteyi çalıştırmadan önce lütfen bu kılavuzu baştan sona okuyun ve gelecekte başvuru amacıyla muhafaza edin. - Página 148 • Dosyalar ad/boyut/tarih/türe göre sıralanabilir. 1.3 Uyarılar • Birlikte verilen güç adaptörünü sökmeye çalışmayın. Yüksek voltaj yaralanmalarına neden olabilir. Adaptörün tamir edilmesi gerekirse lütfen bayinizle ya da Conceptronic yardım masası ile temasa geçin. • Cihazı aşırı nemden uzak tutun. • Cihazı sıvı maddelere batırmayın ya da maruz bırakmayın.
- Página 149 TÜRKÇE 2. Grab’n’GO 3,5” Kart okuyuculu Ortam Oynatıcısının Fonksiyonları 2.1 CSM3PL parçalarının tanıtımı Ön Görünüm • 1. Uzaktan Kumanda Alıcısı 4. HDD (Sabit Disk) LED’i 7. SM Kart Yuvası 2. Güç LED’i 5. MMC/MS/SD Kart Yuvası 8. USB ANA Jak 3.
- Página 150 3. Grab’n’GO 3,5” Kart okuyuculu Ortam Oynatıcısının bağlantısı nasıl yapılır 3.1 Bilgisayar Bağlantısı Bilgisayarınızı açın. Güç kaynağını CSM3PL ve elektrik prizine takın. USB Kabloyu CSM3PL ve bilgisayara takın. Bilgisayar otomatik olarak cihazı algılar ve yapılandırır, yeni sürücü harfi atar ve ardından yığın depolama cihazı...
- Página 151 Conceptronic CSM3PL, bir televizyon ya da monitörle kullanılabilir. TV kullanırken CSM3PL’nin S-VIDEO, Kompozit, Kompozit-SCART ya da Bileşen çıkışını kullanabilirsiniz. CSM3PL’nin video çıkışını görüntülerken doğru giriş kanalını seçmek için lütfen TV kılavuzuna başvurun. CSM3PL’yi VGA modunda kullandıysanız lütfen VIDEO çıkışını tekrar TV’ye değiştirmek için uzaktan kumanda üzerindeki OUTPUT düğmesine basın.
-
Página 152: Uzaktan Kumanda
TÜRKÇE Uzaktan Kumanda 4.1 Uzaktan Kumandanın Açıklaması... - Página 153 TÜRKÇE Açıklama Açıklama POWER (GÜÇ) VIDEO Standby (Hazır Bekleme) Moduna gir ya da çık Videolara Doğrudan Erişim düğmesi (AÇMA/KAPAMA) P / N PHOTO (FOTOĞRAF) Video sistemini seç. (PAL / NTSC) Fotoğraflara Doğrudan Erişim düğmesi OUTPUT (ÇIKIŞ) NEXT (İLERİ) Video Çıkış Sinyalini seç. Sonraki dosya / bölüme ya da aşağı...
-
Página 154: Önemli Açıklamalar
CSM3PL’ye başka bir cihaz bağlı değilse, cihaz, Sabit diskinizin içeriği ile (Eğer sadece 1 disk bölümü varsa) DOSYA KÜTÜPHANESİ’ni gösterir. CSM3PL’ye bir USB Cihaz (Sabit disk ya da USB Flaş Bellek gibi) ya da Bellek Kartı bağlandığında bulunan tüm cihazları listeleyen bir CİHAZ LİSTESİ ekrana gelir. Bağlanan cihazda çok sayıda dosya varsa cihazın algılanmasından önce bu işlem biraz vakit alabilir. - Página 155 TÜRKÇE 5.2 Ayrıntılı İşlemler Dosya Kütüphanesi CSM3PL’ye bağlı harici bir cihaz yoksa (sadece dahili Sabit Disk mevcutsa), çalıştırmak için POWER düğmesine bastığınızda TV ekranında DOSYA KÜTÜPHANESİ görülür (aşağıdaki resimle gösterildiği gibi). Çoklu cihazlar bağlı ise (USB Bellek, Bellek kartı), çalıştırmak için / POWER düğmesine...
- Página 156 Desteklenmeyen Codec ile bir dosya çalmaya çalışırsanız “CODEC NOT SUPPORTED (CODEC DESTEKLENMİYOR)” mesajını göreceksiniz. DVD Oynatımı CSM3PL normal bir DVD gibi sabit diskten DVD çalar. DVD menüsü içinde gezinebilir, alt yazı seçebilir, ses dillerini değiştirebilirsiniz vb. Klasör Ayarları Sabit diskten DVD çalmak için CSM3PL’deki DVD klasörlerini doğru olarak ayarlamanız gerekir.
- Página 157 / STOP düğmesini kullanın. 6.2 Müzik çalma ve dinleme seçenekleri Müzik Çalma Conceptronic CSM3PL, müzik çalabileceğiniz çeşitli modlara sahiptir (WAV, MP3 ve WMA desteği vardır) Müzik dosyalarını çalmak için: Menüye basın ve müzik dosyalarının çalınacağı doğru klasörü seçin. Şarkı görüntülenir ve (uzaktan kumandanın TRANS düğmesine basarak) bir ekolayzır ayarı...
- Página 158 “MUSIC ***” ile başlayan 1’den fazla klasör oluşturursanız cihaz sadece ilk klasörü açar. Hızlı erişim için “MUSICDIR” klasörünün ayarlanması Otomatik olarak müzik çalmak amacıyla CSM3PL’inizi hazırlamak için CSM3PL cihazınızı bilgisayara bağladığınızda özel bir klasör oluşturmanız gerekir. Birinci disk bölümünün kök dizininde “MUSICDIR” klasörü oluşturun.
- Página 159 TÜRKÇE 6.3 Fotoğraf oynatma ve izleme seçenekleri Fotoğraf oynatırken fotoğrafları çevirmek için ROTATE düğmesini kullanabilirsiniz. Varsayılan olarak cihazı kapatıncaya ya da hazırda bekleme moduna geçirinceye kadar fotoğraf çevirme mesajı saklanır. Çevirme mesajını saklamak istemiyorsanız SETUP MENU -> GENERAL SETUP-> ORIENTATION->OFF ile bu özelliği devreden çıkarabilirsiniz. Fotoğraf oynatırken fotoğraflar arasındaki geçişi değiştirmek için TRANS düğmesini kullanabilirsiniz.
- Página 160 TÜRKÇE PLAY/PAUSE (OYNAT/DURAKLAT) düğmesine bir kez basarak fotoğraf görüntülemeyi durdurabilirsiniz (müzik çalmaya devam eder). PLAY/PAUSE (OYNAT/DURAKLAT) düğmesine tekrar bastığınızda müzik duracaktır. Çalma işlemine devam etmek için PLAY/PAUSE (OYNAT/DURAKLAT) düğmesine basın. DELAY düğmesine basarak iki fotoğraf arasındaki görüntüleme süresini ayarlayabilirsiniz. Varsayılan ara süresi SETUP MENU->PREFERENCES->DELAY içinden ayarlanır. Bir geçişi değiştirmek için TRANS düğmesine basın.
- Página 161 TÜRKÇE 7. Setup (Ayar) Menüsü Cihaz çalışmıyorken Ayar Menüsüne giriş için SETUP düğmesine basın. İmleci hareket ettirmek için / / / düğmesine, seçimi onaylamak için / ENTER düğmesine, sonlandığında SETUP düğmesine basın. 7.1 Genel ayarlar • ORIENTATION: Döndürme bilgisini saklar. Seçenekler: ON, OFF (AÇIK, KAPALI) Varsayılan: AÇIK •...
-
Página 162: Teknik Özellikler
TÜRKÇE 7.3 Tercihler • VİDEO OUTPUT: Video çıkışını düzenler. Seçenekler: S-VIDEO, COMPONENT,P-SCAN YPBPR, VGA ve INTERLACE RGB. Varsayılan: S-VIDEO. • OSD LANG: OSD dillerini seçer. Seçenekler: İNGİLİZCE, FRANSIZCA, ALMANCA, İTALYANCA, PORTEKİZCE, İSPANYOLCA, HOLLANDACA Varsayılan: İNGİLİZCE • OSD MESSAGE: Bir dosya oynatma esnasındaki OSD mesajı... - Página 163 üzerindeki AUDIO düğmesine basın. • Mute (Sessiz) fonksiyonu açık. Sessiz fonksiyonunu iptal etmek için uzaktan kumanda üzerindeki MUTE düğmesine basın. • CSM3PL, FF/FR modunda çalışıyor. Normal çalmaya dönmek için uzaktan kumanda üzerindeki PLAY/PAUSE (OYNAT/DURAKLAT) düğmesine basın. Ekran şekli bozuk •...
- Página 164 • Doğru klasör yapısını kullandığınızdan emin olun. Klasör yapısı bölüm 6.1’de açıklanmıştır. • DVD dosyaları bitmemiş, bozuk ya da hasarlı. Bu durum olduğunda CSM3PL, DVD oynatmaz. DVD giriş filmi sırasında ekran kararıyor. • Mevcut bölüm siyah ekranla son buluyor ya da çalınamayacak kadar kısa. Sonraki bölüme geçmek için NEXT’e basın.
-
Página 165: Declaration Of Ce Conformity
Declaration of CE Conformity The manufacturer Conceptronic Address Databankweg 7 3821 AL Amersfoort, the Netherlands Hereby declares that the product Type 3,5” Media Player Plus (Serial ATA) Product CSM3PL Complies with following directives: 89/336/EEC EMC directive: Electromagnetic Compatibility 73/23/EEC Low Voltage Directive:...