Tabla de contenido
Publicidad
Idiomas disponibles
Idiomas disponibles
Enlaces rápidos
CANICOM 300+
Guide d'utilisation ............................................................................................... 3
User's manual .................................................................................................... 13
Manual de instrucciones .................................................................................... 23
Gebrauchsanleitung ........................................................................................... 33
Manuale d'uso ................................................................................................... 43
Guide CANICOM 300+ - indice A - Mars 2020
1/52
Publicidad
Tabla de contenido

Manuales relacionados para Num'axes CANICOM 300+


Resumen de contenidos para Num'axes CANICOM 300+
-
Página 1: Tabla De Contenido
CANICOM 300+ Guide d’utilisation ....................3 User’s manual ....................13 Manual de instrucciones ..................23 Gebrauchsanleitung ................... 33 Manuale d’uso ....................43 Guide CANICOM 300+ - indice A – Mars 2020 1/52... -
Página 2: Declaration Ue De Conformite
DECLARATION UE DE CONFORMITE NUM’AXES déclare que l’ensemble de dressage CANICOM 300+ est conforme à la législation d’harmonisation de l’Union applicable : Directive 2014/53/UE (RED). Pour prendre connaissance de l’intégralité de la déclaration de conformité, rendez-vous à l’adresse internet suivante : www.numaxes.com/fr/content/14-declarations-de-conformite EU DECLARATION OF CONFORMITY NUM’AXES declares that the CANICOM 300+ remote training system is in compliance with... -
Página 3: Composition Du Produit
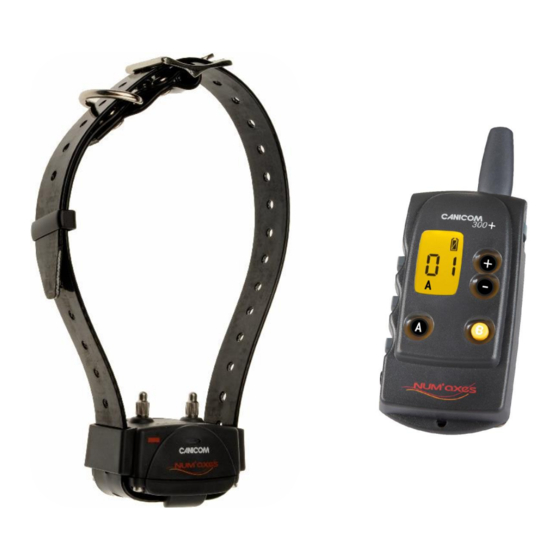
GUIDE D’UTILISATION AVERTISSEMENT Tout porteur d’appareil individuel d’assistance cardiaque (stimulateur cardiaque, pacemaker ou défibrillateur) est invité à prendre les précautions d’usage dans l’utilisation du CANICOM 300+. Cet appareil émet des champs magnétiques statiques (aimant situé dans la télécommande) ainsi que des ondes électromagnétiques hautes fréquences (fréquence = 869,525 MHz, puissance Maxi d’émission = 25 mW). - Página 4 2. Présentation du produit Electrodes Collier récepteur (courtes ou longues) CANICOM Témoin lumineux : Repère rouge : Indicateur Marche/Arrêt Emplacement de l’interrupteur magnétique pour la mise en Indicateur de réception radio Marche/Arrêt du collier et le codage radio collier/télécommande Témoin d’usure de plie Bouton Bouton Marche/Arrêt Télécommande CANICOM 300+...
-
Página 5: Mettre En/Hors Service La Télécommande
3. Première mise en service 3.1. Mise en place de la pile dans le collier CANICOM - Dévissez les 4 vis du couvercle du collier CANICOM à l’aide d’un tournevis. - Insérez la pile 3 V Lithium CR2 en respectant bien la polarité indiquée près du logement de la pile. - Un bip sonore est émis indiquant une mise en place correcte de la pile. -
Página 6: Recoder Un Collier Canicom
3.4. Codage de la télécommande avec le collier récepteur Le codage radio permet de coupler votre télécommande avec le ou les colliers CANICOM afin que ceux-ci répondent aux ordres envoyés par la télécommande. IMPORTANT : avant de débuter le codage, assurez-vous qu’aucune autre personne proche de vous n’utilise son CANICOM 300+ ou tout autre produit de la gamme NUM’AXES : votre collier pourrait enregistrer le code de cette télécommande voisine. - Página 7 4.4. Touche C : stimulations continues L’appui sur la touche C vous permet de mettre en garde votre chien à distance par l’envoi de stimulations délivrées de façon continue par les deux électrodes du collier pendant une durée équivalente à la durée de l’appui sur la touche mais limitée à...
-
Página 8: Changement Des Électrodes
Remplacez la pile usagée en procédant de la façon suivante : ATTENTION Au dos de la télécommande, ôtez la vis et la trappe à pile. Respectez bien Enlevez la pile usagée. les polarités Insérez la pile neuve (3V Lithium CR2) dans son support en respectant la polarité... -
Página 9: Précautions D'emploi
Contrôlez l’état des piles de la télécommande et du collier avant d’utiliser l’appareil et remplacez-les dès que le niveau de charge est faible. Les performances des piles se dégradent sous des températures inférieures à 0°C. Gardez si possible votre télécommande au chaud avant de l’utiliser (par exemple dans une poche intérieure). Ajustement de la sangle La sangle doit être ajustée de façon à... - Página 10 Nous déconseillons le port d’une médaille, d’un collier métallique ou de tout autre collier quand votre chien porte son collier d’éducation et d’aide au dressage CANICOM. Evitez d’approcher la télécommande trop près d’objets sensibles aux champs magnétiques : celle-ci intègre un aimant permanent qui risquerait de les endommager de façon irréversible.
-
Página 11: Caractéristiques Techniques
Pour toutes réparations, le service après-vente NUM’AXES a impérativement besoin : de votre produit complet de la preuve d’achat (facture ou ticket de caisse) Si vous omettez l’un de ces éléments, le service après-vente NUM’AXES vous facturera la réparation. Une somme forfaitaire de 25 € TTC sera facturée en cas de retour SAV non justifié (par exemple pile hors service, pile mise en place dans le mauvais sens, codage télécommande/collier non effectué). - Página 12 Enregistrement de votre produit Vous pouvez enregistrer votre produit sur notre site web www.numaxes.com. Accessoires Vous pouvez vous procurer les accessoires (piles, sangle, …) à tout moment sur le site www.numaxes.com ou auprès de votre distributeur. Collecte et recyclage de votre appareil en fin de vie Le pictogramme apposé...
-
Página 13: Contents Of The Product
USER’S GUIDE WARNING Any person with individual device for cardiac assistance (pacemaker, defibrillator) must take precautions when they use CANICOM 300+. This device emits some static magnetic fields (a magnet is located in the remote control). as well as high frequency electromagnetic waves (Frequency= 869.525 MHz, at = 25 mW). - Página 14 2. Presentation of the product Contact points CANICOM (short or long) receiver collar Indicator light: Red mark: ON/OFF indicator Area where the magnetic switch is located. Radio reception indicator This switch allows you to put ON/OFF the collar and to code the collar with Battery level indicator the remote control.
- Página 15 3. First use from new 3.1. Fitting the battery in the CANICOM receiver collar Unscrew the 4 screws of the top of CANICOM using a screwdriver. Insert the battery (3 Volt Lithium CR 2) paying attention to follow polarity indicated on the battery housing. A beep sound is emitted indicating the correct installation of the battery.
- Página 16 3.4. Coding of the remote control and CANICOM receiver collar Each remote control has its own individual radio operator code. The radio coding of the remote control with the receiver collar(s) enables the units to work together. IMPORTANT: before beginning the coding procedure, make sure no other person is using his CANICOM 300+ or any other products from the NUM’AXES range close by: your receiver collar could accidentally record the code of his remote control.
-
Página 17: Checking/Replacing Battery Of Remote Control
4.4. C button: continuous stimulations Press the C button to send a warning to your dog using continuous stimulations delivered by the two contact points of the collar for as long as the button is pressed (but for 8 seconds maximum). If you press the C button for more than 8 seconds, the collar will automatically go into safety mode for a few seconds before working normally again. -
Página 18: Changing The Contact Points
Replace the old battery with a new one as follows: - On the back of the remote control, unscrew the screw and WARNING remove the battery cover. - Remove the old battery. Make sure the - Insert the new battery (3-V Lithium CR2) paying attention polarity is correct. -
Página 19: Starting Out With The Training Collar
- Check the batteries of the remote control and receiver collar(s) before using the unit and replace them as soon as the level of load is weak. - Battery performances decrease in temperatures lower than 0°C. If possible, keep the remote control warm before using it (e.g. - Página 20 - Remove the battery from the receiver collar and the remote control if you are not using the device for 3 months or more. The coding of the collar with the remote control will be kept for many months even without the batteries.
-
Página 21: Guarantee Conditions
16. Technical specifications Remote control Receiver collar Power supply 1 3-V Lithium CR2 battery 1 3-V Lithium CR2 battery Continuous use: In stand-by: approximately 7 months Battery life approximately 30 000 triggers Continuous use: approximately 2 months Frequency (power) 869.525 MHz (25 mW) 869.525 MHz Range Approximately 300 meters... - Página 22 20. Spare parts You can purchase all the spare parts (batteries, strap, …) on www.numaxes.com or from your supplier at any time. 21. Collection and recycling of your device at the end of its life The pictogram which appears on your product means that this one cannot be thrown with household refuse. You have to bring the device to a collection location suitable for treatment, development, recycling of electric wastes or bring it back to your distributor.
-
Página 23: Composición Del Producto
MANUAL DE INSTRUCCIONES NOTA PREVIA Se recomienda a todo portador de un aparato individual de asistencia cardiovascular (estimulador cardíaco, marcapasos, desfibrilador) tomar precauciones en la utilización del CANICOM 300+. Este aparato emite campos magnéticos estáticos (imán situado en el mando a distancia) así como ondas electromagnéticas de alta frecuencia (frecuencia = 869,525 MHz, potencia de emisión máxima = 25 mW). -
Página 24: Mando A Distancia
2. Presentación del producto Electrodos Collar receptor (cortos o largos) CANICOM Luz indicadora: Indicador rojo: Indicador Encendido/Apagado zona en la cual se sitúa el interruptor magnético para la Indicador de recepción radio puesta En/Fuera de servicio del collar y la codificación radio Indicador de desgaste de la pila collar/mando a distancia Botón... -
Página 25: Colocar La Pila En El Collar Canicom
3. Primera puesta en servicio 3.1. Colocar la pila en el collar CANICOM Desenrosca los 4 tornillos de la tapa del collar CANICOM usando un destornillador. Introduzca la pila 3V de litio CR2 respetando la orientación indicada en el alojamiento de la pila. Se emite una señal sonora que indica la colocación correcta de la pila. -
Página 26: Codificación Del Mando A Distancia Y Del Collar Receptor Canicom
3.4. Codificación del mando a distancia y del collar receptor CANICOM La codificación radio permite acoplar su(s) collar(es) receptor(es) con el mando a distancia. IMPORTANTE: antes de empezar con la codificación, se debe tener en cuenta que ninguna otra persona cercana esté utilizando un CANICOM 300+ o cualquier otro producto de la gama NUM’AXES: su collar receptor podría registrar el código de ese mando a distancia vecino. - Página 27 Si usted presiona el pulsador C durante más de 8 segundos, el collar entra en seguridad. Se para durante algunos segundos y vuelve a funcionar normalmente. 4.5. Tecla B: Booster, estímulos programados para órdenes de urgencia El botón B le permitirá parar el perro a distancia de forma instantánea, con el envío de estímulos de un nivel definido previamente como eficaz para su perro.
-
Página 28: Para Obtener Los Mejores Resultados
- Insertar la pila nueva (3V de Litio CR2) en su alojamiento respetando la orientación indicada cerca del alojamiento de la pila. - Apretar el tornillo sujetador para fijar la tapa del alojamiento de la pila. - Comprobar el buen funcionamiento de su mando. 6. - Página 29 Cuando la temperatura es inferior a 0°C, la pila es menos eficaz que a temperatura ambiente. Guardar el mando al abrigo antes de utilizarlo (en un bolsillo de chaqueta por ejemplo). Ajuste de la correa Debe asegurarse que los electrodos estén en contacto con la piel del perro. - Si la correa está...
-
Página 30: Mantenimiento
Si se prevé no usar el producto durante un período prolongado del orden de 3 meses (fin de temporada de caza por ejemplo), se recomienda retirar la pila del mando a distancia y del collar receptor. La codificación radio collar/mando se conserva durante numerosos meses incluso en ausencia de la pila. Cada 2 años es preciso cambiar la pila también cuando el aparato haya sido poco usado. - Página 31 Estanqueidad Al chorreo Al inmersión Indicador de carga de la pila Indicador sobre pantalla LCD Luz indicadora Niveles de estímulo Temperatura de utilización Entre – 20°C y + 40°C Entre – 20°C y + 40°C Dimensiones 108 mm x 55 mm x 24 mm 68 mm x 43 mm x 38 mm 75 g (sin la correa) Peso (con la pila)
- Página 32 Reciclaje de aparatos electrónicos al final de su vida El pictograma que aparece en su producto, significa que el equipo no puede mezclarse con basuras domésticas. Debe ser entregado en un punto de recogida adecuado para el tratamiento, la valorización y el reciclaje de las basuras electrónicas o bien devolverlo a su distribuidor.
-
Página 33: Gebrauchsanleitung
GEBRAUCHSANLEITUNG VORSICHT Träger von Herzschrittmachern müssen die üblichen Vorsichtsmaßnahmen treffen bei der Bedienung Ihres CANICOM 300+. Dieses Gerät strahlt statische Magnetfelder sowie elektromagnetische Hochfrequenzenwellen ab (ein Magnet befindet sich im Handsender) (Frequenz = 869,525 MHz, maximale Sendeleistung = 25 mW). Dieses Gerät entspricht der europäischen Normen. - Página 34 2. Vorstellung des Gerätes Kontakte CANICOM (kurze oder lange) Empfänger-Halsband Leuchtende Anzeige: Rote Markierung: Des Ein-/Ausschaltens Position des Magnetschalters zum Ein-/Ausschalten des Halsbandes Des Funkempfangs und die Abstimmung des Halsbandes mit Sender Des Batteriestands Taste: Ein-/Ausschaltenstaste CANICOM 300+ Handsender + Beleuchtung des Bildschirms B-Taste: Programmierbare C-Taste: Booster-Taste für Notfälle...
- Página 35 3. Erste Inbetriebnahme 3.1. Legen Sie die Batterie in das CANICOM Empfänger-Halsband ein So gehen Sie vor: Lösen Sie die vier Schrauben des CANICOM-Deckels mittels eines Schraubenziehers. Legen Sie die Batterie (Typ 3V-Lithium CR2) gemäβ der neben dem Batteriefach aufgezeigten Polarität ein. Es ertönt ein (tiefer) Piepton, der auf die richtige Installation der Batterie hinweist.
- Página 36 3.4. Frequenzabstimmung von Handsender und CANICOM Empfänger (Kodierung) Jeder Sender hat seine eigene, einzigartige Funk-Kodierung. Das Halsband muss auf diese Kodierung abgestimmt werden. WICHTIG: Bitte vergewissern Sie sich vor der Frequenzabstimmung, dass sich kein CANICOM 300+ oder kein anderes NUM’AXES Gerät in Ihrer Umgebung in Betrieb befindet. Es könnte ansonsten zu Falschprogrammierungen durch die Kodierung der fremden Komponente kommen.
- Página 37 4.3. F-Taste: Kurz-Impuls (Flash) Durch Drücken der F-Taste wird ein kurzer Stromimpuls aus beiden Kontakten am Halsband abgegeben (weniger als 1 Sekunde). 4.4. C-Taste: Dauer-Impuls (Continuous) Durch Drücken der C-Taste wird ein andauernder Stromimpuls aus beiden Kontakten am Halsband abgegeben. Dieser Impuls wird solange abgegeben, wie Sie die C-Taste drücken –...
-
Página 38: Auswechseln Der Kontakte
Sie können den Batteriezustand kontrollieren, indem Sie Ihren CANICOM 300+ Handsender einschalten. Das Ladezustand-Symbol der Batterie erscheint auf dem LCD-Bildschirm. Die verschiedenen Symbole dieses Zeichens bedeuten wie folgt: Die Batterie ist im guten Zustand. Die Batterieleistung ist schwach: Sorgen Sie für eine Ersatzbatterie. Die Batterie ist leer: Ihr CANICOM 300+ blockiert. - Página 39 Drücken Sie auf die F oder C-Taste, und dann ändern Sie die Stufe der Impulsstärke: die Kontroll-Lampe leuchtet mit mehr oder weniger Leuchtstärke. Ihr Gerät funktioniert einwandfrei. 9. So erzielen Sie die besten Ergebnisse Die Signale zwischen Handsender und Halsband werden über Funkwellen übertragen. Die maximale Reichweite beträgt je nach Gelände bis zu 300 Metern.
- Página 40 Der Unterschied zwischen „Dauer-“ und „Kurzimpuls“ Diese beiden interessanten Funktionen sind von großer Bedeutung und bieten Ihnen die Möglichkeit, situationsgemäß mit Ihrem Hund zu handeln. Der Dauerimpuls Dieser Impuls kann beispielsweise angewandt werden, um ein Kommando, das der Hund bereits kennt, zu unterstützten.
-
Página 41: Technische Merkmale
Es besteht auch die Möglichkeit, das Empfänger-Halsband auf Werkseinstellung zurückzusetzen. Öffnen Sie dazu das Empfänger-Halsband und entnehmen Sie die Batterie. Verursachen Sie mit einem metallischen Gegenstand (z.B. einem Schraubendreher oder einem Scheren) einen Kurzschluss zwischen den beiden Batteriepolen (mindestens 2 Sekunden). Wenn Sie anschließend wieder die Batterie einlegen, sollte der oben beschriebene Batterie-Piepton zu hören sein. - Página 42 Garantiebedingungen 1. Die Garantie kann nur dann gewährt werden, wenn der Kaufbeweis (Rechnung oder Kassenbeleg) dem Händler oder der Firma NUM’AXES vorliegt. 2. Die Garantie erstreckt sich nicht auf folgende Bereiche: Erneuerung der Batterie oder des Gurts. Transportrisiken direkter oder indirekter Art, die durch Rücksendung des Produkts an NUM’AXES entstehen.
-
Página 43: Composizione Del Prodotto
MANUALE D’USO AVVERTIMENTO DESTINATO AI PORTATORI DI APPARECCHI CARDIACI Tutti i portatori di apparecchi cardiaci (stimolatori cardiaci, pacemaker o defibrillatori) sono invitati a prendere le dovute precauzioni per utilizzare CANICOM 300+. Questo apparecchio emette campi magnetici statici (il magnete è situato all’ interno del telecomando) e onde elettromagnetiche ad alta frequenza (frequenza 869,525 Mhz, massima potenza d’emissione 25 mW). -
Página 44: Presentazione Del Prodotto
2. Presentazione del prodotto Elettrodi Collar ricevitore (corti o lunghi) CANICOM Indicatore luminoso: Indicatore rosso: Acceso/Spento posizione interruttore magnetico utilizzato per: Ricezione radio Accensione/Spegnimento del collare Usura della pila Codifica telecomando/collare Pulsante Accensione/Spegnimento Telecomando CANICOM 300+ + luce schermo LCD Pulsante C: Pulsante B: Booster Stimolazione continua... -
Página 45: Accensione E Spegnimento Del Telecomando
3. Primo utilizzo 3.1. Inserimento della pila nel collare CANICOM Con un cacciavite a croce svitare le 4 viti del coperchio collare CANICOM. Inserire la pila al litio da 3V tipo CR2 rispettando la polarità indicata nel vano pila. Un bip sonoro di tonalità grave indicherà che la pila è stata inserita correttamente. Nel caso in cui non udite alcun bip sonoro dopo avere inserito la pila, toglietela immediatamente e verificare la polarità... -
Página 46: Codifica Del Telecomando Con Il Collare Canicom
3.4. Codifica del telecomando con il collare CANICOM Ciascun telecomando ha un propio codice radio. La codifica del telecomando con il collare può essere effettuata sia alla prima attivazione del vostro CANICOM 300+, sia nel caso in cui dobbiate sostituire uno dei due componenti. Con questa operazione il collare potrà... -
Página 47: Luce Display Telecomando
La durata equivale al tempo che viene mantenuto premuto il pulsante, per un massimo di 8 secondi. Se il tasto C rimane premuto per più di 8 secondi il dispositivo di sicurezza disattiva automaticamente la stimolazione bloccando per alcuni secondi il collare, poi riprende a funzionare regolarmente. 4.5. -
Página 48: Sostituzione Elettrodi
Si raccomanda di utilizzare pile dello stesso modello e della stessa marca, come quella che trovate installata nel prodotto. Pile di altre marche possono essere non compatibili e causare malfunzionamenti. Potete procurarvi le pile adeguate al vostro prodotto presso il vostro rivenditore di fiducia o direttamente da NUM’AXES. ATTENZIONE Per sostituire la pila del telecomando, procedete in questo modo: Svitare il coperchio sul retro del telecomando ed estrarre la pila. - Página 49 Posizionamento del collare CANICOM Gli elettrodi del collare devono essere posizionati sotto il collo del cane. La cinghia deve essere stretta in modo da assicurare il contatto degli elettrodi con la pelle del cane. La corretta posizione del collare indossato dal cane, è con la spia luminosa rivolta verso il muso. Se il collare è...
-
Página 50: Caratteristiche Tecniche
Manutenzione Per la pulizia del vostro apparecchio, utilizzate solo un panno morbido e una soluzione detergente neutra, evitando assolutamente l’uso di diluente, olio o benzina. Per preservare l’impermeabilità del collare, raccomandiamo di sostituire la guarnizione ogni anno. In caso di malfunzionamento Prima di affermare che il collare “non funziona”, assicuratevi che il problema riscontrato non sia dovuto ad errori di utilizzo o semplicemente alla batteria scarica. -
Página 51: Registrazione Del Prodotto
Garanzia NUM’AXES garantisce il prodotto contro difetti di fabbricazione per 24 mesi dalla data di acquisto. Le spese di trasporto, andata e ritorno, per l’invio del prodotto a NUM’AXES, sono a carico dell’utilizzatore. Condizioni di garanzia 1. La garanzia è riconosciuta solo se il prodotto inviato in riparazione è corredato di prova di acquisto (fattura o biglietto di cassa), senza alcuna manomissione. - Página 52 Z.A.C. des Aulnaies 745 rue de la Bergeresse – C.S. 30157 45161 OLIVET CEDEX – France France Tél + 33 (0)2 38 63 64 40 / Fax +33 (0)2 38 63 31 00 info@numaxes.com Export Tél + 33 (0)2 38 69 96 27 / Fax +33 (0)2 38 63 31 00 export@numaxes.com www.numaxes.com Guide CANICOM 300+ - indice A –...