Tabla de contenido
Publicidad
Enlaces rápidos
CONTACT US FIRST
CONTACT US FIRST
sauder.com
sauder.com
sauder.com
BEFORE MAKING ANY RETURNS TO THE STORE.
BEFORE MAKING ANY RETURNS TO THE STORE.
sauder.com/service
Visit
Prefer the phone? Give us a ring at
Customer Service is available Monday-Friday - 9 a.m. to 5:30 p.m. EST (except holidays)
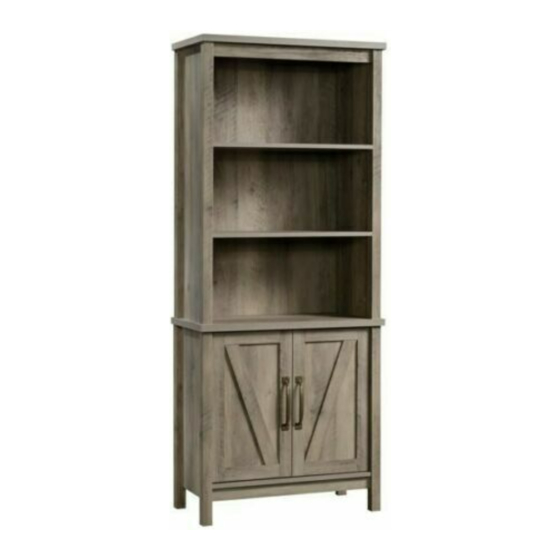
Library
Model 427470
Share your journey!
to order replacement parts, view video assembly tips, or chat with a live rep.
1-800-523-3987
.
Treat yourshelf.
NOTE: THIS INSTRUCTION
BOOKLET CONTAINS IMPORTANT
SAFETY INFORMATION.
PLEASE READ AND KEEP FOR
FUTURE REFERENCE.
English pg 1-24
Français pg 25-28
Español pg 29-32
Lot # 546087
05/27/20
Purchased: __________________
Publicidad
Tabla de contenido

Manuales relacionados para Sauder 427470

Resumen de contenidos para Sauder 427470
- Página 1 Customer Service is available Monday-Friday - 9 a.m. to 5:30 p.m. EST (except holidays) Treat yourshelf. Library NOTE: THIS INSTRUCTION BOOKLET CONTAINS IMPORTANT SAFETY INFORMATION. Model 427470 PLEASE READ AND KEEP FOR FUTURE REFERENCE. English pg 1-24 Français pg 25-28 Español pg 29-32...
- Página 2 Table of Contents Assembly Tools Required Part Identification No. 2 Phillips Screwdriver Tip Shown Actual Size Hardware Identification Assembly Steps 5-24 Hammer Français 25-28 Not actual size Español 29-32 Safety 33-34 Warranty Page 2 427470 www.sauder.com/service...
-
Página 3: Part Identification
BOTTOM (1) LEFT DOOR (1) UPPER LEFT FRONT/RIGHT REAR LEG (2) UPPER ADJUSTABLE SHELF (2) LARGE BACK (1) LOWER RIGHT FRONT/LEFT LOWER ADJUSTABLE SHELF (1) SMALL BACK (1) REAR LEG (2) LOWER LEFT FRONT/RIGHT REAR LEG (2) www.sauder.com/service 427470 Page 3... -
Página 4: Tabla De Contenido
RESTRAINT KIT - 1 BLACK 9/16" LARGE HEAD SCREW - 12 BROWN 7/16" LARGE HEAD SCREW - 4 BLACK 1/2" FLAT HEAD SCREW - 8 15S SILVER 5/8" MACHINE SCREW - 4 BLACK 2-1/4" FLAT HEAD SCREW - 4 Page 4 427470 www.sauder.com/service... -
Página 5: Hidden Cam
Push a HIDDEN CAM into Insert the CAM SCREW into the HIDDEN CAM. the part. The arrow in the Tighten the HIDDEN CAM. HIDDEN CAM must point toward the hole in the edge of the board. Hole www.sauder.com/service 427470 Page 5... - Página 6 Step 1 Look for this icon. It means a video assembly tip is available at www.sauder.com/service/tips Find the numbered video or scan the QR code. å Assemble your unit on a carpeted floor or on the empty carton to avoid scratching your unit or the floor.
- Página 7 UPPER LEGS (C and D). Short edge with HIDDEN CAMS S u r f a c H I D D E N i t h End with hole These surfaces should be even. End with hole www.sauder.com/service 427470 Page 7...
- Página 8 These holes must be here. S u r f a c H I D D E N i t h S u r f a c H I D D E N i t h o Page 8 427470 www.sauder.com/service...
- Página 9 Insert two DOOR STOPS (4I) into the holes in the LOWER TOP (J). o l e r e h i t h f a c S u r These edges must be even. BLACK 2-1/4" FLAT HEAD SCREW (4 used in this step) www.sauder.com/service 427470 Page 9...
- Página 10 Push sixteen HIDDEN CAMS (1F) into the LOWER ENDS (B). å Turn twelve CAM SCREWS (8F) into the LOWER LEGS (E and F). å Insert four WOOD DOWELS (15F) into the LEGS (E and F). Arrow Arrow (16 used) (12 used) Arrow Page 10 427470 www.sauder.com/service...
- Página 11 LOWER LEGS (E and F). S u r f a c Short edge with H I D D E N i t h HIDDEN CAMS The LEGS will These surfaces overhang this edge. should be even. www.sauder.com/service 427470 Page 11...
- Página 12 HIDDEN CAM in one of the LOWER ENDS (B). å Fasten the LOWER END (B) to the LOWER TOP (J). Tighten two HIDDEN CAMS. Metal end S u r f a c H I D D E N i t h Page 12 427470 www.sauder.com/service...
- Página 13 Fasten the BOTTOM (K) to the LOWER END (B). Tighten two HIDDEN CAMS. Metal end Arrow Metal end These holes must be here. D E N H I D i t h f a c S u r www.sauder.com/service 427470 Page 13...
- Página 14 Fasten the LOWER END (B) to the LOWER TOP (J) and like something! BOTTOM (K). Tighten four HIDDEN CAMS. Metal end S u r f a c H I D D E N i t h o Page 14 427470 www.sauder.com/service...
- Página 15 Step 10 å Fasten six ANGLE BRACKETS (27G) to the UPPER TOP (H) and BOTTOM (K). Use six BLACK 9/16" LARGE HEAD SCREWS (1S). BLACK 9/16" LARGE HEAD SCREW (6 used in this step) www.sauder.com/service 427470 Page 15...
- Página 16 LARGE HEAD SCREWS (1S). BLACK 9/16" LARGE HEAD SCREW å NOTE: There are no pre-drilled holes in the SKIRT. The (6 used in this step) SCREWS will tighten into the groove. The groove is closer to this edge. Page 16 427470 www.sauder.com/service...
-
Página 17: Nail
Do not stand the unit upright without the (60 used in this step) BACK fastened. The unit may collapse. These holes must line up over the LOWER TOP (J). The perforations should be here. The SMALL BACK will overlap the LARGE BACK. www.sauder.com/service 427470 Page 17... - Página 18 SAFETY STRAP to the UPPER TOP (H). Use the short screw provided. å NOTE: Position the SAFETY STRAP exactly as shown. å Using your hammer, gently tap four TACK GLIDES (22E) into the bottoms of the LOWER LEGS (E and F). Safety strap Page 18 427470 www.sauder.com/service...
-
Página 19: Installation Instructions
5. Continue to turn until the screw starts spinning freely. å NOTE: Before moving your unit to a different location, unscrew the SAFETY DRYWALL ANCHOR from your wall. The nylon sheath will remain behind your wall. Washer Safety drywall anchor Safety strap www.sauder.com/service 427470 Page 19... -
Página 20: Brown 7/16" Large Head Screw
LEFT DOOR (Q). Use four BROWN 7/16" LARGE Unfinished surface HEAD SCREWS (6S) through four WASHERS (9I), through the DOORS, and into the DOOR MOLDINGS. BROWN 7/16" LARGE HEAD SCREW (4 used in this step) Page 20 427470 www.sauder.com/service... - Página 21 Step 16 å Fasten the HINGES (14H) to the DOORS (P and Q). Use eight BLACK 1/2" FLAT HEAD SCREWS (11S). BLACK 1/2" FLAT HEAD SCREW (8 used in this step) www.sauder.com/service 427470 Page 21...
-
Página 22: Silver 5/8" Machine Screw
Fasten a PULL (149K) to the RIGHT DOOR (P). Use two SILVER 5/8" MACHINE SCREWS (15S). å Repeat this step for the LEFT DOOR (Q). å See the next step for DOOR adjustments. 149K SILVER 5/8" MACHINE SCREW (4 used for the PULLS) Page 22 427470 www.sauder.com/service... - Página 23 (vertical adjustment) The DOOR STOP is adjustable. If the front surfaces of the DOORS are not aligned after making any needed adjustments, turn the DOOR STOP left or right until it allows the DOORS to evenly close. www.sauder.com/service 427470 Page 23...
- Página 24 NOTE: Please read the back pages of the instruction booklet for important safety information. å This completes assembly. Clean with a damp cloth. Wipe dry. And to celebrate, why not share your success story at Walmart.com or (12 used) To cover HIDDEN CAMS Page 24 427470 www.sauder.com/service...
-
Página 25: Liste De Pièces
Modèle 427470 Bibliothèque Utilisez les instructions d’ a ssemblage en français avec les NOUS CONTACTER EN PREMIER schémas étape par étape du manuel d’instruction en anglais. AVANT D'EFFECTUER TOUT RETOUR AU MAGASIN. Chaque étape en français correspond à la même étape en Nous faisons de notre mieux pour nous assurer que votre meuble anglais. - Página 26 Répéter cette étape pour l’ a utre EXTRÉMITÉ SUPÉRIEURE (A) et dans chaque EXCENTRIQUE ESCAMOTABLE des les autres PIEDS SUPÉRIEURS (C et D). EXTRÉMITÉS INFÉRIEURES (B). Fixer l'EXTRÉMITÉ INFÉRIEURE (B) au DESSUS INFÉRIEUR (J). Serrer deux EXCENTRIQUES ESCAMOTABLES. Page 26 427470 www.sauder.com/service...
- Página 27 5. Continuer de tourner jusqu’à ce que la vis commence à pivoter librement. REMARQUE : Avant de déplacer l’unité vers un emplacement différent, dévisser le DISPOSITIF DE SÉCURITÉ POUR PLACOPLÂTRE du mur. La gaine en nylon restera derrière le mur. www.sauder.com/service 427470 Page 27...
- Página 28 VIS À MÉTAUX 16 mm ARGENTÉES (15S). sécurité figurant sur les pages arrière du manuel d’instructions. Répéter cette étape pour la PORTE GAUCHE (Q). Ceci complète l'assemblage. Nettoyer avec un tissu humide. Essuyer. Voir l'étape suivante pour réglages des PORTES. Page 28 427470 www.sauder.com/service...
-
Página 29: Lista De Partes
EXTREMO SUPERIOR ..........2 22E TACHUELA DESLIZANTE ........4 su referencia futura. Si EXCÉNTRICO ESCONDIDO ......36 necesita ponerse en EXTREMO INFERIOR ..........2 contacto con Sauder en PASADOR DE EXCÉNTRICO ......12 PATA SUPERIOR DERECHA cuanto a esta unidad, DELANTERA/IZQUIERDA POSTERIOR ..2 BIELA DE EXCÉNTRICO ........24 refiérase al número... - Página 30 PATAS SUPERIORES (C y D). Inserte el extremo de metal de un PASADOR DE EXCÉNTRICO (2F) en cada EXCÉNTRICO ESCONDIDO de los EXTREMOS INFERIORES (B). Fije el EXTREMO INFERIOR (B) al PANEL SUPERIOR INFERIOR (J). Apriete dos EXCÉNTRICOS ESCONDIDOS. Page 30 427470 www.sauder.com/service...
- Página 31 5. Continúe girando hasta que el tornillo comience a rotar libremente. SUPERIOR INFERIOR (J). NOTA: Antes de trasladar la unidad a otra ubicación, desatornille el ANCLAJE DE SEGURIDAD PARA EL DRYWALL de su pared. La cubierta de nailon permanecerá detrás de su pared. www.sauder.com/service 427470 Page 31...
- Página 32 TORNILLOS PLATEADOS PARA METAL de 16 mm (15S). Esto completa el ensamblaje. Limpiar con un trapo húmedo. Repita este paso para la PUERTA IZQUIERDA (Q). Seque con un paño. Consulte el próximo paso para ajustar la PUERTA. Page 32 427470 www.sauder.com/service...
- Página 33 à mortelles. Les téléviseurs peuvent être un téléviseur. cet effet. particulièrement lourds. De plus, le poids et l’emplacement du tube image ont tendance à rendre les téléviseurs instables et enclins à tomber vers l’ a vant. www.sauder.com/service 427470 Page 33...
- Página 34 Además, el peso y la ubicación del tubo de imagen tienden a causar la inestabilidad de televisores y propensa a volcarse hacia adelante. Page 34 427470 www.sauder.com/service...
-
Página 35: Garantía Limitada De 1 Año
à compter de la date d'achat la première fois et qui sont signalés à Sauder dans les limites de couverture de la contre tout défaut de matériaux ou de fabrication des composantes de mobilier Sauder. -
Página 36: If You Need Assistance
24 hours per day, 7 days per week, to order replacement parts, access assembly tips, register your product and view Sauder products. www.sauder.com/service And don’t forget to rate and review your piece at Walmart.com in the product detail page.