
Manuales relacionados para Klarstein BERNADIN


Resumen de contenidos para Klarstein BERNADIN
- Página 1 BERNADIN Elektrischer Einbaubackofen Built-in Electric Oven Horno eléctrico empotrable Four électrique encastrable Forno a incasso elettrico 10035620 www.klarstein.com...
-
Página 3: Tabla De Contenido
Sehr geehrter Kunde, wir gratulieren Ihnen zum Erwerb Ihres Gerätes. Lesen Sie die folgenden Hinweise sorgfältig durch und befolgen Sie diese, um möglichen Schäden vorzubeugen. Für Schäden, die durch Missachtung der Hinweise und unsachgemäßen Gebrauch entstehen, übernehmen wir keine Haftung. Scannen Sie den folgenden QR-Code, um Zugriff auf die aktuellste Bedienungsanleitung und weitere Informationen rund um das Produkt zu erhalten. -
Página 4: Produktdatenblatt
PRODUKTDATENBLATT Angaben nach 66/2014 Symbol Wert Einheit 10035620 Modellkennung Art des Backofens Elektrobackofen Masse des Gerätes 27,4 Anzahl der Garräume Wärmequelle je Garraum (Strom Strom oder Gas) Volumen je Garraum Energieverbrauch (Strom) bei der Erhitzung einer Standardbeladung im Garraum EC Elektrischer eines Elektrobackofens während 0,77 kWh/Zyklus... -
Página 5: Technische Daten
TECHNISCHE DATEN Artikelnummer 10035620 Stromversorgung 220-240 V ~ 50/60 Hz Gesamtleistung (Watt) 2800 W Oberer äußerer Heizring 1000 W Oberer innerer Heizröhre 1200 W Untere Heizröhre 1000 W Hintere Heizröhre 1800 W Garraum-Volumen (Liter) 70 l Hinweis: Im Standby-Betrieb beträgt die Leistung des Geräts 0,5 Watt. SICHERHEITSHINWEISE VORSICHT Verbrennungsgefahr! Dieses Gerät und die zugänglichen Geräteteile... - Página 6 • Achten Sie darauf, dass sich in der Nähe des Backofens oder im Backofen keine aggressiven Chemikalien, leicht entzündliche Dämpfe oder Fremdkörper befinden. Dieses Gerät ist ausschließlich für das Erwärmen und die Zubereitung von Lebensmitteln geeignet. • Sollten im Inneren des Backofens befindliche Lebensmittel Feuer fangen, halten Sie die Ofentür geschlossen, um die Flammen zu ersticken.
- Página 7 • Installieren Sie das Gerät nicht direkt neben Vorhängen oder weichen Möbeln. • Versuchen Sie niemals, dass Gerät an der Ofentür oder an den Griffen anzuheben, da dies zu Schäden am Gerät oder zu Personenschäden führen könnte. • Wenn das Netzkabel beschädigt ist, muss es vom Hersteller, dem Kundendienst oder einer in ähnlicher Weise qualifi zierten Person ersetzt werden, um Gefahren zu vermeiden.
-
Página 8: Installation (Hinweise Für Fachpersonal)
INSTALLATION (HINWEISE FÜR FACHPERSONAL) VORSICHT Verletzungsgefahr! Lassen Sie die Installation immer von geschultem Fachpersonal durchführen, um Stromschläge, Personenschäden und Schäden am Gerät zu vermeiden. Hinweise zum Einbau in die Küchenzeile • Die Öffnung in der Küchenzeile muss für den Backofen passend sein, damit er richtig funktionieren kann. - Página 9 Verkabelung Schließen Sie die Drähte des Netzkabels entsprechend der folgenden Farbkodierung Grün-Gelb Erdungskabel (E) Blau Neutralleiter (N) Braun Stromkabel (L) Hinweis für Großbritannien und Australien: Schließen Sie das Gerät nicht mit einem 13-A-Stecker an und schützen Sie es nicht mit einer 13-A-Sicherung. Das Gerät muss mit einer Sicherung ab 16 A geschützt werden.
- Página 10 Einbau des Backofens Stellen Sie vor der Installation des Backofens sicher, dass der Schrank die folgenden inneren Leermaße aufweist. Um die Luftzirkulation zu gewährleisten, muss der Backofen in Übereinstimmung mit den in der nachfolgenden Abbildung dargestellten Abmessungen und Abständen zum Schrank installiert werden (alle Angaben in mm). Abmessungen des Backofens Abmessungen des Einbauschranks (mit Überstand)
- Página 11 Einbau mit Überstand (Obenansicht) A: Schranktür Hinweis: Der Backofen kann in jeden hitzebeständigen Schrank eingebaut werden. Einbau des Backofens im Schrank • Öffnen Sie die Ofentür, prüfen Sie die Seitenwand des Backofens und markieren Sie die Befestigungslöcher. • Fixieren Sie den Backofen mit den 2 Schrauben im Schrank.
-
Página 12: Inbetriebnahme
INBETRIEBNAHME Vor dem ersten Gebrauch 1. Entfernen Sie das gesamte äußere Verpackungsmaterial. 2. Ziehen Sie die auf dem Gerät befindliche Schutzfolie (außer das Typenschild) ab. Die Schutzfolie kann durch hohe Temperaturen schmelzen und beim Berühren zu Verbrennungen führen. 3. Entfernen Sie vor der ersten Verwendung das gesamte Verpackungs- und Posterungsmaterial aus dem Backofen und vom Zubehör. - Página 13 Hinweise zur Verwendung des Backofens VORSICHT Verbrennungsgefahr! Der Backofen wird während des Betriebs sehr heiß. Verwenden Sie deshalb im Umgang mit dem Gerät immer Ofenhandschuhe, um Verbrennungen zu vermeiden. • Halten Sie die Ofentür immer geschlossen, wenn das Gerät in Betrieb ist. Stellen Sie hierbei sicher, dass die Ofentür nicht durch Fremdkörper blockiert wird, da der Gareffekt sonst negativ beeinfl usst werden kann, wenn die Ofentür nicht richtig geschlossen ist.
-
Página 14: Geräteübersicht
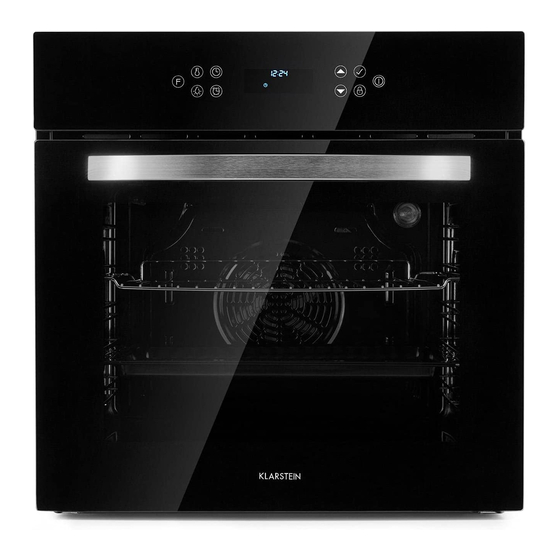
GERÄTEÜBERSICHT Bedienfeld Ofenlampe Abhnehmbare Einschübe Typenschild Ofentür Zubehör Gitterrost: Zum Backen und Grillen. Emaille-Backblech: Wird zum Garen großer Mengen von Lebensmitteln verwendet, wie feuchte Kuchen, Gebäck, Tiefkühlkost. Wird ebenfalls zum Auffangen von Fett, austretender Flüssigkeit und Soße verwendet. Einschübe: Zur leichteren Reinigung des Ofens lassen sich die beiden Einschübe entfernen. - Página 15 Hinweis: Reinigen Sie vor dem ersten Gebrauch alle Zubehörteile. Verwenden Sie ein weiches Tuch und ein neutrales Reinigungsmittel, um den Ofen zu reinigen. Es darf nur Originalzubehör verwendet werden. Wichtiger Hinweis zu den Einschüben • Um zu gewährleisten, dass das Gitterrost und das Backblech sicher verwendet werden können, ist es notwendig, diese richtig herum in die Einschübe zu schieben und dort richtig zu platzieren.
-
Página 16: Bedienfeld
BEDIENFELD EIN/AUS: Backofen Ein/Aus FUNKTION: Funktionsauswahl (5 Sekunden drücken) LICHT: Ofenlampe Ein/Aus BESTÄTIGEN AUF: Wert erhöhen (Betriebs- modus auswählen, Temperatur ALARM: Alarm/Timer-Taste erhöhen oder Zeiteinstellungen vornehmen). ZEIT: Zeiteinstellungen (Uhrzeit/ Hauptanzeigebildschirm Garzeit/Startzeit) AB: Wert verringern (Betriebs- modus auswählen, Temperatur TEMPERATUR: Temperatur- veringern oder Zeiteinstellungen einstellung vornehmen) -
Página 17: Hauptanzeigebildschirm
HAUPTANZEIGEBILDSCHIRM Symbol Erklärung Symbol Erklärung Betriebsmodus Betriebsmodus-Funktion Einstellung Garzeitdauer Uhrzeit Einstellung Garzeitstart Alarm Uhrzeit Digitalanzeige Heizsymbol Temperaturanzeige- Stundensymbol balken Minutensymbol Warmhaltemodus Temperaturanzeige Aufwärmmodus Funktionsmodus Toastmodus... -
Página 18: Funktionen Und Programme
Symbol Erklärung Symbol Erklärung Automatik-Programm- Pizzamodus Modus Ofenlampe Hähnchenschenkel modus Kindersicherung FUNKTIONEN UND PROGRAMME Funktionen (Funktionsmodus) Symbol Betriebs- Funktion Standard- Verwendung modus temperatur Bei Raumtemperatur kann die Luftzirkulation (ohne Auftauen Hitze) schnell gefrorene Lebensmittel auftauen. So können gefrorene Lebensmittel, wie fertiges Gemüse oder mit Butter gefüllte Lebensmittel, schnell und einfach... - Página 19 Symbol Betriebs- Funktion Standard- Verwendung modus temperatur Das untere Heizelement sorgt für konzentrierte Unterhitze 180 °C Hitze ohne Bräunungs- effekt. Dies eignet sich insbesondere zum Aufwärmen von Speisen und für Gerichte die langsam garen müssen, wie beispielsweise Aufläufe, Eintöpfe, Gebäck und Pizza. Das hintere Heißluft- heizelement und das Pizzafunktion...
- Página 20 Symbol Betriebs- Funktion Standard- Verwendung modus temperatur Die Kombination aus Ventilator mit 180 °C Ventilator und zwei Ober- und Heizelementen führt zu Unterhitze einer gleichmäßigeren Wärmeverteilung und kann um 30-40 % Energie sparen. Die Außenseite der Lebensmittel ist leicht gebräunt, während das Innere immer noch feucht ist.
- Página 21 Programme (Automatik-Programm-Modus) Symbol Betriebsmodus Funktion Standard- Standard- temperatur zeit (min) Isolierungsmodus P--1 65 °C Warmhaltemodus P--2 40°C Toastmodus P--3 200 °C Pizzamodus P--4 180 °C Hähnchenschenkelmodus P--5 190°C Brotmodus P--6 190°C Kuchenmodus P--7 200 °C Rindfleischmodus P--8 180 °C...
-
Página 22: Bedienung
BEDIENUNG • Wenn Sie das Gerät einschalten, wird auf dem Bildschirm „12:00“ angezeigt und das Uhrzeitsymbol blinkt 6 Mal auf. Zu diesem Zeitpunkt ist der Backofen nicht in Betrieb. Nach 6 Sekunden hört das Gerät auf zu blinken. Wenn innerhalb von 5 Minuten keine Einstellung vorgenommen wird, schaltet sich das Gerät automatisch aus. - Página 23 Dauer der Garzeit einstellen Stellen Sie die gewünschte Garzeit ein. Wenn die von Ihnen eingestellte Zeit abgelaufen ist, beendet das Gerät automatisch den Betrieb. Es können maximal 6 Stunden eingestellt werden. 1. Wählen Sie den gewünschten Betriebsmodus aus und stellen Sie die Temperatur ein.
- Página 24 4. Sobald die von Ihnen eingestellte Zeit erreicht wurde, ertönt der Alarm und das Gerät schaltet sich automatisch ein. Der Alarm stoppt nach 2 Minuten automatisch (ohne dass Sie die ALARM-Taste drücken). 5. Das Gerät beendet nach dem Ablauf der Garzeit automatisch den Betrieb und der Alarm ertönt.
-
Página 25: Garzeiten Und Einstellungen
GARZEITEN UND EINSTELLUNGEN Gewicht Ebene Funktion Temp. Zeit Zeit Zubehör Menge (1. Seite) (2. Seite) 10-15 Gebäck 500 g 200 °C — Backblech Min. 15-20 Sandwich 200 g 180 °C — Gitterrost Min. 10-18 Biskuitrolle 200 g 180 °C — Backblech Min. 300 g 20-25 Kuchen 185 °C... -
Página 26: Zubereitungstipps
ZUBEREITUNGSTIPPS Allgemeine Empfehlungen • Es wird empfohlen, den Backofen vor der Verwendung vorzuheizen. • Für gewöhnlich ist es nicht möglich, die Garzeit durch Erhöhen der Temperatur zu verringern (die Lebensmittel sind dann häufig an der Außenseite durchgegart und im Inneren noch nicht). •... -
Página 27: Reinigung Und Pflege
• Tauen Sie nur auf einer Einschub-Ebene auf und achten Sie darauf, dass die Lebensmittel sich nicht gegenseitig überlagern. • Beim Auftauen von Fleisch wird empfohlen, das Fleisch auf das Gitterrost in der zweiten Einschub-Ebene zu legen und das Backblech in der ersten Einschub-Ebene zu platzieren, um die austretende Flüssigkeit aufzufangen. - Página 28 Entfernen der Ofentür Das Entfernen der Ofentür ermöglicht Ihnen einen leichteren Zugang zum gesamten Ofeninneren für die Reinigung und Wartung des Backofens. Öffnen Sie die Tür so weit wie möglich und ziehen Sie die Verriegelungen an den beiden Türscharnieren nach hinten. Schließen Sie die Ofentür bis zu einem Winkel von circa 15°.
- Página 29 Nehmen Sie das gesamte Schwenken Sie das Einschubgitter nach innen bis zu Zubehör wie Gitterrost einem Winkel von 90°. Haken Sie das Einschubgitter und Backblech aus dem oben aus und ziehen Sie es vorsichtig heraus. Backofen heraus. Drücken Gehen Sie in umgekehrter Reihenfolge vor, um die Sie den Haken an den Einschubgitter nach der Reinigung des Backofens Einschubgittern am...
-
Página 30: Hinweise Zur Entsorgung
Sensor-Sonde ersetzen Im Backofen kommt eine mechanische Sensorsonde zum Einsatz. Sollte die Sensorsonde Fehlfunktionen bei der Temperaturmessung aufweisen, versuchen Sie nicht, diese selbst zu ersetzen, sondern wenden Sie sich an den Hersteller, den Kundendienst oder qualifiziertes Fachpersonal. HINWEISE ZUR ENTSORGUNG Wenn es in Ihrem Land eine gesetzliche Regelung zur Entsorgung von elektrischen und elektronischen Geräten gibt, weist dieses Symbol auf dem Produkt oder auf der... - Página 31 Dear Customer, Congratulations on purchasing this device. Please read the following instructions carefully and follow them to prevent possible damages. We assume no liability for damage caused by disregard of the instructions and improper use. Scan the QR code to get access to the latest user manual and more product information.
-
Página 32: Product Data Sheet
PRODUCT DATA SHEET Information according to 66/2014 Symbol Value unit Model identification 10035620 Type of oven Domestic electric oven Mass of the appliance 27.4 Number of cavities Heat source per cavity (electricity Electricity or gas) Volume per cavity Energy consumption (electricity) required to heat a standardised load in a cavity of an electric 0.77... -
Página 33: Technical Data
TECHNICAL DATA Item number 10035620 Power supply 220-240 V ~ 50/60 Hz Total output (watts) 2800 W Upper outer ring heat pipe 1000 W Upper inner heating pipe 1200 W Lower heating tube 1000 W Rear heating tube 1800 W Cooking chamber volume (litre) 70 l Note: In standby mode, the power of the appliance is 0.5 watts. - Página 34 • Make sure that there are no harsh chemicals, flammable vapours or foreign bodies near the oven or in the oven. This device is only suitable for heating and food preparation. • If any foodstuffs inside the oven catch fire, keep the oven door closed to choke the flames.
- Página 35 CAUTION Risk of electric shock! Do not attempt to repair a damaged device yourself and stop using it. Turn off the power, unplug the appliance and contact your service representative. • To prevent damage, do not allow the power cord to run over sharp edges and do not bend or fold it.
-
Página 36: Installation (Instructions For Qualified Personnel)
INSTALLATION (INSTRUCTIONS FOR QUALIFIED PERSONNEL) CAUTION Risk of injury! Always have the installation carried out by trained specialist personnel to avoid electric shocks, personal injury and damage to the device. Note on Fitting the Oven into the Kitchen Unit • If the oven is to work properly, the kitchen housing must be suitable. •... - Página 37 Wiring Connect the wires of the mains power cord in accordance with the following colour coding: Green-Yellow Earth wire (E) Blue Neutral wire (N) Brown Live wire (L) Note for Great Britain and Australia: Do not connect the appliance with a 13 A plug and do not protect it with a 13 A fuse.
- Página 38 Installation of the Oven Before installing the equipment, please ensure that the cabinet meets the following internal empty dimensions. To ensure air circulation, the oven must be installed in accordance with the size and distance shown in the figure below (all dimensions in mm). Dimensions of the oven Dimensions of the built-in cabinet (with protrusion)
- Página 39 Installation with protrusion (Top view) A: Cabinet door Note: The oven can be installed in any heat-resistant cabinet. Installation of the oven in the cabinet • Open the oven door, check the side rack of the oven and determine the fixing hole. •...
-
Página 40: Initial Use
INITIAL USE Before First Use 1. Remove all external packaging material. 2. Remove all the protective film on the product (except rating label). The protective film can melt at high temperatures and cause burns when touched. 3. Remove all packing and cushioning materials from the oven and accessories before first use. - Página 41 Notes on Using the Oven CAUTION Risk of burns! The oven becomes very hot during operation. Therefore, always use oven gloves when handling the appliance to avoid burns. • Always keep the oven door closed when the appliance is in operation. Make sure that the oven door is not blocked by foreign objects, otherwise the cooking effect can be negatively affected if the oven door is not closed properly.
-
Página 42: Device Overview
DEVICE OVERVIEW Control panel Oven lamp Removable slide-ins Rating label Oven door Accessories Grate: Used for baking and grilling. Enamelled baking tray: Used for cooking large amounts of food, such as damp cakes, pastries, frozen food. It is also used to trap fat, spills and sauce. Slide-in racks: When cleaning the oven wall, the racks on both sides can be removed. - Página 43 Notes: Before first use, clean all accessories. Use a soft cloth and neutral detergent to clean the oven. Only original accessories can be used. Important Note on the Slide-In Modules • In order to ensure the safe use of the grate or baking tray, it is necessary to insert it in the right direction and place it in the slide-in racks correctly.
-
Página 44: Control Panel
CONTROL PANEL FUNCTION: Function selecting ON/OFF: Oven On/Off button button (press and hold for 5 seconds) LIGHT: Oven lamp On/Off CONFIRM: Confirmation button button UP: Increase button (heating ALARM: Alarm/timer button mode selection, temperature increase or time settings) TIME: Time setting button (clock/ Main display screen cooking time/cooking start time) DOWN: Decrease button... -
Página 45: Main Display Screen
MAIN DISPLAY SCREEN Icon Explanation Icon Explanation Heating mode Heating mode gear Cooking time duration Clock display setting Cooking start time setting Alarm Clock setting digital tube Oven heating Hour Temperature bar display Minute Heat preservation mode Temperature display Warming mode Function heating mode Toast mode... -
Página 46: Functions And Programmes
Icon Explanation Icon Explanation Automatic program Pizza mode heating mode Oven lamp Chicken leg mode Childproof lock FUNCTIONS AND PROGRAMMES Function Heating Mode Icon Type of Heating Default heating mode gear temperature At room temperature, air circulation can Defrost quickly thaw frozen food (without any heat). - Página 47 Icon Type of Heating Default heating mode gear temperature The concealed element at the bottom of the Bottom heat 180 °C oven provides more concentrated heat without browning. Suitable for warming up meals or slow cooking dishes, such as crisp casseroles, stews, pastries and pizza.
- Página 48 Icon Type of Heating Default heating mode gear temperature The combination 180 °C of fan and the two cooking heating elements with bottom on top and bottom and top provides more uniform heating thermal penetration elements performance and can save 30-40 % energy. The dish is browned outside without getting dry inside.
- Página 49 Automatic Program Mode Icon Type of heating Heating Default Default mode gear temperature time (min) Insulation mode P--1 65 °C Warming mode P--2 40°C Toast mode P--3 200 °C Pizza mode P--4 180 °C Chicken leg mode P--5 190°C Bread mode P--6 190°C Cake mode...
-
Página 50: Operation
OPERATION • When the power is turned on, the screen displays “12:00” and the clock icon flashes 6 times. At this time, the oven is not working. After 6 seconds the flashing stops. After 5 minutes without any operation, the oven will turn off automatically. •... - Página 51 Setting the Cooking Time Duration Used for cooking for a selected period of time. When the set time has elapsed, the oven switches off automatically. The cooking time is adjustable to maximum 6 hours. 1. Select the heating mode and temperature you want: 2.
- Página 52 Setting the Timer/Alarm The alarm can be used as a reminder function, for example, to preheat the oven or as an alarm clock for seasoning food during the cooking time. The alarm will sound after the set time has elapsed, but the oven will not stop working. 1.
-
Página 53: Cooking Times And Settings
COOKING TIMES AND SETTINGS Weight Stage Function Temp. Time Time Accessories Quantity (1. side) (2. side) 10-15 Biscuits 500 g 200 °C — Baking tray 15-20 Sandwich 200 g 180 °C — Grating 10-18 Biscuit roll 200 g 180 °C — Baking tray 300 g 20-25 Cakes... -
Página 54: Preparation Tips
PREPARATION TIPS General Suggestions • We suggest to preheat the oven before the food is put into the oven. • Normally, it is impossible to shorten the cooking time by increasing the temperature (food may be well cooked outside, but not yet inside). •... -
Página 55: Cleaning And Maintenance
Tips for Energy saving 1. Keep the oven door closed during cooking. 2. Open the door as rarely as possible during cooking, as heat escapes from the oven each time it is opened. 3. Turn off the oven completely when it is not in use. 4. - Página 56 Removing the oven door Removing the oven door gives you easier access to the entire interior of the oven for cleaning and maintenance of the oven. Open the door to the maximum angle and pull the lock back at the hinge of the door.
- Página 57 Removing the Slide-In Racks Removing the slide-in racks gives you easier access to the entire oven interior for cleaning and maintenance of the oven. Note: Take great care when removing to avoid damaging the enamel. Remove all accessories Swivel the rack inwards up to an angle of 90°. such as the grate and Unhook it at the top and carefully pull it out.
-
Página 58: Disposal Considerations
Replacing the Sensor Probe The probe used in the oven is a mechanical physical probe. Do not replace it without authorization. In case of abnormal temperature sensing of the sensor probe, do not attempt to replace it yourself, but contact the manufacturer, customer service or qualified personnel. - Página 59 Chère cliente, cher client, Toutes nos félicitations pour l’acquisition de ce nouvel appareil. Veuillez lire attentivement et respecter les instructions de ce mode d’emploi afin d’éviter d’éventuels dommages. Le fabricant ne saurait être tenu pour responsable des dommages dus au non-respect des consignes de sécurité et à la mauvaise utilisation de l’appareil.
-
Página 60: Fiche De Données Produit
FICHE DE DONNÉES PRODUIT Informations selon 66/2014 Symbole Valeur Unité Identifiant du modèle 10035620 Type de four Four électrique Masse de l'appareil 27,4 Nombre d'espaces de cuisson Source de chaleur par espace de Électricité cuisson (électricité ou gaz) Volume des espaces de cuisson Consommation d'énergie (électrique) en chauffant une charge standard dans l'espace... -
Página 61: Fiche Technique
FICHE TECHNIQUE Numéro d'article 10035620 Alimentation 220-240 V ~ 50/60 Hz Puissance totale (watts) 2800 W Anneau chauffant extérieur supérieur 1000 W Tube chauffant intérieur supérieur 1200 W Tube chauffant inférieur 1000 W Tube chauffant arrière 1800 W Volume de l'espace de cuisson (Litres) 70 l Remarque : En mode veille, la consommation de l‘appareil est de 0,5 watts. - Página 62 • Assurez-vous qu‘il n‘y a pas de produits chimiques agressifs, de vapeurs hautement inflammables ou de corps étrangers à proximité du four ou dans le four. Cet appareil ne convient que pour chauffer et préparer des aliments. • Si les aliments à l‘intérieur du four prennent feu, gardez la porte du four fermée pour étouffer les flammes.
- Página 63 • Installez l‘appareil de manière à ce que la prise utilisée reste facilement accessible à tout moment. • Avant d‘insérer la fi che de l‘appareil dans la prise, vérifi ez que la tension de la prise correspond à la tension indiquée sur la plaque signalétique de l‘appareil. ATTENTION Risque de choc électrique ! N‘essayez jamais de réparer vous-même un appareil endommagé...
-
Página 64: Installation (Pour Le Personnel Qualifié)
INSTALLATION (POUR LE PERSONNEL QUALIFIÉ) ATTENTION Risque de blessure ! Faites toujours effectuer l‘installation par des spécialistes qualifi és afi n d‘éviter les chocs électriques, les blessures corporelles et les dommages à l‘appareil. Informations pour le montage encastré dans une cuisine intégrée •... - Página 65 Câblage Connectez les fils du cordon d‘alimentation selon le code couleur suivant : Vert-jaune Terre (E) Bleu Neutre (N) Brun Phase (L) Remarque pour la Grande Bretagne et l‘Australie : Ne connectez pas l‘appareil avec une prise 13 A et ne le protégez pas avec un fusible 13 A. L‘appareil doit être protégé...
- Página 66 Encastrement du four Avant d‘installer le four, assurez-vous que le meuble d‘accueil a les dimensions intérieures suivantes. Pour assurer la circulation de l‘air, le four doit être installé conformément aux dimensions et aux distances du meuble de cuisine indiquées dans la figure suivante (toutes les mesures sont en mm).
- Página 67 Installation avec surplomb (vue de haut) A: porte de l‘élément de cuisine Remarque : Le four peut être intégré dans n‘importe quel meuble résistant à la chaleur. Encastrement du four dans sa niche • Ouvrez la porte du four, vérifiez la paroi latérale du four et marquez les trous de montage.
-
Página 68: Mise En Marche
MISE EN MARCHE Avant la première utilisation 1. Retirez tout le matériel d‘emballage extérieur. 2. Retirez le film protecteur de l‘appareil (à l‘exception de la plaque signalétique). Le film protecteur peut fondre en raison des températures élevées et provoquer des brûlures si vous le touchez. - Página 69 Conseils pour l‘utilisation du four ATTENTION Risque de brûlure ! Le four devient très chaud pendant l‘utilisation. Par conséquent, utilisez toujours des gants de cuisine lors de la manipulation de l‘appareil pour éviter les brûlures. • Gardez toujours la porte du four fermée lorsque l‘appareil est en marche. Assurez- vous que la porte du four n‘est pas bloquée par des corps étrangers, sinon la cuisson pourrait en être affectée.
-
Página 70: Aperçu De L'appareil
APERÇU DE L‘APPAREIL Panneau de commande Lampe de four Glissières amovibles Plaque signalétique Porte du four Accessoires Grille de cuisson : pour cuire et faire griller. Plaque de cuisson émaillée : pour cuire de grandes quantités d'aliments tels que des gâteaux humides, des pâtisseries, des aliments surgelés. - Página 71 Remarque : Avant la première utilisation, nettoyez tous les accessoires. Utilisez un chiffon doux et un produit neutre pour nettoyer le four. Seuls les accessoires d‘origine peuvent être utilisés. Remarque importante concernant les glissières • Pour garantir une utilisation sûre de la grille métallique et de la plaque à pâtisserie, il est nécessaire de les insérer dans le bon sens dans les rails de la glissière et de les positionner correctement.
-
Página 72: Panneau De Commande
PANNEAU DE COMMANDE MARCHE/ARRÊT : pour allumer FONCTION : sélecteur de / éteindre le four (appuyez 5 fonction secondes) ÉCLAIRAGE : allume / éteint la CONFIRMER lampe du four HAUT : Augmenter la valeur ALARME : touche d'alarme/ (sélectionner le mode de minuterie fonctionnement, augmenter la température ou régler la durée). -
Página 73: Écran Principal
ÉCRAN PRINCIPAL Symbole Signification Symbole Signification Fonction de mode de Mode de fonctionnement fonctionnement Réglage de la durée de Heure cuisson Réglage de l'heure de Alarme démarrage Affichage numérique de Symbole de chauffage l'heure Barre d'affichage de la Symbole des heures température Symbole des minutes Mode de réchauffage... -
Página 74: Fonctions Et Programmes
Symbole Signification Symbole Signification Mode programme Mode pizza automatique Lampe du four Mode cuisse de poulet Verrouillage parental FONCTIONS ET PROGRAMMES Fonctions (mode fonction) Symbole Mode Fon- Temp. Utilisation fonction- ction standard nement À température ambiante, la circulation d'air (sans Décongélation chaleur) permet de décongeler rapidement... - Página 75 Symbole Mode Fon- Temp. Utilisation fonction- ction standard nement L'élément chauffant inférieur fournit une Chaleur de 180 °C chaleur concentrée sans sole effet de brunissage. Ceci est particulièrement adapté pour réchauffer les aliments et pour les plats qui doivent cuire lentement, tels que les soufflés, les ragoûts, Pâtisseries et pizzas.
- Página 76 Symbole Mode Fon- Temp. Utilisation fonction- ction standard nement La combinaison d'un Ventilateur 180 °C ventilateur et de deux avec chaleur éléments chauffants de voûte et de permet une répartition sole plus uniforme de la chaleur et économise 30 à 40 % d'énergie. L'extérieur des aliments est légèrement doré...
- Página 77 Programmes (mode programme automatique) Symbole Mode Fonction Temp. Durée fonctionnement standard standard (mn) Mode d'isolement P--1 65 °C Mode de maintien au P--2 40°C chaud Mode toast P--3 200 °C Mode pizza P--4 180 °C Mode cuisses de poulet P--5 190°C Mode pain P--6...
-
Página 78: Utilisation
UTILISATION • Lorsque vous allumez l‘appareil, l‘écran affiche 12:00 et le symbole de l‘horloge clignote 6 fois. À ce stade, le four ne fonctionne pas. Après 6 secondes, l‘appareil cesse de clignoter. Si aucun réglage n‘est effectué dans les 5 minutes, l‘appareil s‘éteint automatiquement. - Página 79 Réglage de la durée de cuisson Réglez le temps de cuisson souhaité. Lorsque le délai défini est expiré, l‘appareil s‘arrête automatiquement. La durée maximum réglable est de de 6 heures. 1. Sélectionnez le mode de fonctionnement souhaité et réglez la température. 2.
-
Página 80: Verrouillage Parental
4. Dès que l‘heure réglée est atteinte, l‘alarme retentit et l‘appareil se met en marche automatiquement. L‘alarme s‘arrête automatiquement après 2 minutes (sans appuyer sur la touche ALARME [ 5. Une fois le temps de cuisson écoulé, l‘appareil s‘arrête automatiquement et l‘alarme retentit. -
Página 81: Temps De Cuisson Et Réglages
TEMPS DE CUISSON ET RÉGLAGES Poids Niveau Fonction Temp. Durée Durée Accessoire quantité (1ère (2e face) face) 10-15 Plaque de Pâtisseries 500 g 200 °C — Min. cuisson 15-20 Grille de Sandwich 200 g 180 °C — Min. cuisson 10-18 Plaque de Biscuit roulé... -
Página 82: Conseils De Préparation
CONSEILS DE PRÉPARATION Recommandations générales • Il est recommandé de préchauffer le four avant de l‘utiliser. • En général, il n‘est pas possible de réduire le temps de cuisson en augmentant la température (les aliments seront souvent cuits à l‘extérieur et pas encore à l‘intérieur). -
Página 83: Nettoyage Et Entretien
• Décongelez sur un seul niveau et assurez-vous que les aliments ne se chevauchent pas. • Lors de la décongélation de la viande, nous vous recommandons de la placer sur la grille métallique au deuxième niveau et la plaque à pâtisserie au premier niveau pour récupérer le liquide qui s‘échappe. - Página 84 Démontage de la porte du four Le démontage de la porte du four vous permet d‘accéder plus facilement à tout l‘intérieur pour le nettoyage et l‘entretien du four. Ouvrez la porte autant que possible et tirez les loquets des deux charnières de porte vers l'arrière.
- Página 85 Nehmen Sie das gesamte Schwenken Sie das Einschubgitter nach innen bis zu Zubehör wie Gitterrost einem Winkel von 90°. Haken Sie das Einschubgitter und Backblech aus dem oben aus und ziehen Sie es vorsichtig heraus. Backofen heraus. Drücken Gehen Sie in umgekehrter Reihenfolge vor, um die Sie den Haken an den Einschubgitter nach der Reinigung des Backofens Einschubgittern am...
-
Página 86: Informations Sur Le Recyclage
Remplacement de la sonde du capteur Le four utilise une sonde à capteur mécanique. Si la sonde du capteur fonctionne mal pendant la mesure de la température, n‘essayez pas de la remplacer vous-même, mais contactez le fabricant, le service client ou du personnel qualifié. INFORMATIONS SUR LE RECYCLAGE S‘il existe une réglementation pour l‘élimination ou le recyclage des appareils électriques et électroniques dans... - Página 87 Estimado cliente: Le felicitamos por la adquisición de este producto. Lea atentamente el siguiente manual y siga cuidadosamente las instrucciones de uso con el fin de evitar posibles daños. La empresa no se responsabiliza de los daños ocasionados por un uso indebido del producto o por haber desatendido las indicaciones de seguridad.
-
Página 88: Ficha Técnica Del Producto
FICHA TÉCNICA DEL PRODUCTO Detalles según 66/2104 Símbolo Valor Unidad Modelo 10035620 Tipo de horno Horno eléctrico Masa del aparato 27,4 Número de cámaras de cocción Tipo de calentamiento (gas o Electricidad electricidad) Volumen por cámara Consumo de energía (electricidad) cuando se calienta una carga estándar en la cámara de cocción EC horno... -
Página 89: Datos Técnicos
DATOS TÉCNICOS Número de artículo 10035620 Alimentación eléctrica 220-240 V ~ 50/60 Hz Potencia total (vatios) 2800 W Tubo de calentamiento exterior superior 1000 W Tubo de calentamiento interno superior 1200 W Tubo calefactor inferior 1000 W Tubo de calefacción trasero 1800 W Volumen de la cámara de cocción (litros) 70 l... - Página 90 • Asegúrese de que cerca del horno o en el horno no hay productos químicos agresivos, vapores altamente inflamables o cuerpos extraños. Este dispositivo sólo es adecuado para calentar y preparar alimentos. • Si la comida dentro del horno se incendia, mantenga la puerta del horno cerrada para apagar las llamas.
- Página 91 • Nunca intente levantar el aparato por la puerta del horno o las manijas, ya que esto podría causar daños al dispositivo o lesiones personales. • Si el cable de alimentación está dañado, debe ser reemplazado por el fabricante, o una persona con una cualifi cación similar para evitar los peligros. •...
-
Página 92: Instalación (Notas Para El Personal Técnico)
INSTALACIÓN (NOTAS PARA EL PERSONAL TÉCNICO) ATENCIÓN ¡Peligro de lesiones! Haga que la instalación sea realizada siempre por personal capacitado para evitar descargas eléctricas, lesiones personales y daños al dispositivo. Notas sobre la instalación en la cocina • La abertura de la cocina debe ser adecuada para que el horno funcione correctamente. - Página 93 Cableado Conecte los cables de alimentación de acuerdo con el siguiente código de colores: Verde-amarillo Toma de tierra (E) Azul Neutral (N) Cable de electricidad Marrón Nota para Gran Bretaña y Australia: No conecte el dispositivo a un enchufe de 13 A ni lo proteja con un fusible de 13 A. La unidad debe ser protegida con un fusible de 16 A o más.
- Página 94 Instalación del horno Antes de instalar el horno, asegúrese de que el armario tenga las siguientes dimensiones internas vacías. Para asegurar la circulación del aire, el horno debe instalarse de acuerdo con las dimensiones y distancias del armario que se muestran en la figura siguiente (todas las dimensiones en mm).
- Página 95 Instalación con saliente (vista superior) A: puerta del armario Nota: El horno puede ser instalado en cualquier armario resistente al calor. Instalación del horno en el armario • Abra la puerta del horno, revise la pared lateral del horno y marque los agujeros de montaje.
-
Página 96: Puesta En Marcha
PUESTA EN MARCHA Antes del primer uso 1. Retire todo el material de embalaje externo 2. Quite la lámina protectora del dispositivo (excepto la placa de características). La película protectora puede derretirse debido a las altas temperaturas y puede quemarse. 3. - Página 97 Notas sobre el uso del horno ATENCIÓN ¡Peligro de quemaduras! El horno se calienta mucho durante el funcionamiento. Por lo tanto, use guantes de cocina cuando manipule el aparato para evitar quemaduras. • Mantenga siempre la puerta del horno cerrada cuando el aparato esté en funcionamiento.
-
Página 98: Descripción Del Aparato
DESCRIPCIÓN DEL APARATO Panel de control Lámpara de horno Módulos extraíbles deslizantes Placa de características Puerta horno Accesorios Rejilla: Para hornear y asar. Bandeja de hornear de esmalte: Se utiliza para cocinar grandes cantidades de alimentos, como pasteles húmedos, pasteles, alimentos congelados. También se utiliza para atrapar la grasa, el líquido que se escapa y la salsa. - Página 99 Nota: Limpie todos los accesorios antes de usarlos por primera vez. Use un paño suave y un detergente neutro para limpiar el horno. Sólo se deben utilizar los accesorios originales. Nota importante sobre los módulos deslizantes • Para asegurar que la rejilla y la bandeja de hornear se puedan utilizar con seguridad, es necesario empujarlas en las ranuras en la dirección correcta y colocarlas correctamente.
-
Página 100: Panel De Control
PANEL DE CONTROL FUNCIÓN: Selección de la ON/OFF: Horno On/Off función (presione 5 segundos) LUZ: encender/apagar la luz CONFIRMAR MÁS: Aumentar el valor (seleccionar el modo de ALARMA: tecla de alarma y funcionamiento, aumentar la programador temperatura o hacer ajustes de tiempo) TIEMPO: Ajustes de tiempo Pantalla principal... -
Página 101: Pantalla Principal
PANTALLA PRINCIPAL Símbolo Explicación Símbolo Explicación Modo de funcionamiento Tipo de función Ajuste del tiempo de Hora cocción Ajuste del tipo de cocción Alarma Hora en formato digital Símbolo del calor Señal de temperatura en Horas barra Minutos Mantener caliente Temperatura Calentar Función... -
Página 102: Funciones Y Programas
Símbolo Explicación Símbolo Explicación Programa automático Pizza Lámpara del horno Muslos de pollo Bloqueo de seguridad infantil FUNCIONES Y PROGRAMAS Funciones Símbolo Modo de Función Temp cocción estándar A temperatura ambiente, la circulación Descongelar de aire (sin calor) puede descongelar rápidamente los alimentos congelados. - Página 103 Símbolo Modo de Función Temp cocción estándar El elemento calefactor inferior proporciona Calor inferior 180 °C calor concentrado sin efecto de dorado. Esto es particularmente adecuado para recalentar la comida y para los platos que tienen que cocinarse lentamente, como cazuelas, guisos, pasteles y pizza.
- Página 104 Símbolo Modo de Función Temp cocción estándar La combinación de Aire con calor 180 °C un ventilador y dos superior e elementos calefactores inferior lleva a una distribución de calor más uniforme y puede ahorrar entre un 30 y un 40% de energía.
- Página 105 Programas (modo automático) Símbolo Modo de cocción Función Temperatura Tiempo estándar estándar Modo de aislamiento P--1 65 °C Mantener caliente P--2 40°C Tostar P--3 200 °C Pizza P--4 180 °C Muslos de pollo P--5 190°C P--6 190°C Bizcocho P--7 200 °C Carne de ternera P--8 180 °C...
-
Página 106: Funcionamiento
FUNCIONAMIENTO • Al encender la energía, la pantalla muestra „12:00“ y el símbolo del reloj [ parpadea 6 veces. En este momento el horno no está en funcionamiento. Después de 6 segundos el aparato deja de parpadear. Si no se realiza ningún ajuste en 5 minutos, el aparato se apagará... - Página 107 Establecer la duración del tiempo de cocción Establezca el tiempo de cocción deseado. Cuando el tiempo establecido haya expirado, el aparato dejará de funcionar automáticamente. Se puede establecer un máximo de 6 horas. 1. Seleccione el modo de funcionamiento deseado y ajuste la temperatura. 2.
-
Página 108: Ajustar El Temporizador/Alarma
4. En cuanto se alcance la hora fi jada, sonará la alarma y la unidad se encenderá automáticamente. La alarma se detiene automáticamente después de 2 minutos (sin pulsar la tecla ALARMA [ 5. Cuando el tiempo de cocción ha pasado, el aparato deja de funcionar automáticamente y suena la alarma. -
Página 109: Tiempos Y Ajustes De Cocción
TIEMPOS Y AJUSTES DE COCCIÓN Peso Nivel Función Temp. Tiempo (1 Tiempo Accesorio cantidad lado) (Lado 2) 10-15 Asado 500 g 200 °C — Bandeja Min. 15-20 Sandwich 200 g 180 °C — Rejilla Min. 10-18 Galletas 200 g 180 °C — Bandeja Min. -
Página 110: Consejos De Preparación
CONSEJOS DE PREPARACIÓN Recomendaciones generales • Se recomienda precalentar el horno antes de usarlo. • Normalmente no es posible reducir el tiempo de cocción aumentando la temperatura (los alimentos se cocinan a menudo por fuera y aún no están hechos por dentro). -
Página 111: Limpieza Y Cuidado 1
• Al descongelar carne, se recomienda colocar la carne en la rejilla del segundo estante y colocar la bandeja de hornear en el primer estante para atrapar cualquier líquido que se escape. pour récupérer le liquide qui s‘échappe. Consejos para ahorrar energía 1. - Página 112 Quitar la puerta del horno Quitar la puerta del horno le da un acceso más fácil a todo el interior del horno para su limpieza y el mantenimiento. Abre la puerta lo más lejos posible y tira de los pestillos de ambas bisagras hacia atrás.
- Página 113 Retire todos los Gire la rejilla hacia adentro hasta un ángulo de 90°. accesorios, la rejilla y la Desenganche la parte superior de la rejilla y tire de bandeja de hornear del ella con cuidado.Proceda en orden inverso para horno. Presiona el gancho reemplazar la rejilla después de limpiar el horno.
-
Página 114: Retirada Del Aparato
Reemplazar la sonda del sensor Se utiliza una sonda de sensor mecánica en el horno. Si la sonda del sensor muestra fallos en la medición de la temperatura, no intente cambiarla usted mismo, póngase en contacto con el fabricante, el servicio de atención al cliente o el personal cualificado. INDICACIONES SOBRE LA RETIRADA DEL APARATO Si en su país existe una disposición legal relativa a la... - Página 115 Gentile cliente, La ringraziamo per aver acquistato il dispositivo. La preghiamo di leggere attentamente le seguenti istruzioni per l’uso e di seguirle per evitare possibili danni. Non ci assumiamo alcuna responsabilità per danni scaturiti da una mancata osservazione delle avvertenze di sicurezza e da un uso improprio del dispositivo.
-
Página 116: Scheda Dati Del Prodotto
SCHEDA DATI DEL PRODOTTO Indicazioni secondo 66/2014 Simbolo Valore Unità Contrassegno dispositivo 10035620 Tipo di forno Forno elettrico Dimensioni del dispositivo 27,4 Numero dei vani di cottura Fonte di calore di ogni vano di Elettricità cottura (elettricità o gas) Volume di ogni vano di cottura Consumo energetico (elettricità) durante il riscaldamento di carichi standard nel vano di cottura di... -
Página 117: Dati Tecnici
DATI TECNICI Numero articolo 10035620 Alimentazione 220-240 V ~ 50/60 Hz Potenza totale 2800 W Anello riscaldante superiore esterno 1000 W Tubo riscaldante superiore interno 1200 W Tubo riscaldante inferiore 1000 W Tubo riscaldante posteriore 1800 W Volume vano di cottura 70 l Nota: in standby, la potenza del dispositivo è... - Página 118 • Assicurarsi che non ci siano sostanze chimiche aggressive, vapori facilmente infiammabili o corpi estranei vicino o dentro al forno. Questo dispositivo è adatto solo a riscaldare e preparare alimenti. • Se all’interno del forno dovessero prendere fuoco delle pietanze, tenere lo sportello chiuso per soffocare le fiamme.
- Página 119 • orrisponda al valore indicato sulla targhetta del dispositivo. ATTENZIONE Pericolo di folgorazione! Non cercare assolutamente di riparare autonomamente un dispositivo danneggiato e smettere di utilizzarlo. Spegnere il dispositivo, staccare la spina e contattare il servizio di assistenza ai clienti. •...
-
Página 120: Installazione (Informazioni Per Il Personale Tecnico)
INSTALLAZIONE (INFORMAZIONI PER IL PERSONALE TECNICO) ATTENZIONE Pericolo di lesione! Lasciare eseguire l’installazione sempre da personale tecnico preparato, in modo da evitare folgorazioni, danni a persone e danni al dispositivo. Avvertenze per l’incasso nella cucina • Il vano della cucina deve essere adatto per il forno, in modo da garantirne un corretto funzionamento. - Página 121 Cablaggio Collegare i fili del cavo di alimentazione nel rispetto del seguente codice cromatico: Cavo di messa a terra Giallo-verde Cavo neutrale (N) Marrone Cavo della corrente (L) Nota per la Gran Bretagna e l’Australia: non collegare il dispositivo con una spina 13 A e non proteggerlo con un fusibile 13 A.
- Página 122 Incasso del forno Prima di installare il dispositivo, si prega di assicurarsi che il mobile presenti le seguenti misure di spazio libero. Per garantire la circolazione dell’aria, il forno deve essere installato nel rispetto delle misure e delle distanze indicate nell’immagine seguente (tutte le misure sono in mm).
- Página 123 Incasso con sporgenza (vista dall’alto) A: sportello del forno Nota: il forno può essere incassato in qualunque mobile termoresistente. Incasso del forno nel mobile • Aprire lo sportello, controllare le pareti laterali del forno e segnare i fori di fissaggio. •...
-
Página 124: Messa In Funzione
MESSA IN FUNZIONE Prima di procedere all’utilizzo 1. Rimuovere tutto il materiale d’imballaggio esterno. 2. Staccare la pellicola protettiva dal dispositivo (esclusa la targhetta). La pellicola può sciogliersi ad alte temperature e causare ustioni al contatto. 3. Rimuovere tutto il materiale d’imballaggio dal forno e dagli accessori prima dell’utilizzo. - Página 125 Informazioni sull’uso del forno ATTENZIONE Pericolo di ustione! Il forno diventa estremamente caldo durante l’uso. Usare sempre guanti da forno quando lo si utilizza, in modo da evitare ustioni. • Tenere sempre lo sportello chiuso quando il dispositivo è in funzione. Assicurarsi che lo sportello non sia bloccato da corpi estranei, altrimenti potrebbero esserci effetti negativi sull’effi cacia della cottura se lo sportello non si chiude correttamente.
-
Página 126: Descrizione Del Dispositivo
DESCRIZIONE DEL DISPOSITIVO Pannello di controllo Luce del forno Ripiani rimovibili Targhetta Sportello del forno Accessori Griglia: per cuocere e grigliare. Teglia smaltata: per cucinare grandi quantità di alimenti, come torte umide, biscotti, prodotti surgelati. Serve anche per raccogliere grasso, briciole e salse. Ripiani: rimovibili per facilitare la pulizia del forno. - Página 127 Nota: pulire gli accessori prima dell’utilizzo. Utilizzare un panno morbido e un detergente neutro per pulire il forno. Usare solo accessori originali. Informazioni importanti sui ripiani • Per garantire l’utilizzo sicuro di griglia e teglia, è necessario posizionarle correttamente sui ripiani. Solo in questo modo è possibile assicurare che gli alimenti non scivolino all’indietro quando si tirano fuori griglia o teglia.
-
Página 128: Pannello Di Controllo
PANNELLO DI CONTROLLO FUNZIONE: selezione della ON/OFF: accendere/spegnere funzione il forno (premere per 5 secondi) LUCE: accendere/spegnere la CONFERMARE luce del forno FRECCIA VERSO L’ALTO: aumentare il valore (selezionare ALARM: tasto allarme/timer modalità, alzare la temperatura, impostare il tempo) TEMPO: impostazione del tempo Schermo delle indicazioni (ora/tempo di cottura/tempo principali... -
Página 129: Display Principale
DISPLAY PRINCIPALE Simbolo Spiegazione Simbolo Spiegazione Funzione modalità Modalità operativa operativa Durata di cottura impostata Avvito di cottura Allarme impostato Indicazione ora digitale Simbolo di riscaldamento Barre per indicare la Simbolo delle ore temperatura Modalità di Simbolo dei minuti mantenimento calore Modalità... -
Página 130: Funzioni E Programmi
Simbolo Spiegazione Simbolo Spiegazione Modalità programma Modalità pizza automatico Lampada forno Modalità cosce di pollo Sicura per i bambini FUNZIONI E PROGRAMMI Funzioni (modalità funzione) Simbolo Modalità Funzione Temp. Utilizzo operativa standard A temperatura ambiente (senza calore), la Scongelare circolazione dell’aria può... - Página 131 Simbolo Modalità Funzione Temp. Utilizzo operativa standard L’elemento riscaldante inferiore assicura un Calore dal 180 °C calore concentrato senza basso doratura. Questo è particolarmente adatto a scaldare pietanze e ad alimenti che richiedono una cottura lenta, come sformati, stufati, prodotti da forno e pizza.
- Página 132 Simbolo Modalità Funzione Temp. Utilizzo operativa standard La combinazione di Ventola 180 °C ventola e due elementi con calore riscaldanti porta una dall’alto e dal distribuzione omogenea basso del calore e un risparmio energetico del 30-40 %. Il lato esterno degli alimenti diventa dorato, mentre l’interno resta succulento.
- Página 133 Programmi (modalità programma automatico) Simbolo Modalità operativa Funzione Temperatura Durata standard standard (minuti) Modalità isolamento P--1 65 °C Modalità P--2 40°C mantenimento calore Modalità toast P--3 200 °C Modalità pizza P--4 180 °C Modalità coscia di P--5 190°C pollo Modalità pane P--6 190°C Modalità...
-
Página 134: Utilizzo
UTILIZZO • Quando si accende il dispositivo, lo schermo mostra “12:00” e il simbolo dell’orologio lampeggia 6 volte. A questo punto il forno non è in funzione. Se non si effettuano impostazioni entro 5 minuti, il dispositivo si spegne automaticamente. •... - Página 135 Impostare la durata di cottura Impostare la durata di cottura desiderata. Quando il tempo impostato è scaduto, il dispositivo arresta automaticamente il funzionamento. Possono impostate al massimo 6 ore. 1. Selezionare la modalità operativa desiderata e impostare la temperatura. 2. Se si preme una volta TEMPO , compare il simbolo e sullo schermo lampeggia “h”.
- Página 136 4. Una volta raggiunta l‘ora impostata, l‘allarme suonerà e l‘unità si accenderà automaticamente. L‘allarme si ferma automaticamente dopo 2 minuti (senza che lei abbia premuto il pulsante 5. L‘apparecchio si ferma automaticamente al termine del tempo di cottura e l‘allarme suona.
-
Página 137: Tempi Di Cottura E Impostazioni
TEMPI DI COTTURA E IMPOSTAZIONI Peso/ Livello Funzione Temp. Tempo Tempo Accessorio quantità (1° lato) (2° lato) 10-15 Dolci 500 g 200 °C — Teglia Min. 15-20 Sandwich 200 g 180 °C — Griglia Min. Rotolo di 10-18 200 g 180 °C — Teglia biscotti Min. -
Página 138: Consigli Per La Preparazione
CONSIGLI PER LA PREPARAZIONE Consigli generici • Si consiglia di preriscaldare il forno prima dell’utilizzo. • Normalmente non è possibile ridurre il tempo di cottura alzando la temperatura (gli alimenti sono spesso cotti all’esterno, ma ancora crudi all’interno). • Se si preparano alimenti su più ripiani contemporaneamente, si consiglia di utilizzare la ventola, in modo da favorire una cottura omogenea. -
Página 139: Pulizia E Manutenzione
1. Aprire lo sportello il meno possibile durante la cottura, dato che ogni apertura comporta una dispersione di calore. 2. Spegnere completamente il forno quando non è in uso. 3. Assicurarsi che il vano di cottura sia sempre pulito. PULIZIA E MANUTENZIONE Sportello del forno Il vetro dello sportello deve essere tenuto sempre pulito. - Página 140 Togliere lo sportello La rimozione dello sportello permette un accesso facilitato all’interno del forno per pulizia e manutenzione. Aprire lo sportello al massimo e tirare indietro i blocchi su entrambe le cerniere. Chiudere lo sportello a 15°, sollevarlo e toglierlo. Procedere al contrario per rimontare lo sportello dopo la pulizia.
- Página 141 Rimuovere tutti gli Spingere i ripiani verso l’interno inclinandoli di accessori, come la griglia 90°. Sganciare i ripiani in alto e toglierli facendo e la teglia. Premere verso attenzione. Procedere al contrario per riposizionare i il basso i ganci sulle ripiani dopo la pulizia del forno.
-
Página 142: Smaltimento
Sostituire il sensore a sonda Nel forno è in uso un sensore a sonda meccanico. Se dovesse presentare malfunzionamenti nella misurazione della temperatura, non cercare di sostituirlo autonomamente, ma rivolgersi al produttore, al servizio di assistenza ai clienti o a personale tecnico qualificato.