Tabla de contenido
Publicidad
Idiomas disponibles
Idiomas disponibles
Enlaces rápidos
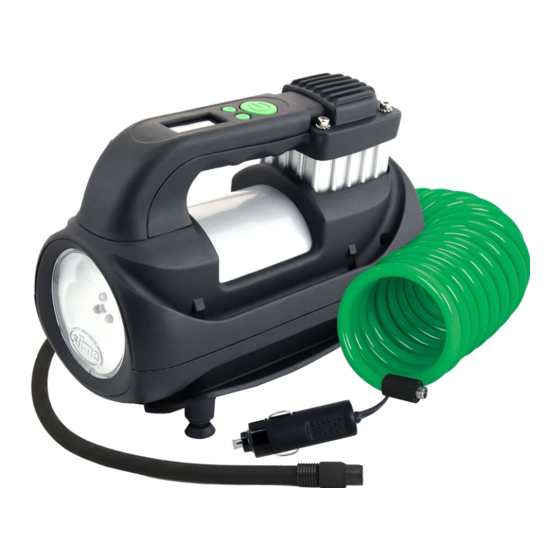
INFLATE RIGHT™ TECHNOLOGY
• Inflator automatically shuts off
when the set pressure level
is achieved
BACKLIT DIGITAL
GAUGE
• 0-99 PSI
LIGHT
• Bright LED
• For night-time
emergencies
POWER SOURCE
• Plugs into 12V power outlet
!
ATTENTION! READ ALL INSTRUCTIONS CAREFULLY
FAILURE TO FOLLOW WARNING INSTRUCTIONS CAN RESULT IN FIRE,
E
E
H H
XPERT
XPERT
CARS • TRUCKS • BIKES • INFLATABLES
ON/OFF SWITCH
CANVAS BAG
PERSONAL INJURY OR PROPERTY DAMAGE.
D D
EAVY
EAVY
UTY
UTY
AIR HOSE
AIR ACCESSORIES
I I
NFLATOR
NFLATOR
INFLATOR
• Powerful direct-drive motor
• Thermal break safety feature
• Air-cooled motor
EXTENSION
COIL AIR HOSE
• Connects to built-in air hose
for extra reach
• Twist-tight valve
PART# 40068 | REV102620ART
Publicidad
Tabla de contenido

Manuales relacionados para Slime Expert Heavy Duty Inflator


Resumen de contenidos para Slime Expert Heavy Duty Inflator
- Página 1 XPERT XPERT EAVY EAVY NFLATOR NFLATOR CARS • TRUCKS • BIKES • INFLATABLES ON/OFF SWITCH INFLATOR • Powerful direct-drive motor INFLATE RIGHT™ TECHNOLOGY • Thermal break safety feature • Inflator automatically shuts off • Air-cooled motor when the set pressure level is achieved BACKLIT DIGITAL GAUGE • 0-99 PSI LIGHT • Bright LED • For night-time emergencies POWER SOURCE EXTENSION • Plugs into 12V power outlet COIL AIR HOSE...
-
Página 2: Tech Specs
CAUTION: HOT! DO NOT OVER INFLATE. DO NOT HOLD IN HAND WHILE OPERATING. PLACE INFLATOR ON A HARD, CLEAN SURFACE. 1. DO NOT run vehicle while inflator is operating. You may need to be in “accessory” or “on” position. Please make sure emergency brake is set and car is in park. 2. Always ensure air hose chuck touches the core of the valve stem for proper inflation. 3. 3. DO NOT use inflator continuously for more than 10 minutes. Allow unit to cool approximately 25 minutes between uses. Do not leave inflator unattended. - Página 3 INFLATE TIRES 1. Securely screw air hose valve connector onto the valve stem. 2. Plug power cord into 12 volt accessory power outlet. 3. Turn on inflator. Inflate tire to manufacturer’s recommended air pressure. Correct tire pressure can be found in vehicle owner’s manual or on driver’s side door jamb. Turn off inflator and unplug power cord and remove air hose connector. 4. If necessary, add the twist-connect extension green air hose for extra length. INFLATE RIGHT™ TECHNOLOGY INSTRUCTIONS 1. Once inflator hose is attached to the valve stem, hold the + or – button for approximately 2 seconds until the display flashes. Set the required pressure using the + or – buttons, then wait 3 seconds. The display will show the pressure value to which the tire will be inflated. (Continuously pressing the “+” or “-” button will enter into “Fast setting mode”, increasing or decreasing the rate of target pressure at an increased speed.) 2. When the pressure gauge reaches the pre-set value, the inflator will automatically stop inflation. Once desired tire pressure is reached, disconnect the air hose, and unplug the power cord. 3. When the pressure gauge reaches the pre-set value, the inflator will automatically stop inflation. Once desired tire pressure is reached, disconnect the air hose. 4. The ON/OFF button can be used to override the pre-set pressure value if required.
- Página 4 FOR WARRANTY INFORMATION GO TO: WWW.SLIME.COM / WARRANTY QUESTIONS OR COMMENTS: Call (888)457-5463 or visit www.slime.com ITW Global Tire Repair • 125 Venture Drive, Suite 210, San Luis Obispo, CA 93401 USA Slime® is a trademark of Illinois Tool Works, Inc., registered in the U.S. and other countries.
-
Página 5: Interruptor De Encendido/Apagado
OMPRESOR OMPRESOR PARA PARA COCHE • CAMIONETA • BICICLETA • INFLABLES INTERRUPTOR DE INFLADOR ENCENDIDO/APAGADO • Motor potente de TECNOLOGÍA INFLATE RIGHT™ accionamiento directo • F unción de seguridad de • El inflador se apaga interrupción térmica automáticamente cuando se • M otor enfriado por aire alcanza el nivel de presión establecido MEDIDOR DIGITAL ILUMINADO • 0-99 PSI • Luz LED brilliante • Para emergencias de noche FUENTE DE ENERGÍA MANGUERA DE AIRE • Se conecta en una ENROLLADA DE EXTENSIÓN... -
Página 6: Especificaciones
PRECAUCIÓN: CALIENTE • NO SOSTENGA CON LA MANO AL OPERAR • COLOQUE EL COMPRESOR SOBRE UNA SUPERFICIE FIRME Y LIMPIA. 1. NO conduzca el vehículo mientras esté funcionando el compresor. Es posible que deba estar en la posición de “accesorios” o “encendido”. Asegúrese de colocar el freno de emergencia y que el vehículo esté en park (estacionamiento). 2. Asegúrese siempre de que el conector de la válvula esté bien sellado y presione contra el vástago de la válvula con el fin de inflar de la manera adecuada. 3. NO use el compresor de manera continua durante más de 10 minutos. Permita que el aparato se enfríe durante unos 25 minutos entre usos. No deje el compresor sin supervisión. -
Página 7: Infle Las Llantas
INFLE LAS LLANTAS 1. Enrosque firmemente el conector de la válvula de la manguera de aire en la válvula 2. Enchufe el cordón eléctrico en la toma de corriente para accesorios de 12 voltios. 3. Presione el botón de encendido para encender el inflador. Infle la llanta a la presión recomendada por el fabricante. La presión de la llanta adecuada se encuentra en el manual del propietario del vehículo o en el panel de la puerta del lado del conductor. NOTA: De ser necesario, anexe la manguera de aire verde de extensión de conexión para mayor longitud INSTRUCCIONES SOBRE LA TECNOLOGÍA INFLATE RIGHT™ 1. Oprima el botón + o - durante unos 2 segundos hasta que la pantalla parpadee. Configure la presión necesaria con los botones + o -, luego espere 3 segundos. La pantalla indicará el valor de presión al que inflará la llanta. (Si el botón “+” o “-” se presiona continuamente, empieza el “Modo de configuración rápida”, que aumenta o reduce la presión deseada a una velocidad más rápida). 2. Cuando el indicador de presión alcanza la presión configurada, el inflador deja de inflar automáticamente. Cuando haya alcanzado la presión deseada en la llanta, desconecte la manguera de aire. 3. Si es necesario, el botón ON/OFF se puede usar para cancelar el valor de presión actual. -
Página 8: Solución De Problemas
PREGUNTAS O COMENTARIOS: Llamar al +1-888-457-5463 o visitar www.slime.com ITW Global Tire Repair • 125 Venture Drive, Suite 210, San Luis Obispo, CA 93401 USA Slime® es una marca registrada de Illinois Tool Works, Inc., registrada en Estados Unidos y en otros países.