Tabla de contenido
Publicidad
Idiomas disponibles
Idiomas disponibles
Enlaces rápidos
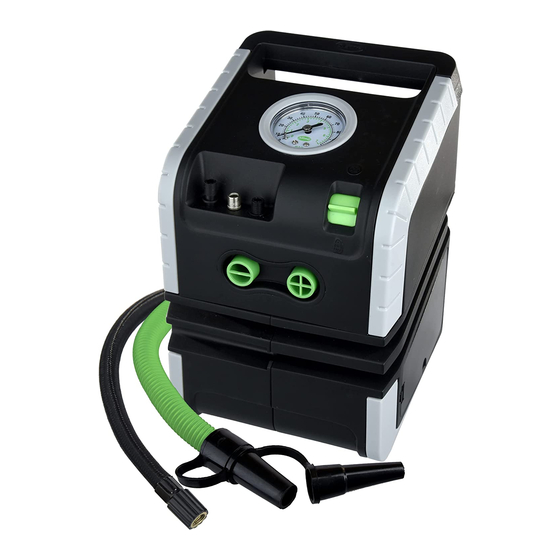
MOUNTING
BRACKETS
• Mounting screws and
anchors included
AIR ADAPTER
STORAGE
• Inflatables adapters
snap-in-place for
easy access
HOME (120V)
CORD STORAGE
HIGH VOLUME
AIR HOSE
• Storage on
the bottom
ATTENTION! READ ALL INSTRUCTIONS CAREFULLY
!
FAILURE TO FOLLOW WARNING INSTRUCTIONS CAN RESULT IN FIRE,
D
D
P P
UAL
UAL
OWER
OWER
HOME 120V / AUTO 12V
HIGH
PRESSURE
AIR HOSE
POWER SOURCE
• 120V or 12V automatically
detected by inflator
PERSONAL INJURY OR PROPERTY DAMAGE.
A A
P P
LL LL
URPOSE
URPOSE
DIAL GAUGE
• Shock-resistant housing
• 0–100 PSI range
I I
NFLATOR
NFLATOR
AIR SWITCH
• Toggle between high
pressure or high volume
AIR HOSE
STORAGE
AUTO (12V)
CORD STORAGE
AIR ACCESSORIES
PART# 40065 | REV120519ART
Publicidad
Tabla de contenido

Manuales relacionados para Slime 40065


Resumen de contenidos para Slime 40065
- Página 1 AUTO (12V) CORD STORAGE HIGH VOLUME AIR HOSE • Storage on the bottom HIGH PRESSURE AIR HOSE POWER SOURCE • 120V or 12V automatically detected by inflator AIR ACCESSORIES ATTENTION! READ ALL INSTRUCTIONS CAREFULLY FAILURE TO FOLLOW WARNING INSTRUCTIONS CAN RESULT IN FIRE, PERSONAL INJURY OR PROPERTY DAMAGE. PART# 40065 | REV120519ART...
-
Página 2: Tech Specs
CAUTION: HOT • DO NOT HOLD IN HAND WHILE OPERATING • PLACE INFLATOR ON A HARD, CLEAN SURFACE. 1. DO NOT run vehicle while inflator is operating. You may need to be in "accessory" or "on" position. Please make sure emergency brake is set and car is in park. 2. Always ensure air chuck hose touches the core of the valve stem for proper inflation. - Página 3 WALL MOUNTING / STORAGE INSTRUCTIONS* Your inflator has built-in features for conveniently wall mounting the unit for storage. Use the included hardware to wall-mount the unit. Take extra care to ensure there is no wiring, plumbing, or other objects located within the wall behind your chosen mounting location. Manufacturer is not responsible for any damage or losses incurred from complications in wall-mounting. For Drywall mounting: 1. Use the template below to mark mounting locations on wall 3 1/16" apart. 2. Using 1/4" drill bit, drill holes at the marked locations. 3. Using a hammer, tap in the wall anchors until flush with the wall 4. Using a screwdriver or screw gun, install the screws into the wall anchors, leaving approximately 3/8" protruding from the wall. 5. Hang the inflator on the screws using the recesses located on the back of the inflator. *NOTE: Wall mount is for storage only. Remove inflator from wall mount and place on a hard clean surface before operating ⁄...
- Página 4 INFLATE TIRES 1. Securely screw air hose valve connector onto the valve stem. 2. Plug power cord into 120 volt wall power outlet or 12 volt accessory power outlet. 3. Flip the toggle switch up to power the inflator for high pressure inflation. Inflate tire to manufacturer's recommended air pressure*. When proper pressure is reached, toggle switch to middle position to turn off inflator. Unplug power cord and remove air hose connector. *NOTE: Correct tire pressure can be found in vehicle owner's manual or on driver's side door jamb.
- Página 5 INFLATE RAFTS AND MATTRESSES The high volume air pump is used for inflatables only (more specifically high volume/low pressure applications) and cannot be used for tires and balls, which require higher pressure. 1. Attach the desired inflation adapter (connected to the air hose) to the high volume air hose. Connect high volume air hose to the high volume inflate portal on the front of the inflator. Insert opposite end into the inflatable's air inlet. 2. Plug power cord into 120 volt wall power outlet or 12 volt accessory power outlet. 3. Flip the toggle switch down to power the inflator for high volume inflation. Once desired pressure is reached, toggle switch to middle position to turn off inflator. Unplug power cord and remove all connections.
- Página 6 Manufacturer’s coupon upon return of proof of purchase. QUESTIONS OR COMMENTS: Call (888)457-5463 or visit www.slime.com ITW Global Tire Repair • 125 Venture Drive, Suite 210, San Luis Obispo, CA 93401 USA Slime® is a trademark of Illinois Tool Works, Inc., registered in the U.S. and other countries.
-
Página 7: Manguera De Alta Presion De Aire
O O TENCIA TENCIA NFLADOR NFLADOR ULTIUSO ULTIUSO OBLE OBLE HOGAR 120V / AUTOMÓVIL 12V MEDIDOR DE CUADRANTE • Carcasa resistente a golpes • Rango de 0 a 100 PSI SWITH DE AIRE SOPORTE DE • Botón de para alternar MONTAJES baja y alta presión de aire • Almacena fácilmente en el garaje. COMPARTIMIENTO PARA EL ADAPTADOR DE AIRE ALMACENAMIENTO • Los adaptadores inflables se insertan en su lugar para fácil acceso... -
Página 8: Especificaciones
PRECAUCIÓN: CALIENTE • NO SOSTENGA CON LA MANO AL OPERAR • COLOQUE EL COMPRESOR SOBRE UNA SUPERFICIE FIRME Y LIMPIA. 1. NO conduzca el vehículo mientras esté funcionando el compresor. Es posible que deba estar en la posición de “accesorios” o “encendido”. Asegúrese de colocar el freno de emergencia y que el vehículo esté en park (estacionamiento). 2. Asegúrese siempre de que el conector de la válvula esté bien sellado y presione contra el vástago de la válvula con el fin de inflar de la manera adecuada. 3. NO use el compresor de manera continua durante más de 10 minutos. Permita que el aparato se enfríe durante unos 25 minutos entre usos. No deje el compresor sin supervisión. -
Página 9: Montaje En Pared / Instrucciones De Almacenaje
MONTAJE EN PARED / INSTRUCCIONES DE ALMACENAJE: Su compresor está fabricado convenientemente para poder fijarlo a la pared para almacenaje. Utiliza la estructura del montaje. Tenga cuidado extra y asegúrese de no perforar algún otro objeto localizado en la pared de su elección para la instalación del equipo. El fabricante no sera responsable de ningún daño o pérdida generada al intentar montar el equipo en la pared. -
Página 10: Infle Las Llantas
INFLE LAS LLANTAS El compresor se puede utilizar para llantas de automóviles y bicicletas, para balones de deportes y otros artículos inflables. 1. Enrosque el conector de la manguera en la válvula del Neumático. 2. Conecte el cable de corriente en la entrada de la pared de 120V o en el auto 12V. 3. Coloque el interruptor hacia arriba para encender el inflador a alta presión. Inflar neumático a la presión de aire recomendada por el fabricante*. Cuando alcance la presión adecuada, cambie el interruptor a la posición media para apagar el compresor. Desenchufe el cable de la energía y retire el conector de la manguera de aire. *IMPORTANTE: La presión recomendada para las llantas se puede encontrar en el manual del propietario o en el marco de la puerta del conductor. -
Página 11: Infle Colchones Y Balsas
INFLE COLCHONES Y BALSAS La bomba de aire para balsas se usa sólo para artículos inflables (más específicamente, en aplicaciones de presión baja/alto volumen) y no puede usarse para llantas o pelotas, las cuales requieren presión más alta. 1. Anexo un adaptador para la manguera para alto volumen de aire (conectar a la manguera de aire). Posteriormente conecte el otro extremo de la manguera al frente del compresor. Inserte el extremo opuesto en la entrada de aire del inflable. 2. Enchufe el cable de alimentación en una toma de corriente de pared de 120 volts o una toma de corriente de accesorios de 12 volts. 3. Mueva el interruptor hacia abajo para encender el inflador para inflarlo a gran volumen. cambie el interruptor a la posición media para apagar el compresor. -
Página 12: Solución De Problemas Del Compresor
PREGUNTAS O COMENTARIOS: Llamar al (888)457-5463 o visitar www.slime.com ITW Global Tire Repair • 125 Venture Drive, Suite 210, San Luis Obispo, CA 93401 USA Slime® es una marca registrada de Illinois Tool Works, Inc., registrada en Estados Unidos y en otros países.