dirna Bergstrom bycool green line DINAMIC 1.1 VOLVO FH Euro 6 Manual Del Usuario
Ocultar thumbs
Ver también para bycool green line DINAMIC 1.1 VOLVO FH Euro 6:
- Instrucciones de montaje (104 páginas)
Tabla de contenido
Publicidad
Idiomas disponibles
Idiomas disponibles
Enlaces rápidos
Publicidad
Tabla de contenido

Manuales relacionados para dirna Bergstrom bycool green line DINAMIC 1.1 VOLVO FH Euro 6


Resumen de contenidos para dirna Bergstrom bycool green line DINAMIC 1.1 VOLVO FH Euro 6
- Página 1 ® DINAMIC VOLVO FH Euro 6 Manual del Usuario User’s handbook Manuel de l’utilisateur Benutzerhandbuch Manuale Per l’utente Empresa Calidad en Automoción Registrada 1002436819 ISO 9001 IATF 16949...
-
Página 2: Función De Teclas Del Mando
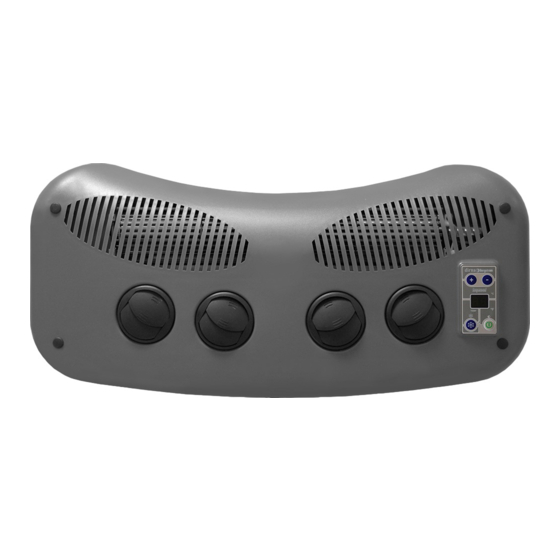
® SELECTOR TEMPERATURA DISPLAY Entre 15º y 27º VELOCIDADES SOPLADOR de U1 a U5 Led indicativo de ºC funcionamiento Led indicativo de COMPRESOR funcionamiento EQUIPO Encendido - Conectado Apagado - Desconectado ºF Intermitente- Compresor conectado TEMP Fijo- Compresor parado Conexión y desconexión manual del Compresor ENCENDIDO - APAGADO El equipo tiene dos modos de funcionamiento:... -
Página 3: Para Dar De Alta El Mando A Distancia
® PARA DAR DE ALTA EL MANDO A DISTANCIA - Con el equipo apagado, mantener pulsada la tecla del panel de control hasta que aparezca en el display parpadeando. Cuando quede fijo, tocar cualquier tecla del mando y quedará reconocido. Si en 30 segundos no se pulsa ninguna tecla del mando, el equipo se apagará.(Se pueden programar hasta 5 mandos para un mismo equipo). -
Página 4: Mensajes De Error
® El compresor y el ventilador del condensador se conectan y desconectan automáticamente al llegar a la temperatura elegida. (Ejem. temperatura elegida 23º, el compresor y el ventilador del condensador se desconectan a 21º y vuelven a conectar a 24º). F1 Módulo termómetro digital Va marcando la temperatura interior del vehículo. - Página 5 ® Importante Si durante el funcionamiento se apaga el equipo, la causa puede ser: - Cable de comunicación desconectado o fusible fundido. - Fusible fundido de alimentación del equipo.
-
Página 6: Esquema Eléctrico
® ESQUEMA ELÉCTRICO ¡AVISO IMPORTANTE! Precaución de no invertir las polaridades al conectar el equipo a la batería. Si esto sucediera el panel de control no se enciende y el equipo no funciona. Sensor aire de retorno ºC Soplador ºF TEMP Sensor Control... - Página 7 ®...
-
Página 8: Temperature Selector
® TEMPERATURE SELECTOR DISPLAY between 15º and 27º BLOWER SPEEDS from U1 to U5 Led indicating ºC COMPRESSOR Led indicating functionning EQUIPEMENT Switched on - Connected functionning Swiched off - Disconnected ºF Flashing - Compressor connected TEMP Fixed - Compressor stopped Conexión y desconexión manual del Compresor SWITCHED ON - SWITCHED OFF... - Página 9 ® TO ACTIVATE REMOTE CONTROL flashes on - With the unit off, keep the key pressed down on the control panel until the display. When it stops flashing, touch any control key for it to be recognised. The unit will go off if no control key is pressed in 30 seconds.
-
Página 10: Error Messages
® The condenser fan and compressor connect and disconnect automatically when the chosen temperature is reached. (e.g. chosen temperature 23º, the compressor and the condenser fan disconnect at 21º and reconnect at 24º). F1 Digital thermometer module It indicates temperature inside vehicle. In this functioning mode, equipment is switched off. F2 Time programming Hours de functioning and switching off from 0 to 9 hours. - Página 11 ® Important If the unit goes off during operation, the cause may be: - Communication cable disconnected or fuse blown. - Unit’s power fuse blown.
-
Página 12: Electric Wiring
® ELECTRIC WIRING IMPORTANT NOTE! Take care not to invert polarities when connecting the unit to the power supply. If this happens, the control panel does not come on and the unit does not work. Return air sensor ºC Blower ºF TEMP Anti-freeze... - Página 13 ®...
- Página 14 ® SÉLECTEUR TEMPÉRATURE AFFICHAGE Entre 15º et 27º VITESSES SOUFFLANTE de U1 à U5 Led indiquant fonctionnement ºC Led indiquant COMPRESSEUR fonctionnemnt ÉQUIPEMENT Allumé - Connecté Éteint - Déconnecté Clignotant - Compresseur connecté ºF TEMP Fixe - Compresseur arrêté Connexion et déconnexion manuelle du Compresseur ALLUMÉ...
- Página 15 ® POUR ACTIVER LA COMMANDE À DISTANCE - Avec l’équipement éteint, appuyer pendant quelques secondes sur la touche en clignotant. Une fois fixe, panneau de commande jusqu’à ce que l’écran affiche appuyer sur une touche quelconque de la commande et il sera reconnu. Si aucune touche de la commande n’est sélectionnée pendant 30 secondes, l’équipement s’éteindra (il est possible de programmer jusqu’à...
-
Página 16: Messages D'erreur
® Le compresseur et le ventilateur du condenseur se connectent et déconnectent automatiquement après avoir atteint la température choisie. (Par ex., la température choisie est de 23º. Le compresseur et le ventilateur du condenseur se déconnectent à 21º et se reconnectent à... - Página 17 ® Important Si l’équipement s’éteint pendant le fonctionnement, la cause peut être la suivante : - Câble de communication déconnecté ou fusible grillé. - Fusible d’alimentation de l’équipement grillé.
-
Página 18: Schéma Électrique
® SCHÉMA ÉLECTRIQUE AVIS IMPORTANT! Attention de ne pas inverser les polarités au moment de connecter l’alimentation à l’équipement. Si cela se produisait, la plaque de commande ne s’allumerait pas et l’équipement ne fonctionnerait pas. Capteur air de retour ºC Souffleur ºF TEMP... - Página 19 ®...
- Página 20 ® TEMPERATURWAHLTASTE DISPLAY Zwischen 15º und 27ºGESCHWINDIGKEITEN GEBLÄSE Von U1 bis U5 Betriebsanzeige- ºC KOMPRESSOR Betriebsanzeige- Licht an - Eingeschaltet LED GERÄT Licht aus - Ausgeschaltet ºF TEMP Blinkend - Kompressor an Dauerlicht - Kompressor aus Manuelles Ein- und Ausschalten des Kompressors ENCENDIDO - APAGADO Das Gerät verfügt über zwei Betriebsarten :...
- Página 21 ® AKTIVIEREN DER FERNBEDIENUNG - Bei abgeschalteter Anlage die Taste des Bedienfelds gedrückt halten, bis auf dem anfängt zu blinken. Wenn die Anzeige kontinuierlich leuchtet, eine beliebige Display Taste der Fernbedienung drücken, damit diese erkannt wird. Wird innerhalb von 30 Sekunden keine Taste der Fernbedienung gedrückt, schaltet sich die Anlage aus.
-
Página 22: Fehlermeldungen
® Durch einmaliges Drücken einer der Tasten wird die gewünschte Temperatur zwischen 15º und 27º C - 59-80º F gewählt. Der Kompressor und der Kondensatorlüfter schalten sich automatisch ein und aus, wenn die eingestellte Temperatur erreicht wird. (Beispiel: Eingestellte Temperatur 23º, der Kompressor und der Kondensatorlüfter schalten sich bei 21º... - Página 23 ® Achtung Wenn sie das gerat in jemanden fehlermeldungen ausmachen möchten, drücken sie die On/Off taste bis das bildschirm sich aysmacht. Achtung Schaltet sich die Anlage während des Betriebs aus, kann dies folgende Ursachen haben: - Kommunikationskabel nicht angeschlossen oder Sicherung geschmolzen. - Sicherung der Stromversorgung der Anlage geschmolzen.
- Página 24 ® ELEKTRISCHES SCHALTSCHEMA WICHTIGER HINWEIS! Darauf achten, dass die Polaritäten beim Anschluss der Stromversorgung an die Anlage nicht vertauscht werden. Ist dies der Fall, schaltet sich das Bedienfeld nicht an und die Anlage funktioniert nicht. Sensor (Rückluft) ºC Gebläse ºF TEMP Sensor Elektro...
- Página 25 ®...
-
Página 26: Funzione Dei Tasti
® SELETTORE TEMPERATURA DISPLAY Tra 15º e 27º C VELOCITÀ SOFFIANTE da U1 a U5 Led indicante il ºC funzionamento Led indicante il COMPRESSORE funzionamento dell’IMPIANTO Acceso - Inserito Spento - Disinserito Lampeggiante - Compressore inserito ºF TEMP Fisso - Compressore fermo Inserimento e disinserimento manuale del compressore ACCESO - SPENTO... -
Página 27: Per Attivare Il Telecomando
® PER ATTIVARE IL TELECOMANDO - Con l’impianto spento, mantenere premuto il tasto del quadro comandi fino alla comparsa sul display di lampeggiante. Quando è fisso, toccare qualsiasi tasto del telecomando che così viene riconosciuto. Se non si preme alcun tasto del telecomando entro 30 secondi, l’impianto si spegne (è... -
Página 28: Messaggi Di Errore
® Il compressore e il ventilatore del condensatore si inseriscono e si disinseriscono automaticamente al raggiungimento della temperatura impostata (ad esempio, temperatura impostata 23ºC: il compressore e il ventilatore del condensatore si disinseriscono a 21ºC e si inseriscono di nuovo a 24ºC). F1 Termometro digitale Segnala la temperatura interna del veicolo. - Página 29 ® Importante In alcuni casi di messaggio d´errore, per spegnere il dispositivo, mantenere premuto il tasto On/Off fino a quando si spegne il display. Importante Se durante il funzionamento l’impianto si spegne, la causa può essere: - Cavo di comunicazione disinserito o fusibile saltato. - Fusibile di alimentazione dell’impianto saltato.
-
Página 30: Schema Elettrico
® SCHEMA ELETTRICO AVVERTENZA IMPORTANTE! Fare attenzione a non invertire le polarità nel collegamento dell’alimentazione dell’impianto. Infatti, in tal caso il quadro comandi non si accende e l’impianto non funziona. Sensore aria ritorno ºC Ventilatore ºF TEMP Sensore Controllo antigelo elettronico Nero Rosso... - Página 31 ®...
- Página 32 Bergstrom, s.l. Esta información ha de ser utilizada única y exclusivamente para el fin para el que fue creada, no siendo dirna Bergstrom, s.l. responsable de los posibles daños que se pudiera causar al cliente y/o a terceras partes por un incorrecto y/o inadecuado uso de la misma.