Tabla de contenido
Publicidad
Idiomas disponibles
Idiomas disponibles
Enlaces rápidos
Publicidad
Tabla de contenido

Manuales relacionados para Costway BB5558


Resumen de contenidos para Costway BB5558
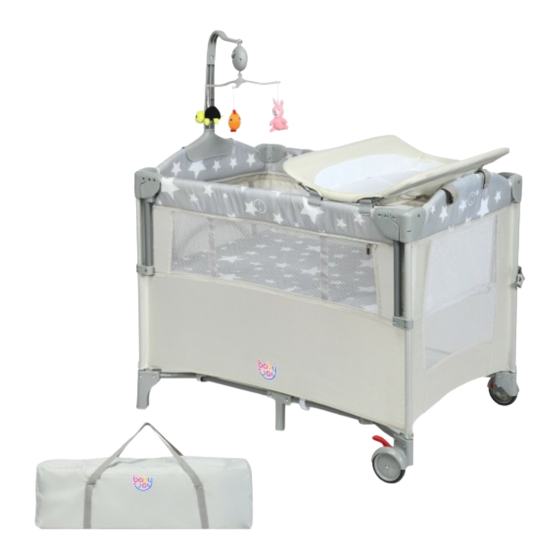
- Página 1 Baby playpen BB5558...
-
Página 2: General Warnings
Manual Instruction IMPORTANT: Read all instructions BEFORE assembly and USE of product, and KEEP THEM FOR FUTURE USE. 1 WARNING WARNING: Never leave the child unattended. WARNING: Do not put the playpen near a fireplace or any other source of heat. WARNING: Upper age /weight limit for children using the playpen: 3 years or 15 kg. - Página 3 3. ASSEMBLY INSTRUCTIONS STEP 3: Install the bassinet STEP 1: OPENING OF THE PACK a.Before installing, remove the foldable mattress from the bottom of playard, place bassinet inside the Open the carrying bag (Fig.1) and take the playpen out. Detach the foldable mattress from the playpen playard and attach the zipper to the top rails.
- Página 4 STEP4: Diaper changer assembly 4. FOLDING AND STORING THE PRODUCT STEP 1: FOLDING THE PLAYPEN a.Unfold the diaper changer. b.Insert the two tubes inside the diaper changer as shown. a.Remove the mattress from the playpen (Fig. 10) and lift up the bottom with the help of the fabric c.Attach the 4 clips on the top short hand rails.
-
Página 5: Maintenance Instructions
IMPORTANT If the rims of the playpen do not fold down completely, repeat the procedure shown in Fig.11 and Fig.12 STEP 2: STORING THE PLAYPEN Once the playpen locking mechanisms have been released, fold it up completely and fit the mattress around the structure, securing it with the self-fastening straps( Fig.15), Slip the whole thing into the carrying bag (Fig. -
Página 6: Kontaktieren Sie Uns
Montage oder Verwendung. Kinderreisebett Bitte beachten Sie darauf, alle Teile richtig anzubringen, eine falsche Montage kann zu einer BB5558 Gefährdung führen. Wir empfehlen, wenn möglich, alle Artikel in der Nähe des Einsatzortes zu montieren, um eine unnötige Bewegung der Artikel zu vermeiden. - Página 7 Handbuch 3.MONTAGEANL EITUNGEN SCHRITT 1:ÖFFNUNG DER PACKUNG Öffnen Sie die Tragetasche (Abb.1) und nehmen Sie den Laufstall heraus. Lösen Sie diefaltbare WICHTIG: Lesen Sie alle Anweisungen, BEVOR Sie das Produkt montieren und verwenden, Matratze vom Laufstall, indem Sie die selbstbefestigenden Gurte lösen (Abb. 2), um den Laufstall undbewahren Sie diese für den zukünftigen Gebrauch auf.
- Página 8 SCHRITT 4: Montage des Windelwechslersa SCHRITT 3 : Installieren Sie die Wiege a. Entfalten Sie den Windelwechsler. a. Vor der Installation entfernen Sie die faltbare Matratze von der Unterseite des Laufstalls, setzen b.Setzen Sie die beiden Schläuche wie gezeigt in den Windelwechsler ein. SieKorbwiege in Seite des Laufstalls und befestigen Sie die 12 Klammern an den oberen Schienen.
- Página 9 4.FALTEN UND SPEICHERN DES PRODUKTS WICHTIG SCHRITT 1: Falten des Laufstalls Wenn die Ränder des Laufstalls nicht vollständig herunterklappen, wiederholen Sie das in a. Entfernen Sie die Matratze vom Laufstall (Abb.10) und heben Sie den Boden mit Hilfe Abb.11 und Abb. 12 gezeigte Verfahren desStoffziehgurts an (Abb.10-1).
- Página 10 Ihre Vorschläge und Kommentare für COSTWAY sind wirklich wichtig für uns! Wir bitten Sie aufrichtig, in unsere Geschäft zurückzukehren und durch nur einen Klick eine gute Bewertung zu hinterlassen. Es wäre sehr ermutigend, wenn Sie das so tun könnten: Tolle Produkte bis jetzt 24.
-
Página 11: Liste Des Pièces
Manuel d’Instruction IMPORTANT: Lisez toutes les instructions AVANT l’assemblage et l’utilisation du produit, et CONSERVEZ-LES POUR UNE RÉFÉRENCE FUTURE 1. AVERTISSEMENT AVERTISSEMEN : Ne laissez jamais l’enfant sans surveillance. AVERTISSEMEN : Ne placez pas le lit près d’un foyer ou de toute autre source de chaleur. AVERTISSEMEN : Limite d’âge / de poids pour les bébés du produit : 3 ans ou 15 kg. -
Página 12: Instructions D'assemblage
3. INSTRUCTIONS D’ASSEMBLAGE ÉTAPE 3 : INSTALLATION DU BERCEAU ÉTAPE 1 : OUVERTURE DU PAQUET a. Avant l’installation, retirez le matelas pliable du fond de lit, placez le berceau à l’intérieur de lit et Ouvrez le sac de transport (Fig.1) et sortez le lit. Sortez le matelas pliable du lit en détachant les sangles attachez la fermeture éclair aux rails supérieurs. - Página 13 ÉTAPE 4 : Assemblage de changeur de couche 4. PLIAGE ET CONSERVATION LE PRODUIT ÉTAPE 1 : PLIER LE LIT a. Dépliez le changeur de couche. b. Insérez les deux tubes à l’intérieur du changeur de couche comme indiqué. a. Retirez le matelas du lit (Fig. 10) et soulevez le fond à l’aide de la sangle de traction en tissu c.
-
Página 14: Consignes D'entretien
24 février 2019 Excellents produits jusqu’à présent. Livraison rapide et l’installation facile. Et le fonctionnnement sans problème. Avec votre évaluation inspirante, COSTWAY sera plus professionnel pour vous offrir une BONNE EXPÉRIENCE D’ACHATS, de BONS PRODUITS et un SERCIVE EFFICACE ! FR office : 26 RUE DU VERTUQUET, 59960 NEUVILLE EN FERRAIN, FRANCE Points de Récompense... -
Página 15: Cuna De Viaje
Cuna de Viaje Asegúrese de que todas las piezas estén instaladas correctamente, la instalación incorrecta BB5558 puede provocar un peligro. Asegúrese de de esté en una superficie segura durante la construcción y coloque el producto ESTE MANUAL DE INSTRUCCIONES CONTIENE IMPORTANTES INFORMACIONES DE SEGURIDAD, POR FAVOR LO LEA Y GUARDE PARA REFERENCIAS FUTURAS. -
Página 16: Instrucción Manual
Instrucción manual 3. INSTRUCCIONES DE MONTAJE PASO 1: APERTURA DEL PAQUETE IMPORTANTE: Lea todas las instrucciones ANTES del ensamblaje y USO del producto, y Abra la bolsa de transporte (Fig. 1) y saque la cuna. Separe el colchón plegable de la cuna MANTÉNGALOS PARA USO FUTURO. - Página 17 PASO 4: conjunto del cambiador de pañales PASO 3: Instale la cuna a. Despliegue el cambiador de pañales. a. Antes de instalar, retire el colchón plegable de la parte inferior de la cuna, coloque el moisés dentro b. Inserte los dos tubos dentro del cambiador de pañales como se muestra. del corral y coloque la cremallera en los rieles superiores.
-
Página 18: Plegar Y Almacenar El Producto
4. PLEGAR Y ALMACENAR EL PRODUCTO IMPORTANTE PASO 1: PLEGAR LA CUNA Si los bordes de la cuna no se pliegan completamente, repita el procedimiento que se muestra en a. Retire el colchón de la cuna (Fig. 10) y levante la parte inferior con la ayuda de la correa de tela (Fig. la Fig.11 y Fig.12 10-1). -
Página 19: Manuale Utente
MANUALE UTENTE Lettino per Bambini BB5558 QUESTO MANUALE DI ISTRUZIONI CONTIENE IMPORTANTI INFORMAZIONI SULLA SICUREZZA. SI PREGA DI LEGGERE E CONSERVARE PER RIFERIMENTO FUTURO. Seguire Costway Vi preghiamo di darci la possibilità di fare bene e fare di meglio! Visitateci: www.costway.it... -
Página 20: Prima Di Iniziare
AVVERTIMENTO: Assicurarsi che il lettino sia completamente aperto e che tutto il sistema di bloccaggio E-mail sia completamente fissato prima di inserire il bambino. IT: cs.it@costway.com 2. RACCOMANDAZIONI RACCOMANDAZIONE: Verificare che tutti i meccanismi di assemblaggio siano adeguatamente protetti e regolarmente monitorati. -
Página 21: Istruzioni Di Montaggio
3. ISTRUZIONI DI MONTAGGIO PASSO 3: Installa la culla PASSO 1: APRI IL PACCHETTO a. Prima dell'installazione, rimuovere il materasso pieghevole dalla parte inferiore del lettino, Aprire la borsa per il trasporto (Fig.1) ed estrarre il lettino. Staccare il materasso pieghevole dal lettino posizionare la culla all'interno del lettino e fissare la cerniera alle guide superiori. - Página 22 PASSO 4: Gruppo del fasciatoio 4. PIEGARE E CONSERVARE IL PRODOTTO PASSO 1: PIEGARE IL LETTINO a. Spiegare il fasciatoio. b. Inserire i due tubi all'interno del fasciatoio come mostrato. a. Rimuovere il materasso dal lettino (Fig. 10) e sollevare il fondo con l'aiuto della cinghia di trazione c.
-
Página 23: Istruzioni Di Manutenzione
24 febbraio 2019 Fig.15 Fig.16 Grandi prodotti finora. Consegna veloce, facile configurazione e funzionamento senza problemi. Con il tuo commento stimolante, COSTWAY continuerà a offrirti FACILITÀ DI ACQUISTO FACILE, PRODOTTI BUONI e SERVIZIO EFFICIENTE! US ufficio: Fontana, California UK ufficio: Ipswich... -
Página 24: Zanim Zaczniesz
Zapewnij bezpieczną przestrzeń roboczą podczas montażu i upewnij się, że produkt znajduje W razie kłopotów skontaktuj się z nami! Śledź Costway się na płaskiej i stabilnej powierzchni. Jeśli potrzebujesz pomocy skontaktuj się z naszym przyjaznym działem Odwiedź nas: www.costway.pl obsługi klienta. Ewentualne braki elementów zostaną uzupełnione najszybciej jak to możliwe! -
Página 25: Lista Elementów
Instrukcja obsługi 3. INSTRUKCJE MONTAŻU KROK 1: OTWIERANIE OPAKOWANIA WAŻNE: Przeczytaj całą instrukcję PRZED montażem i UŻYCIEM produktu, ZACHOWAJ ją na Otwórz torbę przenośną (Obrazek 1) i wyjmij łóżeczko. Wyjmij składany materac z łóżeczka przez PRZYSZŁOŚĆ odczepienie pasów (Obrazek 2). - Página 26 KROK 4: Montaż przewijaka do pieluch KROK 3: Mocowanie siatki A. Rozwiń przewijak. A. Przed instalacją, usuń składany materac z dna łóżeczka i włóż siatkę do łóżeczka, mocując ją B. Włóż dwie rurki do przewijaka tak jak pokazano na obrazku.
-
Página 27: Instrukcje Konserwacji
4. SKŁADANIE I PRZECHOWYWANIE PRODUKTU WAŻNE KROK 1: SKŁADANIE ŁÓŻECZKA Jeżeli ramy łóżeczka nie złożą się całkowicie, powtórz procedurę pokazaną na Obrazku 11 i A. Usuń materac z łóżeczka (Obrazek 10) i podnieś spód za pomocą paska przyszytego do tkaniny Obrazku 12. - Página 28 Świetne produkty 24 luty 2018 Świetne produkty. Szybka dostawa, łatwa konfiguracja i wysoka jakość wykonania. Twoja ocena nas inspiruje! Dzięki niej COSTWAY będzie dążył do zaoferowania ci WYDAJNEJ OBSŁUGI, DOBRYCH PRODUKTÓW I BEZPROBLEMOWYCH ZAKUPÓW! PL office: Gdańsk punkty lojalnościowe doskonała obsługa klienta...