Tabla de contenido
Publicidad
Idiomas disponibles
Idiomas disponibles
Enlaces rápidos
Publicidad
Capítulos
Tabla de contenido

Manuales relacionados para Diamond G77/F14A4-NH


Resumen de contenidos para Diamond G77/F14A4-NH
- Página 1 01/2012 Mod: G77/F14A4-NH Production code: B-GF477B...
-
Página 2: Tabla De Contenido
ITALIANO ....................pagina 2 - 16 ENGLISH ....................page 17 - 30 FRANÇAIS ....................page 31 - 44 DEUTSCH ....................Seite 45 - 58 ESPAÑOL ....................página 59 - 72 INDICE CAPITOLO DESCRIZIONE PAGINA Avvertenze generali ..........................4 Dati tecnici ............................. 5 1.1.S Friggitrice a gas serie OPTIMA Cat. - Página 3 CAPITOLO DESCRIZIONE PAGINA Limitatore di temperatura ........................13 Manutenzione e pulizia .......................... 16 TABELLA II: GAS, PRESSIONE E CATEGORIE NEI VARI PAESI. SECONDO EN 437 - EN 203-1 ..73 DATI TECNICI ............................74 SCHEMI DI INSTALLAZIONE ....................... 85 - 3 -...
-
Página 4: Avvertenze Generali
AVVERTENZE GENERALI - Leggere attentamente le avvertenze contenute nel presente libretto in quanto forniscono importanti indicazioni riguardanti la sicurezza di installazione, d’uso e di manutenzione. - Conservare con cura questo libretto per ogni ulteriore consultazione dei vari operatori. - Dopo aver tolto l’imballaggio, assicurarsi dell’integrità dell’apparecchiatura e in caso di dubbio, non utilizzare l’apparecchiatura e rivolgersi a personale professionalmente qualificato. -
Página 5: Dati Tecnici
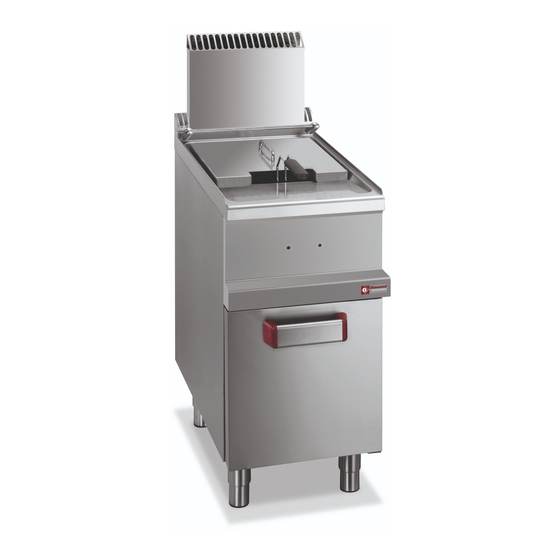
DATI TECNICI 1.1.S FRIGGITRICE A GAS SERIE OPTIMA CAT. II (GAS METANO E G.P.L.) MODELLO G77/F2V7-A4S G77/F14-A4S G77/F28-A7S Dimensioni Tipo Larghezza Profondità Altezza Altezza totale 1150 1150 1150 Peso netto Dimensioni vasca e N° Larghezza Profondità Altezza Capacità vasca 7+ 7 14 + 14 Dimensioni e N°... -
Página 6: Bfriggitrice A Gas Serie Optima Cat. Ii (Gas Metano E G
1.1.B FRIGGITRICE A GAS SERIE OPTIMA CAT. II (GAS METANO E G.P.L.) MODELLO G77/F2V7-A4B G77/F14-A4B G77/F28-A7B Dimensioni Tipo Larghezza Profondità Altezza Altezza totale Peso netto Dimensioni vasca e N° Larghezza Profondità Altezza Capacità vasca 7+ 7 14 + 14 Dimensioni e N° cestelli Larghezza Profondità... -
Página 7: Istruzioni Per L'istallazione
ISTRUZIONI PER L’ISTALLAZIONE L’installazione e l’eventuale trasformazione per l’uso di altri tipi di gas, deve essere eseguita da persone qualificate secondo la normativa in vigore. Vedere tabelle II dati tecnici. AVVERTENZE: Nel caso in cui l’apparecchiatura venga installata contro una parete quest’ultima deve resistere ai valori di temperatura di 80°C e deve essere incombustibile, oppure l’apparecchiatura deve essere sistemata a 10 cm. -
Página 8: Collegamento All'impianto Del Gas
COLLEGAMENTO ALL’IMPIANTO DEL GAS - L’apparecchio deve essere alimentato con gas avente le caratteristiche e la pressione riportata in tabella II. - La pressione del gas si misura alla presa di pressione iniziale con i bruciatori accesi (vedere Fig. 1). - L'apparecchiatura è... -
Página 9: Sostituzione Ugello Bruciatore Principale
TRASFORMAZIONE PER FUNZIONAMENTO AD ALTRO TIPO DI GAS Chiudere il rubinetto del gas a monte dell’apparecchio. SOSTITUZIONE UGELLO BRUCIATORE PRINCIPALE (FIG. 5) - Aprire la porta del’armadio e togliere il contenitore dell’olio. - Allentare la vite (D) e spingere il regolatore dell’aria primaria (C) nel venturi. - Svitare con una chiave del 12 l’ugello (B) e sostituire con quello corrispondente al gas prescelto secondo quanto riportato nella Tabella II. -
Página 10: Sostituzione Dei Componenti Piu' Importanti
SOSTITUZIONE DEI COMPONENTI PIU’ IMPORTANTI L’apparecchio deve essere controllato almeno ogni 6 mesi. Sono da controllare il gruppo bruciatore, l’accensione, l’interaccensione, l’impostazione del massimo e del minimo, è da controllare anche il buon funzionamento della cappa antivento Rompotiraggio e l’entrata dell’aria. SOSTITUZIONE DEI COMPONENTI Per l’eventuale riparazione rivolgersi solamente ad un centro di assistenza tecnica autorizzato e richiedere l’utilizzo di ricambi originali. - Página 11 ATTENZIONE: Controllare bene l’O.R. tenuta gas. - Smontare la termocoppia con una chiave di 9 mm. - Smontare il tubo gas alimentazione bruciatore pilota con una chiave di 10 mm. - Sostituite la vecchia con una nuova valvola termostatica. ATTENZIONE: I pulsanti debbono essere in alto, non dimenticate l’interruzione della termocoppia! - Rimontare il tutto seguendo l’ordine inverso di smontaggio.
-
Página 12: Istruzioni Per L'utente
ISTRUZIONI PER L’UTENTE Premessa Prima di mettere in funzione l’apparecchiatura, lavare accuratamente la vasca ed i cestelli, operando come segue: - Riempire la vasca fino a livello con acqua e detersivo, mettere in funzione il riscaldamento e portare in ebollizione per alcuni minuti, scaricare l’acqua attraverso, il rubinetto di scarico e risciacquare abbondantemente la vasca con acqua pulita. -
Página 13: Pulizia E Accorgimenti
PULIZIA E ACCORGIMENTI Per la pulizia attenersi alle seguenti istruzioni: - Pulire il tutto senza usare lane metalliche o prodotti abrasivi. - Si raccomanda che l’olio o il grasso che vengono usati per la cottura siano di buona qualità e sempre esenti da impurità; queste debbono essere eliminate mediante filtrazione. - Página 14 MANUTENZIONE E PULIZIA - Pulire giornalmente la parti in acciaio inox con acqua tiepida saponata, quindi risciacquare abbondantemente ed asciugare con cura. - Evitare nel modo più assoluto di pulire l’acciaio inox con paglietta, spazzola o raschietti di acciaio comune in quanto possono depositare particelle ferrose che ossidandosi provocano punti di ruggine.
- Página 15 BRUCIATORE BACINELLA RACCOGLI OLIO FILTRO OLIO Fig. 1 Fig. 4 Fig. 5 Fig. 6 G77/F2V7-A4S G77/F14-A4S - G77/F28-A7S Fig. 7 - 15 -...
- Página 16 MAX. LIVELLO OLIO MIN. TUBI RISCALDATI LEVA A FARFALLA IN POSIZIONE ORIZZONTALE SIGNIFICA RUBINETTO CHIUSO Fig. 9 ACCENSIONE PILOTA VITE FISSAGGIO ACCENDITORE MANOPOLA DI REGOLAZIONE TEMPERATURA ACCENSIONE PILOTA SPEGNIMENTO TOTALE Fig. 10 VITE FISSAGGIO COPERCHIO PULSANTE ROSSO RIPRISTINO TERMOSTATO LIMITE Fig.
- Página 17 INDEX CHAPTER DESCRIPTION PAGE General notices ............................18 Technical data ............................19 1.1.S Gas fryer OPTIMA series, category II (Natural gas and L.P.G.) ............... 19 1.1.B Gas fryer OPTIMA series, category II (Natural gas and L.P.G.) ............... 20 Technical characteristics .......................... 20 Installation instructions .........................
-
Página 18: General Notices
GENERAL NOTICES - Carefully read the instructions contained in the present booklet as they supply important information relating to safe installation, use and maintenance. - Keep this booklet with care, for any further consultation by the various operators. - Having removed the packing, make sure the unit is in good order and in case of doubt, do not use the unit, but call on skilled personnel. -
Página 19: Technical Data
TECHNICAL DATA 1.1.S GAS FRYER OPTIMA SERIES, CATEGORY II (NATURAL GAS AND L.P.G.) MODEL G77/F2V7-A4S G77/F14-A4S G77/F28-A7S Dimensions Type Width Depth Height Total Height 1150 1150 1150 Net Weight Tank dimensions and No. Width Depth Height Tank capacity 7+ 7 14 + 14 Basket dimensions N°... -
Página 20: Bgas Fryer Optima Series, Category Ii (Natural Gas And L
1.1.B GAS FRYER OPTIMA SERIES, CATEGORY II (NATURAL GAS AND L.P.G.) MODEL G77/F2V7-A4B G77/F14-A4B G77/F28-A7B Dimensions Type Width Depth Height Total Height Net Weight Tank dimensions and No. Width Depth Height Tank capacity 7+ 7 14 + 14 Basket dimensions N°... -
Página 21: Installation Instructions
INSTALLATION INSTRUCTIONS Installation must be performed by qualified technicians according to the law in force. See technical date tables II. WARNINGS: Should the unit be installed against a wall, the latter must be heat-resistant to temperatures of 80°C and must be fireproof, or it has to be placed at a distance of 10 cm. -
Página 22: Gas System Connection
GAS SYSTEM CONNECTION - The unit should be supplied with gas having the characteristics and the pressure shown on Table II. - The gas pressure is measured at the initial pressure outlet with the burner on (see Fig. 1). - The equipment is tested and preset in order to work with the gas indicated on the external adhestive plate. *N.B. -
Página 23: Transformation To Operate With Other Gas Type
TRANSFORMATION TO OPERATE WITH OTHER GAS TYPE Shut off the gas valve supplying the unit. REPLACING THE MAIN BURNER NOZZLE (FIG. 5) - Open the cabinet door and remove the oil containers. - Loosen screw (D) and press the primary air regulator (C) in the venturi. - Using a size-12 spanner, unscrew nozzle (B) and replace it with the one corresponding to the selected gas, according to the indications on Table II. -
Página 24: Replacing Important Components
REPLACING IMPORTANT COMPONENTS The unit should be checked at least twice a year. You must check the burners, the ignition, the interignition, the maximum and minimum settings. Moreover, you should check the good functioning of the windscreen/draft hood and the air inlet. REPLACING COMPONENTS For any repairs, consult exclusively an authorised assistance centre and ask for original spare parts. - Página 25 - Remove the pilot burner gas supply pipe by using a 10mm-spanner. - Change the old thermostat valve with a new one. ATTENTION : The buttons must be on the top side ; do not forget the thermocouple interruption ! - Mount everything back by following the reverse order.
-
Página 26: Instruction For The User
INSTRUCTION FOR THE USER Foreword Before you start up the unit, thoroughly wash the tank and the baskets, operating as follows : - Fill up the tank to level with water and detergent, switch on the heating and bring to boiling point for a few minutes, drain the water through the drain tap and thoroughly rinse the tank with clean water. -
Página 27: Cooking Examples
COOKING EXAMPLES FOOD TIME IN MINUTES THERMOSTAT °C Crostini Prawns and cuttle-fish 2 - 5 Crumbed fish fillets 2 - 4 Mixed fried fish 3 - 5 Sausages 2 - 4 170 - 180 Chickens 10 - 15 170 - 180 Spring chickens 5 - 8 Miscellaneous roasts (from 1 to 2kg.) -
Página 28: Maintenance And Cleaning
MAINTENANCE AND CLEANING - Clean the stainless steel parts daily with soapy lukewarm water, then rinse well and dry thoroughly. - Absolutely avoid to clean the stainless steel with common steel-wool, or common steel brushes and scrapers, as they may discard ferrous particles which, on depositing, cause rust spots. - Página 29 BURNER OIL TRAY OIL FILTER Fig. 1 Fig. 4 Fig. 5 Fig. 6 G77/F2V7-A4S G77/F14-A4S - G77/F28-A7S Fig. 7 - 29 -...
- Página 30 MAX. OIL LEVEL MIN. HEAT EXCHANGER PIPES OIL DRAIN COCK HANDLE HORINZONTAL = CLOSED Fig. 9 PILOT BURNER IGNITION IGNITER FASTENING SCREW THERMOSTAT KNOB PILOT BURNER ALL BURNER OFF IGNITION Fig. 10 COVER FIXING SCREW RED PUSHBUTTON LIMIT THERMOSTAT Fig. 11 - 30 -...
- Página 31 SOMMAIRE CHAPITRE DESCRIPTION PAGE Regles generales ............................. 32 Donnees techniques ..........................33 1.1.S Friteuse au gaz série OPTIMA Cat. II (Gaz méthane et G.P.L.) ............... 33 1.1.B Friteuse au gaz série OPTIMA Cat. II (Gaz méthane et G.P.L.) ............... 34 Caracteristiques techniques ........................
-
Página 32: Regles Generales
REGLES GENERALES - Lisez attentivement les instructions contenues dans cette notice car elles fournissent d’importantes indications concernant la sécurité d’installation, d’emploi et d’entretien. - Rangez soigneusement cette notice dans un endroit accessible et adapté à de futures consultations. - Après avoir déballé l’appareil, contrôlez-en l’intégrité. En cas de doute ne l’utilisez pas et adressez-vous à un personnel qualifié. -
Página 33: Donnees Techniques
DONNEES TECHNIQUES 1.1.S FRITEUSE AU GAZ SÉRIE OPTIMA CAT. II (GAZ MÉTHANE ET G.P.L.) MODELE G77/F2V7-A4S G77/F14-A4S G77/F28-A7S Dimensions Type Largeur Profondeur Hauteur Hauteur totale 1150 1150 1150 Poids net Dimensions bac Largeur Profondeur Hauteur Capacité bac 7+ 7 14 + 14 Dimensions panier Largeur Profondeur... -
Página 34: Friteuse Au Gaz Série Optima Cat. Ii (Gaz Méthane Et G
1.1.B FRITEUSE AU GAZ SÉRIE OPTIMA CAT. II (GAZ MÉTHANE ET G.P.L.) MODELE G77/F2V7-A4B G77/F14-A4B G77/F28-A7B Dimensions Type Largeur Profondeur Hauteur Hauteur totale Poids net Dimensions bac Largeur Profondeur Hauteur Capacité bac 7+ 7 14 + 14 Dimensions panier Largeur Profondeur Hauteur Temps de préchauffage (180K) -
Página 35: Conseil D'installation
CONSEIL D’INSTALLATION L’installation et la transformation éventuelle pour l’utilisation avec d’autres types de gaz doit être exécutée par un installateur qualifié en conformité avec la législation en vigueur. Reportez-vous aux tableaux des données techniques II. ATTENTION ! Si l’appareil est installé contre un mur, il faut que ce dernier puisse résister à une température de 80° et qu’il soit en matériau incombustible, ou que l’appareil soit installé... -
Página 36: Raccordement A L'installation Du Gaz
RACCORDEMENT A L’INSTALLATION DU GAZ - L’appareil doit être alimenté avec du gaz ayant les caractéristiques et la pression reportée au tableau II. - La pression du gaz se mesure à la prise de pression initiale avec le brûleur allumé (cfr. Fig 1). - L'appareil a été... -
Página 37: Adaptation Pour Fonctionner A Un Autre Type De Gaz
ADAPTATION POUR FONCTIONNER A UN AUTRE TYPE DE GAZ Fermez le robinet du gaz en amont de l’appareil. CHANGEMENT DU GICLEUR DU BRULEUR PRINCIPAL (FIG. 5) - Ouvrez la porte du meuble et enlevez les conteneurs d’huile. - Dévissez la vis (D) et poussez le régulateur de l’air primaire (C) dans le tuyau Venturi. - A l’aide d’une clé... -
Página 38: Changement Des Composants Plus Importants
CHANGEMENT DES COMPOSANTS PLUS IMPORTANTS L’appareil doit être contrôlé tous les 6 mois. Il faut en particulier vérifier le brûleur, l’allumage, le réglage du minimum et du maximum, le bon fonctionnement de la hotte anti-refoulement et coupe tirage ainsi que l’entrée de l’air. CHANGEMENT DES COMPOSANTS Attention ! Pour les réparations adressez-vous seulement à... - Página 39 - Démontez le thermocouple, avec une clé de 9mm. - A l’aide d’une clé de 10 mm, démontez le tuyau d’alimentation de gaz au brûleur de la flamme pilote. - Remplacez la soupape thermostatique par une nouvelle. ATTENTION ! Les boutons doivent être en haut, n’oubliez pas l’interruption du thermocouple ! - Remontez le tout dans le sens inverse du démontage.
-
Página 40: Instructions Pour L'utilisateur
INSTRUCTIONS POUR L’UTILISATEUR Avant - propos Avant de mettre en route l’appareil, lavez soigneusement le bac et les paniers en opérant de la façon suivante : - Remplissez le bac d’eau et de détergent. Mettez en route l’appareil portez à ébullition et laissez bouillir pendant quelques minutes. -
Página 41: Exemples De Cuisson
EXEMPLES DE CUISSON TEMPS DE CUISSON ALIMENTS THERMOSTAT °C (minutes) Croûtons Crevettes et calmars 2 - 5 Filets de poisson panés 2 - 4 Friture de poissons mixte 3 - 5 Saucisses 2 - 4 170 - 180 Poulets 10 - 15 170 - 180 Coquelets 5 - 8... -
Página 42: Entretien Et Nettoyage
ENTRETIEN ET NETTOYAGE - Nettoyez tous les jours les éléments en acier Inox avec de l’eau tiède et savonneuse. Rincez abondamment et séchez soigneusement. - Ne nettoyez jamais les éléments en acier Inox avec des éponges abrasives ou des racleurs en acier car ils abîmeraient la plaque et provoqueraient son oxydation. - Página 43 BRULEUR BAC DE RECUPERATION D’HUILE FILTRE Fig. 1 Fig. 4 Fig. 6 Fig. 5 G77/F2V7-A4S G77/F14-A4S - G77/F28-A7S Fig. 7 - 43 -...
- Página 44 MAX. NIVEAUX D’HUILE MIN. TUBES DE CHAUFFAGE ROBINET DE VIDANGE (POSITION FERMÉE) Fig. 9 VEILLEUSE VIS FIXATION ALLUMEUR MANETTE DE REGLAGE DE LA TEMPERATURE VEILLEUSE ARRET TOTAL Fig. 10 VIS DE FIXATION COUVERCLE POUSSORI ROUGE RÈTABLISSEMENT THÉRMOSTAT LIMITE Fig. 11 - 44 -...
- Página 45 INHALTSVERZEICHNIS KAPITEL BESCHREIBUNG SEITE Allgemeine Hinweise ........................... 45 Technische Daten ..........................47 1.1.S Gasbeheizte Friteuse Serie OPTIMA - KAT. II (Methangas und Flüssiggas) ........47 1.1.B Gasbeheizte Friteuse Serie OPTIMA - KAT. II (Methangas und Flüssiggas) ........48 Technische Eigenschaften ........................48 Installationsanleitungen ........................
-
Página 46: Allgemeine Hinweise
ALLGEMEINE HINWEISE - Dieses Handbuch enthält wichtige Anleitungen für eine sichere Installation, Verwendung und Wartung und muß daher aufmerksam durchgelesen werden. - Dieses Handbuch muß für ein späteres Nachschlagen der verschiedenen Bediener sorgfältig aufbewahrt werden. - Nach dem Entfernen der Verpackung muß das Gerät nach seinem einwandfreien Zustand überprüft werden; verwenden Sie im Zweifelsfall das Gerät nicht, sondern wenden Sie sich an eine qualifizierte Fachkraft. -
Página 47: Technische Daten
TECHNISCHE DATEN 1.1.S GASBEHEIZTE FRITEUSE SERIE OPTIMA - KAT. II (METHANGAS UND FLÜSSIGGAS) MODELL G77/F2V7-A4S G77/F14-A4S G77/F28-A7S Maße Breite Tiefe Höhe Gesamthöhe 1150 1150 1150 Nettogewicht Wanne-Maße und Nr. Breite Tiefe Höhe Wanne-Kapazität 7+ 7 14 + 14 Maße des Korbes Breite Tiefe Höhe... -
Página 48: Gasbeheizte Friteuse Serie Optima - Kat. Ii (Methangas Und Flüssiggas)
1.1.B GASBEHEIZTE FRITEUSE SERIE OPTIMA - KAT. II (METHANGAS UND FLÜSSIGGAS) MODELL G77/F2V7-A4B G77/F14-A4B G77/F28-A7B Maße Breite Tiefe Höhe Gesamthöhe Nettogewicht Wanne-Maße und Nr. Breite Tiefe Höhe Wanne-Kapazität 7+ 7 14 + 14 Maße des Korbes Breite Tiefe Höhe Vorwärmung-Zeit (180K) ca. -
Página 49: Installationsanleitungen
INSTALLATIONSANLEITUNGEN Die Installation und die eventuelle Umrüstung für die Verwendung anderer Gasarten muß in Übereinstimmung mit den geltenden Vorschriften von qualifizierten Fachkräften durchgeführt werden. (Siehe Tabellen II der technischen Daten). HINWEISE: Wenn das Gerät gegen eine Wand installiert wird, so muß die Wand einer Temperatur von 80°C standhalten und feuerfest sein, oder eine Entfernung von 10 cm. -
Página 50: Anschluss An Die Gasanlage
ANSCHLUSS AN DIE GASANLAGE - Das Gerät ist mit einem Gas mit den in der Tabelle II enthaltenen Eigenschaften und Druckwerten zu versorgen. - Den Gasdruck mißt man bei eingeschaltetem Brenner an der Anfangsdruckentnahme (siehe Abb. 1). - Das Gerät ist für den Betrieb mit der auf dem extern angebrachten Klebeschild stehenden Gasart geprüft und vorbereitet. * MERKE: Wenn die Netzdruckschwankungen größer sind als +10% des Nenndruckes, empfiehlt es sich zur Gewährleistung der Nenndruckeinhaltung, dem Gerät einen Druckregler vorzuschalten. -
Página 51: Umrüstung Für Den Betrieb Mit Einer Anderen Gasart
UMRÜSTUNG FÜR DEN BETRIEB MIT EINER ANDEREN GASART Den dem Gerät vorgeschalteten Gashahn schließen. AUSTAUSCHEN DER HAUPTBRENNERDÜSE (ABB. 5) - Die Schranktür öffnen und die Ölbehälter entnehmen. - Die Schraube (D) lockern und den Primärluftregler (C) ins Venturi einschieben. - Mit einem 12er-Schlüssel die Düse (B) losschrauben und mit einer für die gewählte Gasart geeigneten Düse ersetzen. Siehe hierzu Tabelle II. -
Página 52: Austauschen Der Wichtigsten Bestandteile
AUSTAUSCHEN DER WICHTIGSTEN BESTANDTEILE Das Gerät muß mindestens zweimal pro Jahr kontrolliert werden. Zu kontrollieren sind: die Brenner, die Zündung, die Zwischenzündung, die Einstellung der Kleinst- und Höchststufe. Außerdem muß die Funktionstüchtigkeit der Wind- und Zugunterbrechungsschutzhaube die Zuluft kontrolliert werden. AUSTAUSCHEN DER BESTANDTEILE Durchführung eventueller Reparaturen nur durch befugte technische Betreuungsstellen und unter Verwendung von Originalersatzteilen. - Página 53 - Die 4 Schrauben des oberen Gaseingangsflansches abmontieren. ACHTUNG: Den O-Ring der Gasabdichtung gut überprüfen. - Das Thermoelement mit einem 9-mm-Schlüssel abmontieren. - Das Gaszuleitungsrohr zum Leitflammenbrenner mit einem 10-mm-Schlüssel abmontieren. - Das alte thermostatische Ventil durch ein neues ersetzen. ACHTUNG: Die Knöpfe müssen oben sein - die Unterbrechung des Thermoelements nicht vergessen! - Alles in umgekehrter Reihenfolge wieder zusammenbauen.
-
Página 54: Anweisungen An Den Verwender
ANWEISUNGEN AN DEN VERWENDER Vorbemerkung Vor Inbetriebnahme des Gerätes die Wanne und die Körbe folgendermaßen gründlich auswaschen: - Die Wanne bis zum angezeigten Stand mit Wasser und Reinigungsmittel auffüllen, die Geräteheizung einschalten, das Wasser zum Kochen bringen und einige Minuten kochen lassen, das Wasser aus dem Ablaßhahn auslaufen lassen und die Wanne mit sauberem Wasser reichlich nachspülen. -
Página 55: Kochzeitenbeispiele
KOCHZEITENBEISPIELE SPEISEN MINUTENZEIT THERMOSTAT °C Geröstete Brotschnitten Krebstiere und Pfeilkalmare 2 - 5 Panierte Fischfilets 2 - 4 Gemischte Backfische 3 - 5 Bratwürste 2 - 4 170 - 180 Hühnchen 170 - 180 10 - 15 Junge Hühnchen 5 - 8 Verschiedene Braten (von 1 bis 2 kg) 20 - 25 Kartoffelscheiben... -
Página 56: Wartung Und Reinigung
WARTUNG UND REINIGUNG - Die Teile aus Inox-Stahl täglich mit lauwarmem Seifenwasser säubern, reichlich nachspülen und sorgfältig abtrocknen. - Die Inox-Stahlteile dürfen absolut nicht mit herkömmlichen Metallwollen, Bürsten oder Stahlschabern geputzt werden, weil sich dadurch Eisenteilchen ablagern könnten, die verrosten und auf dem Gerät Roststellen bilden könnten. Eventuell kann Stahlwolle verwendet werden, die in die selbe Richtung der Oberflächensatinierung gewischt werden muß. - Página 57 BRENNERGRUPPE ÖLSAMMELBECKEN MIT ÖLFILTER Abb. 1 Abb. 4 G77/F2V7-A4S Abb. 5 Abb. 6 G77/F14-A4S - G77/F28-A7S Abb. 7 - 57 -...
- Página 58 MAX. ÖLSTAND MIN. WÄRMEAUSTÄUSCHER ROHREN ABLAßHAHN ÖL HORINZOTAL = GESCHLOSSEN Abb. 9 ZÜNDFLAMME SCHRAUBEN DES ZÜNDER DREHKNOPF THERMOSTAT ZÜNDFLAMME AUSSCHALTER Abb. 10 SCHRAUBEN DES ARMATUR DECKELS ROTER DRUCKKNOPF FÜR WIEDEREINSCHALTUNG Abb. 11 - 58 -...
- Página 59 ÍNDICE CAPÍTULO DESCRIPCIÓN PÁGINA Advertencias generales ......................... 60 Datos técnicos ............................61 1.1 .S Freidora a gas serie OPTIMA, Categoría II (Gas metano y GPL) ............61 1.1 .B Freidora a gas serie OPTIMA, Categoría II (Gas metano y GPL) ............62 Características técnicas ........................
-
Página 60: Advertencias Generales
ADVERTENCIAS GENERALES - Leer atentamente las observaciones contenidas en el presente manual ya que suministran importantes indicaciones respecto a la seguridad de instalación, de uso y de mantenimiento. - Conservar con cuidado el presente manual para cualquier consulta posterior de los distintos operadores. - Después de haber quitado el embalaje, asegurarse que el aparato esté... -
Página 61: Datos Técnicos
DATOS TÉCNICOS 1.1.S FREIDORA A GAS SERIE OPTIMA, CATEGORÍA II (GAS METANO Y GPL) MODELO G77/F2V7-A4S G77/F14-A4S G77/F28-A7S Dimensiones Tipo Anchura Profundidad Altura Altura tot. 1150 1150 1150 Peso neto Dimensiones del recipiente y N° Anchura Profundidad Altura Cabida del recipiente 7+ 7 14 + 14 Dimensionen de la cesta... -
Página 62: Freidora A Gas Serie Optima, Categoría Ii (Gas Metano Y Gpl)
1.1.B FREIDORA A GAS SERIE OPTIMA, CATEGORÍA II (GAS METANO Y GPL) MODELO G77/F2V7-A4B G77/F14-A4B G77/F28-A7B Dimensiones Tipo Anchura Profundidad Altura Altura tot. Peso neto Dimensiones del recipiente y N° Anchura Profundidad Altura Cabida del recipiente 7+ 7 14 + 14 Dimensionen de la cesta Anchura Profundidad... -
Página 63: Instrucciones Para La Instalación
INSTRUCCIONES PARA LA INSTALACIÓN La instalación y la eventual transformación para el uso con otros tipos de gas tiene que ser efectuada por personas expertas, según las normas en vigor. (Véanse las tablas de datos técnicos II) OBSERVACIONES En caso de que el aparato se instale contra una pared, esta última tiene que resistir a los valores de temperatura de 80°C y debe ser incombustible, o ser a una distancia de 10 cm . -
Página 64: Conexión Con La Instalación Del Gas
CONEXIÓN CON LA INSTALACIÓN DEL GAS - El aparato debe ser alimentado con gas que reúna las características y la presión indicada en la tabla II. - La presión del gas se mide en la toma de presión inicial con los quemadores encendidos (véase la Fig. 1). - El aparato está... -
Página 65: Transformación Para El Funcionamiento Con Otro Tipo De Gas
3. TRANSFORMACIÓN PARA EL FUNCIONAMIENTO CON OTRO TIPO DE GAS Cerrar el grifo del gas situado antes del aparato. SUSTITUCIÓN DEL INYECTOR DEL QUEMADOR PRINCIPAL (FIG. 5) - Abrir la puerta del armario y sacar los contenedores del aceite - Aflojar el tornillo (D) y empujar el regulador del aire de entrada (C) en el venturi. - Desatornillar con una llave del 12 el inyector (B) y sustituir con el correspondiente al gas escogido según lo indicado en la Tabla II. -
Página 66: Sustitución De Los Componentes Más Importantes
SUSTITUCIÓN DE LOS COMPONENTES MÁS IMPORTANTES El aparato tiene que ser controlado por lo menos 2 veces por año. Hay que controlar los quemadores, el encendido, el interencendido, la regulación del máximo y del mínimo. Por otra parte hay que controlar el buen funcionamiento de la campana antiviento / rompe tiraje y la entrada del aire. - Página 67 - Desmontar los 4 tornillos de la platina superior de entrada del gas. ATENCIÓN: controlar bien la junta tórica (OR) de estanqueidad del gas. - Desmontar el termopar con una llave de 9 mm. - Desmontar el tubo de alimentación del quemador piloto con una llave de 10 mm. - Sustituir la vieja válvula termostática con la nueva.
-
Página 68: Instrucciones Para El Usuario
INSTRUCCIONES PARA EL USUARIO Premisa Antes de poner en función el aparato lavar cuidadosamente el recipiente y las cestas, de la siguiente manera: - Llenar el recipiente hasta el nivel con agua y detergente, hacer funcionar el calentamiento y poner en ebullición algunos minutos, vaciar el agua a través del grifo de vaciado y enjuagar abundantemente el recipiente con agua limpia. -
Página 69: Ejemplos De Cocción
EJEMPLOS DE COCCIÓN COMIDA TIEMPO EN MINUTOS TERMOSTATO Tostadas Gambas y calamares 2 - 5 Filete de pescado pasado por pan 2 - 4 Frito mixto 3 - 5 Chorizos 2 - 4 170 - 180 Pollos 10 - 15 170 - 180 Polluelos 5 - 8... -
Página 70: Mantenimiento Y Limpieza
MANTENIMIENTO Y LIMPIEZA - Limpiar diariamente las partes de acero inoxidable con agua tibia enjabonada, luego enjuagar abundantemente y secar con cuidado. - Evitar absolutamente limpiar el acero inoxidable con una esponja metálica, cepillos o rascadores de acero común ya que pueden depositar partículas ferrosas que al oxidarse causen problemas de herrumbre. - Página 71 QUEMADOR RECIPIENTE DEL ACEITE FILTRO Fig. 1 Fig. 4 G77/F2V7-A4S Fig. 5 Fig. 6 G77/F14-A4S - G77/F28-A7S Fig. 7 - 71 -...
- Página 72 MAX. NIVEL ACEITE MIN. TUBO CALENTADO AVALANCIA A BORBOLETA EN POSICIÓN HORIZONTAL = VALVULA DE ENCHIMENTO CERRADO Fig. 9 ENCENDIDO PILOTO TORNILLO DE FIJACIÓN DEL ENCENDEDOR SELECTOR DE AJUSTE TEMPERATURA ENCENDIDO PILOTO APAGADO Fig. 10 TORNILLOS FIJACIÓN TAPADERA BOTÓN ROJO REACTIVACIÓN TERMOSTATO LÍMITE Fig.
-
Página 73: Ländern. Nach En 437 - En 203-1-2
TABELLA II: GAS, PRESSIONE E CATEGORIE NEI VARI PAESI. SECONDO EN 437 - EN 203-1 TABLE II: GAS, PRESSURE AND CLASSES IN DIFFERENT COUNTRIES. AS PER EN 437 EN 203-1-2 TABELLE II: PRESSIONS ET CATÉGORIES DANS LES DIFFÉRENTS PAYS. SELON LES NORMES EN 437 - EN 203-1-2-GAS TABLEAU II : GAZ, DRUCK UND KATEGORIEN IN DEN VERSCHIEDENEN LÄNDERN. -
Página 74: Tecnishe Date
DATI TECNICI – TECHNICAL DATA – DONNEES TECNIQUES TECNISHE DATE – DATOS TÉCNICO TABELLA II -TABLE II -TABLEAU II -TABELLE II - TABLA II: Dati tecnici-Technical data - Donnees tecniques -Tecnishe date -Datos técnicos Modelli – Models – Modèles – Modelle – Modelos G77/F14-A4B G77/F2V7-A4B G77/F28-A7B... - Página 75 Dati tecnici-Technical data - Donnees tecniques -Tecnishe date -Datos técnicos Modelli – Models – Modèles – Modelle – Modelos G77/F14-A4B G77/F2V7-A4B G77/F28-A7B G77/F14-A4S G77/F2V7-A4S Tipo – Type – Bauart Potenza nominale – Nominal thermal power – (kW) Puissance thermique nominale – Nominal- 5,5+5,5 11+11 12,5...
- Página 76 TABELLA II -TABLE II -TABLEAU II -TABELLE II - TABLA II: Dati tecnici-Technical data - Donnees tecniques -Tecnishe date -Datos técnicos Modelli – Models – Modèles – Modelle – Modelos G77/F14-A4B G77/F2V7-A4B G77/F28-A7B G77/F14-A4S G77/F2V7-A4S Tipo – Type – Bauart Potenza nominale –...
- Página 77 TABELLA II -TABLE II -TABLEAU II -TABELLE II - TABLA II: Dati tecnici-Technical data - Donnees tecniques -Tecnishe date -Datos técnicos Modelli – Models – Modèles – Modelle – Modelos G77/F14-A4B G77/F2V7-A4B G77/F28-A7B G77/F14-A4S G77/F2V7-A4S Tipo – Type – Bauart Potenza nominale –...
- Página 78 TABELLA II -TABLE II -TABLEAU II -TABELLE II - TABLA II: Dati tecnici-Technical data - Donnees tecniques -Tecnishe date -Datos técnicos Modelli – Models – Modèles – Modelle – Modelos G77/F14-A4B G77/F2V7-A4B G77/F28-A7B G77/F14-A4S G77/F2V7-A4S Tipo – Type – Bauart Potenza nominale –...
- Página 79 TABELLA II -TABLE II -TABLEAU II -TABELLE II - TABLA II: Dati tecnici-Technical data - Donnees tecniques -Tecnishe date -Datos técnicos Modelli – Models – Modèles – Modelle – Modelos G77/F14-A4B G77/F2V7-A4B G77/F28-A7B G77/F14-A4S G77/F2V7-A4S Tipo – Type – Bauart Potenza nominale –...
- Página 80 TABELLA II -TABLE II -TABLEAU II -TABELLE II - TABLA II: Dati tecnici-Technical data - Donnees tecniques -Tecnishe date -Datos técnicos Modelli – Models – Modèles – Modelle – Modelos G77/F14-A4B G77/F2V7-A4B G77/F28-A7B G77/F14-A4S G77/F2V7-A4S Tipo – Type – Bauart Potenza nominale –...
- Página 81 TABELLA II -TABLE II -TABLEAU II -TABELLE II - TABLA II: Dati tecnici-Technical data - Donnees tecniques -Tecnishe date -Datos técnicos Modelli – Models – Modèles – Modelle – Modelos G77/F14-A4B G77/F2V7-A4B G77/F28-A7B G77/F14-A4S G77/F2V7-A4S Tipo – Type – Bauart Potenza nominale –...
- Página 82 SCHEMI DI INSTALLAZIONE - INSTALLATION DIAGRAM SCHEMAS D’INSTALLATION - INSTALLATIONSPLÄNE - ESQUEMAS DE INSTALACIÓN G77/F14-A4S G77/F28-A7S A= Collegamento gas G 1/2” Gas connection G 1/2" Raccord gaz G 1/2” Gasanschluß G 1/2" Conexión gas G 1/2” D= Rubinetto scarico olio Oil discharge valve Robinet de vidange huile Ölablaßhahn...
- Página 83 G77/F14-A4B G77/F28-A7B A= Collegamento gas G 1/2” Gas connection G 1/2" Raccord gaz G 1/2” Gasanschluß G 1/2" Conexión gas G 1/2” D= Rubinetto scarico olio Oil discharge valve Robinet de vidange huile Ölablaßhahn Grifo vaciado aceite G77/F2V7-A4B -83 -...
- Página 84 INFORMAZIONE AGLI UTENTI AI SENSI delle Direttive 2002/95/CE, 2002/96/CE e 2003/108/CE, relative alla riduzione dell’uso di sostanze pericolose nelle apparecchiature elettriche ed elettroniche, nonché allo smaltimento dei rifiuti. Il simbolo del cassonetto barrato riportato sull’apparecchiatura o sulla confezione, indica che il prodotto alla fine della propria vita utile deve essere raccolto separatamente dagli altri rifiuti.