Tabla de contenido
Publicidad
Idiomas disponibles
Idiomas disponibles
Enlaces rápidos
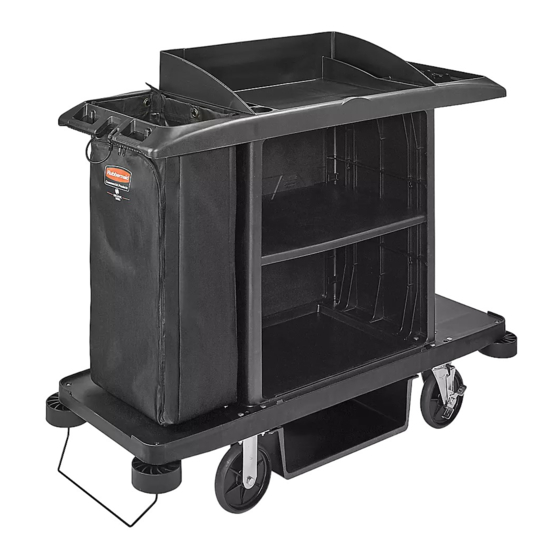
H-4605
RUBBERMAID
®
HOUSEKEEPING CART
TOOLS NEEDED
Rubber Mallet
Wrench
Bolt x 16
Small
Washer x 16
Left Side Panel x 1
Bag x 1
PAGE 1 OF 15
1-800-295-5510
uline.com
Phillips Screwdriver
Electric Drill
Short Screw x 8
Medium Screw x 8
Medium
Large
Washer x 16
Washer x 4
Right Side Panel x 1
Top Shelf x 1
Wire Bar x 1
PARTS
Long Screw x 2
Swivel Caster x 2
Rigid Caster x 2
Back Panel x 2
Shelf x 1
Bumper x 4
Para Español, vea páginas 6-10.
Pour le français, consulter les pages 11-15.
Barrel Nut x 4
Locknut x 16
Panel Clip x 5
Base x 1
Bottom Shelf x 1
Upright x 4
0421 IH-4605
Publicidad
Tabla de contenido

Manuales relacionados para Uline RUBBERMAID H-4605


Resumen de contenidos para Uline RUBBERMAID H-4605
- Página 1 Para Español, vea páginas 6-10. Pour le français, consulter les pages 11-15. H-4605 1-800-295-5510 uline.com RUBBERMAID ® HOUSEKEEPING CART TOOLS NEEDED Rubber Mallet Phillips Screwdriver Wrench Electric Drill PARTS Bolt x 16 Short Screw x 8 Medium Screw x 8...
- Página 2 ASSEMBLY Insert side panels into base. (See Figure 1) 4. Mount the bottom shelf to the bottom side of the base. Secure using eight medium screws and small washers. (See Figure 4) Figure 1 Figure 4 2. Place rigid caster near right side panel. Insert long bolts into top of base as shown and into rigid caster on bottom of base.
- Página 3 ASSEMBLY CONTINUED Place second back panel on top of the first, 9. Select which position to mount shelf. Once selected, ensuring that all brackets are connected. place shelf into that position and secure with four (See Figure 7) short screws and four small washers. (See Figure 9) Figure 7 Figure 9 8.
- Página 4 ASSEMBLY CONTINUED 11. Use rubber mallet to secure top shelf to cart. 13. Place one large washer onto each side of wire bar (See Figure 11) and then set one bumper onto each washer. Then slide upright piece into each bumper. Secure this full piece on underside of base with two barrel nuts.
- Página 5 There are two wire bars to hold the disposable bag in place. Pull disposable bag up over bars and then strap bars down in place. (See Figure 16) Figure 15 Figure 16 1-800-295-5510 uline.com PAGE 5 OF 15 0421 IH-4605...
-
Página 6: Rubbermaid ® Carrito Para Servicio De Limpieza
H-4605 800-295-5510 uline.mx RUBBERMAID ® CARRITO PARA SERVICIO DE LIMPIEZA HERRAMIENTAS NECESARIAS Mazo de Caucho Desarmador de Cruz Llave Taladro Eléctrico PARTES 16 Pernos 8 Tornillos 8 Tornillos 2 Tornillos 4 Tuercas 16 Contratuercas Cortos Medianos Largos de Barril 16 Rondanas... -
Página 7: Ensamble
ENSAMBLE Inserte los paneles laterales en la base. 4. Instale la repisa inferior en el lado inferior de la (Vea Diagrama 1) base. Asegure usando ocho tornillos medianos y rondanas pequeñas. (Vea Diagrama 4) Diagrama 1 Diagrama 4 2. Coloque una rueda rígida cerca del panel lateral derecho. -
Página 8: Continuación Del Ensamble
CONTINUACIÓN DEL ENSAMBLE Coloque el segundo panel posterior encima 9. Seleccione en qué posición instalará la repisa. del primero asegurándose de que todas las Una vez seleccionada, coloque la repisa en esa abrazaderas estén conectadas. posición y asegúrela con cuatro tornillos cortos y (Vea Diagrama 7) cuatro rondanas pequeñas. - Página 9 CONTINUACIÓN DEL ENSAMBLE 11. Use el mazo de caucho para asegurar la repisa 13. Coloque una rondana grande en cada lado de la superior al carrito. (Vea Diagrama 11) barra de alambre y luego coloque un parachoques en cada rondana. Luego deslice una pieza de poste en cada parachoques.
- Página 10 (Vea Diagrama 15) mantienen la bolsa desechable en su lugar. Jale la bolsa desechable por encima de las barras y luego ajuste las barras en su lugar. (Vea Diagrama 16) Diagrama 15 Diagrama 16 800-295-5510 uline.mx PAGE 10 OF 15 0421 IH-4605...
-
Página 11: Outils Requis
H-4605 1-800-295-5510 uline.ca RUBBERMAID CHARIOT D'ENTRETIEN MÉNAGER OUTILS REQUIS Maillet en caoutchouc Tournevis cruciforme Clé Perceuse électrique PIÈCES Écrou à Écrou de Boulon x 16 Petite vis x 8 Vis moyenne x 8 Longue vis x 2 manchon x 4... - Página 12 MONTAGE Insérez les panneaux latéraux dans la base. 4. Installez la tablette inférieure au bas de la base. (Voir Figure 1) Fixez avec huit vis moyennes et petites rondelles. (Voir Figure 4) Figure 1 Figure 4 2. Placez une roulette fixe au niveau du panneau latéral droit.
- Página 13 MONTAGE SUITE Placez le deuxième panneau arrière au-dessus du 9. Déterminez le niveau auquel la tablette sera premier en veillant à ce que tous les supports sont installée. Une fois déterminé, placez la tablette en connectés. (Voir Figure 7) position et fixez avec quatre petites vis et quatre petites rondelles.
- Página 14 MONTAGE SUITE 11. Utilisez un maillet en caoutchouc pour fixer la 13. Placez une grande rondelle sur chaque côté de tablette supérieure au chariot. (Voir Figure 11) la barre en fil de métal, puis un butoir sur chaque rondelle. Glissez un montant dans chaque butoir. Fixez l'ensemble sous la base avec deux écrous à...
- Página 15 à l'intérieur du sac. Deux barres en fil de métal sont présentes pour maintenir le sac jetable en place. Tirez le sac jetable par-dessus les barres et replacez- les en place. (Voir Figure 16) Figure 15 Figure 16 1-800-295-5510 uline.ca PAGE 15 OF 15 0421 IH-4605...