Tabla de contenido
Publicidad
Idiomas disponibles
Idiomas disponibles
Enlaces rápidos
V
VDPL1
1803
EX
XPLIO I
I – 18 X
EX
XPLIO I
I – MOV
EX
XPLIO I
I – PROJ
EX
XPLIO I
I – CABE
EX
XPLIO I
I – "MOV
US
SER MAN
UAL
GE
EBRUIKER
RSHANDL
MO
ODE D'EM
MPLOI
MA
ANUAL D
EL USUAR
BE
EDIENUN
GSANLEIT
MHRG
GB
3W RG
B LED M
ING HE
AD – 18
JECTEUR
R LYRE
EZA MÓV
VIL – 18
VING HE
EAD"-SC
LEIDING
13
24
RIO
35
TUNG
45
MOVING
G HEAD
8X 3W R
RGB-LED
– 18 LE
ED RGB
8X LED
RGBW D
CHEINW
WERFER
3
4
D
DE 3W
DE 3W
– 18X 3 3 W RGB BW-LED
Publicidad
Tabla de contenido

Manuales relacionados para HQ-Power EXPLIO I


Resumen de contenidos para HQ-Power EXPLIO I
- Página 1 VDPL1 1803 MHRG XPLIO I I – 18 X 3W RG B LED M MOVING G HEAD XPLIO I I – MOV ING HE AD – 18 8X 3W R RGB-LED XPLIO I I – PROJ JECTEUR R LYRE – 18 LE ED RGB DE 3W XPLIO I...
- Página 2 VDPL1803MHRGB terminator eindweerstand résistance de terminaison terminación Terminierung How to turn the controller line from 3-pins into 5-pins (plug and socket). Controller line van 3-pin naar 5-pin aanpassen (stekker en contact). Modifier la ligne du contrôleur de 3 broches en 5 broches (fiche et contact). Modificar la línea del controlador de 3 polos y 5 polos (conector y contacto).
- Página 3 PL1803MHR R MAN NUAL Intro oduction o all residen nts of the E European Un nion mportant en nvironment tal informat tion about t this produc This symbol on th he device or r the packag e indicates t that disposa l of the devi ce after its l ifecycle coul...
- Página 4 VDPL1803MHRGB • Familiarise yourself with the functions of the device before actually using it. Do not allow operation by unqualified people. Any damage that may occur will most probably be due to unprofessional use of the device. • All modifications of the device are forbidden for safety reasons. Damage caused by user modifications to the device is not covered by the warranty.
-
Página 5: Control Panel Navigation
VDPL1803MHRGB • Connect the device to the mains with the power plug. Do not connect it to a dimming pack. • The VDPL1803MHRGB has a power output [4] to supply power to another VDPL1803MHRGB. When connecting several VDPL1803MHRGBs in a daisy chain via this output, make sure that the total current does not exceed the power line’s nominal current. -
Página 6: Stand-Alone Mode
VDPL1803MHRGB Menu item Setting Description TC switch Select OFF to enable the temperature control switch (default setting). ON/OFF mask Always use the OFF setting. TC switch TC switch Password protected. Do not change these settings. temp Select ON to inverse the panning direction on this device. Reverse ON/OFF Select OFF to keep the normal panning direction on this device (default... - Página 7 VDPL1803MHRGB Sound-activation Pan/tilt movement Display Description possible possible no movement, but Custom colour. See Manual Mode for more ManualDimmer stationary pan/tilt information. position is adjustable Note: At power-on, the device automatically enters DMX mode (the display shows <LED Addr:xxx>). To set the device to stand-alone mode: 1.
-
Página 8: Master/Slave Mode
VDPL1803MHRGB Macro Programming You can define your own program, a macro, if none of the built-in programs suits your needs. The macro consists of maximum 62 different, consecutive steps. For each step, you can choose among three effects (ChangeColor, Twinkling, Fade). You can choose to include pan/tilt movements or to keep the head stationary. The device will execute all defined steps in an endless loop. - Página 9 VDPL1803MHRGB DMX Mode This mode allows you to control the fixture by any universal DMX controller. • All DMX-controlled devices need a digital start address so that the correct device responds to the signals. This digital start address is the channel number from which the device starts to “listen” to the DMX controller.
- Página 10 VDPL1803MHRGB Channel From Description Strobe 2: opening pulse (fast to slow) Shutter open Strobe 3: closing pulse (fast to slow) Shutter open Strobe 4: random strobe (fast to slow) Shutter open Strobe 5: random opening pulse (fast to slow) Shutter open Strobe 6: random closing pulse (fast to slow) Shutter open Strobe 7: burst pulse (fast to slow)
- Página 11 VDPL1803MHRGB Channel From Description Random colour Fast Medium Slow Open Red dimmer (0 ~ 100 %) Green dimmer (0 ~ 100 %) Blue dimmer (0 ~ 100 %) Colour temperature control No function 100 000 K to 2500 K 9 channel mode: Channel From Description...
-
Página 12: Cleaning And Maintenance
VDPL1803MHRGB 7 channel mode: Channel From Description Pan: 0° ~ 540° / 0° ~ 630° (maximum angle is set via the menu) Pan fine Tilt: 0° ~ 240° Tilt fine Red dimmer (0 ~ 100 %) Green dimmer (0 ~ 100 %) Blue dimmer (0 ~ 100 %) 5 channel mode: Channel... - Página 13 PL1803MHR GEBR RUIKER RSHAN NDLEID DING Inlei ding an alle inge ezetenen va an de Europ pese Unie elangrijke m milieu-infor rmatie betr reffende dit t product Dit sy ymbool op h het toestel of f de verpakk king geeft aa an dat, als h et na zijn lev venscyclus w...
-
Página 14: Installatie
VDPL1803MHRGB Bescherm tegen schokken. Vermijd brute kracht tijdens de bediening. • Leer eerst de functies van het toestel kennen voor u het gaat gebruiken. Ongeschoolde personen mogen dit toestel niet gebruiken. Meestal is beschadiging het gevolg van onprofessioneel gebruik. • Om veiligheidsredenen mag u geen wijzigingen aanbrengen. -
Página 15: Het Bedieningspaneel
VDPL1803MHRGB • Een degelijke praktijkervaring is vereist voor de plaatsing van dit toestel. U moet de maximumbelasting van de draagconstructie kunnen berekenen, weten welk constructiemateriaal u kunt gebruiken en u moet het gebruikte materiaal en het toestel regelmatig laten nakijken. Monteer het toestel niet zelf indien u er geen ervaring mee heeft. - Página 16 VDPL1803MHRGB Menu item Instelling Beschrijving Het is mogelijk (bijvoorbeeld door een stroompiek) dat het toestel afwijkt van de geselecteerde instellingen. In dit geval, selecteer ON zodat het toestel de geselecteerde instellingen automatisch herstelt Reset machine ON/OFF (inclusief de kalibratie-instellingen). Selecteer OFF om terug te keren naar het menu zonder opnieuw in te stellen.
- Página 17 VDPL1803MHRGB Standalone In autonome modus draait het toestel één van de ingebouwde programma's: automatisch of geluidsgestuurd. U kunt kiezen uit de volgende opties: Geluidssturing Pan/tiltbeweging Scherm Beschrijving mogelijk mogelijk Eigen programma. Zie Macro Macroprogrammering voor meer informatie. Ingebouwd programma: kleurwissel, met Fade fade-effect Ingebouwd programma: kleurwissel, met...
- Página 18 VDPL1803MHRGB Manuele modus In de manuele modus (scherm: <LED Manual Dimmer>) kunt u een eigen kleur creëren door de intensiteit van elk LED individueel te regelen (rood, groen, blauw, wit), en een nauwkeurige positie van de kop door de exacte pan/tiltposities in te stellen.
- Página 19 VDPL1803MHRGB Menu item Instelling Beschrijving Selecteer deze optie voor een kleurwissel zonder effecten zoals de derde ChangeColor stap in de macro. Selecteer deze optie voor een kleurwissel met stroboscoopeffect zoals Program step 03 Twinkling de derde stap in de macro. Selecteer deze optie voor een kleurwissel met fade-effect zoals de derde Fade stap in de macro (standaard).
- Página 20 VDPL1803MHRGB 5. Gebruik de <UP> en <DOWN> toetsen om te kiezen tussen DMX-sturing via 5, 7, 9 of 12 kanalen en druk op <ENTER>. 6. Druk eenmaal op <SET/ESC>. 7. Gebruik de <UP> en <DOWN> toetsen om <DMX Address> te selecteren en druk op <ENTER>. 8.
- Página 21 VDPL1803MHRGB Kanaal Functie Controle-instellingen van de armatuur Geen functie Reset (8 seconden aanhouden) Geen functie Normale motorsnelheid Maximale motorsnelheid Minimum motorsnelheid Geen functie Maximale ventilatorsnelheid Geen functie Ventilatorsnelheid geregeld door thermostaat Geen functie Snel dimmen Geen functie Vloeiend dimmen Geen functie Verlicht scherm Kleurenwiel Dimkanaal ingeschakeld...
-
Página 22: Reiniging En Onderhoud
VDPL1803MHRGB Kanaal Functie Sluiter geopend Stroboscoop 5: willekeurige openingspuls (snel naar langzaam) Sluiter geopend Stroboscoop 6: willekeurige sluitingspuls (snel naar langzaam) Sluiter geopend Stroboscoop 7: burst-puls (snel naar langzaam) Sluiter geopend Stroboscoop 8: willekeurige burst-puls (snel naar langzaam) Sluiter geopend Stroboscoop 9: sinusgolf (snel naar langzaam) Sluiter geopend Stroboscoop 10: burst (snel naar langzaam) -
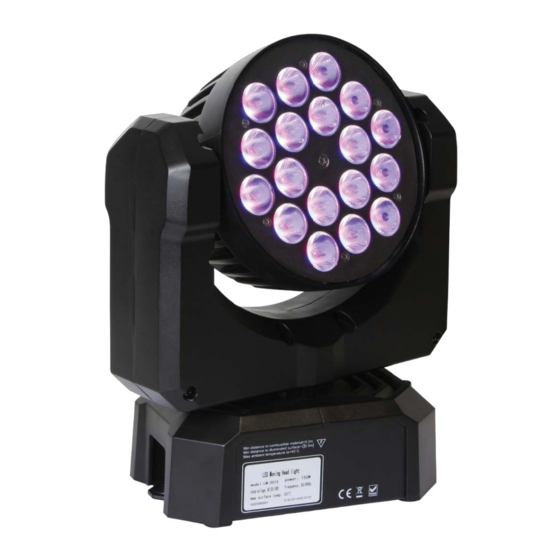
Página 23: Technische Specificaties
VDPL1803MHRGB • De gebruiker mag geen onderdelen vervangen. • Bestel eventuele reserveonderdelen bij uw plaatselijke verdeler. Technische specificaties voeding 100 ~ 240 VAC / 50 - 60 Hz verbruik 160 W 18 x 3-in-1 RGB-LED (EDISON) stralingshoek 25° omgevingstemperatuur -30 °C ~ +40 °C max. - Página 24 PL1803MHR MODE E D’EM MPLOI Intro oduction ux résidents s de l'Union n européen es informat tions enviro onnementa les importa antes conce ernant ce p produit Ce sy ymbole sur l' appareil ou l'emballage indique que l’élimination n d’un appar reil en fin de e vie peut pollue...
- Página 25 VDPL1803MHRGB Protéger contre les chocs et le traiter avec circonspection pendant l’opération. • Se familiariser avec le fonctionnement de l’appareil avant de l’utiliser. Ne pas permettre pas aux personnes non qualifiées d’opérer cet appareil. La plupart des dégâts sont causés par un usage non professionnel. •...
-
Página 26: Navigation Dans Le Menu
VDPL1803MHRGB • Pour un montage en suspension luminaire, utilisez un crochet de suspension approprié (pas livré) et passez un boulon M10 à travers l'étrier (plié). • Déterminer l’angle d’inclinaison au moyen de l’étrier de montage et serrer les vis de montage. •... -
Página 27: Mode Autonome
VDPL1803MHRGB Entrée de Réglage Description menu Sélectionner ON pour rétablir les réglages par défaut, excepté les Reload réglages d'étalonnage (voir Mode manuel pour l'étalonnage). ON/OFF parameter Sélectionner OFF pour revenir au menu sans réinitialiser. TC switch Sélectionner OFF pour activer le réglage de la température (réglage par ON/OFF mask défaut). - Página 28 VDPL1803MHRGB Pilotage par le Mouvement pan/tilt Afficheur Description son possible possible Programme intégré : changement de Twinkling couleurs, avec effet stroboscopique Programme intégré : changement de ChangeColor couleurs, sans effets 10000K 8500K Pas de mouvement, … Différentes couleurs intégrées, fixes position pan/tilt stationnaire par défaut Green...
-
Página 29: Programmation De Macros
VDPL1803MHRGB Entrée de Réglage Description menu ON/OFF Sélectionner ON pour allumer les LEDs. Sélectionner OFF pour éteindre Light switch les LEDs. Light red 0 ~ 255 Régler l'intensité des LEDs rouges. Light green 0 ~ 255 Régler l'intensité des LEDs vertes. Light blue 0 ~ 255 Régler l'intensité... -
Página 30: Mode Maître/Esclave
VDPL1803MHRGB Mode maître/esclave Le mode maître/esclave permet de connecter plusieurs appareils à un appareil maître. Tous les appareils esclave fonctionneront en parfaite synchronisation avec l'appareil maître. Mettez un appareil en mode maître et les autres appareils en mode esclave. 1. Connectez tous les appareils en série avec des câbles DMX. 2. - Página 31 VDPL1803MHRGB Comportement si aucun signal DMX n'est détecté Il est possible de spécifier ce que l'appareil doit faire lorsqu'aucun signal DMX n'est détecté sur l'entrée DMX : 1. Appuyez sur la touche <SET/ESC> jusqu’à ce que <LED Addr:xxx> s’affiche et appuyer sur <ENTER>. Il s'affiche <DMX menu>.
- Página 32 VDPL1803MHRGB Canal À Description Pas de fonction Vitesse de ventilateur réglée par thermostat Pas de fonction Gradateur rapide Pas de fonction Gradateur fluide Pas de fonction Afficheur illuminée Roue chromatique Canal de gradateur activé Différentes couleurs Ouvert Effet de rotation de la roue chromatique Sens horaire, de rapide à...
-
Página 33: Nettoyage Et Entretien
VDPL1803MHRGB Canal À Description Stroboscope 9 : onde sinusoïdale (de rapide à lent) Obturateur ouvert Stroboscope 10 : rafale (de rapide à lent) Obturateur ouvert Pan : 0° ~ 540° / 0° ~ 630° (angle max. réglé depuis le menu) Pan fin Tilt : 0°... - Página 34 VDPL1803MHRGB N’employer cet appareil qu’avec des accessoires d’origine. La SA Velleman ne peut, dans la mesure conforme au droit applicable être tenue responsable des dommages ou lésions (directs ou indirects) pouvant résulter de l’utilisation de cet appareil. Pour plus d’information concernant cet article et la dernière version de cette notice, visiter notre site web www.hqpower.eu.
-
Página 35: Instr Ruccione S De Seg
PL1803MHR ANUAL L DEL U USUAR Intro oducción los ciudada anos de la U Unión Europ mportantes informacio ones sobre el medio am mbiente co oncerniente e a este pro oducto Este símbolo en este aparato o o el embala aje indica qu ue, si tira las s muestras i... -
Página 36: Características
VDPL1803MHRGB • Familiarícese con el funcionamiento del aparato. Sólo personas cualificadas pueden manejar este aparato. La mayoría de los daños son causados por un uso inadecuado. • Por razones de seguridad, las modificaciones no autorizadas del aparato están prohibidas. Los daños causados por modificaciones no autorizadas, no están cubiertos por la garantía. -
Página 37: Navegar Por El Menú
VDPL1803MHRGB • Ajuste el ángulo de inclinación a su gusto mediante un soporte de montaje y fije los tornillos del soporte. • Quite todo material inflamable en un radio de 0.2 m alrededor del aparato. • La conexión eléctrica debe llevarla a cabo un electricista cualificado. •... - Página 38 VDPL1803MHRGB Menú Ajuste Descripción TC switch Seleccione OFF para activar el interruptor para controlar la temperatura ON/OFF mask (ajuste por defecto). Utilice siempre el ajuste OFF. TC switch TC switch Protegido con contraseña. No modifique este ajuste. temp Seleccione ON para invertir la dirección del movimiento « pan » (movimiento giratorio).
- Página 39 VDPL1803MHRGB control por la movimiento pan/tilt Pantalla Descripción música posible posible Programa incorporado: cambio de color, sin ChangeColor sí sí efectos 10000K 8500K sin movimiento, posición … Varios colores preprogramados y fijos pan/tilt estándar fija Green Color personalizado. Consulte « Modo sin movimiento, posición ManualDimmer manual »...
-
Página 40: Modo Maestro/Esclavo
VDPL1803MHRGB Menú Ajuste Descripción Light blue 0 ~ 255 Ajustar la luminosidad de los LEDs azules. Light white 0 ~ 255 Ajustar la luminosidad de los LEDs blancos. Light 0 ~ 255 Seleccione un efecto de estroboscopio. estroboscopio Scan pan 0 ~ 255 Ajustar la posición del movimiento pan. -
Página 41: Modo De Control Dmx
VDPL1803MHRGB 3. En el aparato maestro, pulse la tecla <SET/ESC> hasta que se visualice <SET Menu> y pulse <ENTER>. 4. Utilice <UP> y <DOWN> para seleccionar <Master/Alone> y pulse <ENTER>. 5. Utilice <UP> y <DOWN> para seleccionar <Master Mode> y pulse <ENTER>. «... - Página 42 VDPL1803MHRGB Valores DMX512 detallados por canal Modo de 12 canales: Canal Función Efecto Shutter Shutter cerrado Shutter abierto Estroboscopio 1 (de rápido a lento) Shutter abierto Estroboscopio 2: opening pulse (de rápido a lento) Shutter abierto Estroboscopio 3: closing pulse (de rápido a lento) Shutter abierto Estroboscopio 4: estroboscopio aleatorio (de rápido a lento) Shutter abierto...
- Página 43 VDPL1803MHRGB Canal Función efecto giratorio del disco de color En el sentido de las agujas del reloj, de rápido a lento Stop: parar en el color activado en sentido contrario a las agujas del reloj, de lento a rápido Abierto Color aleatorio Rápido Medio...
-
Página 44: Limpieza Y Mantenimiento
VDPL1803MHRGB Modo de 7 canales: Canal Función Pan: 0° ~ 540° / 0° ~ 630° (el ángulo máx. se ajusta en el menú) Ajuste fino del movimiento pan Tilt: 0° ~ 240° Ajuste fino del movimiento tilt Dimmer rojo (0 ~ 100 %) Dimmer verde (0 ~ 100 %) Dimmer azul (0 ~ 100 %) Modo de 5 canales:... - Página 45 PL1803MHR DIENUN NGSAN NLEITU Einfü ührung n alle Einwo ohner der E Europäische en Union ichtige Umw weltinform mationen üb ber dieses P Produkt Diese s Symbol au uf dem Produ ukt oder der Verpackung g zeigt an, d ass die Ents sorgung dies es Produkte nach...
-
Página 46: Allgemeine Richtlinien
VDPL1803MHRGB Allgemeine Richtlinien Siehe Velleman® Service- und Qualitätsgarantie am Ende dieser Bedienungsanleitung. Schützen Sie das Gerät vor Staub. Schützen Sie das Gerät vor extremen Temperaturen. Vermeiden Sie Erschütterungen. Vermeiden Sie rohe Gewalt während der Installation und Bedienung des Gerätes. • Nehmen Sie das Gerät erst in Betrieb, nachdem Sie sich mit seinen Funktionen vertraut gemacht haben. - Página 47 VDPL1803MHRGB • Stehen Sie während der Montage, Entfernung oder Wartung nie direkt unter dem Gerät. Lassen Sie das Gerät jährlich und vor der Inbetriebnahme von einem Fachmann prüfen. • Montieren Sie das Gerät an einem Ort, wo niemand es berühren kann und wo wenige Leute vorübergehen. •...
- Página 48 VDPL1803MHRGB Menü Einstellung Beschreibung Das Gerät kann andere Einstellungen als die, die Sie eingegeben haben, anzeigen (z.B. nach einem Stromausfall). Ist dies der Fall, wählen Sie ON aus, um die eingegebenen Einstellungen und die Reset machine ON/OFF Kalibrierungseinstellungen zurückzustellen. Wählen Sie OFF, um ohne Rücksetzung zum Menü zurückzukehren. Wählen Sie ON, um das Gerät auf Werkseinstellung zurückzustellen, außer den Kalibrierungseinstellungen (siehe Manueller Modus für Reload...
- Página 49 VDPL1803MHRGB Stand-Alone-Modus Im Stand-Alone-Modus, wird ein eingebautes Programm abgespielt: automatisch oder musikgesteuert. Sie haben folgende Optionen: Schwenk- Musiksteuerung Display Beschreibung /Neigebewegung möglich möglich Ein eigenes Programm erstellen. Für mehr Macro Informationen, siehe « Ein Makro programmieren ». Eingebautes Programm: Farbwechsel, mit Fade Fade-Effekt Eingebautes Programm: Farbwechsel, mit...
- Página 50 VDPL1803MHRGB Manueller Modus Im manuellen Modus (Display: <LED Manual Dimmer>) können Sie eine eigene Farbe einstellen, indem Sie die Helligkeit jeder LED-Farbe (rot, grün, blau, weiß) regeln. Sie können ebenfalls die Position des Kopfs bestimmen, indem Sie die exakte Schwenk-/und Neigeposition eingeben. Sie können auch einen Stroboskop- Effekt hinzufügen oder sogar alle LEDs ausschalten.
-
Página 51: Dmx-Steuerung
VDPL1803MHRGB Menü Einstellung Beschreibung ChangeColor Dritter Schritt im Makro: Farbwechsel ohne Effekte. Twinkling Dritter Schritt im Makro: Farbwechsel mit Stroboskop-Effekt. Program step 03 Dritter Schritt im Makro: Farbwechsel mit Fade-Effekt Fade (Standardeinstellung). … … 4. Das Menü zeigt die Anzahl Schritte, angegeben in “Step quantity”. Wiederholen Sie zum Anzeigen der Anzahl angegebener Schritte. - Página 52 VDPL1803MHRGB 7. Verwenden Sie <UP> und <DOWN> um <DMX Address> auszuwählen und drücken Sie <ENTER>. 8. Verwenden Sie <UP> und <DOWN> um die DMX-Startadresse (001 ~ xxx) auszuwählen und drücken Sie <ENTER>. Bemerkung: Der DMX-Adressenbereich ist begrenzt, um sicherzustellen, dass da immer genügend Kanäle verfügbar sind: 1 ~ 508 für den 5-Kanal-Modus;...
- Página 53 VDPL1803MHRGB Kanal Funktion Rücksetzung (halten Sie 8 Sekunden gedrückt) Keine Funktion Normale Motorgeschwindigkeit Max. Motorgeschwindigkeit Min. Motorgeschwindigkeit Keine Funktion Max. Lüftergeschwindigkeit Keine Funktion der Thermostat regelt die Lüftergeschwindigkeit Keine Funktion Fast dimmer Keine Funktion Smooth dimmer Keine Funktion das Display beleuchten Farbrad Dimmer channel enabled Various colours...
-
Página 54: Reinigung Und Wartung
VDPL1803MHRGB Kanal Funktion Shutter offen Stroboskop 6: Closing Pulse, willkürlich (von langsam auf schnell) Shutter offen Stroboskop 7: Burst Pulse (von langsam auf schnell) Shutter offen Stroboskop 8: Burst Pulse, willkürlich (von langsam auf schnell) Shutter offen Stroboskop 9: Sinuswelle (von langsam auf schnell) Shutter offen Stroboskop 10: Burst (von langsam auf schnell) Shutter offen... -
Página 55: Technische Daten
VDPL1803MHRGB • Es gibt keine zu wartenden Teile. • Bestellen Sie eventuelle Ersatzunterteile bei Ihrem Fachhändler. Technische Daten Stromversorgung 100 ~ 240 VAC / 50 - 60 Hz Stromverbrauch 160 W 18 x 3-in-1 RGB (EDISON) Abstrahlwinkel 25° Umgebungstemperatur -30 °C ~ +40 °C max. - Página 56 - defecten veroorzaakt door opzet, nalatigheid of door een onoordeelkundige behandeling, slecht onderhoud of abnormaal Velleman® Service and Quality Warranty gebruik of gebruik van het toestel strijdig met de voorschriften van Since its foundation in 1972, Velleman® acquired extensive de fabrikant. experience in the electronics world and currently distributes its - schade ten gevolge van een commercieel, professioneel of collectief products in over 85 countries.
- Página 57 nur aufladbare, sondern auch nicht aufladbare, eingebaute oder ersetzbare), Lampen, Gummiteile, Treibriemen, usw. (unbeschränkte Garantía de servicio y calidad Velleman® Liste). Desde su fundación en 1972 Velleman® ha adquirido una amplia - Schäden verursacht durch Brandschaden, Wasserschaden, Blitz, experiencia como distribuidor en el sector de la electrónica en más de Unfälle, Naturkatastrophen, usw.