Tabla de contenido
Publicidad
Idiomas disponibles
Idiomas disponibles
Enlaces rápidos
Perpetual Calendar • Fly-back Chronograph
• Fly-back Chrono Compass • Linear Chronograph • World Time
• Compass • Tide Temp and Compass Altimeter • Depth
Ewiger Kalender • Fly-back-Chronograph • Fly-back-Chrono-Kompass
• Linearchronograph • Weltzeit • Kompass
• Gezeiten Temperatur und Kompass • Höhenmesser • Tiefe
Calendario Perpetuo • Cronógrafo Fly-back
• Brújula y Cronógrafo Fly-back • Cronógrafo lineal • Hora mundial
• Brújula • Marea temperatura y brújula • Altímetro • Profundidad
Calendário Perpétuo • Cronógrafo Fly-back
• Bússola e cronógrafo Fly-back • Cronógrafo Linear • Horário mundial
• Bússola • Maré Temperatura e Bússola • Altímetro • Profundidade
• Corrida de iates com a data perfeita • 3TMG
W273 EU2 355-095014
• Yacht Racer with Perfect Date • 3GMT
• Yacht Racer mit Perfect Date • 3GMT
• Yacht Racer with Perfect Date • 3GMT
™
Publicidad
Tabla de contenido

Manuales relacionados para Timex Intelligent Quartz W273


Resumen de contenidos para Timex Intelligent Quartz W273
- Página 1 Perpetual Calendar • Fly-back Chronograph • Fly-back Chrono Compass • Linear Chronograph • World Time • Compass • Tide Temp and Compass Altimeter • Depth • Yacht Racer with Perfect Date • 3GMT Ewiger Kalender • Fly-back-Chronograph • Fly-back-Chrono-Kompass • Linearchronograph • Weltzeit • Kompass •...
- Página 2 English ......Page 1 Deutsch ......Seite 105 Español ......página 219 Português ......página 333...
- Página 3 ® QUARTZ watch. Please read these instructions carefully ™ to understand how to operate your Timex watch. Your watch may not have all of the features described in this booklet. For more information, and to register your product please visit:...
- Página 4 TABLE OF CONTENTS Tide Temp and Compass ..........52 Altimeter ................61 How to Start Your Watch ............ 5 Depth ................69 Water and Shock Resistance ..........6 Yacht Racer ..............74 Indiglo Night-Light ............8 ® 3GMT ................83 Date and Time Setting ............
-
Página 5: How To Start Your Watch
With Timex Some watches require the setting crown to be screwed Intelligent Quartz watches, the technology is written into in. -
Página 6: Water And Shock Resistance
WATER AND SHOCK RESISTANCE WARNING: TO MAINTAIN WATER-RESISTANCE, DO NOT PRESS ANY BUTTONS UNDER WATER UNLESS If your watch is water-resistant, meter marking (WR_M) YOUR WATCH IS INDICATED AS 200 METER WATER- is indicated. RESISTANT. NEVER PULL OUT THE CROWN WHILE UNDER WATER. -
Página 7: Indiglo ® Night-Light
INDIGLO NIGHT-LIGHT DATE AND TIME SETTING ® NOTE: The watch crown has three positions: closed, Press button or crown to activate light. Electroluminescent technology used in the INDIGLO middle and outer. To familiarize yourself with the ® night-light illuminates the watch face at night and in low difference between the various positions extend the light conditions. -
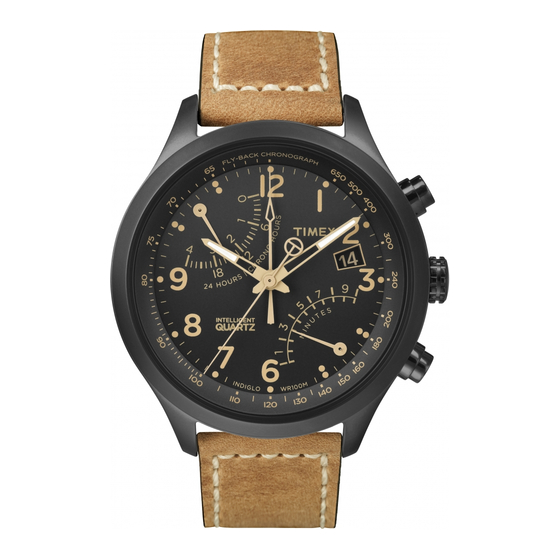
Página 8: Perpetual Calendar
date during this timeframe. Doing so could damage the PERPETUAL CALENDAR watch movement. OVERVIEW Push crown to closed position after setting date/time. The DATE HAND second hand will begin moving. BUTTON A DAY HAND (RECESSED) NOTE: For months with fewer than 31 days, the date will HOUR HAND need to be adjusted. - Página 9 Timex factory. You only need to adjust the time. The watch has two recessed push buttons for use by Timex Service Center to set the day and date after battery replacement. They have no use otherwise.
-
Página 10: Fly-Back Chronograph
FLY-BACK CHRONOGRAPH 4TH CENTER HAND ADJUSTMENT To readjust a misaligned 4th center hand: OVERVIEW 1. Pull the crown to its outer position. The upper and lower hands reset to the ends of their sweeps HOUR HAND 4TH CENTER HAND automatically. BUTTON A UPPER HAND 2. -
Página 11: Second Time Zone
SECOND TIME ZONE shows the second time zone time and the 4th center hand shows the minutes. The upper hand shows the time for the second time zone. Note that the scale is 2. Assuming that the second time zone time has the 24-hours, with midnight same minutes value as the first time zone, the 4th at either end and noon in... - Página 12 FLY-BACK CHRONOGRAPH 4. To reset the fly-back chronograph to zero position, press Button B (FLY-BACK/RESET). The watch provides a 4-hour fly-back chronograph. When the chronograph is reset, all hands move to 1. To start, press Button A (START/STOP). zero position. After another eight seconds, the watch The 4th center hand shows the seconds with 1/5 resumes normal display of the second time zone.
-
Página 13: Fly-Back Chronograph Compass
FLY-BACK CHRONOGRAPH COMPASS INDICATOR HAND (4TH CENTER HAND) ADJUSTMENT To readjust a misaligned indicator hand: OVERVIEW 1. Pull the crown to its outer position. The upper and lower hands reset to the ends of their sweeps MINUTE HAND 4TH CENTER HAND automatically. - Página 14 2. Press B to move the 4th center hand forward. Hold the SECOND TIME ZONE The upper hand normally shows the time for the second button to move the hand quickly. The upper and 4th center hands move together; as the 4th center hand time zone.
- Página 15 2. To stop, press A again (START/STOP). All hands freeze. FLY-BACK CHRONOGRAPH The watch provides a 4-hour fl y-back chronograph. 3. To resume, press A (START/STOP) again, or to reset the chronograph to zero, press B (FLY-BACK/RESET). 1. To start, press A (START/STOP). The 4th center hand shows the seconds with 1/5-second resolution and When the chronograph is reset, all hands move to the lower hand shows...
-
Página 16: Compass Calibration
COMPASS CALIBRATION than normal concentrations of hard and soft iron, as they may cause inaccurate headings. Whenever a heading is Before use, the compass must be calibrated. suspect, recalibrate. Since a compass uses the earth’s magnetic field, you Do not store the watch near any source of magnetism, must be aware of large metallic objects, such as vehicles or bridges, or objects that give off electromagnetic such as a computer, appliance, or television, as the... - Página 17 3. Press C (COMPASS) to begin. The 4th center hand 5. If you do not wish to set the magnetic declination, rotates two revolutions to remind you to rotate the push the crown in. Otherwise, to have watch watch. While level, SLOWLY rotate the watch two automatically compensate for the declination angle, revolutions, taking at least 15 seconds per revolution.
- Página 18 COMPASS OPERATION available through buttons A (START/STOP) and B (FLY- Normally, the compass is inactive, with the 4th center BACK/RESET). hand pointing to 12 o’clock or showing the chronograph NOTE: During compass operation, the second hand seconds. moves in two-second increments. Also, when the compass is activated, the upper and lower hands may While holding the watch level, press C (COMPASS) to activate the compass.
-
Página 19: Linear Chronograph
LINEAR CHRONOGRAPH LINEAR AND 4TH CENTER HAND ADJUSTMENT To readjust a misaligned 4th center hand: OVERVIEW 1. Pull the crown to its outer position. The lower hand HOUR HAND resets to the end of its sweep automatically. 4TH CENTER HAND 2. - Página 20 SECOND TIME ZONE TO SET THE SECOND TIME ZONE: 1. Pull crown to its middle position. The lower hand The lower hand shows the second time zone time and the 4th center shows the time for hand shows the minutes. the second time zone.
- Página 21 LINEAR CHRONOGRAPH When the chronograph is reset, all hands move to zero position. After another eight seconds, the watch resumes The watch provides a 4-hour split chronograph. normal display of the second time zone. While the 1. To start, press Button A (START/STOP). The 4th center chronograph is running, you may take a split time.
-
Página 22: World Time
WORLD TIME TO SET THE WORLD TIME: 1. Pull the crown to its middle position. The center hand OVERVIEW shows the world time zone city and the upper hand 24 CITIES HOUR HAND shows the time in that city. 4TH CENTER HAND UPPER HAND BUTTON A WORLD TIME... - Página 23 2. Press A or B to move the center hand to the city that 4. If the displayed season is not correct for the home represents your home time zone. Hold a button to time zone, press C to change it. If the home time zone move the hand quickly.
- Página 24 INDICATOR HAND (4TH CENTER HAND) ADJUSTMENT CITY TIME DISPLAY To readjust a misaligned indicator hand: Press A or B to move the center 1. Pull the crown to its outer position. The upper and hand backward or lower hands reset to the ends of their sweeps, forward, respec- automatically.
- Página 25 The watch provides one setting to represent the two peri- COMPASS ods all cities that observe daylight savings time have. For OVERVIEW the watch, the period of daylight savings time is SUMMER and the period of standard time is WINTER. DECLINATION SCALE COMPASS HAND MIDDLE...
- Página 26 COMPASS HAND ADJUSTMENT properly near them. For best results, calibrate in the area of intended use. Pull CROWN all the way out. Compass hand should point to 12 o’clock. If it does not, press either A or B to move In calibrating and taking headings, it is important, as with compass hand until it points to 12 o’clock.
- Página 27 To calibrate the compass: 4. When done, press A or B, keeping the watch level. The 4th center hand moves back and forth to acknowledge 1. Pull the crown to its middle position and wait for the the end of calibration and then moves to the current indicator hands to stop moving.
- Página 28 compass will automatically turn off and the 4th center hand will return to its normal operation. This conserves battery life. Press A or B at any time to keep the compass on for another 20 seconds. NOTE: During compass operation, the second hand moves in two-second increments.
-
Página 29: Tide Temp And Compass
TIDE TEMP AND COMPASS INDICATOR HAND ADJUSTMENT Pull crown all the way out. Indicator hand should point OVERVIEW to 12 o’clock. If it does not, press either TIDE or TEMP push button to move hand until it points to 12 o’clock. TIDE and TEMP push buttons move hand clockwise and DECLINATION TEMPERATURE SCALE... - Página 30 THERMOMETER Tides are influenced by sun position and shape of shore- When worn on wrist, thermometer reading is affected by line, so tide clock cannot precisely give times of high and low tides. Periodic adjustment may be necessary. body heat. For more accurate readings, remove watch and put in shade for at least several minutes.
- Página 31 work properly in that same location. If the compass To calibrate the compass: is calibrated away from such objects, it will not work 1. Pull the crown to its middle position and wait for the properly near them. For best results, calibrate in the area indicator hands to stop moving.
- Página 32 4. When done, press C (COMPASS), keeping the watch level. The 4th center hand moves back and forth to acknowledge the end of calibration and then moves to the current magnetic declination setting. 5. If you do not wish to set the magnetic declination, push the crown in.
- Página 33 seconds, the compass will automatically turn off and the ALTIMETER 4th center hand will return to its normal operation. This OVERVIEW conserves battery life. Press C (COMPASS) at any time to keep the compass on for another 20 seconds. ALIMETER NOTE: During compass operation, the second hand SCALE moves in two-second increments.
- Página 34 INDICATOR HAND (4TH CENTER HAND) ADJUSTMENT if your location has not changed. Recalibrate to a known Pull crown all the way out. The upper and lower retro- altitude when drastic pressure changes occur. grade hands reset to the start of their scales automati- To calibrate the altimeter: cally.
- Página 35 will move the center hand more rapidly. The upper To change the unit from METERS to FEET, press C a retrograde hand moves relative to the altitude value second time. To change the unit from FEET to METERS, displayed by the 4th center hand. press C twice (altimeter is turned off first then turned back on with the unit in METERS).
- Página 36 To turn the altimeter off with the current unit set to maximum altitude’s thousands value with divisions every FEET, press C. To turn the altimeter off with the unit set one thousand METERS/FEET. to METERS, press C twice (lower hand goes to FEET first The maximum recorded altitude is displayed for ten before going to the OFF position).
- Página 37 ten METERS/FEET. The upper retrograde hand shows the DEPTH minimum altitude’s thousands value with divisions every OVERVIEW one thousand METERS/FEET. CENTER HAND The minimum recorded altitude is displayed for ten BUTTON A seconds. To extend the display duration for another ten seconds, press B before the previous ten second duration expires To change the unit from METERS to FEET or FEET to METERS, press C.
- Página 38 for 5 minutes, the sensor will automatically turn off. To TEMPERATURE turn the sensor off manually, press and hold button B The temperature sensor is always on and will take a for 2 seconds. The 4th center hand will move to the OFF reading at least once every 60 seconds.
- Página 39 BATTERY LEVEL DETECTION When the watch is in Replace Battery Level status, the The watch determines the battery level status and second hand shall only move at 5-second intervals and shall move by five hand positions. At this point, depth provides the user with a visual indication corresponding to the current battery level.
-
Página 40: Yacht Racer
SCALE HOUR HAND display the correct date upon demand. The date was pre- set at the Timex factory. You only need to adjust the time. UPPER The 4th center hand will display the date when the crown HAND is pushed. -
Página 41: Mode Selection
battery will be replaced and the Perfect Date function will 3. Push crown in to position 1 when finished. be recalibrated to the current date for the location where MODE SELECTION the watch is to be returned. Press button C to advance the upper hand to the desired 4TH CENTER HAND ADJUSTMENT function. - Página 42 (Please note: buttons B and C are disabled while the YACHT RACE TIMER 1: countdown timer is in operation). The countdown timer will start at 1 minute and begin the chronograph once it reaches zero. 3. To stop, press button A (START/STOP) which will stop the countdown process.
-
Página 43: Chronograph Operation
CHRONOGRAPH OPERATION 3. To take a split time, press button B (SPLIT/RESET). The watch provides a one hour chronograph which may The upper, lower, and 4th center hands will hold their positions for you to note the split (lap) time. The chro- be operated independently from the Yacht Race Timer. - Página 44 In normal operation the Chronograph will cycle through 3GMT the 30-minute sequence twice for a total maximum of INNER RING / one hour. Once this hour has elapsed, the upper hand NUMERALS will remain on the 30 minute marker and the lower hand (24-HOUR FORMAT) HOUR HAND will return to zero.
- Página 45 4TH CENTER HAND CALIBRATION The 4th center hand is calibrated at the Timex factory to 2. 4th center hand and inner ring: Displays the time in a reflect the standard minutes within the hour as defined 24-hour format.
- Página 46 1. Pull the crown out to position 3. The 4th center hand 7. Push crown in to position 1 when finished. will point to 12 o’clock. Please note: The 4th center hand will track the time using 2. Rotate the crown to position the minute hand in the the current calibration of the minutes within the hour.
-
Página 47: Tachymeter Function
SETTING THE CASE ROTATING TOP RING TACHYMETER FUNCTION (TIME ZONE III) (not all models) The 3rd time zone is set by using the existing setting of The tachymeter will only determine speeds greater than the 4th center hand and adjusting the case rotating top 60 units per hour using this method;... -
Página 48: Slide-Rule Bezel Function
4. The chronograph second hand is compared to the Inner Ring tachymeter markings to determine the target’s speed. On the inner ring, “MPH” (mile per hour) refers to “speed index”. This index is used to calculate the speed involving any data per hour. On the inner ring, “STAT” (statute miles) SLIDE-RULE BEZEL FUNCTION and “NAUT”... - Página 49 The following examples serve as a guide of how to use Known Factors: Speed: 40 miles per hour Distance: the slide rule. 10 nautical miles • Align “40” on the outer ring with the mark “MPH” SPEED CALCULATION: marking on the inner ring. What speed is required to go 10 nautical miles in 15 minutes? •...
-
Página 50: Unit Conversion
• The distance travelled can be obtained above the “15” HOW TO ADJUST BRACELET marker on the inner ring. The number indicated on the (Variations of the following bracelet sections apply to all outer ring is “10”. watch models). The answer: The distance travelled is 10 nautical miles. -
Página 51: Bracelet Link Removal
FOLDOVER CLASP BRACELET BRACELET LINK REMOVAL 1. Find spring bar that connects bracelet to clasp. REMOVING LINKS: 1. Place bracelet upright and insert pointed tool in 2. Using a pointed tool, push in spring bar and gently opening of link. twist bracelet to disengage. -
Página 52: Timex International Warranty
DO NOT DISPOSE OF BATTERY IN FIRE. DO NOT When the battery needs to be changed, we recommend RECHARGE. KEEP LOOSE BATTERIES AWAY FROM that only TIMEX replace it. Your watch will need to be CHILDREN. recalibrated to correct time and date after changing the TIMEX INTERNATIONAL WARRANTY battery. - Página 53 4. from accidents, tampering or abuse; and To obtain warranty service, please return your watch to Timex, one of its affiliates or the Timex retailer where 5. lens or crystal, strap or band, watch case, attachments the watch was purchased, together with a completed or battery.
-
Página 54: Extended Warranty
Canada; and a UK£3.50 cheque or money Available in U.S. only. Extend your warranty for an order in the U.K. In other countries, Timex will charge additional 4 years from date of purchase for $5. You can you for postage and handling. - Página 55 TIMEX -ARMBANDUHREN ® Herzlichen Glückwunsch zum Kauf Ihrer TIMEX ® INTELLIGENT QUARTZ -Uhr. Bitte lesen Sie die ™ Bedienungsanleitung für Ihre Timex-Uhr genau durch. Ihre Uhr besitzt eventuell nicht alle der hier aufgeführten Funktionen. Weitere Informationen finden Sie auf der nachstehenden Website, auf der Sie außerdem Ihre...
- Página 56 INHALT Gezeiten Temperatur und Kompass ......158 Höhenmesser ..............168 Inbetriebnahme der Uhr ..........109 Tiefe ................176 Wasser- und Stossfestigkeit........... 110 Yacht Racer ..............181 Indiglo -Zifferblattbeleuchtung ........112 ® 3GMT ................191 Einstellen von Uhrzeit und Datum ......... 113 Tachymeterfunktion ............
- Página 57 -Uhren mit INBETRIEBNAHME DER UHR Willkommen in der Welt der Timex ® Intelligent Quartz -Technologie, der Zukunft der ™ (Trifft nicht auf Modelle mit ewigem Kalender zu.) Ent neh- analogen Quarz-Technologie. Die Timex Intelligent men Sie zunächst den Plastikschutz unter der Krone und Quartz-Technologie verbindet die Leistungsfähigkeit eines...
- Página 58 WASSER- UND STOSSFESTIGKEIT ACHTUNG: BEI UHREN, DIE NICHT BIS ZU 200 METERN WASSERFEST SIND, UNTER WASSER AUF KEINEN FALL Wasserdichte Uhren sind mit Tiefenangabe in Metern KNÖPFE DRÜCKEN, DAMIT DIE WASSERFESTIGKEIT (WR_M) gekennzeichnet. GEWÄHRLEISTET BLEIBT. UNTER WASSER NIEMALS DIE KRONE HERAUSZIEHEN. Wasserfestigkeit/Tiefe psia* Unterwasserdruck 1.
-
Página 59: Indiglo ® -Zifferblattbeleuchtung
INDIGLO -ZIFFERBLATTBELEUCHTUNG EINSTELLEN VON UHRZEIT UND DATUM ® Die Beleuchtung wird durch Drücken des Knopfs oder der HINWEIS: Die Krone Ihrer Uhr verfügt über drei Krone aktiviert. Die für die INDIGLO -Funktion verwendete Positionen: eingedrückt, mittlere Stellung und heraus- ® Elektroleuchttechnik erhellt bei Nacht und Dunkelheit das gezogen. -
Página 60: Ewiger Kalender
Datum (trifft nicht auf Modelle mit ewigem EWIGER KALENDER Kalender zu) ÜBERBLICK Ziehen Sie die Krone auf die mittlere Stellung heraus und DATUMSZEIGER drehen Sie sie, bis im Datumsfenster das korrekte Datum KNOPF A TAGESZEIGER (VERSENKT erscheint. Anmerkung: Das Datum springt zwischen MONTIERT) 22 Uhr und 2 Uhr um. - Página 61 Die Uhr hat zwei versenkt montierte Knöpfe, Ziehen Sie hierzu die Krone in die mittlere Stellung heraus. mit deren Hilfe Ihr Timex Service Center nach einem Der Datumszeiger stellt den Ausgleich wie folgt dar: 1 = Batteriewechsel wieder den Wochentag und das Datum 1 Jahr nach Schaltjahr;...
-
Página 62: Flyback-Chronograph
FLYBACK-CHRONOGRAPH EINSTELLEN DES VIERTEN MITTLEREN ZEIGERS Der vierte mittlere Zeiger wird wie folgt justiert: ÜBERBLICK 1. Ziehen Sie die Krone ganz heraus. Der obere VIERTER MITTLERER STUNDENZEIGER ZEIGER und untere Zeiger rücken automatisch in ihre KNOPF A Endstellungen. OBERER ZEIGER 2. -
Página 63: Zweite Zeitzone
ZWEITE ZEITZONE EINSTELLEN DER ZWEITEN ZEITZONE Der obere Zeiger zeigt 1. Ziehen Sie die Krone halb (in die mittlere Stellung) die Uhrzeit für die heraus. Der obere Zeiger zeigt die Uhrzeit in der zweiten zweite Zeitzone an. Bitte Zeitzone, der vierte mittlere Zeiger die Minuten an. beachten Sie, dass es 2. - Página 64 4. Wenn Sie fertig sind, drücken Sie die Krone wieder ein. 3. Zur Wiederaufnahme der Messung betätigen Sie Knopf A (START/STOP) nochmals. FLYBACK-CHRONOGRAPH Die Uhr hat einen Chronographen mit 4-Stunden-Flyback. 4. Nullen Sie den Flyback-Chronographen mithilfe von Knopf B (FLYBACK/RESET). 1.
- Página 65 FLY-BACK-CHRONOGRAPH-KOMPASS EINSTELLEN DES INDIKATORZEIGERS (VIERTER MITTLERER ZEIGER) ÜBERBLICK Der Indikatorzeiger kann bei Bedarf wie folgt neu justiert VIERTER MITTLERER werden: MINUTENZEIGER ZEIGER KNOPF A 1. Ziehen Sie die Krone ganz heraus. Der obere OBERER und untere Zeiger rücken automatisch in ihre ZEIGER DATUMSFENSTER Endstellungen.
- Página 66 ZWEITE ZEITZONE 2. Rücken Sie den vierten mittleren Zeiger mithilfe von Knopf B vor. Zur Beschleunigung dieses Vorgangs Der obere Zeiger zeigt gewöhnlich die Uhrzeit für die können Sie den Knopf niederhalten. Der obere und der zweite Zeitzone an. Bitte beachten Sie, dass es sich um eine 24-Stunden-Skala handelt.
- Página 67 Auf Wunsch können Sie mithilfe der zweiten Zeitzone sung von 1/5 Sekunden, der untere Zeiger die letzte alternativ auch Ihre Standardzeit im 24-Stunden-Format Minutenstelle an, wobei er bis zu zehn zählt und dann anzeigen. Wenn Sie die Zweitzeit auf diese Weise einstellen, wiederholt.
- Página 68 4. Der Chronograph kann auch bei laufendem Betrieb sowie auf Gegenstände mit elektromagnetischer Strah- zurückgesetzt bzw. neu gestartet werden. Halten Sie lung wie Fernseher und Computer zu achten, die das hierzu Knopf B (FLYBACK/RESET) nieder und lassen Magnetfeld im Bereich der Uhr beeinflussen können. Wird Sie ihn los, wenn er neu starten soll.
- Página 69 Die Uhr darf nicht in der Nähe von Magnetfeldquellen, 3. Drücken Sie zunächst den Knopf C (KOMPASS). Der beispielsweise Computern, Haushaltsgeräten oder vierte mittlere Zeiger vollführt zwei Umdrehungen und Fernsehern, aufbewahrt werden, da sie sich magnetisch erinnert Sie so daran, dass die Uhr gedreht werden aufladen und dann falsche Richtungsangaben anzeigen muss.
- Página 70 5. Wenn Sie die Deklination nicht einstellen möchten, drücken Sie die Krone ein. Andernfalls kann die Uhr den Deklinationswinkel automatisch ausgleichen. Drehen Sie hierzu den Kompassring so, dass Norden auf 12 Uhr zeigt. Deklination auf -14° (14°W) eingestellt 6. Rücken Sie den vierten mittleren Zeiger mithilfe von Knopf A oder B nach Westen (-) oder Osten (+), sodass KOMPASSMODUS der Kompass unter Zuhilfenahme der Deklinations-...
- Página 71 schaltet sich der Kompass automatisch ab und der vierte ANMERKUNG: Im Kompassmodus bewegt sich der mittlere Zeiger kehrt in seinen Normalmodus zurück. Sekundenzeiger in 2-Sekunden-Inkrementen. Außerdem Dadurch wird die Batterie geschont. Durch erneutes können sich bei aktiviertem Kompass der obere und Betätigen von Knopf C (KOMPASS) kann der Kompass untere Zeiger geringfügig verschieben;...
-
Página 72: Linearchronograph
LINEARCHRONOGRAPH EINSTELLEN DES LINEAR- UND VIERTEN MITTLEREN ZEIGERS ÜBERBLICK Der vierte mittlere Zeiger wird wie folgt justiert: 1. Krone ganz herausziehen. Der untere Zeiger wird STUNDENZEIGER automatisch an das Ende seiner Gleitbewegung VIERTER MITTLERER zurückgesetzt. ZEIGER KNOPF A DATUMSFENSTER 2. Der vierte mittlere Zeiger muss auf 12 Uhr zeigen. Sollte dieser innerhalb von 5 Sekunden nach dem KRONE Herausziehen der Krone nicht in die 12-Uhr-Stellung... - Página 73 4. Nach Einstellung die Krone wieder hineindrücken. EINSTELLEN DER ZWEITEN ZEITZONE: 1. Krone bis zur Mittelposition herausziehen. Der untere ZWEITE ZEITZONE Zeiger zeigt die Zeit in der zweiten Zeitzone an und der Der untere Zeiger vierte mittlere Zeiger die Minuten. zeigt die Zeit für die zweite Zeitzone an.
- Página 74 4. Nach Einstellung die Krone wieder hineindrücken. 3. B (SPLIT/RESET [Zwischenzeit/Zurücksetzen]) drücken, um den Chronograph auf die Nullposition zurückzuset- LINEARCHRONOGRAPH zen. Die Uhr verfügt über einen Chronographen mit 4-Stunden- Ist der Chronograph zurückgestellt, zeigen alle Zeiger Teilung. auf Null. Nach acht Sekunden nimmt die Uhr wieder 1.
- Página 75 WELTZEIT EINSTELLEN DER WELTZEIT 1. Krone bis zur Mittelposition herausziehen. Der ÜBERBLICK mittlere Zeiger zeigt die jeweilige Stadt einer 24 ORTE STUNDENZEIGER bestimmten Weltzeitzone an und der obere Zeiger die VIERTER MITTLERER OBERER entsprechende Zeit in der Stadt. ZEIGER ZEIGER KNOPF A WELTZEIT- DATUMSFENSTER...
- Página 76 Dieser Vorgang kann durch Niederhalten des Knopfs 4. Sollte die angezeigte Jahreszeit nicht Ihrer Standard- beschleunigt werden. Sie können einen beliebigen zeitzone entsprechen, ändern Sie sie mithilfe von Ort wählen. Knopf C. Wenn in Ihrer Standardzeitzone die Sommer- zeit gilt, rückt der obere Zeiger um eine Stunde vor. 3.
- Página 77 EINSTELLEN DES INDIKATORZEIGERS ORTSZEITANZEIGE (VIERTER MITTLERER ZEIGER) Drehen Sie den mittleren Der Indikatorzeiger kann bei Bedarf wie folgt neu justiert Zeiger mit Knopf A oder B vor bzw. zurück und werden: wählen Sie einen Ort 1. Ziehen Sie die Krone ganz heraus. Der obere und un- aus.
- Página 78 Sie bietet zwei Einstellungen, mit deren Hilfe dies für alle KOMPASS Orte mit Sommerzeitumstellung erreicht werden kann. ÜBERBLICK Diese sind SOMMER für Sommerzeit und WINTER für die Standardzeit. KOMPASSZEIGER DEKLINATIONSSKALA Ist ein Ort auf SOMMER eingestellt, stehen alle Orte in (DAS NORDENDE MITTLERE IST ROT SPITZ/...
- Página 79 EINSTELLEN DES KOMPASSZEIGERS ert, so funktioniert er in ihrer Nähe nicht ordnungsgemäß. Ziehen Sie die KRONE ganz heraus. Der Kompasszei- Optimale Ergebnisse werden erzielt, wenn die Kalibrierung im Bereich der beabsichtigten Verwendung erfolgt. ger muss auf 12 Uhr weisen. Wenn nicht, drehen Sie ihn mithilfe von Knopf A oder B in die 12-Uhr-Stellung.
- Página 80 Der Kompass wird wie folgt kalibriert: 1. Ziehen Sie die Krone halb (mittlere Stellung) heraus und warten Sie ab, bis der Indikatorzeiger stillsteht. 2. Halten Sie die Uhr waagerecht oder legen Sie sie auf eine waagerechte Fläche (sollte das Armband im Weg sein, legen Sie die Uhr auf eine umgedrehte Tasse).
- Página 81 6. A oder B drücken, um den vierten mittleren Zeiger KOMPASSMODUS nach Westen (-) oder Osten (+) zu bewegen, um Der Kompassmodus ist normalerweise deaktiviert und der mit Hilfe der Deklinationsskala auf die magnetische vierte mittlere Zeiger steht auf 12.00 Uhr bzw. zeigt die Deklination Ihres Standortes zu zeigen.
- Página 82 GEZEITEN TEMPERATUR UND KOMPASS EINSTELLEN DES INDIKATORZEIGERS Ziehen Sie die Krone ganz heraus. Der Indikatorzeiger ÜBERBLICK muss auf 12 Uhr weisen. Sollte das nicht der Fall sein, rücken Sie ihn entweder mit Knopf B (GEZEITEN) oder DEKLINATION S- TEMPERATURSKALA Knopf A (TEMPERATUR) in die 12-Uhr-Stellung. GEZEITEN SKALA A (TEMP) rückt den Zeiger im, TEMP entgegen dem Uhrzeigersinn...
- Página 83 rückt zunächst auf den Anfang der Thermometerskala und GEZEITENUHR dann auf die aktuelle Temperatur. Im Gezeitenmodus dreht sich der Indikatorzeiger immer im Uhrzeigersinn. Steigendes Wasser wird von einem nach THERMOMETER links, fallendes Wasser von einem nach rechts weisenden Wird die Uhr am Handgelenk getragen, wird die abgele- Zeiger markiert.
- Página 84 KALIBRIEREN DES KOMPASSES dem sind Bereiche mit übermäßigen Konzentrationen von Vor Gebrauch muss der Kompass kalibriert werden. Hart- und Weicheisen zu meiden, da sie zu ungenauen Richtungsangaben führen können. Bei fragwürdigen Da ein Kompass mit dem Erdmagnetfeld arbeitet, ist auf Richtungsangaben muss erneut kalibriert werden.
- Página 85 sein, legen Sie die Uhr auf eine umgedrehte Tasse). 4. Drücken Sie dann erneut den Knopf C (KOMPASS), Das Uhrglas kann unten liegen, muss jedoch vorsichtig wobei die Uhr nach wie vor waagerecht bleiben muss. behandelt werden. Der vierte mittlere Zeiger bewegt sich hin und her, was den Abschluss der Kalibrierung anzeigt, und rückt 3.
- Página 86 werden. Auf der nächsten Seite fi nden Sie eine Der Kompass wird durch Drücken von Knopf C (KOMPASS) Abbildung mit einem Beispiel. aktiviert. Die Uhr muss dabei waagerecht gehalten werden. Der Kompasszeiger rückt in die Norden-Stellung. 7. Drücken Sie die Krone ein, wenn Sie fertig sind. Wird die Uhr gedreht, rückt der vierte mittlere Zeiger so weiter, dass er stets auf Norden zeigt.
- Página 87 HÖHENMESSER EINSTELLEN DES INDIKATORZEIGERS (VIERTER MITT LERER ZEIGER) ÜBERBLICK Ziehen Sie die Krone ganz heraus. Der obere und untere retrograde Zeiger werden automatisch auf den Anfang HÖHENMESSERSKALA ihrer Skalen zurückgesetzt. Der Indikatorzeiger (vierter (HUNDERTE) mittlerer Zeiger) muss auf 12 Uhr zeigen. Falls nicht, KNOPF A rücken Sie ihn mithilfe von Knopf A oder B auf 12 Uhr.
- Página 88 bekannten Referenzhöhenwert oder eine Standard- mittlere Zeiger und der obere retrograde Zeiger müs- referenzhöhe an einem gegebenen Standort einzustellen. sen auf die aktuelle Höhe zeigen. Plötzliche Druckänderungen aufgrund von Wetterum- 3. Drehen Sie mithilfe von Knopf A oder B den vierten schwüngen können dazu führen, dass Ihre Höhenmes- mittleren Zeiger im oder gegen den Uhrzeigersinn, bis sung bis zu +/-100 m abweicht, selbst wenn sich Ihr...
- Página 89 HÖHENMESSER EIN/AUS werden, betätigen Sie Knopf C zweimal (der untere Zeiger Der Höhenmesser wird durch Betätigen von Knopf C dreht sich zunächst auf FEET und dann auf OFF). eingeschaltet. Der untere retrograde Zeiger zeigt auf Die Uhr schaltet den Höhenmesser automatisch METERS.
- Página 90 den-Intervalls Knopf A betätigt werden. ABRUFEN DER MIN/MAX-HÖHENMESSUNG Die aufgezeichnete Höchsthöhe wird durch Drücken von Die aufgezeichnete Mindesthöhe wird mit Knopf B an- Knopf A angezeigt. Der untere retrograde Zeiger zeigt gezeigt. Der untere retrograde Zeiger zeigt die Maßeinheit die Maßeinheit an, in der die Höchsthöhe aufgezeichnet an, in der die Mindesthöhe aufgezeichnet wurde, sofern wurde, sofern der Höhenmesser zum Zeitpunkt der Knopf- der Höhenmesser zum Zeitpunkt der Knopfbetätigung...
- Página 91 TIEFE TEMPERATUR Der Temperatursensor ist stets eingeschaltet und nimmt ÜBERBLICK mindestens einmal alle 60 Sekunden eine Messung vor. MITTLERER ZEIGER Die Temperatur wird vom unteren Zeiger auf der zugehöri- KNOPF A gen Skala angezeigt. Wird die Uhr am Handgelenk getragen, wirkt sich die Körperwärme auf die Temperaturmessung aus.
- Página 92 Bei einer noch nicht benutzten Uhr zeigt der mittlere der Messwert 5 Minuten lang in einem Bereich zwischen 0 und 2 Metern, schaltet sich der Sensor automatisch ab. Zeiger 0 Meter und der untere Zeiger 0° C an. Die Krone Sie können den Sensor auch manuell abschalten.
-
Página 93: Yacht Racer
Im Status „Batterie ersetzen“ rückt der Sekundenzeiger YACHT RACER nur alle 5 Sekunden um fünf Zeigerstellungen vor. Zu diesem Zeitpunkt darf der Tiefensensor auf keinen Fall PERFECT mehr aktiviert werden und die Batterie muss unverzüglich DATE-SKALA ausgewechselt werden. STUNDEN- ZEIGER OBERER ZEIGER KRONE... - Página 94 PERFECT DATE Batterie ausgetauscht werden muss, sollten Sie die Uhr an ein Timex-Servicezentrum senden, wo die Batterie Mit der Perfect Date-Funktion muss das Datum bis ausgetauscht und die Perfect Date-Funktion wieder auf zum Jahre 2060 nicht mehr umgestellt werden. Die Uhr das aktuelle Datum für den Standort kalibriert wird, an...
- Página 95 bis er auf 12 zeigt. Durch das Halten von Knopf A oder YACHT RACE TIMER 5: B bewegt sich der Zeiger schneller. Bitte beachten Sie, Der Countdown-Timer beginnt bei 5 Minuten und startet dass nach 5 Sekunden der Krone auf Position 3 ohne den Chronograph, sobald Null erreicht wird.
- Página 96 BETRIEB DES YACHT RACE TIMERS aktiviert ist, bis der Countdown-Timer zurückgesetzt Die Uhr verfügt über einen Countdown-Timer von 5, 3 wird.) oder 1 Minute. Sobald der Countdown-Timer Null erreicht, 4. Zum Zurücksetzen den Knopf B (SPLIT/RESET wird automatisch ein 1 Stunde andauernder Chronograph [Zwischenzeit/Zurücksetzen]) 2 Sekunden lang gestartet.
- Página 97 BETRIEB DES CHRONOGRAPHEN (Achten Sie darauf, dass der Knopf C bei laufendem Die Uhr verfügt über einen einstündigen Chronograph, Countdown-Timer deaktiviert ist.) der unabhängig vom Yacht Race Timer verwendet 3. Zum Messen einer Zwischenzeit den Knopf B (SPLIT/ werden kann. RESET [Zwischenzeit/Zurücksetzen]) drücken.
- Página 98 5. Zum Zurücksetzen den Knopf B (SPLIT/RESET 3GMT [Zwischenzeit/Zurücksetzen]) 3 Sekunden lang halten. Hierdurch wird der Chronograph wieder auf den INNENRING/ZIFFERN Beginn der 30-Minuten-Skala zurückgesetzt. (24-STUNDEN- FORMAT) STUNDENZEIGER Im Normalbetrieb durchläuft der Chronograph die 30-minütige Abfolge zweimal, um insgesamt 1 Stunde zu erreichen.
- Página 99 3-ZEITZONEN-FUNKTION EINSTELLEN DES VIERTEN MITTLEREN ZEIGERS Ihre Uhr kann drei Zeitzonen anzeigen. Der vierte mittlere Zeiger wird wie folgt justiert: 1. Stunden- und Minutenzeiger: Zeigt die Zeit in einem 1. Die Krone auf Position 3 herausziehen. Standard-12-Stunden Format an. Bitte beachten: Das 2.
- Página 100 KALIBRIERUNG DES VIERTEN MITTLEREN ZEIGERS Standort setzen, für den Sie die zweiten und dritten Der vierte mittlere Zeiger wird im Timex-Werk auf die Zeitzonen einrichten wollen. Standardminuten innerhalb 1 Stunde gemäß Universal 3. Krone in Position 2 drücken. Der vierte mittlere Zeiger Time Coordinated kalibriert.
- Página 101 Bitte beachten: Der vierte mittlere Zeiger zeichnet die EINSTELLEN DES VIERTEN MITTLEREN ZEIGERS Zeit mit der derzeit kalibrierten Stellung der Minuten (ZEITZONE II) innerhalb der Stunde auf. Zeitzonen 2 und 3 nutzen beide Achten Sie auf die aktuelle Uhrzeit in dem Standort, für den vierten mittleren Zeiger, und deswegen müssen den Sie die zweite Zeitzone einstellen wollen.
- Página 102 EINSTELLEN DES GEHÄUSE-AUSSENRINGS TACHYMETERFUNKTION (ZEITZONE III) (nicht bei allen Modellen) Die dritte Zeitzone wird eingestellt, indem gemäß der Anhand dieser Methode bestimmt das Tachymeter bestehende Einstellung des vierten mittleren Zeigers le diglich Geschwindigkeiten über 60 Einheiten pro Stunde. der Gehäuse-Außenring auf die gewünschte Zeit der Sollen langsamere Geschwindigkeiten gemessen werden, dritten Zeitzone gesetzt wird.
- Página 103 3. Stoppen Sie den Chronographen, sobald das Objekt RECHENSCHIEBERFUNKTION für die Geschwindigkeitsmessung die Endmarkierung Die Rechenschieberfunktion des oberen Rings wird passiert. durch Drehen des Außenrings bedient. Der Innenring 4. Bestimmen Sie durch Vergleichen des Chronographen- ist nicht beweglich. Der Außenring bezieht sich immer Sekundenzeigers mit den Tachymetermarkierungen auf „Entfernung“...
- Página 104 britische Meilen) und „NAUT“ (nautical miles Die folgenden Beispiele erläutern, wie der Rechenschieber –Seemeilen) auf dem Innenring dienen der Umrechnung zu verwenden ist. von Entfernungseinheiten. GESCHWINDIGKEITSBERECHNUNG: Mit welcher Geschwindigkeit werden 10 Seemeilen AUSSENRING in 15 Minuten zurückgelegt? Bekannte Faktoren: Entfernung: 10 Seemeilen Zeit: INNENRING 15 Minuten •...
- Página 105 Zeitberechnung: Wie lange dauert es, 10 Seemeilen ENTFERNUNGSBERECHNUNG: Was für eine Entfernung kann bei 40 Meilen pro mit einer Geschwindigkeit von 40 Meilen pro Stunde Stunde und einer Zeit von 15 Minuten zurückgelegt zurückzulegen? Bekannte Faktoren: Geschwindigkeit: 40 Meilen pro werden? Stunde Entfernung: 10 Seemeilen Bekannte Faktoren: Geschwindigkeit: 40 Seemeilen pro...
-
Página 106: Justieren Des Armbands
KONVERTIERUNG VON EINHEITEN: JUSTIEREN DES ARMBANDS Um Entfernung von Seemeilen zu britischen Meilen und (Die nachstehenden Armbandanleitungen gelten, eventu- Kilometern umzurechnen. ell mit leichten Abweichungen, für alle Uhrenmodelle.) Bekannter Faktor: Zu konvertierende Entfernung beträgt ARMBAND MIT SCHIEBEVERSCHLUSS 10 Seemeilen 1. Öffnen Sie die Verschlussplatte. •... - Página 107 ARMBAND MIT FALTVERSCHLUSS HERAUSNEHMEN VON ARMBANDGLIEDERN 1. Finden Sie den Federsteg, der das Armband mit dem GLIEDER WERDEN WIE FOLGT HERAUSGENOMMEN: Verschluss verbindet. 1. Stellen Sie das Armband aufrecht und führen Sie ein 2. Drücken Sie den Federsteg mit einem spitzen Instru- spitzes Instrument in die Gliedöffnung ein.
- Página 108 Lebensdauer von vier bis sechs Jahren. Sie kann jedoch in Rechnung. abhängig vom tatsächlichen Gebrauch variieren. SCHICKEN SIE BITTE NIEMALS BESONDERE ARMBÄN- Wir empfehlen, die Batterie nur von TIMEX auswechseln DER ODER SONSTIGE ARTIKEL VON PERSÖNLICHEM zu lassen. Im Anschluss an einen Batteriewechsel müssen WERT MIT EIN.
-
Página 109: Internationale Timex-Garantie
INTERNATIONALE TIMEX-GARANTIE 2. wenn die Uhr nicht bei einem Timex-Vertragshändler gekauft worden ist Für ihre TIMEX -Uhr übernimmt die Timex Group USA, Inc. ® 3. wenn Reparaturen nicht von Timex ausgeführt worden für die Dauer EINES JAHRES ab dem Erstverkaufsdatum eine sind Garantie auf Herstellungsmängel. - Página 110 Garantie verleiht Ihnen bestimmte Rechte. Darüber in GB einen Scheck oder eine Zahlungsanweisung über hinaus haben Sie u.U. weitere Rechte, die je nach Land GBP 3,50. In allen anderen Ländern stellt Timex die Porto- unterschiedlich sind. und Verpackungskosten in Rechnung. SCHICKEN SIE BITTE NIEMALS BESONDERE ARMBÄNDER ODER SONSTIGE...
- Página 111 Scheck i.H.v. $5 einsenden an: Timex Extended Warranty, P.O. Box 1676, Dept. EF, Little Rock, AR 72203, USA. ©2014 Timex Group USA, Inc., TIMEX, INDIGLO und INTELLIGENT QUARTZ sind Marken der Timex Group B.V. und ihrer angeschlossenen Unternehmen.
- Página 112 RELOJES TIMEX ® Felicitaciones por la compra de su reloj TIMEX ® INTELLIGENT QUARTZ . Por favor lea atentamente las ™ instrucciones para saber cómo funciona su reloj Timex. Es posible que su reloj no tenga todas las características descritas en este folleto.
- Página 113 ÍNDICE DE CONTENIDOS Marea temperatura y brújula ......... 272 Altímetro ................ 282 Cómo inicializar su reloj ..........223 Profundidad ..............291 Resistencia al agua y a golpes ........224 Yacht Racer ..............296 Luz nocturna Indiglo ............ 226 ® 3GMT (Hora de Greenwich) ..........306 Programación de fecha y hora ........
-
Página 114: Cómo Inicializar Su Reloj
La tecnología de inicializar su reloj retire el protector plástico de abajo de cuarzo inteligente de Timex brinda el poder de un la corona y luego presione la corona contra la caja. microprocesador con la eficiencia y exactitud del Algunos relojes requieren ajustar la corona para ser medidor de tiempo análogo de cuarzo. -
Página 115: Resistencia Al Agua Y A Golpes
RESISTENCIA AL AGUA Y A GOLPES ADVERTENCIA: PARA MANTENER LA RESISTENCIA AL AGUA, NO APRIETE NINGÚN BOTÓN DEBAJO DEL Si su reloj es resistente al agua, se indicarán los metros AGUA A MENOS QUE SU RELOJ ESTÉ INDICADO PARA (WR_M). UNA RESISTENCIA AL AGUA DE 200 METROS. -
Página 116: Luz Nocturna Indiglo
LUZ NOCTURNA INDIGLO PROGRAMACIÓN DE FECHA Y HORA ® NOTA: La corona tiene tres posiciones: cerrada, media y Pulse el botón o la corona para activar la luz. La tecnología electroluminiscente utilizada en la luz nocturna externa. Para que se acostumbre a la diferencia entre las INDIGLO ilumina toda la esfera del reloj por la noche y en distintas posiciones, extienda la corona hasta la posición... -
Página 117: Calendario Perpetuo
Nota: La fecha cambia entre las 10 pm y las 2 am. No CALENDARIO PERPETUO cambie la fecha durante este período. Al hacerlo, podría DESCRIPCIÓN GENERAL dañar el movimiento del reloj. MANECILLA DE LA FECHA Pulse la corona a la posición cerrada después de fijar la MANECILLA BOTÓN A fecha u hora. -
Página 118: Introducción
Centro de servicio termine y las manecillas vuelven a mostrar normalmente de Timex para ajustar la fecha y el día después del día, mes y fecha. reemplazo de la pila. Fuera de lo mencionado no tienen otro uso. -
Página 119: Cronógrafo Fly-Back
CRONÓGRAFO FLY-BACK AJUSTE DE LA 4TA MANECILLA CENTRAL Para reajustar una 4ta manecilla central desalineada: DESCRIPCIÓN GENERAL 1. Jale la corona hasta su posición externa. Las CUARTA MANECILLA manecillas superior e inferior se mueven hasta el final MANECILLA HORARIA CENTRAL de sus ciclos, auto-ajustándose en forma automática. -
Página 120: Segunda Zona Horaria
PARA AJUSTAR LA SEGUNDA ZONA HORARIA: SEGUNDA ZONA HORARIA La manecilla supe- 1. Jale la corona hasta su posición media. La manecilla rior muestra la hora superior muestra la hora de la segunda zona horaria para la segunda zona y la 4ta. manecilla central muestra los minutos. horaria. - Página 121 4. Pulse la corona hacia adentro cuando termine. 3. Para reanudar, pulse el botón A (START/STOP) nuevamente. CRONÓGRAFO FLY-BACK El reloj tiene un cronógrafo “fly-back” (que revisa 4. Para reiniciar el cronógrafo fly-back desde cero, pulse marcajes anteriores) de 4 horas. el botón B (FLY-BACK/RESET).
-
Página 122: Brújula Y Cronógrafo Fly-Back
BRÚJULA Y CRONÓGRAFO FLY-BACK AJUSTE DE LA MANECILLA INDICADORA (4TA MANECILLA CENTRAL) DESCRIPCIÓN GENERAL Para reajustar una manecilla desalineada: CUARTA MANECILLA 1. Jale la corona hasta su posición externa. Las maneci- MANECILLA DE MINUTOS CENTRAL BOTÓN A llas superior e inferior se mueven hasta el fi nal de sus MANECILLA ciclos, auto-ajustándose en forma automática. - Página 123 SEGUNDA ZONA HORARIA 2. Pulse B para mover hacia delante la 4ta manecilla central. Sostenga el botón para mover con rapidez La manecilla superior normalmente muestra la hora la manecilla. Las manecillas superior y 4ta manecilla para la segunda zona horaria. Observe que la escala es de 24 horas, con medianoche a cualquier extremo y central se mueven a la vez;...
- Página 124 de horas y minutos corresponda con la de las 24 horas, tiempo total, incluyendo horas y minutos, con divisio- al verifi car que la fecha cambie a medianoche y no al nes a cada diez minutos. El cronógrafo cuenta hasta mediodía.
- Página 125 cronógrafo y suéltelo cuando desee reiniciarlo. No alrededor del reloj. Si la brújula se calibra cerca de tales tiene que esperar a que todas las manecillas lleguen objetos, sólo funcionará apropiadamente en ese mismo a cero antes de soltar el botón; el conteo comenzará lugar.
- Página 126 No guarde el reloj cerca de alguna fuente de magnetismo LENTAMENTE, tomando aproximadamente 15 segun- como computadoras, electrodomésticos o televisores, dos por rotación. pues el reloj puede recoger la carga magnética y conducir a rumbos inexactos. La exactitud típica de los instrumen- tos de uso en la muñeca es de +/- 10 grados.
-
Página 127: Funcionamiento De La Brújula
hacer que el reloj compense automáticamente el FUNCIONAMIENTO DE LA BRÚJULA ángulo de declinación, mueva el anillo giratorio de la Normalmente, la brújula está apagada y la 4ta manecilla brújula hasta que el Norte esté a las 12 en punto. central apunta a las 12 en punto o muestra los segundos del cronógrafo. -
Página 128: Cronógrafo Lineal
continúan mostrando la hora en el cronógrafo y todas las CRONÓGRAFO LINEAL funciones del cronógrafo están disponibles mediante los DESCRIPCIÓN GENERAL botones A (START/STOP) y B (FLY-BACK/RESET). NOTA: Mientras se usa la brújula, el segundero se mueve MANECILLA HORARIA en incrementos de dos segundos. De igual modo, cuando 4TA MANECILLA CENTRAL BOTÓN A... -
Página 129: Ajuste De La Manecilla Linealy 4Ta Manecilla Central
AJUSTE DE LA MANECILLA LINEAL 3. Si el cronógrafo es reiniciado y la manecilla lineal Y 4TA MANECILLA CENTRAL no está en 0, pulse y sostenga el botón B durante 5 segundos para hacer una calibración completa del Para reajustar una 4ta manecilla central desalineada: indicador lineal, lo cual demorará... -
Página 130: Para Fijar La Segunda Zona Horaria
SEGUNDA ZONA HORARIA PARA FIJAR LA SEGUNDA ZONA HORARIA: La manecilla inferior 1. Jale la corona hasta su posición media. La manecilla muestra la hora para la inferior muestra la hora de la segunda zona horaria y segunda zona horaria. la 4ta. - Página 131 4. Pulse la corona hacia adentro cuando termine. 3. Para reiniciar el cronógrafo a la posición cero, pulse el botón B (SPLIT/RESET). CRONÓGRAFO LINEAL Cuando se reinicia el cronógrafo, todas las manecillas se El reloj tiene un cronógrafo interválico de 4 horas. mueven a la posición cero.
-
Página 132: Hora Mundial
HORA MUNDIAL PARA FIJAR LA HORA MUNDIAL: 1. Jale la corona hasta su posición media. La manecilla DESCRIPCIÓN GENERAL central muestra la hora mundial de la ciudad y la 24 CIUDADES MANECILLA HORARIA manecilla superior muestra la hora de dicha ciudad. CUARTA MANECILLA MANECILLA CENTRAL... - Página 133 con rapidez la manecilla. Se puede utilizar cualquier 4. Si la estación presentada no es la correcta para la ciudad. zona horaria local, presione C para cambiarla. Si la zona horaria local observa el horario de verano, la 3. Jale la corona hasta su posición externa. La manecilla manecilla superior se moverá...
-
Página 134: Visualización De La Hora De La Ciudad
AJUSTE DE LA MANECILLA INDICADORA VISUALIZACIÓN DE LA HORA DE LA CIUDAD (4TA MANECILLA CENTRAL) Pulse A o B para mover Para reajustar una manecilla desalineada: la manecilla central hacia atrás o hacia adelante 1. Jale la corona hasta su posición externa. Las maneci- respectivamente, y llas superior e inferior se mueven hasta el final de sus seleccionar una ciudad. - Página 135 El reloj se encarga de esto dando una confi guración BRÚJULA para representar los dos periodos que tienen todas las DESCRIPCIÓN GENERAL ciudades que observan la hora de verano. Para el reloj, AGUJA DE LA el periodo de hora de verano es VERANO y el periodo de ESCALA DE DECLINACIÓN BRÚJULA MEDIO...
-
Página 136: Ajuste De La Aguja De La Brújula
AJUSTE DE LA AGUJA DE LA BRÚJULA objetos, sólo funcionará apropiadamente en ese mismo Jale la CORONA totalmente hacia afuera. La aguja de la lugar. Si la brújula se calibra lejos de tales objetos, no funcionará apropiadamente en la cercanía de ellos. Para brújula debe señalar las 12 en punto. - Página 137 a rumbos inexactos. La exactitud típica de los instrumen- tos de uso en la muñeca es de +/- 10 grados. Para calibrar la brújula: 1. Jale la corona a su posición media y espere a que las manecillas indicadoras se detengan. 2.
- Página 138 ángulo de declinación, mueva el anillo giratorio de la FUNCIONAMIENTO DE LA BRÚJULA brújula hasta que el Norte esté a las 12 en punto. Normalmente, la brújula está apagada y la 4ta manecilla central apunta a las 12 en punto o muestra los segundos 6.
-
Página 139: Marea Temperatura Y Brújula
MAREA TEMPERATURA Y BRÚJULA AJUSTANDO LA AGUJA INDICADORA Jale la corona totalmente hacia afuera. La aguja indica- DESCRIPCIÓN GENERAL dora debe señalar las 12 en punto. Si no las señala, pulse cualquiera de los botones MAREA o TEMPERATURA ESCALA DE TEMPERATURA hasta que la aguja marque las 12 en punto. -
Página 140: Reloj De Marea
comienzo del termómetro y luego a la temperatura actual. en el sentido de las manecillas del reloj, de modo que la marea va subiendo cuando la aguja señala a la izquierda y TERMÓMETRO bajando cuando señala a la derecha. El número de horas Cuando se lleva puesto en la muñeca, la lectura del para la siguiente marea alta/baja se muestra en la escala termómetro es afectada por el calor corporal. - Página 141 CALIBRACIÓN DE LA BRÚJULA resultar en errores grandes. Hay que evitar también áreas que pudieran exhibir concentraciones de hierro duro y Se debe calibrar la brújula, antes de usarse. suave más elevadas de lo normal, pues pueden ocasionar Dado que la brújula usa el campo magnético de la Tierra, rumbos incorrectos.
- Página 142 sobre un vaso invertido). El reloj puede estar bocabajo, 4. Cuando haya acabado, pulse C (BRÚJULA), mante- pero tome precauciones para proteger el cristal. niendo el reloj a nivel. La 4ta manecilla central se mueve hacia atrás y adelante indicando el final de la 3.
- Página 143 7. Pulse la corona hacia adentro cuando termine. Norte. Después de 20 segundos, la brújula se apagará automáticamente y la 4ta manecilla central retornará a su operación normal. Esto alarga la duración de la pila. Pulse C (BRÚJULA) en cualquier momento para mantener la brújula encendida durante otros 20 segundos.
-
Página 144: Calibración Del Altímetro
ALTÍMETRO AJUSTE DE LA MANECILLA INDICADORA (4TA MANECILLA CENTRAL) DESCRIPCIÓN GENERAL Jale la corona totalmente hacia afuera. Las manecil- las retrógradas superior e inferior se reinician hasta el ESCALA DE comienzo de sus escalas automáticamente. La manecilla ALTÍMETRO indicadora (4ta manecilla central) debe señalar las 12 en (CENTENAS) BOTÓN A punto. - Página 145 programar el altímetro a una altitud de referencia en la pantalla de altitud. La 4ta manecilla central y la retrógrada superior deben apuntar a la altitud actual. conocida, o a una referencia de altitud estándar de un determinado lugar. Cambios repentinos en presión debido 3.
-
Página 146: Altímetro Encendido/Apagado
ALTÍMETRO ENCENDIDO/APAGADO Para encender el altímetro pulse C. La manecilla retrógrada inferior apunta a METROS. Usando las marcas en el anillo superior, la 4ta manecilla central muestra las decenas y centenas del valor de la altitud actual con di- visiones cada diez METROS/PIES. La manecilla retrógrada superior muestra los miles del valor de la altitud actual con divisiones cada mil METROS/PIES. -
Página 147: Memoria De Altitud Mínima/Máxima
El reloj apagará el altímetro automáticamente después de La máxima altitud grabada aparece durante diez segun- 60 minutos desde la activación. dos. Para extender la duración de la pantalla durante otros diez segundos, pulse A antes de que termine la MEMORIA DE ALTITUD MÍNIMA/MÁXIMA duración previa de diez segundos. -
Página 148: Profundidad
La altitud mínima grabada aparece durante diez segun- PROFUNDIDAD dos. Para extender la duración de la pantalla durante DESCRIPCIÓN GENERAL otros diez segundos, pulse B antes de que termine la MANECILLA duración previa de diez segundos. Para cambiar la unidad CENTRAL de METROS a PIES o de PIES a METROS, pulse C. -
Página 149: Sensor De Profundidad Encendido/Apagado
apuntará a la profundidad del momento como se indica TEMPERATURA en la escala de profundidad. Si la lectura permanece en El sensor de temperatura está siempre activado y tomará el rango de 0 a 2 metros (0 a 6 pies) durante 5 minutos, una lectura al menos cada 60 segundos. -
Página 150: Nivel De La Pila
Si el reloj no ha sido usado todavía, las manecillas central 2 segundos en desplazamientos de dos posiciones de e inferior mostrarán en la pantalla 0 metros/pies y 0ºC/32 manecilla. Se recomienda que el usuario reemplace la pila ºF, respectivamente. La corona se debe enroscar nueva- cuando el nivel de la bateria es bajo. - Página 151 MANECILLA siempre mostrará la fecha correcta a pedido. La fecha HORARIA SUPERIOR fue programada en la fábrica de Timex. Sólo necesita MANECILLA ajustarse la hora. La 4ta manecilla central mostrará la CORONA fecha cuando se presiona la corona. La manecilla se 4TA MANE- desplazará...
-
Página 152: Ajuste De La 4Ta Manecilla Central
Timex donde la pila será se mueva más rápido. Tenga en cuenta: después de reemplazada y la función Fecha perfecta será calibrada 5 segundos sin actividad con la corona en la posición nuevamente a la fecha actual para el sitio a donde el reloj 3, la 4ta manecilla central se moverá... -
Página 153: Temporizador 3 Yacht Race
TEMPORIZADOR 3 YACHT RACE: temporizador Yacht Race El contador regresivo comenzará a los 3 minutos e inicia 2. Para comenzar, pulse el botón A (START/STOP). La 4ta el cronógrafo cuando éste llega a cero. manecilla central muestra los segundos de conteo regresivo y la manecilla inferior muestra los minutos, TEMPORIZADOR 1 YACHT RACE: El contador regresivo comenzará... -
Página 154: Cómo Funciona El Cronógrafo
En operación normal del temporizador Yacht Race, 2. Para comenzar, pulse el botón A (START/STOP). La 4ta cuando el contador regresivo llega a cero el cronógrafo manecilla central muestra los segundos ascendentes; arrancará automáticamente. Igualmente, hay una alerta la manecilla inferior muestra los minutos ascendentes acústica que marca cada vez que el contador pasa por en una escala de 5 minutos y la manecilla superior cada minuto, que también sonará... - Página 155 mientras las manecillas están detenidas. Para soltar En funcionamiento normal el cronógrafo circulará por las manecillas, pulse el botón B (SPLIT/RESET) y éstas una secuencia de 30 minutos dos veces, hasta el máximo rápidamente se moverán para mostrar el tiempo total de 1 hora.
-
Página 156: Zonas Horarias
3GMT (HORA DE GREENWICH) 3 ZONAS HORARIAS El reloj puede mostrar tres zonas horarias: ANILLO INTERNO/ 1. Manecillas de hora y minutos: muestra la hora en NUMERALES formato estándar de 12 horas. Tenga en cuenta: La (FORMATO MANECILLA DE 24 HORAS) fecha mostrada en la ventanilla de fecha está... - Página 157 La 4ta manecilla central tiene calibración de fábrica por 3. Empuje la corona hacia adentro, a la posición 2. La Timex para reflejar los minutos estándar dentro de la 4ta manecilla central apuntará a su actual posición hora como lo define el Tiempo Universal Coodinado.
-
Página 158: Configuración De La 4Ta Manecilla Central
5. Tire de la corona, hacia afuera hasta la posición 3. La CONFIGURACIÓN DE LA 4TA MANECILLA CENTRAL 4ta manecilla central apuntará a las 12 en punto. (ZONA HORARIA II) Observe la hora actual en la ubicación que desea rastrear 6. -
Página 159: Configuración Del Anillo Superior Giratorio De La Caja (Zona Horaria Iii)
FUNCIÓN TAQUÍMETRO CONFIGURACIÓN DEL ANILLO SUPERIOR GIRATORIO DE LA CAJA (ZONA HORARIA III) (no todos los modelos) La 3ra zona horaria se programa usando la existente El taquímetro sólo determina velocidades que sean configuración de la 4ta manecilla central y ajustando mayores a 60 unidades por hora usando este método;... -
Página 160: Función De Regla Deslizante
3. Detenga el cronógrafo cuando el objetivo para la FUNCIÓN DE REGLA DESLIZANTE medida de velocidad pase por el punto final. La función de regla deslizante integrada al anillo giratorio 4. El segundero del cronógrafo es comparable con los superior se utiliza rotando el aro. El anillo interno no se marcadores del taquímetro para determinar la veloci- mueve. -
Página 161: Cálculo De Velocidad
Los siguientes ejemplos sirven de guía para el uso de la regla deslizante. CÁLCULO DE VELOCIDAD: ANILLO INTERNO ¿Cuál velocidad se requiere para ir a 10 millas náuti- cas en 15 minutos? Factores conocidos: Distancia: Tiempo para 10 millas náuticas: 15 minutos •... -
Página 162: Cálculo De Distancia
Cálculo de tiempo: ¿En cuánto tiempo se harán 10 CÁLCULO DE DISTANCIA: millas náuticas a una velocidad de 40 millas por hora? ¿A qué distancia se puede viajar a 40 millas por hora Factores conocidos: Velocidad: 40 millas por hora durante 15 minutos? Distancia: 10 millas náuticas Factores conocidos: Velocidad: 40 millas náuticas por... -
Página 163: Conversión De Unidades
CÓMO AJUSTAR LA PULSERA CONVERSIÓN DE UNIDADES: Para convertir distancia de millas náuticas a millas (Las variaciones de las siguientes secciones de pulseras terrestres y kilómetros: se aplican a todos los modelos de relojes). Factor conocido: Distancia a convertir es 10 millas PULSERA CON BROCHE DESLIZANTE náuticas 1. -
Página 164: Pulsera Con Broche Plegable
PULSERA CON BROCHE PLEGABLE REMOCIÓN DE ESLABONES DE LA PULSERA 1. Localice la barra de resorte que conecta la pulsera al CÓMO QUITAR LOS ESLABONES: broche. 1. Coloque la pulsera en posición vertical e introduzca la 2. Utilizando una herramienta puntiaguda, empuje el herramienta puntiaguda en la abertura del eslabón. -
Página 165: Garantía Internacional De Timex
TIMEX la reemplace. Su reloj necesitará ser calibrado a GARANTÍA INTERNACIONAL DE TIMEX la hora y fecha correctas después del cambio de pila. Para devolver su reloj a Timex use un envío de prepago. Timex Group USA, Inc garantiza el reloj TIMEX contra ®... - Página 166 Para solicitar los servicios incluidos en la garantía, o la pila. Timex podría cobrarle por el reemplazo de devuelva el reloj a Timex a una de sus sucursales o al co- cualquiera de estas piezas. mercio minorista adonde se compró el reloj junto con el ESTA GARANTÍA SE OFRECE EN FORMA EXCLUSIVA Y EN...
- Página 167 CAN $7,00 (dólares canadienses); en el Reino Unido, un cheque o giro por valor de UK £ 3,50 (libras). En otros países, Timex se encargará de cobrarle el importe por el franqueo y el manejo. NUNCA INCLUYA CON EL RELOJ UNA PULSERA ESPECIAL NI NINGÚN OTRO ARTÍCULO DE...
-
Página 168: Garantía Extendida
(5 dígitos). También puede enviar un cheque de $5 por correo a: Timex Extended Warranty, P.O. Box 1676, Dept. EF, Little Rock, AR 72203. ©2014 Timex Group USA, Inc. TIMEX, INDIGLO y INTELLIGENT QUARTZ son marcas registradas de Timex Group B.V. y sus afiliados. - Página 169 Parabéns por ter adquirido um relógio TIMEX ® INTELLIGENT QUARTZ . Leia cuidadosamente as ™ instruções para saber como operar o relógio Timex. É possível que o seu relógio não possua todos os recursos descritos neste folheto. Para obter mais informações e registrar seu produto, visite:...
- Página 170 ÍNDICE Maré, temperatura e bússola ........386 Altímetro ................ 396 Como iniciar o funcionamento do relógio ..... 337 Profundidade ..............405 À prova d’água e de choque .......... 338 Corrida de iate..............410 Luz noturna Indiglo ............. 340 ® 3TMG ................420 Configuração da data e hora .........
-
Página 171: Como Iniciar O Funcionamento Do Relógio
Retire a proteção plástica abaixo da coroa e pressione a e precisão para medição da hora analógica com quartzo. coroa contra a caixa para iniciar o funcionamento Com os relógios Timex Intelligent Quartz, a tecnologia do relógio. está impressa no design, oferecendo um novo nível de complexidade do mostrador. -
Página 172: À Prova D'água E De Choque
À PROVA D’ÁGUA E DE CHOQUE ADVERTÊNCIA – PARA MANTER A RESISTÊNCIA À ÁGUA, NÃO PRESSIONE NENHUM BOTÃO EMBAIXO Se o relógio for à prova d’água, haverá uma indicação de D’ÁGUA, A MENOS QUE O RELÓGIO SEJA RESISTENTE profundidade em metros (WR_M). À... -
Página 173: Luz Noturna Indiglo
LUZ NOTURNA INDIGLO CONFIGURAÇÃO DA DATA E HORA ® Pressione o botão ou a coroa para ativar a luz. A tecnologia OBSERVAÇÃO – A coroa do relógio tem três posições: eletroluminescente utilizada na luz noturna INDIGLO fechada, no meio e para fora. Para se acostumar com a ®... -
Página 174: Visão Geral
Data (Não se aplica aos modelos com CALENDÁRIO PERPÉTUO calendário perpétuo) VISÃO GERAL Puxe a coroa até a posição do meio e gire-a até a data PONTEIRO DA DATA correta ser exibida na janela da data. Observação – A BOTÃO A PONTEIRO data muda entre as 22h00 e as 2h00. -
Página 175: Introdução
Você só precisa ajustar a hora. O relógio tem dois botões encaixados somente utilizados pelo Centro de Serviço Timex para ajustar o dia e a data após a substituição da bateria. Não cumprem nenhuma outra função. COMPENSAÇÃO DO ANO BISSEXTO Para manter a data correta, o relógio inclui uma confi-... -
Página 176: Cronógrafo Fly-Back
CRONÓGRAFO FLY-BACK AJUSTE DO 4º PONTEIRO CENTRAL Para reajustar o 4º ponteiro central quando está VISÃO GERAL desalinhado: 4º PONTEIRO PONTEIRO DAS HORAS 1. Puxar a coroa para a sua posição externa. Os CENTRAL ponteiros superior e inferior reconfiguram automa- BOTÃO A PONTEIRO ticamente ao final de suas respectivas voltas. -
Página 177: Segundo Fuso Horário
PARA CONFIGURAR O SEGUNDO FUSO HORÁRIO: SEGUNDO FUSO HORÁRIO O ponteiro superior mostra a hora do segundo fuso 1. Puxe a coroa até a posição intermediária. O ponteiro horário. Observe que a superior mostra a hora do segundo fuso horário, escala é... - Página 178 4. Pressione a coroa quando terminar. 4. Para reconfigurar o cronógrafo fly-back para a posição zero, pressione o botão B (FLY-BACK/RESET). CRONÓGRAFO FLY-BACK O relógio tem um cronógrafo fly-back de 4 horas. Ao reconfigurar o cronógrafo, todos os ponteiros passam para a posição zero. Depois de oito segundos, 1.
-
Página 179: Ajuste Do Ponteiro Indicador
BÚSSOLA E CRONÓGRAFO FLY-BACK AJUSTE DO PONTEIRO INDICADOR (4º PONTEIRO CENTRAL) VISÃO GERAL Para reajustar o ponteiro indicador quando estiver 4º PONTEIRO desalinhado: PONTEIRO DOS MINUTOS CENTRAL BOTÃO A 1. Puxar a coroa para a sua posição externa. PONTEIRO Os ponteiros superior e inferior reconfi guram automa- SUPERIOR JANELA DA DATA ticamente ao fi nal de suas respectivas voltas. - Página 180 2. Pressione o botão B para mover o 4º ponteiro central SEGUNDO FUSO HORÁRIO O ponteiro superior geralmente mostra a hora do para a frente. Para mover o ponteiro com mais rapidez, mantenha o botão pressionado. O ponteiro segundo fuso horário. Observe que a escala é de 24 horas, sendo que a meia-noite fi ca em qualquer extremidade superior e o 4º...
- Página 181 no formato de 24 horas. Ao confi gurar o segundo fuso O ponteiro superior mostra o tempo total, incluindo horário, certifi que-se de que o visor da hora/minuto horas e minutos, com divisões a cada dez minutos. corresponda ao visor de 24 horas verifi cando se a data O cronógrafo conta até...
- Página 182 RESET) para zerar o cronógrafo e solte quando quiser computadores), o que poderia afetar o campo magnético que reinicie. Você não tem que esperar até que em torno do relógio. Se a bússola for calibrada perto de os ponteiros cheguem a zero para soltar o botão; tais objetos, ela apenas trabalhará...
- Página 183 Não guarde o relógio perto de fontes magnéticas, 3. Pressione o botão C (COMPASS) para começar. como computadores, eletrodomésticos ou televisores, O 4º ponteiro central executa duas voltas completas porque o relógio poderá adquirir uma carga magnética para que não se esqueça de girar o relógio. Com e produzir leituras de determinação de direção incorretas.
- Página 184 vai para trás e para a frente para assinalar o fi m da calibração e, a seguir, move-se para a confi guração da declinação magnética atual. 5. Caso não queira confi gurar a declinação magnética, pressione a coroa para dentro. Caso contrário, para Declinação magnética confi gurada para -14°...
- Página 185 operação normal. Isto permite poupar a bateria. Pressione CRONÓGRAFO LINEAR o botão C (COMPASS) em qualquer momento para manter VISÃO GERAL a bússola ativada durante outros 20 segundos. A bússola pode ser ativada quando o cronógrafo estiver PONTEIRO DAS HORAS sendo usado.
-
Página 186: Ajuste Do Ponteiro Linear E 4º Ponteiro Central
AJUSTE DO PONTEIRO LINEAR E 4º PONTEIRO CENTRAL SEGUNDO FUSO HORÁRIO Para reajustar o 4º ponteiro central quando está fora de O ponteiro inferior alinhamento: mostra a hora do segundo fuso horário. 1. Puxe a coroa para fora. O ponteiro inferior volta auto- Observe que a escala maticamente para o final do seu ciclo. - Página 187 PARA CONFIGURAR O SEGUNDO FUSO HORÁRIO: 4. Pressione a coroa quando terminar. 1. Puxe a coroa até à posição do meio. O ponteiro CRONÓGRAFO LINEAR inferior mostra a hora do segundo fuso horário O relógio tem um cronógrafo de tempo fracionado e o 4º...
- Página 188 2. Para parar, pressione novamente o botão A HORA MUNDIAL (Start/Stop). Todos os ponteiros param de se VISÃO GERAL movimentar. 24 CIDADES PONTEIRO DAS HORAS 3. Para zerar o cronógrafo, pressione o botão B 4º PONTEIRO CENTRAL PONTEIRO (Split/Reset). SUPERIOR BOTÃO A Ao reconfigurar o cronógrafo, todos os ponteiros passam ESCALA DE...
-
Página 189: Para Ajustar A Hora Mundial
PARA AJUSTAR A HORA MUNDIAL: horário. Para mover o ponteiro com mais rapidez, 1. Puxe a coroa até à posição do meio. O ponteiro central mantenha o botão pressionado. Poderá ser utilizada qualquer cidade. mostra o fuso horário mundial da cidade e o ponteiro superior mostra a hora em essa cidade. - Página 190 4. Se a estação do ano apresentada não estiver correta AJUSTE DO PONTEIRO INDICADOR para o fuso horário principal, pressione em C para (4º PONTEIRO CENTRAL) a alterar. Se o fuso horário principal seguir o horário Para reajustar o ponteiro indicador quando estiver de Verão, o ponteiro superior se moverá...
- Página 191 o relógio continua para a operação de configuração da CONFIGURAÇÃO DA ESTAÇÃO DO ANO hora mundial (ver CONFIGURAÇÃO DA HORA MUNDIAL). A configuração da estação permite ao relógio estabelecer o horário de Verão. APRESENTAÇÃO DAS HORAS NAS CIDADES Pressione o botão A ou O relógio dispõe de uma configuração para representar os B para mover o ponteiro dois períodos de todas as cidades que adotam o horário...
-
Página 192: Ajuste Do Ponteiro Da Bússola
BÚSSOLA AJUSTE DO PONTEIRO DA BÚSSOLA Puxe a COROA completamente para fora. O ponteiro da VISÃO GERAL PONTEIRO DA bússola deve apontar para as 12h00. Se isso não acon- BÚSSOLA (O LADO tecer, pressione os botões A ou B para mover o ponteiro ESCALA DE DECLINAÇÃO QUE INDICA O MEIO... - Página 193 tais objetos, ela apenas trabalhará corretamente neste porque o relógio poderá adquirir uma carga magnética local. Se a bússola for calibrada longe de tais objetos, e produzir leituras de determinação de direção incorretas. não trabalhará corretamente perto deles. Para obter os A precisão típica de instrumentos de usar no pulso é...
- Página 194 que não se esqueça de girar o relógio. Com o relógio 5. Caso não queira configurar a declinação magnética, nivelado, gire-o LENTAMENTE dando duas voltas pressione a coroa para dentro. Caso contrário, para completas, demorando pelo menos 15 segundos em que o relógio defina automaticamente o ângulo de cada volta.
- Página 195 para o norte. Depois de 20 segundos, a bússola desligará automaticamente e o 4º ponteiro central voltará para a operação normal. Isto permite poupar a bateria. Pressione os botões A ou B em qualquer momento para manter a bússola ativada durante outros 20 segundos. OBSERVAÇÃO –...
- Página 196 MARÉ, TEMPERATURA E BÚSSOLA AJUSTE DO PONTEIRO INDICADOR Puxe a coroa completamente para fora. O ponteiro VISÃO GERAL indicador deve apontar para as 12h00. Se isso não acontecer, pressione os botões TIDE ou TEMP para mover ESCALA DA o ponteiro até este apontar para as 12h00. Ao pressionar TEMPERATURA ESCALA DE os botões TIDE e TEMP faz com que o ponteiro se mova...
- Página 197 o termómetro. O ponteiro desloca-se para o início da RELÓGIO DAS MARÉS escala do termômetro e a seguir para a temperatura atual. Para o relógio das marés, o ponteiro indicador gira sempre no sentido horário; quando estiver apontando para a TERMÔMETRO esquerda a maré...
- Página 198 no sentido horário e anti-horário, respectivamente. Durante a calibração e quando fizer as leituras de posição, Pressione a coroa quando terminar. é importante, como com todas as bússolas, manter a bússola nivelada. Fazer a calibração ou determinar CALIBRAÇÃO DA BÚSSOLA direções quando o relógio estiver desnivelado pode Você...
- Página 199 Para calibrar a bússola: 1. Puxe a coroa para a posição do meio e espere que os ponteiros indicadores parem de mover-se. 2. Mantenha o relógio nivelado ou coloque-o sobre uma superfície nivelada (se a correia do relógio atrapalhar, coloque o relógio sobre um copo virado para baixo). 4.
- Página 200 6. Pressione em A ou B para mover o 4º ponteiro FUNCIONAMENTO DA BÚSSOLA central para Oeste (-) ou Este (+), respectivamente, Normalmente, a bússola inativa está com o 4º ponteiro para apontar para o ângulo de declinação do local central apontando para as 12h00 ou mostrando os utilizando a escala de declinação.
- Página 201 ALTÍMETRO AJUSTE DO PONTEIRO INDICADOR (4º PONTEIRO CENTRAL) VISÃO GERAL Puxe a coroa completamente para fora. Os ponteiros retrógrados superior e inferior voltam automatica- ESCALA DO mente ao início das suas escalas. O ponteiro indicador ALTÍMETRO (4º ponteiro central) deve apontar para as 12h00. Se isso (CENTENAS) BOTÃO A não acontecer, pressione os botões A e/ou B para mover...
- Página 202 é importante calibrar o altímetro para um valor de altitude retrógrado inferior aponta para a unidade atual de referência conhecido ou para a altitude de referência selecionada no mostrador de altitude. O 4º ponteiro padrão de um determinado lugar. Mudanças bruscas central e o ponteiro retrógrado superior apontam para de pressão devidas a mudanças do clima, podem causar a altitude atual.
-
Página 203: Altímetro Ligado/Desligado
ALTÍMETRO LIGADO/DESLIGADO Para ligar o altímetro, pressione em C. O ponteiro retrógrado inferior aponta para METROS. Utilizando as marcas no anel superior, o 4º ponteiro central mostra os valores das centenas da altitude atual e o das dezenas com divisões cada dez METROS/PÉS. O ponteiro retrógra- do superior mostra o valor dos milhares da altitude atual com divisões cada mil METROS/PÉS. - Página 204 O relógio desliga o altímetro automaticamente 60 minu- por mais dez segundos, pressione em A antes dos dez tos depois de ter sido ativado. segundos anteriores terem terminado. REVISÃO DA ALTITUDE MIN/MAX DO ALTÍMETRO Para mudar a unidade de medida de METROS para PÉS ou Para ver a altitude máxima registrada, pressione em A.
- Página 205 O valor da altitude mínima registrado é mostrado durante PROFUNDIDADE dez segundos. Para estender o tempo de visualização por VISÃO GERAL mais dez segundos, pressione em B antes dos dez segun- PONTEIRO dos anteriores terem terminado. Para mudar a unidade CENTRAL de medida de METROS para PÉS ou de PÉS para METROS, BOTÃO A...
-
Página 206: Sensor De Profundidade Ligado/Desligado
TEMPERATURA atual na escala de profundidade. Se as leituras permane- O sensor da temperatura está sempre ligado e fará uma cerem na faixa de valores de 0 a 2 metros (0 a 6 pés) leitura pelo menos uma vez a cada 60 segundos. A tem- durante 5 minutos, o sensor desligará... -
Página 207: Verificação Da Carga Da Bateria
de 2 segundos e deverá mover-se duas posições do pon- Se o relógio ainda não foi usado, então os ponteiros central e inferior deverão mover-se para mostrar 0 metros/pés e teiro para a frente. Recomenda-se que o usuário substitua a bateria quando o relógio apresenta o nível de Carga da 0 ºC/32 ºF, respectivamente. -
Página 208: Corrida De Iate
DAS HORAS SUPERIOR O dia e a data foram previamente ajustados na fábrica PONTEIRO Timex. Você só precisa ajustar a hora. O 4º ponteiro central mostrará a data quando a coroa é pressionada. COROA 4° O ponteiro irá para a posição da data atual como PONTEIRO é... -
Página 209: Ajuste Do 4° Ponteiro Central
12h00. Mantendo o botão A ou B pressionado fará centro de serviço Timex onde a bateria será substituída com que o ponteiro se mova mais rápido. Observe: e o recurso de data perfeita será reajustado para a data depois de 5 segundos sem qualquer ação com a coroa... -
Página 210: Timer 3 Da Corrida De Iate
TIMER 3 DA CORRIDA DE IATE: 1. Pressione o botão C até que o ponteiro superior O timer de contagem regressiva começará aos 3 minutos mostre o modo de timer da corrida de iate desejado de 5, 3 ou 1 minuto. e iniciará... - Página 211 o timer de contagem regressiva para o seu valor inicial OPERAÇÃO DO CRONÓGRAFO anteriormente selecionado de 5, 3 ou 1 minuto. O relógio dispõe de um cronógrafo de uma hora o qual pode ser operado independentemente do timer da Durante a operação normal do timer da corrida de iate, corrida de iate.
- Página 212 de 30 minutos. (Observe: o botão C estará desativado 5. Para reiniciar, mantenha pressionado o botão B enquanto o cronógrafo estiver em operação). (SPLIT/RESET) por 3 segundos, o qual voltará a colocar o cronógrafo no início da escala de 30 minutos. 3.
- Página 213 3TMG 3 FUNÇÕES DE FUSO HORÁRIO O seu relógio pode mostrar 3 fusos horários: ANEL INTERIOR / 1. Ponteiros das horas e dos minutos: Apresenta a hora NUMERAIS no formato normal de 12 horas. Observe: A data (FORMATO PONTEIRO DE 24 HORAS) apresentada na janela da data está...
- Página 214 CALIBRAÇÃO DO 4° PONTEIRO CENTRAL 3. Puxe a coroa para a posição 2. O 4º ponteiro central O 4º ponteiro central é calibrado na fábrica Timex para apontará para a sua posição calibrada atual dos refletir os minutos padrão dentro da hora, tal como está...
-
Página 215: Configurando O 4º Ponteiro Central
5. Puxe a coroa para fora, para a posição 3. O 4° ponteiro CONFIGURANDO O 4º PONTEIRO CENTRAL central estará apontando para as 12h00. (FUSO HORÁRIO II) Observe a hora atual no local em que você deseja seguir 6. Rode a coroa para posicionar os ponteiros das horas e como o segundo fuso horário. - Página 216 CONFIGURANDO O ANEL SUPERIOR DE ROTAÇÃO FUNÇÃO DO TAQUÍMETRO DA CAIXA (FUSO HORÁRIO III) (não para todos os modelos) O 3º fuso horário é configurado utilizando a configuração O taquímetro medirá apenas velocidades superiores existente para o 4º ponteiro central e ajustando o anel a 60 unidades por hora utilizando este método;...
- Página 217 3. Pare o cronógrafo uma vez que o objeto do qual quer FUNÇÃO DA ESCALA DESLIZANTE DE BISEL medir a velocidade passou pela meta. A função da escala deslizante do anel superior funciona 4. O ponteiro secundário do cronógrafo é comparado rodando o anel exterior.
-
Página 218: Cálculo De Velocidade
CÁLCULO DE VELOCIDADE: ANEL EXTERIOR Qual é a velocidade necessária para percorrer 10 ANEL INTERIOR milhas náuticas em 15 minutos? Fatores conhecidos: A distância: 10 milhas náuticas; O tempo: 15 minutos • Alinhe a seta do nº “10” sobre o anel exterior com o “15”... -
Página 219: Conversão De Unidades
• Alinhe o nº “40” sobre o anel exterior com a marca marca do nº “15” sobre o anel interior. O número “MPH” sobre o anel interior. indicado sobre o anel exterior é “10”. • O tempo requerido pode ser visto diretamente por A resposta é: a distância percorrida são 10 milhas náuticas. -
Página 220: Como Ajustar A Pulseira
COMO AJUSTAR A PULSEIRA PULSEIRA DE FIVELA DOBRÁVEL 1. Encontre a barra de mola que une a pulseira à fivela. (Variações das seguintes seções das pulseiras aplicam-se 2. Empurre a barra de mola com uma ferramenta a todos os modelos de relógio). pontuda e torça delicadamente a pulseira para PULSEIRA DE FIVELA DESLIZANTE desprendê-la. - Página 221 Para devolver o relógio à Timex, 3. Repita a operação até retirar o número desejado faça-o por meio de um remetente com frete pré-pago.
-
Página 222: Garantia Internacional Timex
NUNCA INCLUA NENHUMA PULSEIRA ESPECIAL contra defeitos de fabricação por um período de UM OU OUTRO ARTIGO DE VALOR PESSOAL NA SUA ANO a partir da data original da compra. A Timex e suas REMESSA. filiais em todo o mundo reconhecerão esta Garantia NÃO JOGUE A BATERIA NO FOGO. - Página 223 5. se o defeito for no cristal, na pulseira, na caixa do reló- Para obter o serviço de garantia, devolva o relógio à gio, nos acessórios ou na bateria. A Timex poderá cobrar Timex, a uma das filiais ou ao revendedor autorizado o custo de substituição de qualquer uma dessas peças.
-
Página 224: Extensão Da Garantia
1676, Dept. EF, Little Rock, AR 72203. (das 10h às 12h). Na Alemanha e Áustria, ligue para 43 ©2014 Timex Group USA, Inc. TIMEX, INDIGLO e INTELLIGENT QUARTZ 662 88921 30. No Oriente Médio e na África, ligue para são marcas comerciais registradas da Timex Group B.V. e suas 971-4-310850.