Tabla de contenido
Publicidad
Idiomas disponibles
Idiomas disponibles
Enlaces rápidos
Publicidad
Capítulos
Tabla de contenido
Solución de problemas

Manuales relacionados para Yamaha M-5000


Resumen de contenidos para Yamaha M-5000
- Página 1 Power Amplifier Owner´s Manual Manual de instrucciones...
-
Página 2: Features
¡ To use the product properly and safely, we suggest that you read this manual and Safety Brochure (separate booklet) thoroughly. Keep the manual in a safe, accessible place for future reference. You can download a PDF version of this manual from the following Yamaha website. https://download.yamaha.com/ Features ¡... -
Página 3: Tabla De Contenido
Table of contents Features About this manual Supplied accessories Maintenance Mirror-finish side panels . . . . . . . . . . . . . . . . . . . . . . . . . . . . 4 Surfaces other than the mirror-finish side panels . -
Página 4: Supplied Accessories
. • If you wipe the surface area in the vicinity of the Yamaha logo with force, the logo might peel off or fiber from the cloth might stick to the surface . -
Página 5: Part Names And Functions
Part Names and Functions This section describes the names and functions of the parts on the front and rear panel. -
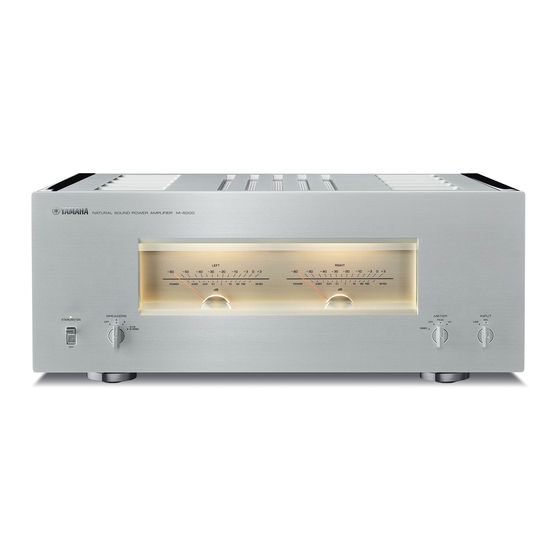
Página 6: Front Panel
Front panel NATURAL SOUND P O W E R AMPLIFIER SPEAKERS WIRING STANDBY/ON/OFF (Power) Note switch/indicator After you turn on the unit, it will take a few seconds before the unit can reproduce sound. Turns the power to the unit on or off. STANDBY/ON: Turns the power to the unit on. - Página 7 METER INPUT PEAK LINE DIMMER PEAK: Switches the meter display type to a peak NOTICE level meter. The peak level meter shows the highest Make sure that the impedance of each speaker is instantaneous level of an audio output signal. appropriate for the system configuration .
-
Página 8: Rear Panel
Rear panel ¹ µ PHASE selector Note For information regarding the connection procedure, refer Sets the position (polarity) of the HOT pin at the BAL to “Connections” (page 11) . input jacks according to the connected preamplifier. For more information, refer to “Balanced and unbalanced connections”... -
Página 9: Mode Selector
¸ ¹ MODE selector TRIGGER IN jack TRIGGER OUT jack Switches the speaker output between stereo and monaural. For more information, refer to “Basic speaker Used to connect a component that supports the trigger connections” (page 14), “Bi-wiring connections” function so that you can control the unit’s power on and (page 18), “Bi-amp connections”... -
Página 10: Balanced And Unbalanced Connections
Pin #2 Pin #3 Note Pin #1 Select NORMAL (pin #2 is HOT) for a Yamaha player or preamplifier . When making a balanced connection, you must set the polarity correctly. To set the polarity, use the PHASE selector on the rear panel. -
Página 11: Connections
Connections This section explains how to connect the unit to a preamplifier and speakers. CAUTION Turn off the power to all components before making any connections . NOTICE Before you connect external components, read and follow the instruction manuals for those components . Otherwise, this unit or external components might malfunction . -
Página 12: Connecting A Preamplifier
Connecting a preamplifier Connect your preamplifier to the unit’s input jacks. For this connection, use XLR-type balanced cables or RCA-type unbalanced cables. Balanced connection M-5000 Front panel XLR-type balanced cable INPUT LINE Preamplifier Unbalanced connection M-5000 Front panel RCA-type pin cable... -
Página 13: Trigger Connections
Trigger connections You can control the unit’s power on and off in sync with a connected Yamaha component, such as a preamplifier or AV receiver. Use the supplied system cable to make connections as shown in the following diagram. Example (one M-5000 unit is used) -
Página 14: Basic Speaker Connections
Basic speaker connections Preamplifier R channel R channel L channel R channel signal L channel signal R channel High Shorting bar MODE selector MODE: NORMAL Turn off the power to the unit and all CAUTION connected components Be sure to use speakers that feature the impedance shown in the table below . - Página 15 L channel M-5000 L channel High Shorting bar SPEAKERS selector (front panel) SPEAKERS WIRING Note • All connections must be correct: L (left) to L, R (right) to RMAL R, “+” to “+”, and “−” to “−” . If the connections are faulty, no sound will be heard from the speakers .
-
Página 16: Connecting Speaker Cables
Connecting speaker cables Using standard speaker cables CAUTION • Do not loosen the knob excessively . Otherwise, the knob Remove approximately 10 mm (0 4 in) of might come off and a child might swallow it accidentally . • To reduce the risk of electric shock, do not touch the insulation from the end of each speaker SPEAKERS terminals while the power to the unit is on . -
Página 17: Using Y-Shaped Lug Cables
Using Y-shaped lug cables Unscrew the knob, and then sandwich the Y-shaped lug between the ring part and base of the terminal. Y-shaped lug Slide Thickness of the terminal core: 5.0 mm (0.20 in) Tighten the knob. -
Página 18: Bi-Wiring Connections
Bi-wiring connections R channel Preamplifier R channel L channel R channel signal L channel signal R channel High Remove the shorting bar MODE selector MODE: NORMAL To bi-wire your speakers, separate cables are used to Remove the shorting bars or bridges on connect the mid/high-frequency speaker driver (tweeter) the speakers and the low-frequency driver (woofer) on each bi-... - Página 19 L channel M-5000 L channel High Remove the shorting bar SPEAKERS selector (front panel) SPEAKERS WIRING CAUTION Connect the power amplifier to the speakers Be sure to use speakers that feature the impedance shown in the table below . For each channel speaker, connect the cables Speaker impedance from the speaker’s mid/high range terminals...
-
Página 20: Bi-Amp Connections
Turn off the power to the unit and all M-5000 units. connected components The M-5000 features two built-in amplifiers. Each of Remove the shorting bars or bridges on these amps is connected to the mid/high-frequency speaker driver (tweeter) and the low-frequency driver the speakers (woofer) on the speaker of the corresponding channel. - Página 21 L channel M-5000 M-5000 L channel High Remove the shorting bar SPEAKERS selector MODE selector (front panel) SPEAKERS WIRING WIRING MODE: DUAL MONO/BRIDGE CAUTION Set the MODE selector on the rear panel to DUAL MONO/BRIDGE Be sure to use speakers that feature the impedance shown in the table below .
-
Página 22: Bridge Connections
(front panel) SPEAKERS WIRING MODE: DUAL MONO/BRIDGE MODE: DUAL In a bridge connection configuration, the M-5000 is used NOTICE as a monaural amplifier. To create a stereo system, you Since amplification will be doubled in this configuration, need two M-5000 units. - Página 23 L channel M-5000 M-5000 L channel High Shorting bar SPEAKERS selector MODE selector (front panel) SPEAKERS WIRING WIRING MODE: DUAL MONO/BRIDGE CAUTION Set the SPEAKERS selector on the front Be sure to use speakers that feature the impedance shown panel to A, B, or A+B BI-WIRING in the table below .
-
Página 24: Connecting The Power Cord
Otherwise, continued use of the unit might lead to electric shock, fire, or malfunction . Contact your nearest Yamaha dealer or service center for check-up or repair . • Do not touch the power cord or plug during lightning storms . Otherwise, an electric shock might be caused . -
Página 25: Reference Materials
Reference Materials... -
Página 26: General Specifications
To obtain 2-channel driven, the latest manual, access the Yamaha website then BAL to SPEAKERS, 50 W/8Ω . . . . . . . . . . . 0 .035%... -
Página 27: Block Diagram
Block diagram... -
Página 28: Audio Characteristics
Audio characteristics Total harmonic distortion (8Ω) 0.05 20 kHz 0.03 0.02 1 kHz 0.01 0.005 20 Hz 0.003 0.002 0.001 50 60 80 100 Output (W) Total harmonic distortion (4Ω) 20 kHz 0.05 0.03 0.02 1 kHz 0.01 20 Hz 0.005 0.003 0.002... -
Página 29: Total Harmonic Distortion (Monaural 8Ω)
Total harmonic distortion (monaural 8Ω) 20 kHz 0.05 0.03 20 Hz 0.02 0.01 1 kHz 0.005 0.003 0.002 0.001 Output (W) Frequency response –2 –4 –6 –8 –10 –12 –14 200 300 100k Frequency (Hz) -
Página 30: Troubleshooting
Refer to the table below if this unit does not function properly. If the instructions below do not help, or if the problem you are experiencing is not listed below, turn off the unit, disconnect the power cord, and contact the nearest authorized Yamaha dealer or service center. Problem... - Página 31 Problem Cause Remedy page Make sure that the speaker wires are The protection circuitry has not touching each other or shorting out been activated because of a against the rear panel of the unit, and short circuit, etc. then turn on the power to the unit. The sound is suddenly muted.
-
Página 32: Index
Index AUTO POWER STANDBY switch . . . . . . . . . . . . 9 Unbalanced connection . . . . . . . . . . . . . . . . . . . . . 10 Balanced connection . -
Página 34: Funciones
¡ Para utilizar el producto de forma adecuada y segura, le sugerimos que lea detenidamente este manual y el Folleto de seguridad (folleto independiente). Conserve el manual en un lugar seguro y de fácil acceso como referencia futura. Puede descargar una versión en PDF de este manual desde el siguiente sitio web de Yamaha. https://download.yamaha.com/ Funciones ¡... - Página 35 Contenido Funciones Acerca de este manual Accesorios suministrados Mantenimiento Paneles laterales con acabado de espejo Superficies distintas de los paneles laterales con acabado de espejo Nombres y funciones de las piezas Panel delantero Panel trasero Conexiones balanceadas y no balanceadas Conexiones Conexión de un preamplificador Conexiones de activación...
-
Página 36: Accesorios Suministrados
(diluido en agua), escúrralo bien y limpie la suciedad • Si limpia la zona de la superficie cercana al logotipo de Yamaha con fuerza, es posible que el logotipo se despegue o que se adhieran fibras del paño a la superficie Paneles laterales con acabado de espejo Se recomienda utilizar un paño de limpieza como los destinados a pianos. -
Página 37: Nombres Y Funciones De Las Piezas
Nombres y funciones de las piezas En esta sección se describen los nombres y las funciones de las piezas en los paneles delantero y trasero. -
Página 38: Panel Delantero
Panel delantero NATURAL SOUND P O W E R AMPLIFIER SPEAKERS WIRING Interruptor/indicador STANDBY/ON/ Nota OFF (alimentación) Tras encender la unidad, tendrá que esperar unos segundos antes de que pueda reproducir sonido Activa o desactiva la alimentación de la unidad. STANDBY/ON: activa la alimentación de la unidad. -
Página 39: Visor Del Indicador (Left/Right)
METER INPUT PEAK LINE DIMMER OFF: desactiva el funcionamiento del indicador y la AVISO iluminación del visor. Asegúrese de que la impedancia de cada altavoz es PEAK: cambia el tipo de visor a un indicador de nivel adecuada para la configuración del sistema Para máximo. -
Página 40: Panel Trasero
Panel trasero ¹ µ Selector PHASE Nota Para obtener información acerca del procedimiento de Establece la posición (polaridad) del contacto con conexión, consulte “Conexiones” (página 43) corriente en los jacks de entrada BAL en función del preamplificador conectado. Para obtener más información, consulte “Conexiones balanceadas y no balanceadas”... - Página 41 ¸ ¹ Selector MODE Jack TRIGGER IN Jack TRIGGER OUT Cambia la salida de los altavoces entre estéreo y monaural. Para obtener más información, consulte Se utilizan para conectar un componente compatible “Conexiones básicas de los altavoces” (página 46), con la función de activación para que pueda controlar la “Conexiones bicable”...
-
Página 42: Conexiones Balanceadas Y No Balanceadas
Nota Contacto n º 1 Seleccione NORMAL (el contacto n º 2 tiene corriente) para un reproductor o preamplificador Yamaha Al realizar una conexión balanceada, debe establecer correctamente la polaridad. Para establecer la polaridad, utilice el selector PHASE en el panel trasero. -
Página 43: Conexiones
Conexiones En esta sección se explica cómo conectar la unidad a un preamplificador y a altavoces. ATENCIÓN Desactive la alimentación de todos los componentes antes de realizar conexiones AVISO Antes de conectar componentes externos, lea y siga los manuales de instrucciones de dichos componentes De lo contrario, se pueden producir averías en esta unidad o los componentes externos... -
Página 44: Conexión De Un Preamplificador
Conexión de un preamplificador Conecte el preamplificador a los jacks de entrada de la unidad. Para esta conexión, utilice cables balanceados de tipo XLR o cables no balanceados de tipo RCA. Conexión balanceada M-5000 Panel delantero Cable balanceado de INPUT... -
Página 45: Conexiones De Activación
Puede controlar la activación y desactivación de la alimentación de la unidad de manera sincronizada con un componente Yamaha conectado, como un preamplificador o un receptor AV. Utilice el cable del sistema suministrado para realizar conexiones como se muestra en el diagrama siguiente. -
Página 46: Conexiones Básicas De Los Altavoces
Conexiones básicas de los altavoces Preamplificador Canal R Canal R Canal L Señal de canal R Señal de canal L Canal R High Barra de cortocircuito Selector MODE MODE: NORMAL Desactive la alimentación de la unidad y ATENCIÓN de todos los componentes conectados Asegúrese de utilizar altavoces que presenten la impedancia mostrada en la tabla siguiente Establezca el selector MODE del panel... - Página 47 Canal L M-5000 Canal L High Barra de cortocircuito Selector SPEAKERS (panel delantero) SPEAKERS Nota WIRING • Todas las conexiones deben ser correctas: L (izquierdo) con L, R (derecho) con R, “+” con “+” y “−” con “−” Si las conexiones son defectuosas, no se escuchará...
-
Página 48: Conexión De Los Cables De Los Altavoces
Conexión de los cables de los altavoces Mediante cables de altavoces ATENCIÓN estándar • No afloje la perilla excesivamente De lo contrario, podría salirse y un niño podría ingerirla accidentalmente • Para reducir el riesgo de descarga eléctrica, no toque los Quite aproximadamente 10 mm de terminales SPEAKERS con la alimentación de la unidad aislamiento del extremo de cada cable de... -
Página 49: Mediante Cables De Lengüeta En Y
Mediante cables de lengüeta en Y Desatornille la perilla y luego meta la lengüeta en Y entre la parte del anillo y la base del terminal. Lengüeta en Y Deslizar Grosor del núcleo del terminal: 5 mm Apriete la perilla. -
Página 50: Conexiones Bicable
Conexiones bicable Canal R Preamplificador Canal R Canal L Señal de canal R Señal de canal L Canal R High Retire la barra de cortocircuito Selector MODE MODE: NORMAL Para realizar conexiones bicable de los altavoces, Retire las barras o puentes de cortocircuito se utilizan cables independientes para conectar el en los altavoces potenciador de altavoz de frecuencias medias/altas... - Página 51 Canal L M-5000 Canal L High Retire la barra de cortocircuito Selector SPEAKERS (panel delantero) SPEAKERS WIRING ATENCIÓN Asegúrese de utilizar altavoces que presenten la Conecte el amplificador de potencia a los impedancia mostrada en la tabla siguiente altavoces Impedancia de los altavoces...
-
Página 52: Conexiones De Biamplificación
Desactive la alimentación de la unidad y necesita dos unidades M-5000. de todos los componentes conectados La unidad M-5000 presenta dos amplificadores Retire las barras o puentes de cortocircuito integrados. Cada uno de ellos se conecta al potenciador de altavoz de frecuencias medias/altas (agudos) y al... - Página 53 Canal L M-5000 M-5000 Canal L High Retire la barra de cortocircuito Selector SPEAKERS Selector MODE (panel delantero) SPEAKERS WIRING WIRING MODE: DUAL MONO/BRIDGE ATENCIÓN Asegúrese de utilizar altavoces que presenten la Establezca el selector MODE del panel impedancia mostrada en la tabla siguiente...
-
Página 54: Conexión Puenteada
MODE: DUAL En una configuración de conexión puenteada, la unidad AVISO M-5000 se utiliza como un amplificador monaural. Para Dado que la amplificación se duplicará en esta crear un sistema estéreo, necesita dos unidades M-5000. configuración, ajuste el nivel de volumen según En cada amplificador, conecte el terminal “+”... - Página 55 Canal L M-5000 M-5000 Canal L High Barra de cortocircuito Selector SPEAKERS Selector MODE (panel delantero) SPEAKERS WIRING WIRING MODE: DUAL MONO/BRIDGE ATENCIÓN Establezca el selector SPEAKERS del panel Asegúrese de utilizar altavoces que presenten la delantero en A, B o A+B BI-WIRING...
-
Página 56: Conexión Del Cable De Alimentación
Póngase en contacto con su centro de servicio Si no va a utilizar la unidad durante un periodo prolongado, o distribuidor Yamaha más cercano para una revisión o asegúrese de desenchufar el enchufe de alimentación una reparación de la toma de CA Aunque el interruptor STANDBY/ ON/OFF (alimentación) esté... -
Página 57: Materiales De Referencia
Materiales de referencia... -
Página 58: Especificaciones Generales
LINE a SPEAKERS, 50 W/8Ω . . . . . . . . . . . 0,035% obtener el último manual, acceda al sitio web de Dirigida por 2 canales, Yamaha y descargue el archivo del manual. -
Página 59: Diagrama En Bloques
Diagrama en bloques... -
Página 60: Características De Audio
Características de audio Distorsión armónica total (8Ω) 0.05 20 kHz 0.03 0.02 1 kHz 0.01 0.005 20 Hz 0.003 0.002 0.001 50 60 80 100 Output (W) Distorsión armónica total (4Ω) 20 kHz 0.05 0.03 0.02 1 kHz 0.01 20 Hz 0.005 0.003 0.002... -
Página 61: Distorsión Armónica Total (8Ω Monoaural)
Distorsión armónica total (8Ω monoaural) 20 kHz 0.05 0.03 20 Hz 0.02 0.01 1 kHz 0.005 0.003 0.002 0.001 Output (W) Respuesta de frecuencia –2 –4 –6 –8 –10 –12 –14 200 300 100k Frequency (Hz) -
Página 62: Resolución De Problemas
Yamaha autorizado más cercano. Consulte... - Página 63 Consulte Problema Causa Solución la página Asegúrese de que los cables de los El circuito de protección se altavoces no se toquen entre sí, o que ha activado debido a un no estén cortocircuitados al panel cortocircuito, etc. trasero de la unidad y luego vuelva a El sonido se silencia activar la alimentación de la unidad.
-
Página 64: Índice
Índice Altavoces, Conexión . . . . . . . . . . . . . . . . . . . . . . . 46 TRIGGER, Jack . - Página 68 Yamaha Global Site https://www.yamaha.com/ Yamaha Downloads https://download.yamaha.com/ Manual Development Group © 2018 Yamaha Corporation Published 02/2019 IPEM-C0 VCV2420 10-1 Nakazawa-cho, Naka-ku, Hamamatsu, 430-8650 Japan...