Tabla de contenido
Publicidad
Idiomas disponibles
Idiomas disponibles
Enlaces rápidos
Publicidad
Capítulos
Tabla de contenido

Manuales relacionados para Kodak Mini Digital Film Scanner


Resumen de contenidos para Kodak Mini Digital Film Scanner
- Página 1 KODAK Mini Digital Film Scanner Mini scanner numérique de pellicules Mini Scanner di Rullini Digitale Digitaler Mini-Filmscanner Mini escáner digital para película User Manual Manuel de l'utilisateur Manuale Utente Bedienungsanleitung Manual del usuario...
-
Página 2: Tabla De Contenido
CONTENTS INTRODUCTION SPECIFICATIONS INCLUDED ACCESSORIES SAFETY PRECAUTIONS PRODUCT OVERVIEW MAIN MENU OVERVIEW PREPARING MEDIA TO SCAN LOADING NEGATIVES LOADING SLIDES CONTINUOUS LOADING (SLIDES AND/OR FILM) USING THE SCANNER VIEWING SCANNED IMAGES SETTING THE LANGUAGE CHOOSING PHOTO RESOLUTION FORMATTING THE SD CARD ™... -
Página 3: Introduction
2. SPECIFICATIONS 1. INTRODUCTION Thank you for purchasing the KODAK Mini Digital Film Function Film scanner/USB MSDC Scanner. This User Guide is intended to provide you Interface USB 2.0 with guidelines to ensure that operation of this product Image Sensor 14.0 megapixels... -
Página 4: Included Accessories
8.82 oz. (250g) Digital Film Scanner, immediately turn the power off and *Your KODAK Mini Digital Film Scanner uses a process called remove any slides, slide trays, and/or film negatives from “interpolation” to upgrade and enhance the megapixels of your the product. -
Página 5: Product Overview
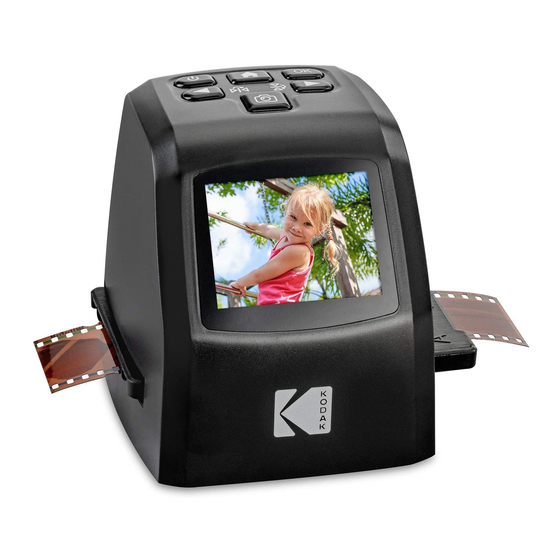
5. PRODUCT OVERVIEW 6. MAIN MENU OVERVIEW 1. LCD Screen 2. SD card slot ™ (NOTE: SD card ™ not included) 3. Mini USB power connection 4. TV-out connection 5. OK button 6. Home button (This button will ALWAYS take you to the home screen, no matter where you are in the menu sequence.) -
Página 6: Preparing Media To Scan
7. PREPARING MEDIA TO SCAN 8. LOADING NEGATIVES Before using your film scanner, you should either insert an SD NOTE: Always handle slide or film ™ card (not included) as device memory is very limited, or make negatives with care to avoid getting sure there is enough room in the very limited device memory to scratches or fingerprints on them. -
Página 7: Loading Slides
9. LOADING SLIDES 10. CONTINUOUS LOADING (SLIDES AND/OR FILM) 1. Hold the slide toward the light and face the front of the slide This useful function allows you to continue feeding new toward you. negatives or slides into the film scanner without the messy and frustrating process of removing the tray and repositioning your film or slides every time. - Página 8 1. After powering on the scanner, use the arrow keys to navigate to the Capture screen, then press the OK button to enter Capture Mode. 2. Insert your film negatives or slides into the appropriate tray/holder d. Select the correct type of film (Negative, Slide, B&W) and and into the film slot for scanning.
- Página 9 e. You will automatically be returned to Capture Mode. 6. To make edits to the image in terms of brightness or coloration, press the OK button while in Capture Mode. The screen will 5. Once the correct film type is selected, you can choose give you the option to adjust brightness and RGB values.
-
Página 10: Viewing Scanned Images
3. Languages available include: English, French, German, 7. Once you’ve made your adjustments, press the key to Italian, Spanish, T-Chinese, S-Chinese, and Japanese. capture the image and save it. Remember: hitting the Capture button will always scan and save the image you’re 14. -
Página 11: Formatting The Sd ™ Card
4. After the formatting process completes, press the power 15. FORMATTING THE SD CARD ™ button to turn the scanner off, then turn it back on again. 1. From the main menu, use the 16. CONNECTING THE SCANNER TO left and right arrows to navigate to YOUR COMPUTER the Format option and press the OK button. -
Página 12: Warranty Information
WARRANTY INFORMATION WHAT DOES THIS WARRANTY COVER? This limited warranty covers defects in materials and workmanship of the KODAK Mini LIMITED WARRANTY ON KODAK MINI DIGITAL FILM SCANNER Digital Film Scanner (the “product”) for the Warranty Period as THIS LIMITED WARRANTY GIVES YOU SPECIFIC LEGAL RIGHTS defined below. -
Página 13: Customer Service Contact Information
International Support: kodakintl@camarketing.com 844-516-1540 www.kodakphotoplus.com The Kodak trademark, logo, and trade dress are used under license from Kodak. Mac is a trademark of Apple Inc. in the U.S. and other countries. SD is a trademark of SD-3C, LLC in the U.S.. - Página 14 CONTENU 1. PRÉSENTATION PRÉSENTATION Merci d'avoir acheté un Mini scanner numérique de FICHE TECHNIQUE pellicules KODAK. Ce manuel contient des instructions garantissant une utilisation sécuritaire du produit, sans ACCESSOIRES INCLUS présenter de risque pour l'utilisateur. Toute utilisation CONSIGNES DE SÉCURITÉ...
-
Página 15: Fiche Technique
2.4″ couleur TFT LCD Poids 8.82 oz. (250g) Contrôle d'exposition Automatique/Manuel (-2,0 ~ .0 *Votre Mini scanner numérique de pellicules KODAK utilise un + 2,0 EV) procédé appelé “interpolation” pour améliorer la résolution de Balance des blancs Automatique vos photos numérisées à 14 -22 MP. -
Página 16: Consignes De Sécurité
REMARQUE : Une carte SD n'est pas incluse, mais elle est fortement • Pour protéger le scanner et économiser de l' é nergie, il s' é teint recommandée lors de l'utilisation de ce produit. Cet appareil dispose automatiquement après 30 minutes d'inactivité. Appuyez sur le d'une quantité... -
Página 17: Vue D'ensemble Du Menu Principal
6. VUE D'ENSEMBLE DU MENU PRINCIPAL 7. PRÉPARATION DU MÉDIA À SCANNER Avant d'utiliser votre scanner de pellicules, vous devez soit insérer une carte SD (non incluse) car la mémoire de l'appareil ™ est très limitée, ou vous assurer qu'il y a suffisamment de place dans la mémoire de l'appareil pour contenir les images que vous souhaitez scanner. -
Página 18: Charger Des Négatifs
8. CHARGER DES NÉGATIFS 9. CHARGER DES DIAPOSITIVES REMARQUE : Toujours manipuler les 1. Tenez la diapositive vers la lumière négatifs de diapositives ou de pellicules et orientez l'avant de la diapositive avec soin pour éviter d’y faire des rayures vers vous. ou de laisser des traces de doigts. -
Página 19: Chargement Continu
1. Après avoir allumé le scanner, 10. CHARGEMENT CONTINU utilisez les touches fléchées pour (DIAPOSITIVES ET/OU PELLICULES) atteindre l'écran de capture, puis appuyez sur le bouton OK pour entrer en mode Capture. Cette fonction utile vous permet d'alimenter en continu de nouveaux négatifs ou des diapositives dans le scanner, sans 2. - Página 20 e. Vous serez automatiquement renvoyé en mode Capture. 5. Une fois le type de pellicule sélectionné, vous pouvez choisir de retourner ou inverser l'image en appuyant sur les touches fléchées. Cela est particulièrement utile avec des négatifs où le texte est affiché à l'envers. a.
-
Página 21: Voir Les Images Numérisées
6. Pour modifier l'image en termes de luminosité ou de couleur, 7. Une fois que vous avez effectué vos réglages, appuyez sur la appuyez sur le bouton OK en étant dans le mode Capture. L' é cran vous donne la possibilité d'ajuster la luminosité et les touche pour capturer l'image et l' e nregistrer. -
Página 22: Choisir La Résolution Photo
3. Les langues disponibles sont : Anglais, Français, allemand, 15. FORMATER LA CARTE SD ™ Italien, Espagnol, Chinois (Traditionnel), Chinois (Simplifié), Japonais. 1. Dans le menu principal, utilisez les flèches gauche et droite pour accéder à l' o ption Format et 14. -
Página 23: Connecter Le Scanner À
INFORMATIONS DE GARANTIE bouton d'alimentation pour éteindre le scanner, puis rallumez-le. GARANTIE LIMITÉE DU MINI SCANNER NUMÉRIQUE POUR 16. CONNECTER LE SCANNER À PELLICULES KODAK VOTRE ORDINATEUR CETTE GARANTIE LIMITÉE VOUS CONFÈRE DES DROITS SPÉCIFIQUES RECONNUS PAR LA LOI. VOUS POURRIEZ DISPOSER DE DROITS SUPPLÉMENTAIRES QUI VARIENT D'UNE... - Página 24 Cette garantie limitée englobera toutes les défectuosités de matériels et de fabrication éventuelles du Mini scanner numérique pour pellicules KODAK (le “produit”) pendant la période de garantie définie ci-dessous. QU'EST-CE QUI N'EST PAS COUVERT PAR CETTE GARANTIE ? Cette garantie limitée ne couvre pas les dégâts dus aux cas suivants ...
-
Página 25: Informations De Contact Du Service À La
Support technique International : kodakintl@camarketing.com 844-516-1540 www.kodakphotoplus.com La marque commerciale Kodak, le logo et l'habillage sont utilisés sous licence Kodak. Mac est une marque commerciale d'Apple Inc., enregistrée aux États-Unis et d'autres pays. SD est une marque commerciale de SD-3C LLC aux États-Unis. - Página 26 CONTENUTO 1. INTRODUZIONE INTRODUZIONE Grazie per aver acquistato il Mini Scanner Digitale SPECIFICHE per Rullini KODAK. Il Manuale dell'utente è concepito per fornire indicazioni all’utente per garantire il ACCESSORI INCLUSI funzionamento sicuro del prodotto minimizzando PRECAUZIONI PER LA SICUREZZA i rischi. Qualsiasi utilizzo non conforme a quanto PANORAMICA PRODOTTO illustrato nel Manuale dell'utente può...
-
Página 27: Specifiche
Peso 8.82 oz. (250g) Sensore Immagine 14.0 megapixel (4416x3312) *Il tuo Mini Scanner Digitale per Rullini KODAK usa un processo 1/2.33" sensore CMOS chiamato "interpolazione” per migliorare e potenziare i megapixel delle tue foto scannerizzate da 14 - 22MP Display 2.4’’... -
Página 28: Precauzioni Per La Sicurezza
5. PANORAMICA PRODOTTO 4. PRECAUZIONI PER LA SICUREZZA • Non provare per alcun motivo a disassemblare questo dispositivo 1. Schermo LCD • Non toccare la parte interna dello scanner dopo che è caduto o 2. Slot scheda SD ™ dopo che ha subito alcun tipo di danno. (NOTA: Scheda SD ™... -
Página 29: Panoramica Menu Principale
6. PANORAMICA MENU PRINCIPALE 7. PREPARAZIONE MEDIA DA SCANNERIZZARE Prima di utilizzare il tuo scanner per rullini, dovresti o inserire una scheda SD (non inclusa) dato che la memoria del ™ dispositivo è molto limitata, o assicurarti che ci sia abbastanza spazio nella memoria molto limitata del dispositivo per ricevere le immagini che vuoi scannerizzare. -
Página 30: Caricamento Negativi
8. CARICAMENTO NEGATIVI 9. CARICAMENTO DIAPOSITIVE NOTA: Maneggia sempre con cura i 1. Mantieni la diapositiva rivolta negativi delle diapositive o dei rullini per verso la luce e posiziona il fronte evitare di lasciare graffi o impronte sopra della diapositiva verso di te. di essi. -
Página 31: Caricamento Continuo
1. Dopo aver acceso lo scanner, 10. CARICAMENTO CONTINUO usa le frecce di navigazione per (DIAPOSITIVE E/O RULLINI) spostarti su Cattura schermata, poi premi il pulsante OK per entrare in modalità cattura. Questa utile funzione ti permette di caricare continuamente nuovi negativi o diapositive nello scanner per rullini senza 2. - Página 32 e. Tornerai automaticamente alla modalità Cattura. 5. Una volta che è stato selezionato il tipo di film corretto, potrai scegliere di girare o invertire l’immagine premendo le freccette. Questo puo’ tornare utile per i negativi dove il testo viene mostrato al contrario. a.
-
Página 33: Visione Immagini Scannerizzate
6. Per modificare l’immagine di luminosità o di colorazione, premi 7. Una volta che hai fatto le tue modifiche, premi la il pulsante OK mentre sei in modalità Cattura Lo schermo di chiave per catturare l’immagine e salvarla. Ricorda: mostrerà l’ o pzione regola valori luminosità e RGB. Usa le premere il pulsante Cattura scannerizzerà... -
Página 34: Scegliere Risoluzione Foto
3. Le lingue disponibili includono: Inglese, Francese, Tedesco, 15. FORMATTARE LA SCHEDA SD ™ Italiano, Spagnolo, T-Cinese, S-Cinese, e Giapponese. 1. Dal menu principale, usa le 14. SCEGLIERE RISOLUZIONE FOTO freccette sinistra e destra per navigare verso l’ o pzione Formatta e premere il pulsante OK. -
Página 35: Tuo Computer
INFORMAZIONI GARANZIA premi il pulsante accensione per spegnere lo scanner e dopo riaccendilo. GARANZIA LIMITATA SUL MINI SCANNER DIGITALE PER RULLINI KODAK. 16. CONNETTERE LO SCANNER AL QUESTA GARANZIA LIMITATA TI FORNISCE DEI SPECIFICI TUO COMPUTER DIRITTI LEGALI E ALTRI POSSIBILI DIRITTI, CHE VARIANO DA STATO IN STATO. - Página 36 COSA COPRE QUESTA GARANZIA? Questa garanzia limitata copre possibili difetti nei materiali e nella fattura del mini scanner digitale per rullini Kodak (il “prodotto”) per il Periodo di Garanzia definito qua sotto. COSA NON COPRE QUESTA GARANZIA? Questa garanzia limitata non copre alcun danno dovuto a: (a) trasporti;...
-
Página 37: Informazioni Di Contatto Per Il
Supporto Internazionale: kodakintl@camarketing.com 844-516-1540 www.kodakphotoplus.com Il marchio, il logo e l’immagine commerciale di Kodak sono utilizzati secondo licenza fornita da Kodak. Apple è un marchio commerciale di Apple Inc., registrato negli USA e in altri paesi. SD è un marchio registrato di SD-3C, LLC negli USA Windoes è... - Página 38 INHALT 1. EINFÜHRUNG EINFÜHRUNG Vielen Dank, dass Sie sich für den digitalen KODAK SPEZIFIKATIONEN Mini-Filmscanner entschieden haben. Diese MITGELIEFERTES ZUBEHÖR Bedienungsanleitung soll Ihnen Richtlinien an die SICHERHEITSVORKEHRUNGEN Hand geben, die sicherstellen, dass der Betrieb dieses PRODUKTÜBERSICHT Produkts sicher ist und keine Gefahr für den Benutzer ÜBERBLICK ÜBER DAS HAUPTMENÜ...
-
Página 39: Technische Daten
Bildsensor 14,0 Megapixel Gewicht 250g (8,82 Unzen) (4416 x 3312) *Ihr KODAK digitaler Mini-Filmscanner verwendet einen als 1/2,33" CMOS-Sensor „Interpolation“ bezeichneten Prozess, um die Megapixel Display 2,4″ Farb-TFT-LCD Ihrer gescannten Fotos von 14 auf 22 MP zu erhöhen und zu verbessern. -
Página 40: Sicherheitsvorkehrungen
5. PRODUKTÜBERSICHT 4. SICHERHEITSVORKEHRUNGEN • Versuchen Sie nicht, dieses Gerät aus irgendeinem Grund 1. LCD-Bildschirm zu zerlegen. 2. SD -Kartensteckplatz ™ • Wenn der Scanner heruntergefallen ist oder eine (HINWEIS: SD -Karte nicht ™ Beschädigung erlitten hat, berühren Sie das Innere des Geräts im Lieferumfang enthalten) nicht. -
Página 41: Überblick Über Das Hauptmenü
6. ÜBERBLICK ÜBER DAS HAUPTMENÜ 7. VORBEREITUNG DER MEDIEN FÜR DAS SCANNEN Bevor Sie Ihren Filmscanner verwenden, sollten Sie entweder eine SD -Karte (nicht im Lieferumfang enthalten) einlegen, da ™ der Gerätespeicher äußerst begrenzt ist, oder sicherstellen, dass im sehr begrenzten Gerätespeicher genügend Platz für die Bilder ist, die gescannt werden sollen. -
Página 42: Negative Laden
8. NEGATIVE LADEN 9. DIAS LADEN HINWEIS: Behandeln Sie Dias oder 1. Halten Sie das Dia gegen das Filmnegative immer sehr vorsichtig, um Licht, so dass die Vorderseite des Kratzer oder Fingerabdrücke zu Dias zu Ihnen zeigt. vermeiden. Wir empfehlen die Verwendung von Baumwollhandschuhen für den Umgang mit Negativen und die Verwendung von komprimierter... -
Página 43: Kontinuierliches Laden (Dias Und/Oder Film)
1. Verwenden Sie nach dem 10. KONTINUIERLICHES LADEN (DIAS Einschalten des Scanners die UND/ODER FILM) Pfeiltasten, um zum Aufnahmeschirm zu navigieren, und drücken Sie dann die OK- Taste, um in den Aufnahmemodus Mit dieser nützlichen Funktion können Sie immer weiter neue zu gelangen. - Página 44 e. Sie kehren automatisch in den Aufnahmemodus zurück. 5. Ist der richtige Filmtyp ausgewählt, können Sie das Bild anhand der Pfeiltasten auf den Kopf stellen oder spiegeln. Dies ist insbesondere bei Negativen hilfreich, bei denen der Text rückwärts dargestellt wird. a.
-
Página 45: Gescannte Bilder Anzeigen
6. Um das Bild in Bezug auf Helligkeit oder Farbgebung zu 7. Nachdem Sie Ihre Einstellungen vorgenommen haben, bearbeiten, drücken Sie die OK-Taste, während Sie sich im drücken Sie die Taste , um das Bild aufzunehmen und Aufnahmemodus befinden. Auf dem Bildschirm erhalten Sie Optionen, um die Helligkeit und RGB-Werte einzustellen. -
Página 46: Die Bildauflösung Einstellen
dann OK. 15. DIE SD -KARTE FORMATIEREN ™ 3. Die folgenden Sprachen sind verfügbar: Englisch, Französisch, Deutsch, Italienisch, Spanisch, traditionelles Chinesisch, 1. Verwenden Sie im Hauptmenü die vereinfachtes Chinesisch und Japanisch. Pfeile nach links und rechts, um zur Option „Formatieren“ zu navigieren, 14. -
Página 47: Den Scanner Mit Ihrem
4. Drücken Sie nach Abschluss des Formatierungsvorgangs die GARANTIE-INFORMATIONEN Ein-Aus-Taste, um den Scanner auszuschalten, und schalten Sie ihn dann wieder ein. BESCHRÄNKTE GARANTIE AUF DEN KODAK DIGITALEN MI- NI-FILMSCANNER 16. DEN SCANNER MIT IHREM DIESE BESCHRÄNKTE GARANTIE GEWÄHRT IHNEN BESTIMMTE COMPUTER VERBINDEN RECHTE. - Página 48 Ihnen, dem Käufer, übernommen. Die Kosten für den Versand WAS DECKT DIESE GARANTIE AB? Diese beschränkte Garantie des Ersatzgerätes an Sie werden von uns übernommen. erstreckt sich auf Material- und Verarbeitungsfehler des Kodak digitalen Mini-Filmscanners (das „Produkt“) während der Ga- rantiezeit, wie nachfolgend definiert.
-
Página 49: Kontaktinformationen Für Den
Internationaler Support: kodakintl@camarketing.com 844-516-1540 www.kodakphotoplus.com Die Marke Kodak, das entsprechende Logo und die Aufmachung werden unter Lizenz von Kodak verwendet. Mac ist eine in den USA und anderen Ländern eingetragene Marke von Apple Inc. SD ist eine in den USA eingetragene Marke von SD-3C, LLC. -
Página 50: Introducción
1. INTRODUCCIÓN INTRODUCCIÓN Gracias por adquirir el Mini escáner digital para película ESPECIFICACIONES KODAK. Esta Guía para el usuario tiene como objeto ACCESORIOS INCLUIDOS brindarle pautas para asegurar que la operación de PRECAUCIONES DE SEGURIDAD este producto sea segura y no plantee riesgos para el DESCRIPCIÓN GENERAL DEL PRODUCTO... -
Página 51: Especificaciones
Peso 8,82 oz (250 g) Resolución 14 megapíxeles/22 megapíxeles* *Su mini escáner digital para película KODAK utiliza un proceso denominado “interpolación” para actualizar y mejorar los Tipos de película que megapíxeles de sus fotografías escaneadas de 14 a 22 MP. pueden escanearse Película de 135 (36 x 24 mm) Película de 126 (27 x 27mm) -
Página 52: Accesorios Incluidos
3. ACCESORIOS INCLUIDOS 4. PRECAUCIONES DE SEGURIDAD • No intente desarmar este dispositivo por ninguna razón. • No toque las partes internas del escáner después de que se caiga al suelo o luego de que haya sufrido algún tipo de daño. Soporte para negativos Adaptador para negativos Adaptador para... -
Página 53: Descripción General Del Producto
5. DESCRIPCIÓN GENERAL DEL PRODUCTO 6. DESCRIPCIÓN GENERAL DEL MENÚ PRINCIPAL 1. Pantalla de LCD 2. Ranura para tarjetas SD ™ (NOTA: No se incluye la tarjeta SD ™ 3. Conexión de alimentación mini USB 4. Conexión para salida de TV 5. -
Página 54: Preparación Del Medio Para El Escaneo
8. CARGA DE NEGATIVOS 7. PREPARACIÓN DEL MEDIO PARA EL ESCANEO NOTA: Siempre manipule las diapositivas o los negativos con Antes de utilizar su escáner para película, debe insertar una tarjeta cuidado para evitar rayarlos o (que no se incluye) ya que la memoria del dispositivo es muy ™... -
Página 55: Carga De Diapositivas
9. CARGA DE DIAPOSITIVAS 10. CARGA CONTINUA (DIAPOSITIVAS Y/O NEGATIVOS) 1. Sostenga la diapositiva a contraluz con la parte frontal de Esta útil función le permite seguir colocando nuevos la diapositiva hacia usted. negativos o diapositivas en el escáner para película sin tener que retirar la bandeja y volver a posicionar los negativos o las diapositivas cada vez, un 2. - Página 56 1. Luego de encender el escáner, utilice las teclas de flechas para navegar hasta la pantalla Capture (Captura); luego, presione el botón OK (Aceptar) para entrar al Capture Mode (Modo de captura). 2. Inserte sus negativos o diapositivas d. Seleccione el tipo de película correcto (negativo, diapositiva, en la bandeja/soporte adecuado blanco y negro) y el tamaño correcto (110, 135, 126, Super8).
- Página 57 e. El dispositivo lo llevará automáticamente a Capture Mode 6. Para realizar ediciones en la imagen con respecto al brillo o la (Modo de captura). coloración, presione el botón OK (Aceptar) mientras se encuentre en Capture Mode (Modo de captura). La pantalla le 5.
-
Página 58: Visualización De Las Imágenes Escaneadas
3. Los idiomas disponibles incluyen: inglés, francés, alemán, 7. Una vez que haya realizado los ajustes, presione la tecla italiano, español, chino tradicional, chino simplificado y japonés. para capturar la imagen y guardarla. Recuerde: al presionar el botón Capture (Capturar), escaneará y guardará la imagen que esté... -
Página 59: Formateo De La Tarjeta Sd
4. Una vez finalizado el proceso de formateado, presione el 15. FORMATEO DE LA TARJETA SD ™ botón de encendido/apagado para apagar el escáner, y luego vuelva a encenderlo. 1. Desde el menú principal, utilice las flechas izquierda y derecha para navegar hasta la opción Format 16. -
Página 60: Información De La Garantía
GARANTÍA LIMITADA PARA EL MINI ESCÁNER DIGITAL PARA llas de materiales o de mano de obra del mini escáner digital para PELÍCULA KODAK película KODAK (el "producto") durante el período de garantía que se ESTA GARANTÍA LIMITADA LE OTORGA DERECHOS LEGALES ESPE- define debajo. -
Página 61: Información De Contacto De Atención Al Cliente
844-516-1540 www.kodakphotoplus.com La marca registrada Kodak, el logotipo y la presentación del producto se usan bajo licencia de Kodak. Mac es marca registrada de Apple Inc. en EE. UU. y en otros países. SD es marca registrada de SD-3C, LLC en EE. UU.