Publicidad
Idiomas disponibles
Idiomas disponibles
Enlaces rápidos
DE
EN
FR
NL
IT
ES
Tiviton_DAB.indd 1
Bedienungsanleitung
Digitaler kabelloser Hörver-
stärker mit DAB Radio
User manual
Digital wireless headset with
DAB radio
Mode d'emploi
Processeur de son numérique
sans fil avec radio DAB
Gebruiksaanwijzing
Draadloze digitale hoofdtele-
foon met DAB-radio
Istruzioni per l'uso
Cuffie audio wireless digitali
con radio DAB
Manual de instrucciones
Amplificador de audio digital
inalámbrico con radio DAB
Seite 2
Page 18
Page 34
Pagina 50
Pagina 66
Página 82
13.12.2018 14:26:03
Publicidad

Manuales relacionados para HumanTechnik tiviton 2.4


Resumen de contenidos para HumanTechnik tiviton 2.4
- Página 1 Seite 2 Bedienungsanleitung Digitaler kabelloser Hörver- stärker mit DAB Radio Page 18 User manual Digital wireless headset with DAB radio Page 34 Mode d’emploi Processeur de son numérique sans fil avec radio DAB Pagina 50 Gebruiksaanwijzing Draadloze digitale hoofdtele- foon met DAB-radio Pagina 66 Istruzioni per l’uso Cuffie audio wireless digitali...
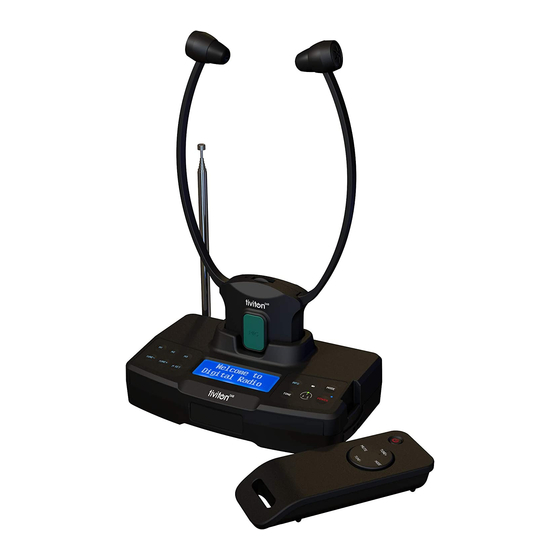
- Página 2 Lieferumfang Sender Toslink-Kabel (S/PDiF) Kinnbügel-Empfänger Mikrofon Fernbedienung (inkl. Batterien) Cinch-Adapter zu 3.5 mm Buchse Lithium-Polymer-Akku, 2 Stück 10 Cinch-Adapter zu 3.5 mm Stecker Adapter 3.5mm / 6.3mm Klinkenstecker 11 Netzteil Audiokabel 3.5 mm Klinke / Klinke Garantiekarte (Ohne Abbildung) 2 Deutsch Tiviton_DAB.indd 2 13.12.2018 14:26:03...
- Página 3 Bedienelemente: Empfänger Verstellbare Ohrpolster Ein/Aus-Schalter Lautstärkeregler Mikrofon LED-Anzeige Ein/Aus Balanceregelung (Links/Mitte/Rechts) MIC-Taste Akku Deutsch 3 Tiviton_DAB.indd 3 13.12.2018 14:26:04...
- Página 4 Bedienelemente: Sender Vorderseite Rückseite Speichertasten M1-M3 11 LED-Anzeige für Toneinstellung Tune - 12 Power-Taste Tune + 13 Ladeschacht für Zweitakku Programmtaste 14 Optischer Toslink-Eingang Digital-ln Ladeschacht für Empfänger 15 Eingangs-Wahlschalter Info-Taste 16 3.5mm Audio-Eingang LED-Ladeanzeige für Empfängerakku 17 Optischer Toslink-Ausgang Digital-Out LED-Ladeanzeige für Zweitakku 18 3.5mm Audio-Ausgang Modus-Taste...
- Página 5 Einleitung Der 2.4 GHz kabellose Kinnbügelhörer »tiviton DAB« verwendet neueste digitale Funktech- nologie und ermöglicht eine Klangverstärkung. Geniessen Sie kristallklaren Stereo- und Fernsehklang überall im Haus. Verbinden Sie ein- fach den Sender mit der gewünschten Tonquelle: DVD- oder CD-Wiedergabegerät, Fern- seher, Stereoanlage oder MP3-Player.
- Página 6 Installation: Sender Auf der Rückseite des Senders bestehen mehrere Anschlussmöglichkeiten, um Audiosig- nale von einer Tonquelle (zum Beispiel DVD- oder CD-Wiedergabegerät, Fernseher, Stereo- anlage oder MP3-Player) auf dem Kopfhörer auszugeben. Des Weiteren besteht die Möglichkeit, diese Tonquellen und das FM/DAB+ Signal über einen externen Verstärker (zum Beispiel eine Stereoanlage) wiederzugeben.
- Página 7 Audio-Ausgang Verbinden Sie gegebenenfalls den Audio-Ausgang (analog oder optisch) des Senders mit einem Audio-Eingang Ihrer Musikanlage, um das Signal des DAB-Radios auf dieser wiedergeben zu können. 1. Verbinden Sie das Netzteilkabel mit der “DC IN” Steckerbuchse auf der Rückseite des Senders.
- Página 8 8 Deutsch Tiviton_DAB.indd 8 13.12.2018 14:26:04...
- Página 9 Empfänger Setzen Sie den Akku in den Empfänger, achten Sie auf die richtige Polarität. Inbetriebnahme 1. Schalten Sie die mit dem Sender verbundene Tonquelle, (Fernseher oder Stereogerät) ein. Die grüne Stromanzeige-LED des Senders leuchtet nun konstant. 2. Schieben Sie den ON/OFF-Schalter des Empfängers auf “ON”, die grüne LED-Anzeige des Hörers leuchtet nun.
- Página 10 Moduswahl Das »tiviton DAB« stellt 3 verschiedene Modi zur Auswahl: “Auxiliary Input”, “DAB” und “FM”: - “Auxiliary Input” steht für das Audiosignal einer angeschlossenen externen Tonquelle, wie Fernseher, Stereoanlage oder Mobiltelefon. - “DAB” dient zum Empfang von Radiosendungen im digitalen DAB/DAB+ Sendeformat. - “FM”...
- Página 11 Radioempfang Bitte beachten: - Bitte ziehen Sie die Antenne immer komplett heraus. - Richten Sie die Antenne aus um einen optimalen Empfang zu ermöglichen. - In vielen Fällen variiert die Signalstärke je nach Aufstellungsort. Um den Empfang zu verbessern, wählen Sie einen Installationsort in der Nähe eines Fensters. DAB+ Radio 1.
- Página 12 FM Radio 1. Drücken Sie die MODE-Taste am Sender, bis Sie sich im FM-Modus befinden (alternativ die MODE Taste der Fernbedienung). 2. Halten Sie TUNE+ oder TUNE- für 2 Sekunden gedrückt, um den automatischen Sendersuchlauf zu starten 3. Um die Schnellwahltasten M1 bis M3 zu programmieren, halten Sie eine der Favoriten- Tasten am Sender gedrückt, die Sie als Voreinstellung speichern möchten.
- Página 13 Akkuladung 1. Stellen Sie den ON/OFF-Schalter des Kinnbügel- hörers auf “OFF”. 2. Setzen Sie den Kinnbügelhörer auf den Sender, stellen Sie sicher, dass die Kontakte die Kontakt- zungen des Senders berühren. 3. Der Ladevorgang startet automatisch. Die LED- Anzeige des Hauptakkus leuchtet konstant rot. Nach ca.
- Página 14 Kommunikationsfunktion des Empfängers: Der Ton der Übertragung kann jederzeit unterbrochen werden, um sich z. B. mit einer Per- son im Raum zu unterhalten. Drücken Sie hierzu 1x die MIC-Taste des Empfängers. Das integrierte Mikrofon des Empfängers nimmt nun die umgebenden Geräusche auf und gibt diese verstärkt über den Empfänger wieder.
- Página 15 Fehlersuche: Kein Ton: - Stellen Sie sicher, dass das Netzteil fest in der Steckdose ist und das Netzteilkabel richtig in der “DC IN”-Buchse des Senders sitzt. - Der Ladepegel des Akkus im Kinnbügelhörer könnte zu niedrig sein. Laden Sie diesen oder ersetzen Sie ihn mit einem voll aufgeladenen Akku.
- Página 16 Garantie Entsorgung von gebrauch ten elek- trischen und elektronischen Gerä - Sollten trotz sachgerech ter Bedienung Stö- ten (anzuwenden in den Ländern rungen auftreten, setzen Sie sich bitte mit der Euro päischen Union und anderen euro- ihrem Fachhänd ler in Ver bindung oder wen- päischen Ländern mit einem se paraten den Sie sich direkt an den Hersteller.
-
Página 17: Digital Radio Dab
EN 300 440 V2.1.1 : 2017 EN 62479 : 2010 - EN 62368-1 : 2014 Die Konformität mit den o. a. Richtlinien wird durch das CE-Zeichen auf dem Gerät be- stätigt. CE Konformitätserklärungen stehen im Internet unter www.humantechnik.com zur Verfügung. Technische Änderungen vorbehalten. Deutsch 17 Tiviton_DAB.indd 17... - Página 18 Scope of delivery Transmitter TOSlink cable Underchin receiver External Microphone Remote control (Batteries included) RCA adapter cable, female Lithium Polymer batteries (2 pieces) 10 RCA adapter Cable, male 6,3 mm to 3,5 mm Adapter Plug 11 Power supply unit Audio cable (with 3,5mm stereo plugs) Warranty card (not depicted) 18 English Tiviton_DAB.indd 18...
- Página 19 Controls: Receiver Front: Back: Adjustable Earbuds Power On/Off Switch Volume Control Microphone LED Indicator of Power/Signal Sound Balance Control (Left/Middle/Right) MIC Button for verbal communication Battery English 19 Tiviton_DAB.indd 19 13.12.2018 14:26:05...
-
Página 20: Power-Button
Controls: Transmitter Front Back Memory buttons M1-M3 11 LED Indicator of Tone Clarity Tune - 12 POWER-Button Tune + 13 Spare Charging Slot Program button 14 Optical input, digital Charging dock for Receiver 15 Optical/Analog input selector switch INFO-Button 16 3.5mm Audio-In Socket LED Charging Indicator for Receiver battery 17 Optical output, digital LED Charging Indicator for Spare Battery... - Página 21 Introduction The 2.4 GHz wireless headphone »tiviton DAB« uses the latest technology in digital wirel- ess transmission and offers sound amplification. Geniessen Sie kristallklaren Stereo- und Fernsehklang überall im Haus. Simply connect the transmitter to a desired audio source: DVD player, CD player, TV set, Hi-Fi system or MP3-Player.
- Página 22 Setup: Transmitter Several connection possibilities are given on the rear side of the transmitter, in order to bring audio from a sound source (e. g. a DVD- or CD-player, TV-set, Stereo set or MP3-player) to the headphone receiver. It is also possible to reproduce these sound sources and the FM/DAB+ signalover an exter- nal amplifier (e.
- Página 23 Audio output Connect the audio output of the transmitter (optical or analogue) with the audio input of your stereo set, should you wish to reproduce the DAB radio signal over it. 1. Connect the lead of the power supply with the “DC IN” socket on the rear side of the transmitter.
- Página 24 24 English Tiviton_DAB.indd 24 13.12.2018 14:26:05...
- Página 25 Receiver Insert a battery into the receiver with correct polarity. Operation 1. Switch the sound source (TV-set, stereo set), which has been connected to the transmitter, on. The green power LED indicator will of the transmitter will glow constantly when the incoming audio signal of the sound source is detected.
-
Página 26: Dab/Dab+ Radio
Mode selection The »tiviton DAB« offers a choice of 3 different modes: “Auxiliary Input”, “DAB” and “FM”: - “Auxiliary Input” stands for the audio sinput of a connected external sound source like a TV-set, a stereo set or a mobile phone. - “DAB”... - Página 27 Radio reception Please note: - Always extend the antenna to full length. - Adjust the antenna‘s tilt to ensure the best possible reception. - In many cases the radio signal strength can vary, depending on where the device is placed. If the reception needs improvement, try placing it in the vicinity of a window. DAB+ Radio 1.
- Página 28 FM Radio 1. Press the MODE-button on the transmitter, until you arrive in the FM-mode (alterna- -tively press the MODE-button on the remote control). 2. Press and hold TUNE+ or TUNE- to start the automatic channel scan. 3. When listening to a station, press and hold one of the memory buttons M1 to M3 to memorise the station on the acording button.
- Página 29 Akkuladung 1. Move the On/Off switch of the receiver to the OFF position. 2. Place the receiver in the transmitter, make sure that the charge contacts touch the charge pins of the transmitter. 3. The charging process starts automatically. The LED indicator for the main battery will glow red.
- Página 30 Communication feature: The sound of the transmission can be interrupted at any time, for example to talk to a person in the same room. Press the MIC-button on the front of the receiver once. The receiver‘s inbuilt microphone will now pick up and amplify the surrounding sounds. The volume can be adjusted with the volume control.
- Página 31 Troubleshooting: No sound: - Ensure that the mains adapter is pushed firmly into the mains power outlet and that its cable is properly connected to the “DC IN”-socket of the transmitter. - The charge level of the receiver battery may be too low. Recharge the battery or replace it with a fully charged spare battery.
- Página 32 Warranty Disposal of used electric and elec- tronic units (applicable in the coun- Should a malfunction occur despite the unit tries of the Euro pean Union and oth- having been set up and operated correctly, er Euro pean countries with a separate col- please contact your dealer or the manufac- lection system).
- Página 33 EN 62479 : 2010 - EN 62368-1 : 2014 Compliance with the directives listed above is confirmed by the CE seal on the device. CE compliance declarations are available on the Internet at www.humantechnik.com. Technical specifications subject to change without notice. English 33 Tiviton_DAB.indd 33...
- Página 34 Contenu de l’emballage Emetteur câble Toslink Récepteur stethoscopique Câble audio stéréo avec prise Télécommande jack 3,5 mm Accu lithium polymère, 2 pièces 10. Câble audio stéréo avec fiches Adaptateur jack 6,5 mm / 3,5 mm jack de 3,5 mm 2 piles AAA pour la télécommande 11.
- Página 35 Vues du récepteur - Face avant : - Face arrière : Microphone Ecouteurs, réglables Réglage de la balance Réglage du volume (gauche/milieu/droite) LED Marche/Arrêt Compartiment accu Touche microphone Interrupteur Marche/Arrêt Français 35 Tiviton_DAB.indd 35 13.12.2018 14:26:06...
- Página 36 Vues de l’émetteur Avant : Arrière : Touches mémoire M1-M3 11 Témoin lumineux pour le réglage Tune - du son Tune + 12 Touche d’alimentation Touche de programme 13 Emplacement de chargement pour Emplacement de chargement pour le l’accu secondaire récepteur 14 Entrée optique Toslink Digital-ln Touche Info...
- Página 37 Introduction Ce système d’écoute TV sans fil digital 2,4 GHz utilise la plus récente technologie radio numérique avec une amplification du son nécessaire à certains utilisateurs. Bénéficiez du son stéréo clair de votre source souhaitée partout dans votre habitation. Branchez simple- ment votre lecteur DVD, votre téléviseur, votre chaine hifi ou votre lecteur MP3.
- Página 38 Installation : Emetteur Il y a plusieurs options de connexion à l‘arrière de l‘émetteur pour transmettre l‘audio d‘une source sonore (comme un lecteur DVD ou CD, un téléviseur, une chaîne stéréo ou un lecteur MP3) à un casque d‘écoute. Il est également possible de reproduire ces sources sonores et le signal FM/DAB+ via un amplificateur externe (par ex.
- Página 39 Sortie audio Si nécessaire, connectez la sortie audio (analogique ou optique) de l‘émetteur à une entrée audio de votre système audio afin de pouvoir y lire le signal de la radio DAB. 1. Branchez la fiche du bloc d’alimentation sur « DC IN » au dos de l’émetteur. 2.
- Página 40 40 Français Tiviton_DAB.indd 40 13.12.2018 14:26:06...
- Página 41 La LED d’état verte clignote dès que l’appareil est sous tension et reste allumée en perma- nence si le signal d’une source sonore est reconnu. Récepteur Placez un accu dans le récepteur en respectant la polarité. Exemple : Récepteur stéthoscopique Mise en service 1.
- Página 42 Choix du mode Le « tiviton DAB » permet de sélectionner 3 modes différents : « Auxiliary Input », « DAB » et « FM » : - « Auxiliary Input » indique le signal audio provenant d‘une source audio externe connectée, telle qu‘un téléviseur, une chaîne stéréo ou un téléphone portable.
- Página 43 Réception radio Remarques : - Sortez toujours l‘antenne complètement. - Orientez l‘antenne pour une réception optimale. - Dans de nombreux cas, l‘intensité du signal varie en fonction du lieu d‘installation. Pour améliorer la réception, sélectionnez un emplacement d‘installation près d‘une fenêtre.
- Página 44 Radio FM 1. Appuyez sur la touche MODE sur l’émetteur jusqu’à ce que vous soyez en mode FM (alternativement, la touche MODE de la télécommande). 2. Appuyez sur TUNE+ ou TUNE- pendant 2 secondes pour lancer la recherche automatique des stations. 3.
- Página 45 Recharge de accus 1. Mettez l’interrupteur « ON/OFF » sur « OFF ». 2. Placez le récepteur sur la base de chargement en vérifiant que les contacts touchent correcte- ment les languettes de l’émetteur. 3. La recharge démarre automatiquement. La LED de chargement de l’accu du récepteur s’allume en rouge puis en vert après environ 2 h quand l’accu est complètement rechargé.
- Página 46 Fonction amplificateur d’écoute : Le son de la source audio (TV, Hifi,...) peut être coupé à chaque instant afin de permettre par exemple la conversation avec une personne dans la pièce. Pour commuter en mode amplificateur d’écoute appuyez 1 fois sur la touche microphone MIC. Le microphone est intégré...
- Página 47 Recherche de pannes : Pas de son : - Vérifiez si le bloc d’alimentation est branché correctement au réseau et sur la prise « DC IN » de l’émetteur. - Il est possible que l’accu du casque stéthoscopique soit trop faible. Rechargez l’accu ou remplacez-le par un accu rechargé.
- Página 48 Garantie Elimination des appareils électri- ques et électroniques (dans les Si en dépit d’un mon tage et d’un em ploi pays de l’Union européenne et corrects, des dysfonctionnements appa- dans les autres pays européens disposant raissaient, veuillez con tacter votre vendeur d’un système de collecte distinct pour cette spécialisé...
- Página 49 - 2014/35/EU Directive basse tension EN 60065 : 2014 La conformité avec les directives ci-dessus est attestée par le logo CE apposé sur l’appareil. Les déclarations de conformité CE sont consultables sur le site Internet www.humantechnik.com. Sous réserve de modifications techniques. Français 49 Tiviton_DAB.indd 49...
- Página 50 Componentenlijst Zender / laadstation 2 AAA batterijen voor de Kinbeugel ontvanger Afstandsbediening Afstandsbediening Verloopplug stereo jack 6,3mm naar Lithium herlaadbare accu (2 stuks) 3,5mm RCA aansluitsnoer 10. Verloopplug stereo plug 6,3mm Audiokabel (2 x 3,5mm stereo jack naar 3,5mm plug) 11 AC/DC voedingsadapter Toslink-kabel Garantiekaart (zonder afbeelding)
- Página 51 Functies: Ontvanger Oordopjes AAN/UIT schakelaar Volumeregelaar Interne microfoon LED indicatie AAN / SIGNAAL Balansregeling MIC knop bij spraak via interne Accu microfoon Nederlands 51 Tiviton_DAB.indd 51 13.12.2018 14:26:07...
- Página 52 Functies: Zender / laadstation Voor Achter Geheugenknoppen M1-M3 11 Ledindicator voor geluidsinstelling Tune - 12 Aan/uit-knop Tune + 13 Oplaadsleuf voor tweede batterij Programmeerknop 14 Optische Toslink-ingang Digital-ln Oplaadsleuf voor ontvanger 15 Ingangkeuzeschakelaar Infoknop 16 3,5 mm audio-ingang Led-laadindicator voor batterij 17 Optische Toslink-uitgang Digital-Out ontvanger 18 3,5 mm audio-uitgang...
- Página 53 Introductie Deze 2.4 Digitale Hoofdtelefoon maakt gebruik van de laatste digitale draadloze technolo- gie en maakt het mogelijk voor veel hoortoestelgebruikers, veelal ouderen, door de (hele) woning weer volop kunnen genieten van een helder en duidelijk geluid van de TV of de Stereo-installatie.
- Página 54 Installeren: Zender Aan de achterzijde van de zender zitten verschillende aansluitmogelijkheden om audiosig- nalen van een geluidsbron (zoals een dvd- of cd-speler, tv, stereo-installatie of mp3-speler) naar de hoofdtelefoon te sturen. Het is ook mogelijk om deze geluidsbronnen en het FM-/DAB-signaal af te spelen via een externe versterker (bijv.
- Página 55 Audio-uitgang Sluit indien nodig de audio-uitgang (analoog of optisch) van de zender aan op een audio- ingang van uw muzieksysteem om het signaal van de DAB-radio af te kunnen spelen. 1. Sluit de voedingsadapter aan op de DC in aansluiting 2.
- Página 56 56 Nederlands Tiviton_DAB.indd 56 13.12.2018 14:26:07...
- Página 57 De groene LED indicatie zal knipperen zodra u de zender aangesloten heeft aan het licht- net. Indien er een audiosignaal gedetecteerd is van 1 van de geluidsbronnen, zal de LED indicatie constant groen gaan branden. Hoofdtelefoon-ontvanger Plaats de accu op de juiste wijze in de hoofdtelefoon. Voorbeeld: kinbeugel ontvanger Werking 1.
- Página 58 Modusselectie „tiviton DAB“ biedt 3 verschillende modi om uit te kiezen: „Auxiliary Input“, „DAB“ en „FM“: - „Auxiliary Input“ staat voor het audiosignaal van een aangesloten externe audiobron, zo- als een televisie, stereo-installatie of mobiele telefoon. - „DAB“ wordt gebruikt om radio-uitzendingen te ontvangen in het digitale uitzendformaat DAB/DAB+.
- Página 59 Radio-ontvangst Let op: - Trek de antenne altijd volledig uit. - Richt de antenne voor een optimale ontvangst. - In veel gevallen varieert de signaalsterkte afhankelijk van de plaats van installatie. Om de ontvangst te verbeteren, kiest u een installatieplaats in de buurt van een venster. Radio DAB+ 1.
- Página 60 FM-radio 1. Druk op de zender op de MODE-knop totdat het apparaat in de FM-modus staat (of druk op de MODE-knop op de afstandsbediening). 2. Houd TUNE+ of TUNE- gedurende 2 seconden ingedrukt om het automatisch zoeken naar zenders te starten 3.
- Página 61 Laden van de accu’s 1. Schakel de hoofdtelefoon UIT. 2. Plaats de hoofdtelefoon op het laadstation van de zen- der. Zorg ervoor dat de laadcontacten van de zender en de ontvanger goede verbinding hebben. 3. Het laadproces start automatisch. De LED indicatie van de hoofd accu zal eerst rood branden en na volledig geladen te zijn groen gaan branden.
- Página 62 Mededeling van de functie: Het geluid van de transmissie kan worden onderbroken op elk gewenst moment, bijvoorbe- eld om te praten met een persoon in dezelfde kamer. Druk eenmaal op de MIC-knop van de ontvanger. De ingebouwde microfoon van de ontvanger zal nu registreren de omringende geluiden en versterkt hen.
- Página 63 Storingen: Geen geluid: - Controleer of de voedingsadapter volledig in het stopcontact zit en de voedingsplug goed aangesloten zit op de DC-in van de zender. - De accu in de hoofdtelefoon kan niet geladen zijn. Vervang deze voor de reserve accu, of laad de accu volledig bij.
- Página 64 Garantie Verwijdering van gebruikte elektri- sche en elektronische appara tuur Mochten er ondanks correcte bediening (toe te passen in de landen van de storingen optreden, neem dan contact op Euro pese Unie en andere Europese landen met uw audicien of rechtstreeks met de met een eigen inzamelsysteem voor zulke fabrikant.
- Página 65 EN 62479 : 2010 - 2014/35/EU Laagspanningsrichtlijn EN 60065 : 2014 De conformiteit met de voornoemde richtlijnen wordt bevestigd door het CE-teken op het apparaat. EG-conformiteitsverklaringen staan online ter beschikking onder www.humantechnik.com. Technische wijzigingen voorbehouden. Nederlands 65 Tiviton_DAB.indd 65 13.12.2018 14:26:07...
- Página 66 Contenuto della scatola Trasmettitore cavo ottico Toslink Ricevitore a mentoniera 2 batterie AAA per telecomando Telecomando Cavo audio (2 connessioni, presa da Batterie ai Poilmeri di Litio, 2 unità 3,5 mm) 6,3 mm / 3,5 mm plug adattatore 10. Cavo audio (2 terminali jack 3,5 mm) Cavo audio (2 terminali jack 3,5 mm) 11.
- Página 67 Elementi di Funzionamento: Ricevitore Auricolari regolabili Interruttore di accensione / spegnimento Regolazione del volume Microfono Indicatore di funzionamento Bilanciamento del suono sinistro/destro Tasto microfono per comunicazione Batteria ricaricabile vocale Italiano 67 Tiviton_DAB.indd 67 13.12.2018 14:26:08...
- Página 68 Elementi di Funzionamento: Trasmettitore Fronte Retro Tasti di memorizzazione M1-M3 Display a LED per la regolazione Tune - (Canale -) del suono Tune + (Canale +) Tasto Power di Tasto di programmazione accensione/spegnimento Slot di ricarica per il ricevitore Slot di ricarica per la seconda Pulsante INFO batteria Indicatore a LED di carica della...
- Página 69 Introduzione Il presente auricolare digitale wireless da 2,4 GHz, con ricevitore sottomento, utilizza la tec- nologia radio digitale di ultima generazione e consente di aumentare la potenza acustica. Godetevi la limpidezza della musica stereo e dell’audio della TV in ogni angolo della casa. Basta collegare il trasmettitore alla fonte audio che si preferisce: lettore DVD o CD, televi- sore, impianto stereo o lettore MP3.
- Página 70 Installazione: trasmettitore Ci sono diverse opzioni di connettività sul retro del trasmettitore per trasmettere l’audio da una sorgente sonora (ad esempio un lettore DVD o CD, TV, impianto stereo o lettore MP3) alle cuffie. Inoltre, è possibile riprodurre queste sorgenti sonore e il segnale FM/DAB+ tramite un am- plificatore esterno (ad esempio, un impianto stereo).
- Página 71 Uscita audio Se necessario, collegare l‘uscita audio (analogica o ottica) del trasmettitore a un ingresso audio del vostro impianto stereo, per riprodurre il segnale della radio DAB su di esso. 1. Collegare il cavo dell’alimentatore alla presa “DC IN” collocata sul retro del trasmettitore.
- Página 72 72 Italiano Tiviton_DAB.indd 72 13.12.2018 14:26:08...
- Página 73 Il LED di accensione verde lampeggia non appena si inserisce l’alimentatore nella presa elettrica. Una volta rilevato il segnale audio, il LED verde rimane acceso permanentemente. Installazione: Ricevitore Inserire la batteria nel ricevitore rispettando la polarità. Figura di esempio: auricolare con ricevitore sottomento Messa in funzione 1.
- Página 74 Selezione della modalità «Tiviton DAB» offre 3 diverse modalità: “Ingresso ausiliario”, “DAB” e “FM”: - “Ingresso ausiliario” indica il segnale audio di una sorgente sonora esterna collegata, ad esempio TV, impianto stereo o telefono cellulare. - “DAB” viene utilizzato per ricevere trasmissioni radio in formato di trasmissione digitale DAB/DAB+.
- Página 75 Ricezione radio Nota: - Si prega di estendere sempre completamente l’antenna. - Orientare l’antenna per ottenere una ricezione ottimale. - In molti casi, la potenza del segnale varia a seconda della posizione. Per migliorare la ricezione, posizionarsi vicino a una finestra per l’installazione. DAB+ Radio 1.
- Página 76 Radio FM 1. Premere il pulsante MODE sul trasmettitore fino a quando non si raggiunge la modalità FM (in alternativa il pulsante MODE sul telecomando). 2. Tenere premuto TUNE+ o TUNE- per 2 secondi per avviare la sintonizzazione automatica 3. Per programmare i tasti di scelta rapida da M1 a M3, tenere premuto un pulsante dei “preferiti”...
- Página 77 Ricarica delle batterie 1. Portare l’interruttore ON/OFF del ricevitore auricolare in posizione “OFF”. 2. Collocare il ricevitore auricolare sulla base del trasmettitore assicurandosi che i contatti tocchino le linguette stesse della base. 3. Il processo di ricarica si avvia automaticamente. Il LED della batteria principale emette una luce rossa costante.
- Página 78 Funzione di comunicazione del ricevitore: L’audio della trasmissione si può interrompere in qualsiasi momento, ad es. per parlare con una persona che si trova nello stesso locale. A tale scopo, premere una volta il tasto MIC del ricevitore. Il microfono incorporato nel ricevitore registra i suoni circostanti e li trasmette amplificati tramite il ricevitore.
- Página 79 Risoluzione dei problemi: Nessun suono: - Accertarsi che l’alimentatore sia correttamente posizionato nella presa di corrente e che il cavo sia inserito correttamente nella presa “DC IN” del trasmettitore. - Il livello di carica della batteria del ricevitore potrebbe essere troppo basso. Ricaricarla o sostituirla con una batteria completamente carica.
- Página 80 Garanzia Smaltimento delle apparecchiatura La „TivitonDAB“ si distingua per la sua note- elettriche elettroniche vole affidabilità di esercizio. utilizzate (valido paesi Se dovessero verificarsi anomalie nonostante dell‘Unione Europea e negli altri paesi euro- che il montaggio e l‘utilizzo siano appropriati, pei che prevedono un sistema di smaltimen- contattare il proprio rivenditore specializzato to separato per queste apparecchiature).
- Página 81 - 2014/35/EU Direttiva sulla bassa tensione EN 60065 : 2014 La conformità ai requisiti di cui sopra è comprovata dal contrassegno CE riportato sull’apparecchio. Le dichiarazioni di conformità CE sono disponibili online all’indirizzo: http://www.humantechnik.com/service Specifiche tecniche soggette a variazioni senza preavviso. Italiano 81 Tiviton_DAB.indd 81...
- Página 82 Contenido del paquete Transmisor Cable óptico Toslink Receptor bajo la barbilla Cable de audio Mando a distancia (2 x 3,5 mm socket) Batería, dos piezas 10. Cable de audio Adaptador 6,3 mm / 3,5 mm (clavija jack 2 x 3,5 mm) 2 pilas AAA para el mando a 11.
- Página 83 Controles: Receptor Auricular derecha / izquierda Interruptor On/Off Configuración volumen Micrófono Indicador de funcionamiento Ajuste (izquierda / derecha) Tecla de micrófono para escuchar los Batería sonidos del entorno Español 83 Tiviton_DAB.indd 83 13.12.2018 14:26:09...
- Página 84 Controles: Transmisor Frente Revés Teclas de memoria M1-M3 11 Indicador LED del ajuste de tono Ajustar - 12 Tecla de encendido Ajustar + 13 Ranura de carga de la batería Tecla de programa secundaria Ranura de carga del receptor 14 Entrada digital óptica Toslink Tecla INFO 15 Selector de entrada Indicador LED de carga de la batería...
- Página 85 Introducción Le felicitamos por haber adquirido los auriculares »introson 2.4«. Ha escogido un aparato moderno y fiable. Lea atentamente este manual de instrucciones para poder poner en servicio el aparato adecuadamente y familiarizarse con todas las opciones del aparato. El transmisor tiene un receptor DAB + / FM integrado, que le permite disfrutar de la mejor calidad de radio.
- Página 86 Entrada de audio 1. Conecte la fuente de alimentación a la entrada de conexión (DC-IN) situada en la parte posterior del transmisor. 2. Conecte la fuente de alimentación en un enchufe. 3. El cable adaptador cinch, el cable de audio, el adaptador de clavija de 6,3 mm a 3,5 mm, el cable de fibra óptica Toslink (SPDiF) y el micrófono externo, sirven para el enlace de diferentes tipos de conexión a su fuente de sonido deseada (por ejemplo reproductores DVD o CD, televisores, equipos de sonido o reproductores MP3).
- Página 87 Salida de audio Si es necesario, conecte la salida de audio (analógica u óptica) del transmisor a una ent- rada de audio de su equipo de música para poder reproducir la señal de radio DAB en el mismo. 1. Conecte la fuente de alimentación a la entrada de conexión (DC-IN) situada en la parte posterior del transmisor.
- Página 88 88 Español Tiviton_DAB.indd 88 13.12.2018 14:26:09...
- Página 89 Receptor Coloque la batería en el receptor, compruebe que la polaridad es la correcta. Ejemplo: Receptor arco bajo la barbilla Puesta en marcha 1. Encienda la fuente de sonido conectada con el transmisor (televisor o equipo estéreo). El led verde indicador de encendido del transmisor se ilumina ahora de forma constante.
- Página 90 Selección de modo El «tiviton DAB» ofrece 3 modos diferentes: „Auxiliary Input“, „DAB“ y „FM“: - „Auxiliary Input“ es para la señal de audio de una fuente de sonido externa, como un televisor, un equipo estéreo o un teléfono móvil. - „DAB“...
- Página 91 Recepción de radio Tenga en cuenta lo siguiente: - Mantenga siempre la antena completamente extendida. - Oriente la antena para una recepción óptima. - En muchos casos, la intensidad de la señal varía según la ubicación. Para mejorar la recepción, seleccione un lugar de instalación cerca de una ventana. Radio DAB+ 1.
- Página 92 Radio FM 1. Pulse la tecla MODE del transmisor hasta que esté en el modo FM (también puede utilizar la tecla MODE del mando a distancia). 2. Mantenga presionada durante 2 segundos la tecla TUNE+ o la tecla TUNE- para iniciar la búsqueda automática de emisoras 3.
- Página 93 alargar el placer de la audición. Para cargarla insér- tela simplemente en la ranura de carga del transm- sor. El indicador led de la batería secundaria se ilumina de forma constante en rojo. El indicador pasa a color verde cuando la batería está totalmente cargada, aproximadamente al cabo de unas 2 horas.
- Página 94 Función de comunicación del receptor: El sonido de la transmisión puede interrumpirse en todo momento, por ejemplo, para con- versar con una persona en dentro del área. Pulse para ello una vez la tecla MIC del re- ceptor. El micrófono integrado del receptor registra ahora los sonidos del entorno y los reproduce intensificados mediante el receptor.
- Página 95 Localización de fallos: No hay sonido: - Asegúrese de que la fuente de alimentación esté correctamente enchufada y de que el cable de la fuente de alimentación esté bien colocado en el conector «DC IN» del transmisor. - El nivel de carga de la batería del auricular bajo la barbilla podría estar demasiado bajo. Cárguela o sustitúyala por una batería completamente cargada.
- Página 96 Indicación medioambiental - Garantía Eliminación »TivitonDAB« posee una elevada seguri- Eliminación de aparatos eléctricos dad de funcionamiento. Si se produjesen y electrónicos usados (aplicable en los averías a pesar del montaje y el manejo países de la Unión Europea y otros países conformes, póngase en contacto con su europeos con un sistema de recogida sepa- distribuidor especializado o directamente...
- Página 97 La conformidad con las directivas mencionadas anteriormente se confirma mediante el símbolo CE que aparece en el dispositivo. Para obtener la declaración de conformidad completa utilice por favor la descarga gratuita de nuestro sitio web: www.humantechnik.com Sujeto a cambios técnicos. Español 97 Tiviton_DAB.indd 97...
- Página 98 Tiviton_DAB.indd 98 13.12.2018 14:26:09...
- Página 99 Im Wörth 25 Fax: +49 (0) 76 21/ 9 56 89-70 D-79576 Weil am Rhein E-mail: info@humantechnik.com Germany Humantechnik GHL AG Tel.: +41 (0) 61/ 6 93 22 60 Rastatterstrasse 9 Fax: +41 (0) 61/ 6 93 22 61 CH-4057 Basel E-mail: info@humantechnik.com...