Publicidad
Enlaces rápidos
For use with Yakima SkyLine or Timberline towers.
À employer avec les pieds SkyLine ou Timberline de Yakima.
Para usar con las torres SkyLine o Timberline de Yakima.
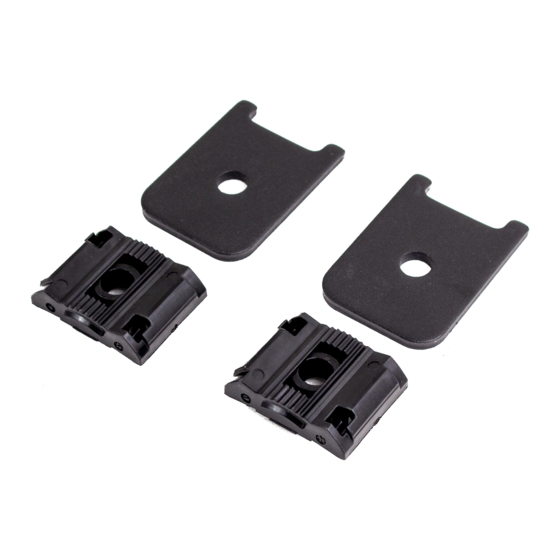
adapter (2X)
adaptateur (x 2)
adaptador (2X)
4mm hex or torque wrench
10mm box or spanner wrench
Note: Each 2 pack of adapters is for
2 towers. Purchase additional sets
depending on the number of towers.
Pour le français, allez à la page 6.
Instruction #1036004A - Page 1 of 9
SL Adapter, 2-Pack
plate (2X)
plaque (x 2)
placa (2X)
Go to yakimatech.com for your
2 Crossbars (4 Clamps) - up to 220lbs (100 kg)
3 Crossbars (6 Clamps) - up to 330lbs (150 kg)
4 Crossbars (8 Clamps) - up to 440lbs (200 kg)
Para español ir a la página 6.
nut insert (2X)
douille filetée (x 2)
tuerca insertable (2X)
specific vehicle load capacity
LockNLoad
Publicidad

Manuales relacionados para Yakima LockNLoad SL


Resumen de contenidos para Yakima LockNLoad SL
- Página 1 LockNLoad SL Adapter, 2-Pack For use with Yakima SkyLine or Timberline towers. À employer avec les pieds SkyLine ou Timberline de Yakima. Para usar con las torres SkyLine o Timberline de Yakima. nut insert (2X) plate (2X) adapter (2X) douille filetée (x 2)
- Página 2 Vehicles with curved raised rails may require more pitch adjustment. Assess your vehicle beforehand and do not use the plates in TimberLine step 5 if necessary. REMOVE COVERS. LOOSEN THE ADJUSTMENT SCREW. Squeeze and pull to Use the 4mm remove the torque wrench covers.
- Página 3 INSTALL THE MOUNTING BLOCKS. Align the mounting block from 3.5 Nm the LockNLoad platform with the bracket. Then thread two M6 x 16mm capscrews from the platform hardware and tighten to “Click!” 3.5 Nm using the torque wrench. “Click!” “Click!” NOTE: The mounting block assembly will still have movement after tightening the screws.
- Página 4 BACK OUT INSTALL THE ADAPTERS. OPEN COVERS. ADJUSTMENT SCREW. Snap the adapters into place. Use the 4mm torque Squeeze and pull to wrench supplied with open the covers. “Snap” your SkyLine towers to loosen the adjustment screw about 8 turns. INSTALL THE BRACKET AND PLATES.
- Página 5 INSTALL THE MOUNTING BLOCKS. 3.5 Nm Align the mounting block from the LockNLoad platform with the bracket. Then thread two M6 x 16mm capscrews from the platform hardware and tighten to 3.5 Nm using the torque wrench. NOTE: The mounting block assembly will still have movement after tightening the screws.
- Página 6 ESPAÑOL Français Nota: Cada paquete de 2 adaptadores es para 2 torres. Compre Remarque : cet emballage contient une paire d’adaptateurs. Il faut los paquetes adicionales en función del número de torres. une paire d’adaptateurs par paire de pieds. Il faudra se procurer d’autres paires d’adaptateurs s’il y a plus de paires de pieds.
- Página 7 ESPAÑOL Français FIXER LES ENSEMBLES PIED/BALANCIER SUR FIJE LOS CONJUNTOS TORRE/BLOQUE LES LONGERONS SURÉLEVÉS DU VÉHICULE. DE MONTAJE A LOS RIELES LATERALES ELEVADOS DEL VEHÍCULO. Déposer les ensembles pied TimberLine/balancier sur les longerons, Coloque los conjuntos formados por las torres Timberline y los en s’assurant de placer le trou qui se trouve sous l’ensemble bloques de montaje en la parte superior de los rieles, asegurándose directement sur le longeron.
- Página 8 In order to replace any lost or defective keys, note the lock and note du numéro de la serrure et des clés ci-dessous et les enregistrer key numbers below and register them at www.yakima.com. à www.yakima.com. Instruction #1036004A - Page 8 of 9...
- Página 9 Para reemplazar una llave perdida o defectuosa, anote más abajo los números de la cerradura y de la llave y regístrelos en www.yakima.com. Instruction #1036004A - Page 9 of 9...