Tabla de contenido
Publicidad
Idiomas disponibles
Idiomas disponibles
Enlaces rápidos
D
Dieses Produkt ist nur für gut isolierte Räume oder für den
gelegentlichen Gebrauch geeignet.
DK
Dette produkt er kun egnet til godt isolerede rum eller lejlighedsvis
brug.
ES
Este producto está indicado únicamente en lugares abrigados o para
una utilización puntual.
FIN
Tämä tuote soveltuu ainoastaan hyvin eristettyihin tiloihin tai
satunnaiseen käyttöön.
F
Ce produit ne peut être utilisé que dans des locaux bien isolés ou de
manière occasionnelle.
GB
This product is only suitable for well insulated spaces or occasional use.
I
Il presente prodotto è adatto solo a ambienti correttamente isolati o
ad un uso occasionale.
5
3
4
>
1
9
y
EOR 1515 LCD
N
NL
P
PL
S
SLO
MANUAL DE FUNCIONAMIENTO
MANUEL D'UTILISATION
OPERATING MANUAL
ISTRUZIONI D'USO
GEBRUIKSAANWIJZING
MANUAL DE INSTRUÇÕES
PRIROČNIK ZAUPORABO
Dette produktet er bare egnet for velisolerte rom eller sporadisk bruk.
Dit product is uitsluitend geschikt voor goed geïsoleerde plaatsen of
voor incidenteel gebruik.
Este produto é adequado apenas para espaços bem isolados espaços
ou utilização ocasional.
Ten produkt jest odpowiedni tylko do sporadycznego użytku lub do
stosowania w dobrze izolowanych pomieszczeniach.
Denna produkt är endast lämpad för välisolerade utrymmen eller
sporadisk användning.
Tento výrobok je určený iba do dobre izolovaných priestorov alebo na
príležitostné použitie
2
18
34
50
68
84
100
Publicidad
Tabla de contenido

Manuales relacionados para Qlima EOR 1515 LCD


Resumen de contenidos para Qlima EOR 1515 LCD
- Página 1 EOR 1515 LCD Dieses Produkt ist nur für gut isolierte Räume oder für den Dette produktet er bare egnet for velisolerte rom eller sporadisk bruk. gelegentlichen Gebrauch geeignet. Dit product is uitsluitend geschikt voor goed geïsoleerde plaatsen of Dette produkt er kun egnet til godt isolerede rum eller lejlighedsvis voor incidenteel gebruik.
- Página 2 Estimado Señor / Señora, Queremos felicitarle por la compra del calefactor doméstico portátil. Usted ha adquirido un producto de calidad que le será útil durante muchos años. Esto, por supuesto, siempre que lo use correctamente. Por favor, lea primero las instrucciones de uso, para garantizar la máxima vida útil de su calefactor.
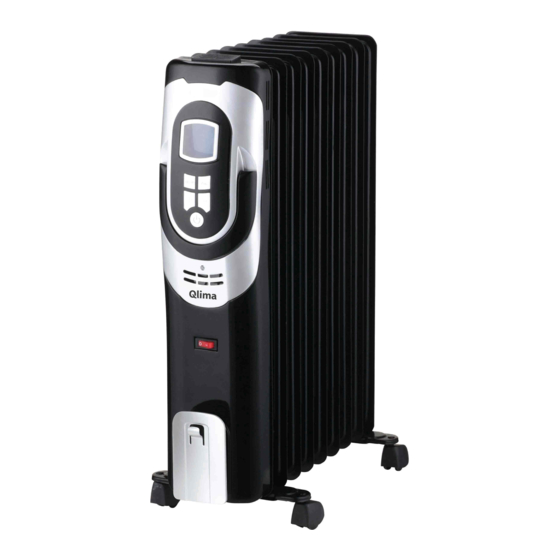
- Página 3 COMPONENTES BELANGRIJKE ONDERDELEN PRINCIPALES Ruedas Bedieningspaneel giratorias (2) Uitlaat van droge lucht Botón de encendido Uitneembaar waterreservoir Botones Inlaat van vochtige lucht Pantalla LCD Luchtfilter Interruptor de Afvoertuit (ø 13 mm) met dop alimentación Zwenkwieltje Panel de control Stekker en snoer Cubierta frontal Handvat...
-
Página 4: Instrucciones De Seguridad
INSTRUCCIONES DE SEGURIDAD L e a e s t e m a n u a l u s u a r i o cuidadosamente antes de usar el aparato y consérvelo para futuras consultas. Instale este aparato solo cuando cumpla con la legislación, ordenanzas y estándares regionales y nacionales. - Página 5 Q l i m a o p e r s o n a s cualificadas similares para evitar riesgos. • Devuelva siempre el aparato al centro de servicio autorizado de Qlima para examinarlo o repararlo. • La reparación por parte de personal no cualificado puede causar un peligro extremo para el usuario.
- Página 6 • Apague el aparato y desconéctelo de la red inmediatamente si percibe un olor extraño o un ruido anormal. Lleve la unidad a un centro autorizado Qlima. • Apague el aparato y desenchúfelo según las instrucciones de usuario antes de moverlo o limpiarlo.
-
Página 7: Instalación Del Calefactor
á r e a l i z a r s e e n u n c e n t r o autorizado de Qlima. En caso de fuga de aceite, contacte con el fabricante o con un centro de servicio autorizado. - Página 8 - tuercas de mariposa - escuadras con forma de arco - Estas instrucciones de uso Conserve la caja y los materiales de embalaje para almacenamiento y/o transporte. 2. S a q u e l a s r u e d a s g i r a t o r i a s y l a s e s c u a d r a s c o n f o r m a d e a r c o d e l embalaje del producto.
-
Página 9: Funcionamiento
6. Gire el radiador en posición vertical después de ajustar el montaje de las ruedas giratorias. FUNCIONAMIENTO PRECAUCIÓN: Use el radiador solo en posición vertical con las ruedas giratorias provistas en la parte inferior de la unidad, cualquier otra posición puede entrañar peligro. -
Página 10: Ajuste De Temperatura
los 30°C. 4. Presione el -botón B una vez más para apagar el calefactor. AJUSTE DE TEMPERATURA POWER 1. Presione el botón Modo hasta que el icono temperatura parpadee. Se muestra el ajuste de temperatura que puede cambiarse cuando el icono esté parpadeando. -
Página 11: Ajuste Del Temporizador
5. Una vez que la temperatura de la habitación descienda 1°C por debajo de la fijada, el calefactor empezará a calentar de nuevo y el icono de temperatura dejará de parpadear. P R O T E C C I Ó N C O N T R A SOBRECALENTAMIENTO Este aparato tiene dos niveles de protec-... - Página 12 Asegúrese de ajustar la temperatura deseada antes de establecer el temporizador, de forma que el calefactor se apague al alcanzar dicha temperatura. Al ajustar el temporizador de APAGADO automático puede decidir el momento de apagado del calefactor. 1. Mantenga presionado el botón de Modo hasta que el icono del temporizador parpadee.
-
Página 13: Encendido Automático
ENCENDIDO AUTOMÁTICO Asegúrese de ajustar la temperatura deseada antes de establecer el temporizador, de forma que el calefactor se apague al alcanzar dicha temperatura. Si se establece la temperatura deseada, esta función anulará la función temporizador. Al ajustar el temporizador de ENCENDIDO automático puede decidir el momento de encendido del calefactor. -
Página 14: Función Fahrenheit/Celsius
En la función encendido automático el calefactor se encenderá una vez transcurrido el tiempo ajustado. Si no se ha seleccionado tiempo de apagado automático, se aplicará un temporizador de 10 horas. FUNCIÓN FAHRENHEIT/CELSIUS Este aparato ofrece la opción para leer el ajuste de temperatura en grados Fahrenheit o Celsius. -
Página 15: Especificaciones Técnicas
PRECAUCIÓN: No permita que agua u otros líquidos entren en el producto, ya que podría provocar fuego y/o fallo eléctrico. • N o u s e l i m p i a d o r e s a b r a s i v o s o disolventes ya que podrían dañar el aparato. -
Página 16: Declaración De Conformidad Ce
DECLARACIÓN DE CONFORMIDAD CE El aparato ha sido diseñado, fabricado y distribuido de conformidad con la legis- lación de seguridad de las directivas de la El dispositivo está destinado para uso doméstico normal y descrito para ese único propósito. CONDICIONES DE LA GARANTÍA El aparato cuenta con una garantía de 24 meses, a contar a partir de la fecha de compra. - Página 17 6. La garantía no cubre daños causados por negligencia o por usos no ampara- dos en este manual de instrucciones. 7. Los costos de transporte y los riesgos implicados durante el transporte del electrodoméstico o sus componentes correrán siempre por cuenta del com- prador.
- Página 18 à condition de l’utiliser de façon responsable et correcte. Pour assurer à votre produit de chauffage Qlima une durée de vie et une sécurité d’utilisation maximum, lisez attentivement ce manuel avant utilisation et conservez-le pour pouvoir le consulter ultérieurement.
- Página 19 PRINCIPAUX BELANGRIJKE ONDERDELEN ÉLÉMENTS Roues pivo- Bedieningspaneel tantes (2) Uitlaat van droge lucht Bouton d'alimentation Uitneembaar waterreservoir Boutons Inlaat van vochtige Écran d'affi- lucht chage à cris- Luchtfilter taux liquides Afvoertuit Bouton (ø 13 mm) met dop d'alimentation ...
-
Página 20: Prescriptions De Sécurité
PRESCRIPTIONS DE SÉCURITÉ Lisez attentivement ce manuel d’utilisation avant d’utiliser l’appareil et conservez-le pour toute référence ultérieure. Installez cet appareil uniquement s’il est conforme à la législation, aux ordonnances et aux normes locales et nationales. Ce produit a été conçu pour être utilisé comme convec- teur électrique dans des maisons résiden- tielles, et il doit être utilisé... - Página 21 • Si le cordon électrique est endommagé, faites-le remplacer pour éviter tout dan- ger. Pour cela, contactez un centre de réparations agréé par Qlima ou un tech- nicien aux qualifications comparables. • Pour inspection ou réparation, adres- sez-vous toujours à un centre technique agréé...
- Página 22 ATTENTION • En présence d’une odeur inhabituelle ou d’un bruit anormal, éteignez et débran- chez immédiatement l’appareil. Faites-le vérifier par un centre technique Qlima agréé. • Avant de déplacer ou de nettoyer l’ap- pareil, éteignez et débranchez-le en sui- vant les instructions.
-
Página 23: Installation De L'appareil
Cet appareil contient une quantité pré- cise d’huile spécifique. La réparation et l’ouverture de cet appareil doit être fait par un centre autorisé par Qlima. En cas de fuite d’huile, contacter votre reven- deur ou un service après-vente agréé. • Merci de respecter la législation en vigueur pour le recyclage de l’huile si... - Página 24 - Roues pivotantes - Ecrous papillons - Pattes en forme d'arc - Manuel d’utilisation Conservez le carton et l’emballage (fig. A) a des fins d’entreposage et/ou de transport. 2. Déballer les roues pivotantes et les pattes en forme d'arc, de l'emballage du produit.
- Página 25 6. Mettre le radiateur en position verticale une fois les roulettes installées. L’UTILISATION ATTENTION: N'utiliser le radiateur qu'en position verticale droite, les roulettes installées en bas de l'appareil, car toute autre position pourrait être dangereuse 1. Brancher la fiche dans la prise murale. 2.
-
Página 26: Réglage De La Température
faible. L’écran affiche . Le chauffage continuera de fonctionner à pleine puis- sance jusqu'à ce que le courant soit coupé manuellement, ou que la tempé- rature ambiante dépasse 30° C. 4. Appuyer sur le bouton B pour couper le chauffage. RÉGLAGE DE LA TEMPÉRATURE POWER 1. -
Página 27: Protection En Cas De Surchauffes
5. Dès que la température de la pièce des- cend de 1º C en-dessous de la tempéra- ture réglée, le chauffage va commencer à chauffer à nouveau, et l'icône de tem- pérature, sur l'écran, cesse de clignoter. PROTECTION EN CAS DE SURCHAUFFES Cet appareil dispose de deux niveaux de protection en cas de surchauffes : 1. -
Página 28: Réglage De La Minuterie
RÉGLAGE DE LA MINUTERIE S'assurer de régler à la température COUPURE AUTOMATIQUE (AUTO OFF) souhaitée, avant de procéder au réglage de la minuterie, afin que le chauffage s'éteigne à la température souhaitée. Grâce à la minuterie d'arrêt automatique, vous pouvez décider du moment où le chauffage doit automatiquement se cou- per. - Página 29 AUTO ON (MISE EN MARCHE AUTOMA- TIQUE) S'assurer de régler à la température souhaitée, avant de procéder au réglage de la minuterie, afin que le chauffage s'éteigne à la température souhaitée. Si la température souhaitée est définie, cette fonction remplace la minuterie.
-
Página 30: Maintenance Et Stockage
En mode de mise en marche automatique, le chauffage s'allume une fois le délai défini écoulé. Si aucune heure d'arrêt automatique n'a été sélectionnée, par défaut, une minuterie de 10 heures sera appliquée à la fonction. FONCTION FAHRENHEIT/CELSIUS Ce chauffage permet de lire la tempé- rature en degrés Fahrenheit ou Celsius. -
Página 31: Spécification Techniques
ATTENTION: Ne pas laisser d'eau ou autres liquides pénétrer à l'intérieur de l'appareil, ce qui pourrait entrainer un incendie et / ou des risques de chocs électriques. • Ne pas utiliser de nettoyants abrasifs ou de solvants, car ils pourraient endomma- ger l'appareil. -
Página 32: Déclaration De Conformité Ce
DÉCLARATION DE CONFORMITÉ CE L’appareil est conçu, fabriqué et distribué conformément aux directives de sécurité 2006/95/CE Matériel à basse tension 2004/108/CE CEM 93/68/CEE Marquage CE L’appareil est uniquement destiné à une utilisation domestique et doit être exclusi- vement utilisé dans le but pour lequel il a été... - Página 33 5. La garantie s’applique uniquement sur présentation de la preuve d’achat d’origine datée et sans aucun rature ni modification. 6. La garantie ne s’applique pas aux dégâts causés par la négligence de l’uti- lisateur ou par le non respect du pré- sent mode d’emploi.
- Página 34 Dear Sir, Madam, Congratulations with your purchase of a portable domestic heater. You have purchased a quality product, which will serve you for many years to come. This, of course, provided you use the heater correctly. Please read these Directions for Use first, to ensure maximum lifetime for your heater.
- Página 35 MAIN BELANGRIJKE ONDERDELEN COMPONENTS Castor Bedieningspaneel wheels (2) Uitlaat van droge lucht Power button Uitneembaar waterreservoir Buttons Inlaat van vochtige lucht LCD display screen Luchtfilter Power Afvoertuit (ø 13 mm) met dop switch Zwenkwieltje Control panel Stekker en snoer Front cover Handvat ...
-
Página 36: Safety Instructions
SAFETY INSTRUCTIONS Read this user manual carefully before using the appliance and keep it for future reference. Install this device only when it complies with local/national legislation, ordinances and standards. This product is intended to be used as a mobile heater in residential houses and is only suitable for use in normal household conditions, indoors in living room, kitchen, and... - Página 37 • If the mains cord is damaged, you must have it replaced by a service centre authorised by Qlima or similarly qualified persons in order to avoid a hazard. • A l w a y s r e t u r n t h e a p p l i a n c e t o a service centre authorised by Qlima for examination or repair.
- Página 38 • This heater is filled with a precise amount of special oil. Opening the heater and repairs to it should be carried out by a service centre authorised by Qlima. If the case of oil leakage, contact the manufacturer or an authorized service...
- Página 39 • When disposing of the stove, please respect the existing rules on oil recycling. • This appliance can be used by children aged from 8 years and above and persons with reduced physical, sensory or mental capabilities or lack of experience and knowledge if they have been given supervision or instruction concerning use of the appliance in a safe way and...
- Página 40 Keep the box and the packaging materials for storage and/or transportation. 2. Unpack the Castor Wheels and Arc- shaped Brackets from the product packaging. 3. Turn the radiator upside-down on a scratch-free and stable surface to prevent damage to the paint finish or your floor surfacing.
-
Página 41: Temperature Setting
1. Insert the plug in the wall outlet. 2. Use the power switch E and press the -button B to switch the heater on. The heater starts operating at maximum power. The display shows . The heater will continue operating at full power until the power is switched off manually or if the room temperature exceeds 30ºC. -
Página 42: Overheat Protection
temperature is displayed and can be changed as the temperature icon blinking. 2. Use the + and - button to set the desired temperature, from 13 to 30ºC. 3. The temperature icon will stop blinking and the current room temperature will appear after the desired temperature is set. -
Página 43: Timer Setting
be returned to an approved service cen- tre for replacement. If overheating or malfunctions occur on a regular basis, return the heater to an approved service centre for examination. TIMER SETTING AUTO OFF Make sure to set the desired temperature prior to setting the timer, so that the heater will shut off at the desired temperature setting. - Página 44 NOTE! When both desired temperature and timer off function have been activated, the heater will switch on and off per the set temperature setting and will stop operating once the programmed timer setting has been reached. AUTO ON Make sure to set the desired temperature prior to setting the timer, so that the heater will shut off at the desired temperature setting.
-
Página 45: Maintenance And Storage
NOTE! When both desired temperature and timer on function have been activated, the heater will switch on and off per the set temperature setting once the heater begins to operate. In the Auto-on function the heater will turn on after the set time has elapsed. -
Página 46: Technical Specifications
serious burns or other personal injury. • Clean the exterior surface of the product by wiping it with a soft, damp cloth. CAUTION: Do not allow water or other liquids to run into the interior of the product, as this could create a fire and/or electrical hazard. -
Página 47: Ec Declaration Of Conformity
EC DECLARATION OF CONFORMITY The appliance has been designed, con- structed and distributed in conformity with the safety regulations of EC direc- tives. The appliance is intended for normal domestic use and for the described pur- poses only. GUARANTEE CONDITIONS The appliance is supplied with a 24-month guarantee, commencing on the date of purchase. - Página 48 invoice and if no modifications have been made. 6. The guarantee is invalid for damage caused by neglect or by actions that deviate from those in this instruction booklet. 7. Transportation costs and the risks involved during the transportation of the appliance or components of the appliance shall always be for the account of the purchaser 8.
- Página 50 Egregio Signore, Gentile Signora, Ci congratuliamo con Lei per l'acquisto di una stufa portatile. Lei ha acquistato un prodotto di qualità, da cui trarrà grande soddisfazione per molti anni, naturalmente sempre a patto che Lei adoperi la stufa in modo corretto. Per tale motivo, al fine di garantire la massima durata delle stufe portatili, Le consigliamo di leggere con attenzione le istruzioni prima dell'uso.
- Página 51 COMPONENTI BELANGRIJKE ONDERDELEN PRINCIPALI Ruote Bedieningspaneel basculanti (2) Uitlaat van droge lucht Pulsante di accensione Uitneembaar waterreservoir Pulsanti Inlaat van vochtige lucht Schermo display LCD Luchtfilter Interruttore di Afvoertuit (ø 13 mm) met dop alimentazione Zwenkwieltje Pannello di controllo Stekker en snoer Coperchio...
-
Página 52: Struzioni Per La Sicurezza
STRUZIONI PER LA SICUREZZA Prima di usare l’apparecchiatura, leggere attentamente il presente manuale e conservarlo come riferimento futuro. Installare questo dispositivo soltanto quando è conforme con la legislazione, le ordinanze e gli standard locali/nazionali. Questo prodotto è destinato a essere usato come stufe nelle case ad uso residenziale ed è... - Página 53 • Nel caso in cui il cavetto elettrico risulti danneggiato e onde evitare qualsiasi rischio provvedere alla sua sostituzione rivolgendosi ad un centro di assistenza autorizzato Qlima o ad un riparatore qualificato. • Se l’apparecchio necessita di verifiche o riparazioni va sempre consegnato ad un centro di assistenza autorizzato Qlima.
-
Página 54: Se Si Percepisce Un Odore Inusuale O Un Rumore Anomalo Proveniente
In questi casi l’apparecchio deve essere consegnato ad un centro di assistenza autorizzato Qlima per i controlli del caso. • Prima di spostare o pulire l’apparecchio disattivarlo e staccare la spina dalla... - Página 55 presa di alimentazione. • L ’ a p p a r e c c h i o e d i l c a v e t t o d i alimentazione vanno posizionati sempre a distanza di sicurezza dai bambini piccoli (ad almeno un metro).
-
Página 56: Installazione Della Stufa
• Il dispositivo può essere usato da bambini a partire dagli 8 anni di età e da persone con capacità fisiche, sensoriali o mentali ridotte o con mancanza di esperienza e conoscenze a condizione che siano state fornite istruzioni e supervisione in merito a un uso sicuro del dispositivo accertandosi del fatto che siano stati compresi i rischi associati all’uso del... - Página 57 Conservare la scatola ed il materiale d'imballaggio per l'immagazzinaggio e/o il trasporto. 2. Disimballare le ruote basculanti e le staffe a forma di arco dall'imballaggio del prodotto. 3. C a p o v o l g e r e i l r a d i a t o r e s u u n a superficie priva di graffi e stabile al fine di evitare danni alle finiture della vernice o alla superficie del pavimento.
- Página 58 OPERATION ATTENZIONE: Usare il radiatore solo quando è dritto, coi gruppi Ruote basculanti fissati alla parte inferiore dell'unità; altre posizioni potrebbero causare situazioni di pericolo. 1. Inserire la spina nella presa a parete. 2. Servirsi dell'interruttore di corrente E e premere il pulsante di accensione per accendere il radiatore.
-
Página 59: Impostazione Della Temperatura
IMPOSTAZIONE DELLA TEMPERATURA POWER 1. P r e m e r e i l p u l s a n t e M o d e f i n o a che l'icona della temperatura lampeggia. Sul display compare la temperatura desiderata e può... -
Página 60: Protezione Anti-Surriscaldamento
PROTEZIONE ANTI-SURRISCALDAMENTO Questo apparecchio dispone di due livelli di protezione anti-surriscaldamento: 1. Interruttore a soglia termica Questo dispositivo spegne la stufa nel caso rilevi casi di surriscaldamento o malfunzionamento, per poi ripristinar- la nuovamente quando la temperatura scende a livelli standard. 2. -
Página 61: Accensione Automatica
possibile decidere l'ora in cui il radiatore si dovrebbe spegnere in automatico. 1. Tenere premuto il pulsante Mode fino a che l'icona del timer non lampeggia. Comparirà anche l'icona di spegnimento automatico. 2. Servirsi dei pulsanti + e - per impostare il tempo di funzionamento del radiatore fra 1 e 24 ore (l'opzione predefinita è... - Página 62 Col t im e r d i a c cens i on e au tomatic a acceso sarà possibile decidere l'ora in cui il radiatore si dovrebbe accendere in automatico. 1. Tenere premuto il pulsante Mode fino a che non compaiono l'icona timer e l'icona Auto ON.
-
Página 63: Manutenzione E Stoccaggio
FUNZIONE FAHRENHEIT/CELSIUS Questo radiatore offre la possibilità di leggere l'impostazione della temperatura in Fahrenheit o Celsius. Premere il pulsante F/C per alternare fra la visualizzazione Fahrenheit e Celsius. MANUTENZIONE E STOCCAGGIO Lasciar raffreddare completamente il prodotto prima di maneggiarlo o pulirlo. -
Página 64: Specifiche Tecniche
• N o n u s a r e d e t e r g e n t i a b r a s i v i o solventi, che potrebbero danneggiare il prodotto. • Conservare in un luogo pulito e secco quando non viene utilizzato. -
Página 65: Condizioni Di Garanzia
le secondo gli scopi previsti. CONDIZIONI DI GARANZIA Sul presente apparecchio e concessa una garanzia di 24 mesi: la garanzia decorre dalla data di acquisto. Entro questo perio- do si ha diritto alla riparazione gratuita di tutti i difetti di materiale ed i vizi di fab- bricazione o alla sostituzione gratuita di componenti difettate. - Página 66 si al trasporto dell’apparecchio o di sue componenti sono a carico dell’acquiren- te in tutti i casi. 8. I danni causati dal non avere utilizzato i ricambi di tipo adatto non sono coperti dalla garanzia. Onde evitare un’inutile spesa consigliamo di leggere innanzitutto le presenti istru- zioni per l’uso con accuratezza.
- Página 67 >...
- Página 68 Geachte mevrouw / mijnheer, Van harte gefeliciteerd met de aankoop van uw elektrische kachel. U heeft een kwaliteitsproduct aangeschaft waar u nog vele jaren plezier van zult hebben, mits u het apparaat verantwoord gebruikt. Lees daarom eerst deze gebruiksaanwijzing voor een optimale levensduur van uw kachel.
- Página 69 KERNCOM- BELANGRIJKE ONDERDELEN PONENTEN Zwenkwielen Bedieningspaneel Uitlaat van droge Aan- en uit lucht knop Uitneembaar Knoppen waterreservoir Inlaat van vochtige LCD display lucht Aan/uit Luchtfilter schakelaar Afvoertuit (ø 13 mm) met dop Bedienings- paneel Zwenkwieltje Voorpaneel Stekker en snoer Radiator- Handvat ...
-
Página 70: Veiligheidsvoorschriften
VEILIGHEIDSVOORSCHRIFTEN Lees deze gebruikershandleiding aandach- tig alvorens het toestel te gebruiken en bewaar het voor later. Installeer dit toestel enkel wanneer het voldoet aan de lokale/ nationale wetgeving, regelgeving en nor- men. Dit product is bedoeld om gebruikt te worden als een verplaatsbare kachel in woningen en is alleen geschikt voor gebruik binnenshuis in woonkamers, keu- kens en garages, in normale huishoudelijke... - Página 71 Qlima erkend servicecentrum of door vergelijkbaar bevoegde personen. • Breng het apparaat ter inspectie of repa- ratie altijd bij een door Qlima erkend servicecentrum. • Reparaties door onbevoegden kunnen extreem gevaarlijke situaties opleveren voor de gebruiker.
- Página 72 Breng het apparaat naar een erkend Qlima servicecentrum. • Zet het apparaat uit en trek de stekker uit het stopcontact volgens de gebruiks- instructies voordat u het verplaatst of schoonmaakt.
- Página 73 • Gebruik geen verlengsnoeren of meer- voudige adapters. • Haal altijd de stekker uit het stopcontact als het apparaat niet wordt gebruikt. • Deze kachel is gevuld met een nauwkeu- rige hoeveelheid speciale olie. De kachel openen of repareren is alleen toege- staan aan de fabrikant of een bevoegde servicevertegenwoordiger.
- Página 74 - Zwenkwielen - Vleugelmoeren - Boogvormige beugels - Deze gebruiksaanwijzing Bewaar de doos en het verpakkingsmate- riaal (fig. A) voor opslag en/of transport. 2. Verwijder de verpakking van de zwenk- wielen en de boogvormige beugels. 3. Draai de radiator ondersteboven op een krasvrije en stabiele ondergrond en dek de vloer af om eventuele schade te voor- komen.
-
Página 75: Ingebruikname
6. Zet de radiator rechtop, nadat de zwenkwielen zijn gemonteerd. INGEBRUIKNAME WAARSCHUWING: Gebruik de radiator enkel in de gebruikelijke verticale positie met de zwenkwielen aan de onderzijde van het apparaat bevestigd. Een andere positie kan een gevaarlijke situatie veroorzaken. 1. Steek de stekker in het stopcontact. 2. -
Página 76: Temperatuur Instelling
verwarming zal blijven werken in lage verwarmingsmodus totdat de kachel handmatig wordt uitgeschakeld of de kamertemperatuur hoger is dan 30 º C. 4. Druk opnieuw op de -knop B om de verwarming uit te schakelen. TEMPERATUUR INSTELLING POWER 1. Druk op de Mode-knop totdat het tem- peratuur icoon begint te knipperen. - Página 77 Wanneer deze niet-her- stelbare schakelaar zijn werk heeft gedaan dient het apparaat geretour- neerd worden naar een door Qlima geautoriseerde dealer. Indien oververhitting of storingen zich blij- ven voordoen, breng het apparaat retour...
- Página 78 TIMER-INSTELLING AUTO OFF Zorg ervoor dat de gewenste temperatuur ingesteld is voorafgaand aan het instellen van de timer, zodat de kachel uitschakelt op de gewenste temperatuur instelling. Met de Auto OFF timer-instelling kan de tijd bepaald worden waarop de verwar- ming automatisch uitschakelt.
- Página 79 AUTO ON Zorg ervoor dat de gewenste temperatuur ingesteld is voorafgaand aan het instellen van de timer, zodat de kachel uitschakelt op de gewenste temperatuur instelling. Als de gewenste temperatuur is ingesteld, zal deze functie de timer functie overtreffen. Met de Auto ON timer-instelling kan de tijd bepaald worden waarop de verwar- ming automatisch moet inschakelen.
-
Página 80: Onderhoud En Opslag
In de Auto-ON functie wordt de verwarming ingeschakeld, nadat de ingestelde tijd is verstreken. Als er geen Auto-OFF is geselecteerd, wordt een standaard timer van 10 uur aangehouden. FAHRENHEIT / CELSIUS FUNCTIE Deze kachel biedt de mogelijkheid om de temperatuurinstelling te tonen in Celsius of Fahrenheit. -
Página 81: Technische Specificaties
WAARSCHUWING: Laat geen water of andere vloeistoffen in het interieur van het product komen, omdat dit tot brand en / of elektrisch gevaar kan leiden. • Gebruik geen schuur- of oplosmiddelen, omdat dan schade aan het product kan optreden. • Bewaar het product, wanneer het niet in gebruik is op een schone, droge plaats. -
Página 82: Eg-Verklaring Van Overeenstemming
EG VERKLARING VAN OVEREENSTEMMING Het apparaat is ontworpen, geconstru- eerd en gedistribueerd in overeenstem- ming met de veiligheidsvoorschriften van de EG-richtlijnen. Het apparaat is uitsluitend bestemd voor normaal huishoudelijk gebruik en voor de beschreven doeleinden. GARANTIEVOORWAARDEN Het apparaat wordt geleverd met een garantie van 24 maanden die ingaat op de aankoopdatum. - Página 83 of handelingen die niet overeenkomen met die in deze handleiding. 7. Vervoerkosten en de risico’s verbonden aan vervoer van het apparaat of appa- raatonderdelen zijn altijd voor de reke- ning van de klant. 8. Schade veroorzaakt door het niet gebruiken van geschikte reserveonder- delen wordt niet gedekt door de garan- tie.
- Página 84 Caro utilizador, Parabéns pela compra de um aquecedor doméstico portátil. Comprou um produto de qualidade do qual usufruirá durante muitos anos. Isto se utilizar o aquecedor corretamente. Leia as instruções de utilização primeiro para garantir uma vida útil máxima do aquecedor. O aquecedor é...
- Página 85 COMPONENTES BELANGRIJKE ONDERDELEN PRINCIPAIS Rodízios (2) Bedieningspaneel Uitlaat van droge lucht Botão de alimentação Uitneembaar waterreservoir Botões Inlaat van vochtige lucht Ecrã do visor LCD Luchtfilter Interruptor de Afvoertuit (ø 13 mm) met dop alimentação Zwenkwieltje Painel de controlo Stekker en snoer Tampa frontal...
-
Página 86: Instruções De Segurança
INSTRUÇÕES DE SEGURANÇA L e i a a t e n t a m e n t e e s t e m a n u a l d o utilizador antes de utilizar o aparelho e guarde-o para referência futura. Instale este dispositivo apenas quando estiver em conformidade com a legislação, normas e normas locais/nacionais. - Página 87 • S e o c a b o d e a l i m e n t a ç ã o e s t i v e r danificado, deve ser substituído por um centro de assistência autorizado pela Qlima ou por um equipa igualmente qualificadas para evitar situações de perigo.
- Página 88 í d o anormal. Leve o aparelho a um centro de assistência autorizado Qlima. • Desligue o aparelho e remova-o da alimentação de acordo com as instruções...
- Página 89 óleo especial. A abertura do aquecedor e as reparações devem ser feitas por um centro de assistência autorizado da Qlima. No caso de fuga de óleo, entre em contacto com o fabricante ou um centro de assistência autorizado.
-
Página 90: Vire O Radiador Ao Contrário Numa
— porcas de orelhas — suportes em forma de arco — estas instruções de utilização G u a r d e a c a i x a e o s m a t e r i a i s d a embalagem para armazenamento e/ou transporte. - Página 91 de instalar os rodízios. OPERAÇÃO CUIDADO: Utilize o radiador apenas na vertical com os rodízios fixados na parte inferior da unidade. Qualquer outra posição pode criar uma situação de perigo. 1. Insira a ficha na tomada. 2. Utilize o interruptor de alimentação E e prima o botão B para ligar o aquecedor.
- Página 92 DEFINIÇÃO DE TEMPERATURA POTÊNCIA 1. Prima o botão Mode até o ícone de temperatura piscar. A temperatura d e f i n i d a é a p r e s e n t a d a e p o d e ser alterada enquanto o ícone de temperatura está...
-
Página 93: Ajuste Do Temporizador
R O T E Ç Ã O C O N T R A SOBREAQUECIMENTO Este aparelho tem dois níveis de prote- ção contra sobreaquecimento: 1. Corte térmico automático Desliga o aquecedor no caso de sobrea- quecimento ou avaria e reinicia assim que a temperatura estiver a um nível normal 2. -
Página 94: Ligação Automática
1. Prima o botão Mode até o ícone do temporizador piscar. O ícone de desligamento automático também é apresentado. 2. Utilize os botões + e - para definir o tempo de funcionamento do aquecedor entre 1 e 24 horas (a predefinição é 10 horas). - Página 95 1. Continue a premir o botão Mode até o ícone do temporizador e o ícone de ligação automática serem apresentados. 2. Utilize os botões + e - para definir o tempo de início do aquecedor entre 1 e 24 horas (a predefinição é 1 hora). 3.
-
Página 96: Manutenção E Armazenamento
MANUTENÇÃO E ARMAZENAMENTO Deixe o produto arrefecer completamente antes de o manusear ou limpar. Certifique-se de que o produto está na posição desligada "O" e o cabo de alimentação está desligado da tomada elétrica antes de limpar o produto. • C e r t i f i q u e - s e s e m p r e d e q u e o compartimento do produto está... -
Página 97: Especificações Técnicas
ESPECIFICAÇÕES TÉCNICAS EOR 1515 Modelo Capacidade máx. aquecimen- 1500 3 (Auto = Definições de 600 W/900 aquecimento W/1500 W) Intervalo termos- °C 13–30 tático Corrente V/Hz/ Rede elétrica 220–240/50/1 Fase Peso Dimensões 380x140x650 (l x p x a) Tamanho da divi- m³... - Página 98 Todos os defeitos de material e fabrico serão reparados ou substituídos gratuita- mente dentro deste período. Aplicam-se as seguintes regras: 1. Recusamos expressamente todas as reclamações de danos adicionais, incluindo reclamações de danos colate- rais. 2. A reparação ou substituição de compo- nentes dentro do período de garantia não resultará...
- Página 99 Para evitar gastos desnecessários, reco- mendamos que consulte sempre primeiro cuidadosamente as instruções de utiliza- ção. Leve o aparelho ao seu revendedor para realizar as reparações se estas instru- ções não fornecerem uma solução. Os resíduos de produtos elétricos não devem ser eliminados com o lixo domés- tico.
- Página 100 Spoštovana gospa, spoštovani gospod, Čestitamo vam ob nakupu prenosnega hišnega grelca. Kupili ste kakovosten izdelek, ki vam bo služil mnoga leta. Seveda to velja samo, če boste izdelek uporabljali pravilno. Da bi zagotovili čim daljšo življenjsko dobo vašega grelca, najprej preberite navodila za uporabo Vaš...
- Página 101 GLAVNI SESTAV BELANGRIJKE ONDERDELEN DELI Kolesca (2) Bedieningspaneel Uitlaat van droge Gumb za lucht napajanje Uitneembaar Gumbi waterreservoir Inlaat van vochtige Zaslon LCD lucht Napajalno Luchtfilter stikalo Afvoertuit (ø 13 mm) met dop Nadzorna plošča Zwenkwieltje Sprednja Stekker en snoer maska Handvat...
-
Página 102: Varnostna Navodila
VARNOSTNA NAVODILA Pred uporabo tega pripomočka pozorno preberite ta navodila in jih shranite za uporabo v prihodnosti. To napravo namestite samo, če je skladna s krajevnimi/ državnimi zakoni, uredbami in standardi. Ta izdelek je namenjen za uporabo kot prenosni grelec v stanovanjskih hišah in je primeren samo za uporabo v običajnih g o s p o d i n j s k i h p o g o j i h , v n o t r a n j i h prostorih, v dnevni sobi, kuhinji in garaži. - Página 103 • Č e j e o m r e ž n i e l e k t r i č n i k a b e l poškodovan, ga mora popraviti servisni center, ki ga pooblasti družba Qlima, ali podobno usposobljene osebe, da se prepreči tveganje.
- Página 104 • Kadar naprava ni v uporabi, vedno odstranite vtič iz vtičnice. • Ta grelnik je napolnjen z ustrezno količino posebnega olja. Odpiranje in popravila grelnika lahko izvajajo samo v servisnem centru, ki ga pooblasti družba Qlima. Če pride do puščanja olja, stopite...
- Página 105 v stik s proizvajalcem ali pooblaščenim servisnim centrom. • Kadar pečico odvržete, upoštevajte obstoječa pravila recikliranja olja. • To napravo lahko uporabljajo otroci, ki so stari 8 let ali več in osebe z omejenimi f i z i č n i m i , č u t n i m i a l i d u š e v n i m i s p o s o b n o s t m i , a l i p o m a n j k a n j e m izkušenj in znanja, če so pod nadzorom ali so prejeli navodila za uporabo...
- Página 106 Škatlo in embalažni material shranite za ponovno shranjevanje in/ali prevažanje naprave. 2. Iz embalaže izdelka vzemite kolesca in lokaste nosilce. 3. Radiator obrnite na glavo in položite na stabilno površino, ki ni groba, da preprečite poškodbe barvnega premaza ali lesenih tal. 4.
- Página 107 1. Vtič vstavite v električno vtičnico. 2. Za vklop grelca vklopite napajalno stikalo E nato pa pritisnite gumb Grelec začne delovati z največjo močjo. Na zaslonu je prikazano . Grelec deluje s polno močjo, dokler se napajanja ne izklopi ročno ali če temperatura prostora presega 30 °C.
-
Página 108: Zaščita Pred Pregrevanjem
lahko spreminja, ker ikona temperature utripa. 2. Temperaturo lahko z gumboma + in - nastavite na želeno v razponu od 13 do 30 ºC. 3. Ko nastavite želeno temperaturo, ikona temperature preneha utripati in se prikaže trenutna temperatura prostora. 4. Kadar temperatura prostora za več kot 10 sekund presega nastavljeno temperaturo, grelec preneha greti, ikona temperature pa utripa. - Página 109 Če se pregrevanje ali okvare pojavljajo redno, vrnite grelnik v pooblaščeni servis, kjer ga bodo pregledali. NASTAVITEV ČASOVNIKA SAMODEJNI IZKLOP Poskrbite, da boste pred nastavljanjem časovnika nastavili želeno temperaturo, tako da se bo grelnik izklopil, ko doseže nastavljeno želeno temperaturo. Z nastavitvijo časovnika samodejnega IZKLOPA lahko določite čas, ko naj se grelnik izklopi samodejno.
- Página 110 SAMODEJNI VKLOP Poskrbite, da boste pred nastavljanjem časovnika nastavili želeno temperaturo, tako da se bo grelnik izklopil, ko doseže nastavljeno želeno temperaturo. Če je želena temperatura nastavljena, ta funkcija preglasi funkcijo časovnika. S časovnikom samodejnega VKLOPA lahko določite čas, ko naj se grelnik samodejno vklopi.
-
Página 111: Vzdrževanje In Shranjevanje
Pri uporabi funkcije samodejnega vklopa se bo grelnik vklopil, ko preteče nastavljeni čas. Če ni nastavljenega časa samodejnega izklopa, bo za funkcijo uporabljena privzeta nastavitev časovnika, ki je 10 ur. FUNKCIJA FAHRENHEIT/CELZIJ Ta grelnik ima možnost prikaza nastavitve temperature v Fahrenheitovih ali Celzijevih enotah. -
Página 112: Tehnični Podatki
SVARILO: Ne dovolite, da bi v notranjost izdelka prišla voda ali druge tekočine, ker to lahko povzroči tveganje za požar in/ali električne nevarnosti. • Ne uporabljajte razjedljivih čistil ali topil, ker poškodujejo izdelek. • Kadar izdelek ni v uporabi, ga shranjujte na čistem, suhem mestu. -
Página 113: Pogoji Za Garancijo
distribuirana v skladu z varnostnimi pred- pisi direktiv ES. Naprava je namenjena samo za uporabo v običajnem gospodinjskem okolju in za opi- sane namene. POGOJI ZA GARANCIJO Aparat je dobavljen s 24-mesečno garanci- jo, ki začne veljati na dan nakupa. Vse okvare v materialu in delovanju bodo poplačane ali zamenjane brezplačno v tem obdobju. - Página 114 8. Poškodbe, ki jih povzroči uporaba neo- riginalnih rezervnih delov, niso zajete v garancijo. Za preprečitev nepotrebnih stroškov pripo- ročamo, da si vedno najprej pozorno pre- berete navodila za uporabo. Če ta navodi- la ne zagotovijo rešitve, napravo odnesite k svojemu trgovcu na popravilo. Odpadnih električnih izdelkov ne smete zavreči med običajne gospodinjske odpad- ke.
- Página 115 Information requirement for the electric local space heaters Model identifier(s): EOR 1515 LCD Item Symbol Value Unit Item Unit Heat output Type of heat input, for electric storage local space heaters only (select one) Nominal heat output Pnom 1,50 manual heat charge control, with integrated thermostat...
- Página 116 FIN Jos haluat huoltoapua, lisätietoja tai laitteen kanssa tulee ongelmia, tutustu verkkosivustoon osoitteessa www.qlima.com tai kysy neuvoa PVG kuluttajapalvelukeskuksesta (www.qlima.com). GB If you need information or if you have a problem, please visit the our website (www.qlima.com) or contact our sales support (you find its phone number on www.qlima.com) I Per informazioni e in caso di problemi, visitate il sito Web www.qlima.com oppure contattate...