Oase FishGuard Instrucciones De Uso
Ocultar thumbs
Ver también para FishGuard:
- Instrucciones de uso (91 páginas) ,
- Instrucciones de uso (146 páginas)
Tabla de contenido
Publicidad
Idiomas disponibles
Idiomas disponibles
Enlaces rápidos
Publicidad
Tabla de contenido

Manuales relacionados para Oase FishGuard


Resumen de contenidos para Oase FishGuard
- Página 1 FishGuard Operating instructions Notice d‘emploi Instrucciones de uso...
- Página 2 FHG0001 2 FishGuard...
- Página 3 B FDG0005 3 ...
- Página 4 max. 2 in. (50 mm) FGD0006 4 FishGuard...
- Página 5 D FDG0002 5 ...
- Página 6 FDG0003 6 FishGuard...
- Página 7 F FDG0004 7 ...
- Página 8 FGH0007 8 FishGuard...
-
Página 9: Safety Information
Indicates information intended to give the by persons with reduced user a better understanding. physical, sensory or mental Additional information capabilities or lack of experi‐ A Reference to a figure, e.g. Fig. A. ence and knowledge if they PRODUCT DESCRIPTION are supervised or have been Intended use instructed on how to use the FishGuard, referred to in the following as "unit", unit in a safe way and they may only be used as specified in the following: understand the hazards in‐ For automatic feeding of fish in an aquarium. volved. The following restrictions apply to the unit: Do not allow children to play Only use indoors and for aquaristic purposes in the home (not for commercial use). with the unit. Only allow children to carry out cleaning and user ... - Página 10 Ensure that it is securely seated in a at any time. The drive is battery operated or op‐ stable position. erated with the aid of a power supply unit (not included in the delivery scope). Programming the unit Default setting: 2 feeds a day with one ration OASE recommends: each at 08:00 and 18:00. If this setting is suf‐ • C Holder for FishGuard (45053) ficient, no further programming is necessary after setting the time. Time: When the batteries are inserted, 00:00 COMMISSIONING/START‐UP flashes in the display. Now set the time. (→ Operating panel) Setting up and filling the food container D Turn over the automatic feeder, fit the feet and insert 4 x AA 1.5 V batteries (not included in the delivery scope). Do not use rechargeable batteries! 10 FishGuard...
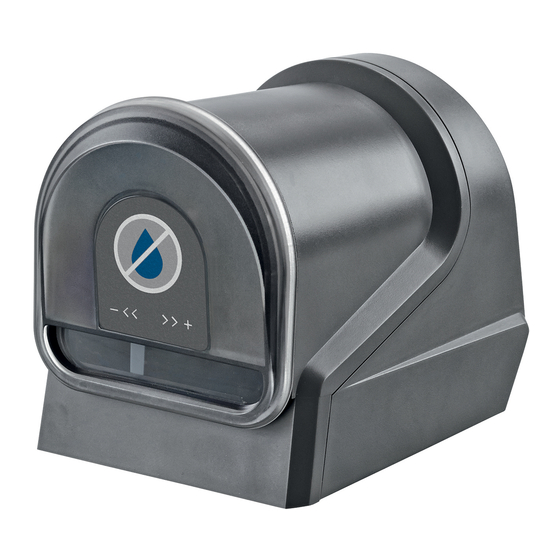
- Página 11 ‐ EN ‐ Operating panel Set mode: Press the Set button for 3 seconds to run through the program: Time > Feeding > Feeding times. Flashing values can be changed and/or saved. When the time set at the beginning is displayed again and no longer flashes, all settings are saved and the unit is ready for operation (operating mode). Operating mode: Press the Set button briefly to dispense food outside the set times. F Description Function Value Display Time display 00:00 … 12:00 h AM/PM (standard) or (numerical dis‐ 00:00 … 24:00 h (changed) play) Display of feeds Left‐hand number in the 1 … 4, number of programmed feeds display Right‐hand number in the 0 … 3, number of programmed rations ("0" display stands for no ration) Display of feeding times 1st feed 00:00 … 12:00 h AM/PM or 00:00 … 24:00 h 2nd to 4th feed Accordingly Set button Command button Change settings Keep the button pressed for 3 s.
- Página 12 ‐ EN ‐ F Description Function Value Plus button Increase the flashing value. Each press of the button increases the flashing value by 1. Minus button Decrease the flashing value. Each press of the button decreases the flashing value by 1. Change the display to/from Keep the button pressed for 5 s. 24:00 h Button combination Display the number of rations Keep the Set and Plus button pressed. Display the number of pro‐ Keep the Set and Minus button pressed. grammed rations per feed, horizontally arranged 12 FishGuard...
-
Página 13: Remedy Of Faults
‐ EN ‐ REMEDY OF FAULTS Malfunction Probable cause Remedy No display No power supply Battery operated: Check the position of the batteries (po‐ larity) and condition of the batteries. Operated via the power sup‐ ply unit: Check the power supply. The food container does not Insufficient power supply Battery operated: Replace move out or back. batteries Operated via the power sup‐ ply unit: Check the power supply. Mechanism blocked Remove the container. Press the Set button (manual reset cycle), clean the pushing out mecha‐ nism with a dry cloth. Insert the container again. Container moves out sluggishly Insufficient power supply Battery operated: Replace for dispensing the food. batteries Operated via the power sup‐ ply unit: Check the power ... -
Página 14: Spare Parts
When filling the food container ensure that the unit. Please visit our website for spare parts the guide pin in the housing is not soiled. drawings and spare parts. Occasionally check that the food container is correctly moved out and that the food is dis‐ pensed as intended. MAINTENANCE AND CLEANING N O T E Do not use rechargeable batteries. Reprogram the unit after changing the http://www.oase-livingwater.com/spareparts-international-ia batteries. Remove the batteries if the unit is not used for a prolonged period. 14 FishGuard... - Página 15 OASE shall not be subject to liability for any − Improper or incorrect installation of the consequential damage to any other part of...
- Página 16 Some states do not allow the exclusion or limitation of incidental or consequential damages, to the above limitation may not apply to you. Should your OASE product be defective or fail under the terms of this limited warranty, you should return the product to OASE North America...
-
Página 17: Consignes De Securite
A Renvoi à l'illustration, p. ex. Figure A. souffrant d'un handicap DESCRIPTION DU PRODUIT mental ou plus générale‐ Utilisation conforme à la finalité ment par des personnes FishGuard, appelé par la suite «appareil», doit manquant d'expérience, un être utilisé exclusivement comme suit : adulte averti devra être pré‐ Pour la distribution automatique de nourri‐ sent, qui renseignera le mi‐ ture pour poissons dans un aquarium. neur ou la personne fragili‐... -
Página 18: Mise En Service
B Mettre le distributeur automatique de fournitures). nourriture en place sur l'aquarium. Veiller à une assise stable. OASE préconise : C Support pour FishGuard (45053) Programmation d’appareil Cordon d'alimentation électrique pour Fish‐ Préréglage : 2 distributions de nourriture par Guard (45052, non disponible en Grande‐Bre‐ jour avec une ration pour chaque, à 08:00 tagne) heures et à 18:00 heures. Si ce réglage est suf‐ fisant, aucune autre programmation n'est né‐ MISE EN SERVICE cessaire après le réglage de l'heure. ... - Página 19 ‐ FR ‐ Tableau de commande Mode Set (réglage) : Un appui prolongé sur la touche Set vous guide dans le programme : Heure > Distribution de nourriture > Horaires de distribution de nourriture. Les valeurs clignotantes sont modi‐ fiables voire enregistrables. Lorsque l'heure réglée au départ s'affiche à nouveau et ne clignote plus, tous les réglages sont enregistrés et l'appareil est opérationnel (mode de fonctionnement). Mode de fonctionnement : Un court appui sur la touche Set déclenche une distribution de nourriture supplémentaire. F Description Fonctionnement Valeur Affichage Affichage de l'heure 00:00 … 12:00 h AM/PM (standard) ou (affichage en 00:00 … 24:00 h (changé) chiffres) Affichage de distribution de nourriture Affichage du chiffre à 1 … 4, nombre de distributions de nourri‐ gauche ture programmables Affichage du chiffre à 0 … 3, nombre de rations programmables droite ("0" signifie pas de ration) Affichage des horaires de dis‐ tribution de nourriture 1 Distribution de nourri‐ 00:00 … 12:00 h AM/PM ou ture 00:00 … 24:00 h 2 à 4 : Distribution de en fonction nourriture Touche Set...
- Página 20 Raccordement appareil d'ali‐mentation 6 V CC. Non inclus. Non Prise disponible en Amérique du Nord, à pile uniquement Touche Plus Augmenter la valeur cligno‐ De 1 à chaque pression de touche tante affichée Touche Moins Diminuer la valeur cligno‐ De 1 à chaque pression de touche tante affichée Adapter l'affichage horaire Maintenir la touche appuyée pendant 5 s. horaire de/à 24:00 h Combinaison de touches Afficher le nombre de rations Maintenir les touches Set et Plus enfon‐ cées Afficher en segmentation hori‐ Maintenir les touches Set et Moins enfon‐ zontale le nombre de rations cées programmées par distribution de nourriture 20 FishGuard...
- Página 21 ‐ FR ‐ ÉLIMINATION DES DERANGEMENTS Défaut Cause éventuelle Remède Pas d'affichage Absence d'alimentation en Fonctionnement avec piles : courant Contrôler la position des piles (polarité) et l'état des piles. Fonctionnement avec ali‐ mentation électrique : Con‐ trôler l'alimentation en cou‐ rant Le bac à nourriture ne sort pas Alimentation en courant insuf‐ Fonctionnement avec piles : ou ne rentre pas fisante Remplacer les piles Fonctionnement avec ali‐ mentation électrique : Con‐ trôler l'alimentation en cou‐ rant Le mécanisme est bloqué Retirer le bac. Appuyer sur la touche Set (cycle de réinitialisa‐ tion manuel), le cas échéant, procéder au nettoyage à sec du mécanisme d'extraction. Remettre le bac en place Le bac à nourriture est grippé Alimentation en courant insuf‐ Fonctionnement avec piles : ...
-
Página 22: Nettoyage Et Entretien
L'appareil continue de fonctionner de manière d'effriter les flocons. fiable et sécurisée avec des pièces originales Lors du remplissage du bac à nourriture veil‐ d'OASE. Vous trouverez nos pièces de ler à ce que la tige de guidage dans le boîtier rechange et leurs schémas sur notre site ne soit pas encrassée. internet. Occasionnellement contrôler que le bac à... - Página 23 GARANTIE d'utilisation). OASE offre pour ce produit une garantie limitée La seule responsabilité de OASE en vertu de de 36 . La durée de la garantie limitée prend cette garantie limitée sera de remplacer ou de effet à...
- Página 24 ‐ FR ‐ OASE ne sera assujettie à aucune responsabilité Si votre produit OASE est défectueux ou échoué pour tout dommage consécutif à toute autre aux termes de cette garantie limitée, vous devez partie du jardin d'eau, étang, système d'eau, renvoyer le produit auprès de votre paysage, aquarium, paludarium, structure ou le concessionnaire OASE, ainsi que votre reçu...
-
Página 25: Indicaciones De Seguridad
‐ ES ‐ Símbolos en estas instrucciones INDICACIONES DE SEGURIDAD Este equipo puede ser utili‐ I N D I C A C I Ó N zado por niños a partir de Informaciones para un mejor comprendi‐ 8 años y mayores así como miento. por personas con capacida‐ Otras indicaciones des físicas, sensoriales o A Referencia a una ilustración, p. ej. ilus‐ mentales ... -
Página 26: Funcionamiento
Ajuste previo: 2 alimentaciones en el día, rías o con un equipo de red (no incluido en el su‐ cada una con una ración, a las 8.00 h y a las ministro). 18.00 h. Si este ajuste es suficiente, no es ne‐ cesario ninguna otra programación después OASE recomienda: del ajuste de la hora. C Soporte para FishGuard (45053) Fuente de alimentación para FishGuard Hora: Después de la colocación de las baterías (45052, no disponible en Gran Bretaña) parpadea en la pantalla 00:00. Ajuste ahora la hora. (→ Panel de control) PUESTA EN MARCHA Emplazamiento y llenado del recipiente de pienso D Invierta el alimentador automático, monte los pies y coloque las 4 baterías AA 1,5 V (no incluidas en el suministro). No emplee baterías recargables. - Página 27 ‐ ES ‐ Panel de control Modo de ajuste: La pulsación prolongada de la tecla Set guía por el programa: Hora > Alimentación > Tiempos de alimentación. Los valores intermitentes se pueden modificar o almacenar. Cuando la hora ajustada al comienzo se indica de nuevo y ya no parpadea, todos los ajustes están almacenados y el equipo está listo para el servicio (modo de operación). Modo de operación: La pulsación corta de la tecla Set conduce a una alimentación extraordinaria. F Descripción Función: Valor Pantalla Indicación hora 00:00 … 12:00 h AM/PM (estándar) o (indicación de 00:00 … 24:00 h (cambiada) números) Indicación alimentación Indicación números a la iz‐ 1 … 4, cantidad de las alimentaciones pro‐ quierda gramables Indicación números a la 0 … 3, cantidad de las raciones programa‐ derecha bles ("0" significa ninguna ración) Indicación tiempos de ali‐ mentación Primera alimentación 00:00 … 12:00 h AM/PM o 00:00 … 24:00 h Segunda a cuarte alimenta‐ en correspondencia a ción Tecla Set Tecla de comando...
- Página 28 Conexión equipo de red 6 V CC. No incluido. No disponible en América del Manguito Norte, sólo con pilas Teclas Más Aumentar el valor intermitente Por cada pulsación de la tecla en 1 indicado Tecla Menos Disminuir el valor intermi‐ Por cada pulsación de la tecla en 1 tente indicado Cambiar la indicación de Mantener pulsada la tecla 5 s tiempo a/de 24:00 h Combinación de teclas Indicar la cantidad de raciones Mantener pulsada la tecla Set y Más Indicar de forma horizontal y Mantener pulsada la tecla Set y Menos desglosada la cantidad de las raciones de pienso programa‐ das por cada alimentación 28 FishGuard...
-
Página 29: Eliminación De Fallos
‐ ES ‐ ELIMINACIÓN DE FALLOS Fallo Posible causa Acción correctora Ninguna indicación en la panta‐ Ninguna alimentación eléctrica Funcionamiento con baterías: lla Comprobar la posición de las baterías (polaridad) y com‐ probar el estado de las bate‐ rías Funcionamiento con la fuente de alimentación: Com‐ probar la alimentación eléc‐ trica El recipiente de pienso no sale o Alimentación eléctrica de‐ Funcionamiento con baterías: no retorna ficiente Sustituya las baterías Funcionamiento con la fuente de alimentación: Com‐ probar la alimentación eléc‐ trica Mecanismo bloqueado Sacar el recipiente. Pulsar la te‐ cla Set (ciclo de reset manual), limpiar en seco el mecanismo de extracción si fuera necesario. Colocar de nuevo el recipiente Recipiente de pienso se mueve Alimentación eléctrica de‐ Funcionamiento con baterías: ... -
Página 30: Piezas De Recambio
PIEZAS DE RECAMBIO pienso en forma de crisps o gránulos. Los co‐ pos se deben triturar si fuera necesario. El equipo se mantiene seguro y trabaja de Garantice durante el llenado del recipiente de forma fiable con las piezas originales de OASE. pienso que el pasador de guía en la carcasa no Consulte los dibujos de piezas de recambio y las se ensucie. piezas de recambio en nuestra página web. ... -
Página 31: Garantía
La garantía descritas en estas instrucciones de uso o comienza con la fecha de la compra según lo establecido por OASE de vez en original y se extiende a defectos de cuando; material y fabricación o a aquellos defectos - Defectos o daños resultantes de un... - Página 32 - ES - acuáticas en, alrededor o alrededor del Si su producto OASE es defectuoso o falla jardín acuático, estanque, acuario, sistemas bajo los términos de esta garantía acuáticos, paludarium o sistema de agua. limitada, debe devolver el producto a su LAS GARANTÍAS EXPRESADAS AQUÍ...
- Página 33 4.5 in. × 3 in. × 3.7 in. 7.6 in FishGuard 4 1.5 V AA 115 mm 78 mm 93 mm 125 cm EN Dimensions Food capacity Batteries FR Dimensions Piles Capacité d'alimentation ES Dimensiones Capacidad de pienso Baterías For indoor use. Do not dispose of together with Read the operating in‐ household waste! structions. Pour utilisation à l'intérieur. Ne pas recycler dans les ordures Lire la notice d'emploi.
- Página 36 OASE North America INC. · www.oase-livingwater.com...