Tabla de contenido
Publicidad
Idiomas disponibles
Idiomas disponibles
Enlaces rápidos
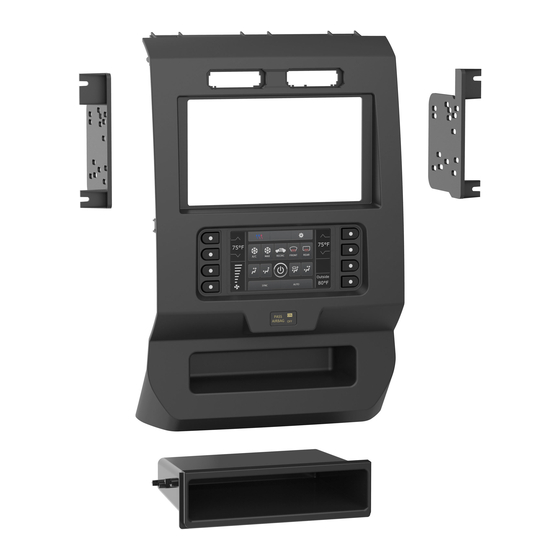
KIT COMPONENTS
• A) Radio trim panel with touchscreen display • B) Radio brackets • C) SYNC
• F) (4) #4 x 1/2" Phillips pan-head screws • G) (7) Panel clips • H) HVAC interface and wiring harness (not shown) • I) Antenna adapter (not shown)
B
A
The World's best kits.
®
Ford F-150
Ford F250/350/450 XL
MetraOnline.com
Visit
for more detailed information about the product and up-to-date vehicle
specific applications
KIT FEATURES
• ISO DIN radio provision with pocket
• ISO DDIN radio provision
• Touchscreen display for climate and personalization features
• Included interface for climate and steering wheel functions
• Integrated passenger airbag indicator
• Painted charcoal
Note: This kit will not support the Pro Trailer Backup Assist™ feature,
nor the massaging seats.
®
module brackets • D) Pocket • E) (4) #8 x 3/8" Phillips truss-head screws
C
D
MetraOnline.com
2015-2017 /
, XLT
2017
(w/ CD)
E
F
G
© COPYRIGHT 2019 METRA ELECTRONICS CORPORATION
99-5834CH
I N S TA L L AT I O N I N S T R U C T I O N S
TABLE OF CONTENTS
Dash Disassembly ...............................................2-3
Kit Preparation .......................................................4
- ISO DIN radio provision with pocket .................5
- ISO DDIN radio provision ....................................5
Axxess Interface Installation ............................6-15
Final Assembly ...................................................... 11
WIRING & ANTENNA CONNECTIONS
Wiring Harness: Axxess interface built
into touchscreen
Antenna Adapter: Included with kit
TOOLS REQUIRED
• Panel removal tool • Phillips screwdriver
• 9/32" socket wrench • Cutting tool
Attention!
Let the vehicle sit with the key
out of the ignition for a few minutes before
removing the factory radio. When testing the
aftermarket equipment, ensure that all factory
equipment is connected before cycling the
key to ignition.
REV. 4/5/19 INST99-5834CH
Publicidad
Capítulos
Tabla de contenido
Solución de problemas

Manuales relacionados para Metra 99-5834CH


Resumen de contenidos para Metra 99-5834CH
-
Página 1: Tabla De Contenido
When testing the aftermarket equipment, ensure that all factory equipment is connected before cycling the key to ignition. The World’s best kits. MetraOnline.com ® © COPYRIGHT 2019 METRA ELECTRONICS CORPORATION REV. 4/5/19 INST99-5834CH... -
Página 2: Dash Disassembly
DASH DISASSEMBLY 1. For vehicles with a center channel Ensure that the vehicle is completely off before speaker: Unclip and remove the speaker proceeding onto the following (5) steps grille in the center of the dash above the 4. Unclip, unplug, and remove the radio/ radio/climate control panel, and then climate control panel. - Página 3 DASH DISASSEMBLY 6. For models with a 4.2-inch display 8. For models equipped with a factory ® screen and SYNC : Remove the (2) 9/32” backup camera: Remove the (3) 10mm ® screws securing the SYNC module, then nuts securing the camera module, move unplug and remove.
-
Página 4: Kit Preparation
® the brackets from SYNC module. 2. Attach the SYNC ® module brackets to To the 99-5834CH radio trim panel: the SYNC ® module using the (4) (Figure C) 1. Attach the hazard switch and traction #8 x 1/2” Phillips pan-head screws control buttons. -
Página 5: Kit Assembly
KIT ASSEMBLY ISO DIN radio provision with pocket ISO DDIN radio provision 1. Attach the pocket to the radio brackets 1. Attach the radio brackets to the radio using the (4) supplied #8 x 3/8” Phillips using screws supplied with the radio. truss-head screws. -
Página 6: Axxess Interface Installation
AXXESS INTERFACE INSTALLATION INTERFACE FEATURES TABLE OF CONTENTS Connections • Provides accessory power (12-volt 10-amp) For models without a Sony amplifier ..................7 • Retains R.A.P. (retained accessory power) For models with a Sony amplifier .................... 8 • Provides NAV outputs (parking brake, reverse, speed sense) 3.5mm jack - steering wheel control retention .............. -
Página 7: Connections
CONNECTIONS For models without a Sony amplifier: From the 5834 harness to the aftermarket radio: • Connect the Black wire to the ground wire. From the 16-pin harness with stripped leads to the aftermarket radio: • Connect the Yellow wire to the battery wire. •... -
Página 8: For Models With A Sony Amplifier
CONNECTIONS For models with a Sony amplifier: From the 5834 harness to the aftermarket radio: • Connect the Black wire to the ground wire. From the 16-pin harness with stripped leads to the aftermarket radio: • Connect the Yellow wire to the battery wire. •... -
Página 9: 3.5Mm Jack - Steering Wheel Control Retention
Brown wire of the connector . There are two different methods for connecting the factory backup camera. • Metra OE: Connect the steering wheel control Key 1 wire (Gray) to the Brown wire. If retaining the camera to the aftermarket radio is desired: •... -
Página 10: Installation
INSTALLATION It is highly advisable to read the following steps beforehand, to ensure a clear understanding of HVAC interface what is to be expected. The following steps must be done in the order that they are numbered. 6. Connect the HVAC interface harness into the HVAC interface, and then to the wiring harnesses in the vehicle. -
Página 11: Final Assembly
* For models with steering wheel controls. If the vehicle is equipped with SYNC and a 4.2” display screen, the 99-5834CH can retain this feature. 4. Cycle the key off. If the driver’s door is closed, open and close the door. Cycle the key back on. -
Página 12: Touchscreen Display Operation
TOUCHSCREEN DISPLAY OPERATION Climate Control screen • This is the climate control screen which will be displayed on the touchscreen display. This is considered the Main Menu. • The upper left tab with (3) arrows will take you to the screen where the Heated/Cooled Seats and Heated Steering are now placed, if applicable. -
Página 13: Backlight
TOUCHSCREEN DISPLAY OPERATION (CONT.) Configuration Settings • Backlight • Steering Wheel Controls • Remap Buttons – For remapping the steering wheel control buttons • For controlling the color of the buttons and back-light intensity. • Dual Assign – For dual assigning the steering wheel control buttons (long button press) •... -
Página 14: Steering Wheel Control Settings
STEERING WHEEL CONTROL SETTINGS Remap Buttons Dual Assign • The interface has the ability to change the button assignment for the steering wheel • The interface has the capability to assign two functions to a single button, except Volume- control audio buttons, except Volume-Up and Volume-Down. Follow the prompts on the Up and Volume-Down. -
Página 15: Troubleshooting
Eclipse (Type 1) † Pioneer/Jensen Clarion (Type 2) † Parrot ** System Configuration. Kenwood ‡ Alpine * Metra OE XITE 2. Refer to Programming, step 3, from this point. Clarion (Type 1) † Visteon Eclipse (Type 2) † Philips Sony / Dual Valor REV. - Página 16 Log onto www.installerinstitute.com or call 800-354-6782 for more information and take steps toward a better tomorrow. Metra recommends MECP certified technicians The World’s best kits. MetraOnline.com ® © COPYRIGHT 2019 METRA ELECTRONICS CORPORATION REV. 4/5/19 INST99-5834CH...
- Página 17 Además, no quite el radio de fábrica con la llave en la posición o de encendido ni con el vehículo funcionando. The World’s best kits. MetraOnline.com ® © COPYRIGHT 2019 METRA ELECTRONICS CORPORATION REV. 4/5/19 INST99-5834CH...
-
Página 18: Desmontaje Del Tablero
DESMONTAJE DEL TABLERO 1. Para vehículos con una bocina de canal Asegúrese de que el vehículo esté central: Desenganche y retire la rejilla completamente apagado antes de pasar a los siguientes (5) pasos de la bocina en el centro del tablero por encima del panel del radio/control del 4. - Página 19 DESMONTAJE DEL TABLERO 6. Para los modelos con una pantalla de 8. Para los modelos equipados con cámara ® 4.2 pulgadas y SYNC : Quite los (2) de reversa de fábrica: Quite las (10) tornillos de 9/32” que sujetan el módulo tuercas de 10 mm que sujetan el módulo ®...
-
Página 20: Preparación Del Kit
(Figura C) al módulo SYNC ® usando los (4) tornillos Al panel de la moldura del radio 99-5834CH: Phillips #8 x 1/2” de cabeza troncocónica 1. Coloque el interruptor de las luces suministrados. (Figura A) intermitentes y botones del control de 3. -
Página 21: Ensamble Del Kit
ENSAMBLE DEL KIT Provisión de radio ISO DIN con cavidad Provisión de radio ISO DDIN 1. Sujete la cavidad a los soportes del 1. Una los soportes al radio usando los radio usando los (4) tornillos Phillips tornillos que vienen con el radio. #8 de 3/8”... -
Página 22: Instalación De La Interfase Axxess
INSTALACIÓN DE LA INTERFASE AXXESS CARACTERÍSTICAS DE LA INTERFAZ INDICE Conexiones • Provee corriente de accesorios (12 voltios 10 amperes) Para modelos sin amplificador Sony ..................7 • Retiene R.A.P. (corriente de accesorio retenida) Para modelos con amplificador Sony ..................8 •... -
Página 23: Conexiones
CONEXIONES Para modelos sin amplificador Sony: Desde el arnés 5834 al radio de mercado secundario: • Conecte el cable negro al cable de tierra. Del arnés de 16 pins con conectores pelados al radio de mercado secundario: • Conecte el cable amarillo al cable de la batería. •... -
Página 24: Para Modelos Con Amplificador Sony
CONEXIONES Para modelos con amplificador Sony: Desde el arnés 5834 al radio de mercado secundario: • Conecte el cable negro al cable de tierra. Del arnés de 16 pins con conectores pelados al radio de mercado secundario: • Conecte el cable amarillo al cable de la batería. •... -
Página 25: Retención De Control Del Volante Jack De 3.5Mm
Hay dos métodos diferentes para conectar la cámara de respaldo de fábrica. • Equipo original Metra: Conecte el cable Key 1 (gris) del control en el volante al cable marrón. Si desea conservar la cámara en la radio no original: •... -
Página 26: Instalación
Nota: Ignore el conector macho; no se utilizará en esta aplicación. 10. Localice el conector de la antena de fábrica en el tablero y realice todas las conexiones necesarias al radio. Metra recomienda el uso de un adaptador adecuado de acoplamiento de Metra. -
Página 27: Programación
* Para modelos con controles en el volante. Si el vehículo está equipado con SYNC, el 99-5834CH puede conservar esta función. 4. Apague la llave y vuelva a encenderla. Si la puerta del conductor está cerrada, abra y cierre la puerta . -
Página 28: Operación De La Pantalla Táctil
OPERACIÓN DE LA PANTALLA TÁCTIL Climate Control screen • Esta es la pantalla de control HVAC que se mostrará en la pantalla táctil. Esto se considera como la Pantalla Principal. • La pestaña superior izquierda con (3) flechas lo llevará a la pantalla donde ahora se encuentran los asientos con calefacción/enfriamiento y la dirección con calefacción, si corresponde. - Página 29 OPERACIÓN DE LA PANTALLA TÁCTIL (CONT.) Ajustes de Configuración • Backlight • Steering Wheel Controls • Botones de reubicación: para reubicar los botones del control en el volante • Para controlar el color de los botones y la intensidad de la luz de fondo. •...
-
Página 30: Configuración De Control En Volante
CONFIGURACIÓN DE CONTROL EN VOLANTE Reubicar el botón Dual Assign • La interfaz tiene la capacidad de cambiar la asignación de botón para los botones de audio del • La interfaz tiene la capacidad de asignar dos funciones a un solo botón, excepto Subir control en el volante, excepto para Subir volumen y Bajar volumen. -
Página 31: Resolución De Problemas
Eclipse (Tipo 1) † Pioneer/Jensen Clarion (Tipo 2) † Parrot ** mencionado en Configuración del sistema. Kenwood ‡ Alpine * Metra OE XITE 2. Consulte Programación, paso 3, desde este punto. Clarion (Tipo 1) † Visteon Eclipse (Tipo 2) † Philips... - Página 32 Tenga el vehículo separado y listo para realizar los pasos de solución de problemas antes de ponerse en contacto con el soporte técnico de Metra / Axxess. EL CONOCIMIENTO ES PODER Mejore sus habilidades de instalación y ®...